The Grow Awards 2026 🏆 


Likes
22
Share
@Vincent11
Follow
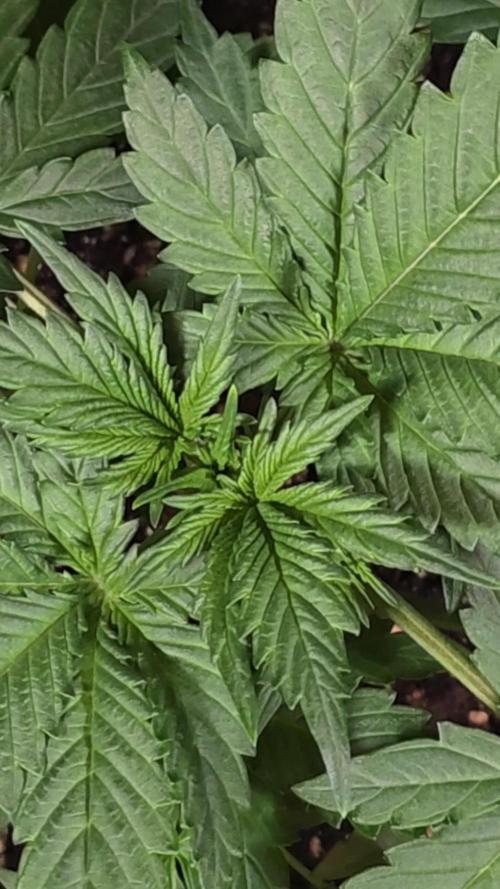
Hi grow mates.
Fat Banana is doing great she's building those buds nicely and so much trichomes every where.
I am quite happy how she does at the moment starting to get some yellow and purple leaves and this tells me we aren't far away from harvest.
Probably 2/3 weeks maximum.
She really impressing me guys I love growing her.
Last dose PK 13/14 will be given this week and will be feeding her water only till she is ready to take last step with flawless finish.
Happy Growing everyone.

Likes
117
Share
@PEAKYPLANTERS
Follow
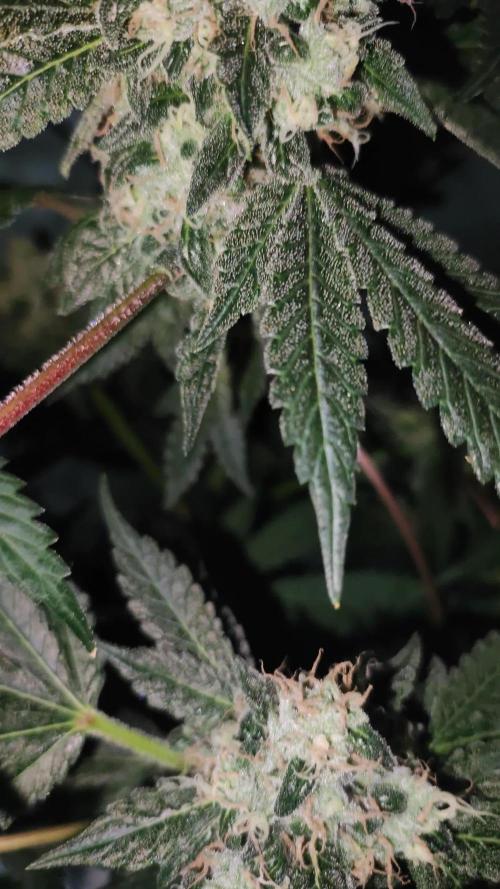
Brothers and sisters farmers.
My job here is over!
the only one and only reason why I prolonged the late release of the end-growth report is just because this plant really deserves !!!!!
Strain super super super fantastic !!!
I was really struck by everything that is what these powerful super beans have.
From growth to smoked! 10/10
Beautiful frosty and rocky nuggets .... mmh just like Peaky
His odor is ..... amazing .... and the gems inside show purple nuances.
I will still update you on the smoke of these magnificent dolls.
Stay on the piece
Greetings to all of you, fantastic Weed friends
Happy and abundant harvesters

Likes
8
Share
@Skinnytalls420
Follow
Day 12-07/05/22 everything looking good so far will start to give them Biobizz bloom tomorrow

Likes
26
Share
@Melloganja
Follow
For now, everything is going okay. Some nutrients shortage, but they are fixed.
Likes
13
Share
@Oyziphar
Follow
This was the last week for the Cookies Gelato. They've turned purple. Weather is not that great anymore, and I want to avoid more budrot, so I had to chop them down 😛


Likes
29
Share
@Natrona
Follow
Fat Bastard Auto by MSNL
👉Sponsored Grow👈
W2 V2
Fat Bastard shot up 4 inches this week and is now 6 inches tall now. Because I have iridium and copper in the water, the ph meter fluctuates due to breaking bonds between the hydrogen and oxygen. The fluctuation range I see is between 6.4 and 6.9 so I’m reporting 6.6. So far, I don’t see any negative effects of the iridium & copper on the plant.
The soil base is Happy frog, Coast of Maine, Mushroom Compost and super soil. I’m giving only ph water to her for this grow. I gave 1 liter of ph 6.6 PPM 376 at 66.7f twice this week
As always, thank you all for stopping by, for the likes and most of all growers’ love and support.
Stay green, growers love 💚🌿
💫Natrona💫

Likes
8
Share
@LokalGrenz
Follow
March 21 day 50 I’m flipping to flower
6am-6pm on 6pm-6am off
Oppressed with Gaia green bloom 2-8-4
Two weeks ago

Processing
Likes
94
Share
@Master_weeda
Follow
Good morning all
Day 63 and everything goes wonderfully I think for most that feels the end.
Some begin senescence including my gorilla glue from fastbuds and northen light auto from RQS
I start rinsing all of my 5 plants except the bubblegum which has not started to flower after 63 days
I specify that in terms of performance the blueberry auto of pev seeds and the most prolific it is beautiful. 😍
The gorilla glue from fast_buds is smaller but is not left behind because it is loaded with nitroglycerine 😋
We are no longer far from the harvest I am doing a final defolliation in order to let the light reach the lower heads
I think that within a week for some to two weeks for others they will all be harvested
What a pleasure for this run even if the weather is long approaching the harvest ... patience is the mother of all the virtues 😉
May the strength be with me 💪
And in french langage
Bonjour a tous
Jour 63 et tout ce passe à merveille je pense que pour la plupart cela sent la fin .
Certaines commencent la senescence notamment ma gorilla glue de chez fastbuds ainsi que la northen light auto de chez RQS
Je commence le rinçage de la totalité de mes 5 plants hormis la bubblegum qui n'a toujours pas commencée à fleurir après 63jours
Je précise que en terme de rendement la blueberry auto de pev seeds et la plus prolifique elle est magnifique. 😍
La gorilla glue de chez fast_buds est plus petite mais n'est pas en reste car chargée à la nitroglycérine 😋
Nous sommes plus très loin de la récolte j'effectue une dernière defolliation en vue de laisser la lumière atteindre les têtes du bas
Je pense que d'ici une semaine pour certaines à deux semaines pour d'autres elles seront toutes récoltées
Quel plaisir pour ce run même si le temps ce fais long à l'approche de la récolte... la patience est mère de toute les vertus 😉
Que la force soit avec moi 💪


Likes
3
Share
@TheBuckeyeGrower
Follow
Light feed day 8. Day 12 I'm happy with the growth so far, I'm feeding maybe half a liter every couple days. Dumped a liter of water in the saucer to bottom water. Day 14, split a gallon of feed between the 3. Very happy at the end of week 2
Likes
120
Share
@Kitties_and_Colas
Follow
~_~_~_~_~_~_~_~_~_~_~_~_~_~_~_~_~_~_~_~_~_~_~_~_~_~_~_~_~_~_~_~_~_~_~_~_~_~_~_~_~_~_~_~_~_~_~_~_~_~_~_~_~_~_~_~_~_~_~_~_~_~_~_~_~_~_~_~_~_~_~_~_~_~_~_~_~_~_~_~_~_~_~_
1/2/22
😽🎉 Happy New Year Growmies!! Week 2 of flower is here and they're really filling out nicely!.. im a little bummed we found a hermi but way better than not finding it lol, besides the White OG is filling in the space nicely....color is nice and uniform save a few burnt tips in the bunch (nothing serious), I assume these plants still have another 3-5days of stretching left but time will tell...a few girls look dramatically different and some are much bigger than the rest, i would guess that this is unavoidable...Our goal is 1lb at harvest which should be relatively easy to achieve with a grow this size...Thanks as always for dropping by and happy harvests everyone!! ❤️🌱
~_~_~_~_~_~_~_~_~_~_~_~_~_~_~_~_~_~_~_~_~_~_~_~_~_~_~_~_~_~_~_~_~_~_~_~_~_~_~_~_~_~_~_~_~_~_~_~_~_~_~_~_~_~_~_~_~_~_~_~_~_~_~_~_~_~_~_~_~_~_~_~_~_~_~_~_~_~_~_~_~_~_~_
01/07
They're just about done stretching and they look strong and healthy 😻.. we'll do some moderate defoliation on day 21of flower to improve airflow and light penetration..we've been feeding a little bloom, grow and a touch of calmag with every watering and they seem to appreciate the off-label regiment so far..thanks for reading, we'll update soon!
❤️💡🌱
~_~_~_~_~_~_~_~_~_~_~_~_~_~_~_~_~_~_~_~_~_~_~_~_~_~_~_~_~_~_~_~_~_~_~_~_~_~_~_~_~_~_~_~_~_~_~_~_~_~_~_~_~_~_~_~_~_~_~_~_~_~_~_~_~_~_~_~_~_~_~_~_~_~_~_~_~_~_~_~_~_~_~

Likes
54
Share
@MrJones
Follow
MrJones Cream Mandeiran Auto XL - ViparSpectra XS2000 240W Infrared Full Spectrum LED Grow Light
´🍪⊱╮🍪╰⊰🍪 WEEKLY GOALS 🍪╰⊰´🍪⊱╮🍪
🏡Indoor - 3"x4"x8" Custom Built Grow Closet
🌞Environment - 80F and 60%Humidity - using Humidfyer as needed.
🌾LST and Defoliation - this strain likes to stretch!
🗓️Week 6 Flower
⚱️5-Gallon 📊5.8/6.2 PH
💧 Feeding / Using Dr. Earth Dry Organic Amendments - Home Grown & Bud / Bloom Booster
🌞ViparSpectra XS2000 240W x2 Infrared Full Spectrum LED Grow Light
🕷️ IPM - Will be using Green Cleaner" 1 OZ per Gallon, and CannControl from Mammoth alternating between products each month for Integrated Pest Management.
´🍪⊱╮🍪╰⊰🍪 PLANT UPDATES 🍪╰⊰´🍪⊱╮🍪
📝 Notes - With week 8 underway, Started the week off with an IPM treatment of Green cleaner, the buds are hard and getting very fat, the ViparStrectra XS-2000 lights are just blowing up on these ladies, just amazing!
╰⊰🍪╰⊰´🍪⊱╮🍪╰⊰🍪╰⊰🍪╰⊰´🍪⊱╮🍪╰⊰🍪╰⊰🍪╰⊰🍪⊱╮
🔶Sunday 08.01.21/ Just watering with H20 PH to 5.8/6.2
🔶Monday 08.02.21/ Watering with 32 ounces daily of H20 PH 5.8 / 6.2 - The plants are starting to show signs of nutrient lockout, adjust the PH to see if I can correct it, just not much time to do anything else.
🔶Tuesday 08.03.21/ Watering with 32 ounces daily of H20 PH 5.8 / 6.2
🔶Wednesday 08.04.21/ Watering with 32 ounces daily of H20 PH 5.8 / 6.2
🔶Thursday 08.05.21/ Watering with 32 ounces daily of H20 PH 5.8 / 6.2
🔶Friday 08.06.21/ Watering with 32 ounces daily of H20 PH 5.8 / 6.2
🔶Saturday 08.07.21/ With the week ending, the ladies ae looking great, just Watering with 32 ounces daily of H20 PH 5.8 / 6.2
╰⊰🍪╰⊰´🍪⊱╮🍪╰⊰🍪╰⊰🍪╰⊰´🍪⊱╮🍪╰⊰🍪╰⊰🍪╰⊰🍪⊱╮
Cream Mandarine XL Auto®️ Information
Tall-stemmed auto-flowering strain. This high-yielding 4th generation auto-flowering strain is the resulting hybrid from the cross between selected specimens of our Cream Mandarine Auto®️ (SWS29)) and a Super Tai’98 elite clone.
The genetic coming from the Super Tai’98 elite clone contributes with interesting Sativa characteristics to this hybrid, such as bigger size, but also subtle aromatic and spicy tones with hints of wood and nuts. The so much appreciated Cream Mandarine Auto®️ genetic contributes with traits from the Indica side, such as high flower and resin production, but also sweet and fresh aromas with tones of citric fruits of the mandarin orange type.
DATA SHEET
Variety SWS55
Indica: 35% / Sativa: 63,4% / Ruderalis: 1,6%
THC: 18-23% · CBD: 0,6%
Indoor Yield: 450-650 g/m2
Outdoor Yield: 50-300 g/plant
Indoor/Outdoor Harvest: 9 weeks from germination
Height: 110-150 cm

Processing
Likes
8
Share
@Max1973
Follow
Day 35 - few pics and vids..... everything going along nicely 👍
This is a pretty big update, so i'll add to it over the next few days, as i
finish building it all....
i'm building these 2 x SS haze, the full tent, just finishing up the setup.....
trimming them, changing solutions to 12/12 and flower.....
changed the exhaust fan and filter setup to the better outside the tent method....
and installed 12v CPU computer fan, lol ("alta9" fits in 4in ducting perfectly), drops wattage on extractor fan.... 10w tops...
got a few kg of active carbon and making/replacing the carbon filter ....
i'll add afew vids of the new setup in afew days...
Day 36 - few pics/vid of new tent setup...... "alta 9" fan :)
post tomorrow after i finish trimmin and settin up night mode etc......
and into tomorrow we go, lol ... Day 37....
slowly getting there..... little bit more to go...
this should make things abit more interesting..... right tank (short babie) has : 19 lts of tap water @18oC + 150 ml -dutch master one gold FLOWER.... 6.4 PH - 1400 PPM
left tank has : 19 lts of tap water @18oC + 50 ml of elements a and 50ml of b and 10 ml of nitro and 20ml of Crystalic (molasses/pot) .... 6.5 PH - 1200 PPM
more pics / vids of the finished tent setup.... roots, transfer, etc... Day 37 is alot of vids of the clean and change to flower.....
edit - day after build noticed left tank (nutrifield) not enough bubbles..... pulled out the 4 air pump and swapped to the 2 x original oxipumps...
much better, also to fix the problem with ph goin high, and bubbles not stirin the mix, was to add another 10ml of crystallic and another 5ml of nitro...
then pumped both tanks with ph down and set em to 5.8-6.2 - both plants have fully recovered from the big trim, and bounced back within 12-24hrs,
post pics/vid in abit.....
Day 39 - made a freaky video... was curious about what the plants would see looking up at the lights...
the lights and buzzing of air compressors and bubbling tank water, and dazzling lights turned out pretty cool in vid editor,
was in selfie mode....
and final vid of the bounceback from trim :)
👍😎

Likes
6
Share
@Bwright_315
Follow
Planted 2 weeks after my other Plant and it already the Same size as all them growing like a champ. I know I need more soil.


Likes
160
Share
@GrowingGrannie
Follow
Pretty plant. Fairly happy plant (finally). Smells lovely. But still no sign of flowers. I really do think she's just not going to amount to anything here... I'm giving her one more week... and then I might pop another seed instead.
Changed up the reporting on this - rather than ppm, I'm now reporting EC... but to keep record, the ppm is 436
10/20 - She's really starting to go now.. drinking a lot of water, going through the nutes... not giving me the "normal" signs of being in flower but... I'm starting to worry I'm not going to have the headroom for her in my tent! Going to have to do some crazy stuff with the lights soon. Trying to LST her enough so that's not a worry but she refuses to grow "out" - she insists on growing "up"! Can't imagine what she would have been had I not screwed her up so badly at the beginning... but no, I'm not going to give up on her... she WILL be fine!
10/21 - She's going crazy now.. I do believe she's in flower and she's drinking up a storm. Cleaned out the reservoir and added new nutes for her today. EC now stands at 1.0 and I hope to get her up to the max of 1.2 in a few days... Also raised the pH to 6.2 and I'm very happy with that as well... My cat has also given her stamp of approval - she's now demanding to take her naps in the tent... smells just delicious in there!
10/22 - Damn, I'm proud of this lady - for standing up to me, for telling me "hit me with your best shot" .. she took every mistake I made and turned it around... she was NOT going to be denied! Need to get in and get more defoliation going...
10/23 - She's going to give me a harvest... that's really all I care about, especially since I had no hope of it at the beginning! It won't be a massive harvest and that's ok.. I'll be exceedingly happy with whatever she has to offer... and who know, I might be surprised! But the harvest won't hold a candle to what I'm going to get from #2... I still love them both the same...


Likes
8
Share
@DoMoNe
Follow
Following RQS auto guide : https://www.royalqueenseeds.com/blog-how-to-grow-autoflowering-cannabis-n83
WEEK 6: THINGS START TO SMELL #36 19.4. - #42 25.4.
#36 19.4.
-Just Remotemonitoring
#37 20.4.
-Defoliated a lot, about 40-50 leafes/lower branches that wont make it to the surface anyway.
-Raised the lamps 10cm
#38 21.4.
-Watered with nutes 1,5liters/plant
#39 22.4.
-Attached net and startd ScrOG:ing
#40 23.4.
-Just Remotemonitoring
#41 24.4.
-Watered 1,5/plant with nutes, so far 12liters in last 6days, so a ½liter/day/plant.
-ScrOG adjustments
#42 25.4.
-Just Remotemonitoring


