The Grow Awards 2026 🏆 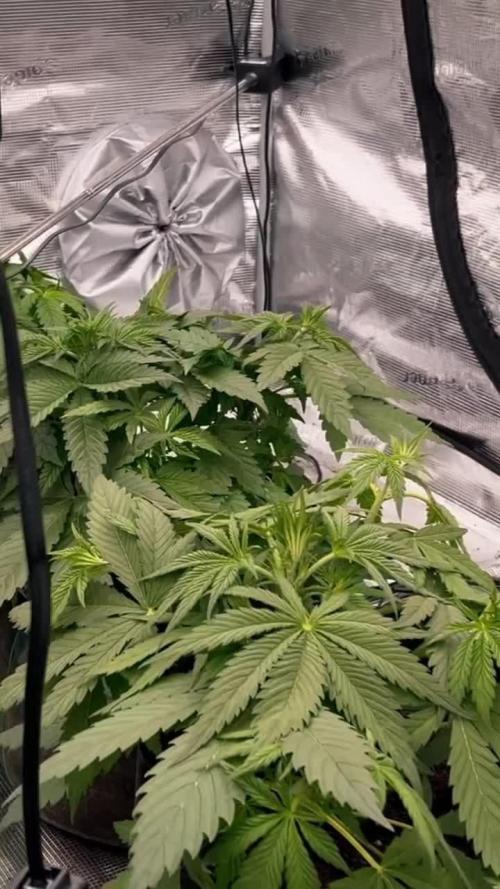


Likes
Comments
Share
@WaffleTerps
Follow
Great structural progress this week. I adjusted the first LST on all Tropicanna Poison plants and they responded perfectly — fast recovery, strong lateral growth and a very even canopy. Installed the SCROG net at ~26–30 cm to prepare for the next stage.
I also switched to the automatic drip system (2 L/h emitters). The nutrient mix needed a few corrections, but the final feed landed at EC ~850 µS / pH ~5.8, giving each plant 700 ml. Soil dried quickly and the roots are clearly active.
Environment stayed stable at 22–23°C, 65–70% RH and PPFD ~420 µmol/m²/s.
All plants look healthy, compact and already releasing a nice sweet cannabis aroma.

Likes
2
Share
@Albanymedicinalgarden
Follow
Skywalker rounding the corner. Harvested 8/7 @ Day 76 from sprout
Blueberry bulking up.
Glueberry og done stretching and bulking up now


Likes
11
Share
@Tuki3
Follow
Buenas gente, vienen tomando buena formita los cocos! muy contento con su aroma como ya he mencionado, y ahora que estamos arrancando las 6ta semana se empieza a ver la parte mas linda (a mi parecer) que es el engorde.. es esa semana crítica donde uno piensa que los cogollos se estancaron, que algo le pasó, y ahí es cuando aguantas 2 o 3 días más, y te das cuenta que empezó a engordar 😍😍😍😍
Veremos estas semanas como sigue!


Likes
4
Share
@Mr_Pgrow
Follow
Time for chop down, I know it won't be a big harvest, but I don't mind. Not really after yield, just good quality herb.
The beautiful pungent yet subtle fruity aroma excites the cuoristy in me and I can't wait to try her.
Follow me:
https://www.theweedtube.com/user/Mr.PersonalGrow
Likes
23
Share
@RazzleMatazzle
Follow
New week, new fun. Runtz is simply a brilliant genetic. I wish many other strains, like the Zamnesia Blueberry Auto, would behave the same way as Runtz does as an automatic. The smell drives you crazy. Runtz has a wilder scent, but unlike its companions, it is now beginning to develop a new fruity-sweet aroma. I noticed this for the first time today.
As you can see in the pictures, the strain makes a great impression and grows excellently without much worry. However, one thing to note: Runtz takes significantly more time. Almost as if it knows that good results require patience. A very good genetic—I'm almost tempted to grow it outdoors to see how it develops there.
I can't say much about the taste yet, but for anyone who knows Runtz, I can only recommend this strain from Zamnesia.
Green Sensation from Plagron is doing its job. It seems to be doing the plants a lot of good.
This makes growing in the Grow Cup really fun. I hope I'll get the chance from 💙💙💙Zamnesia💙💙💙 to participate in more events like this.


Likes
24
Share
@Jays_Not_Here_Man
Follow
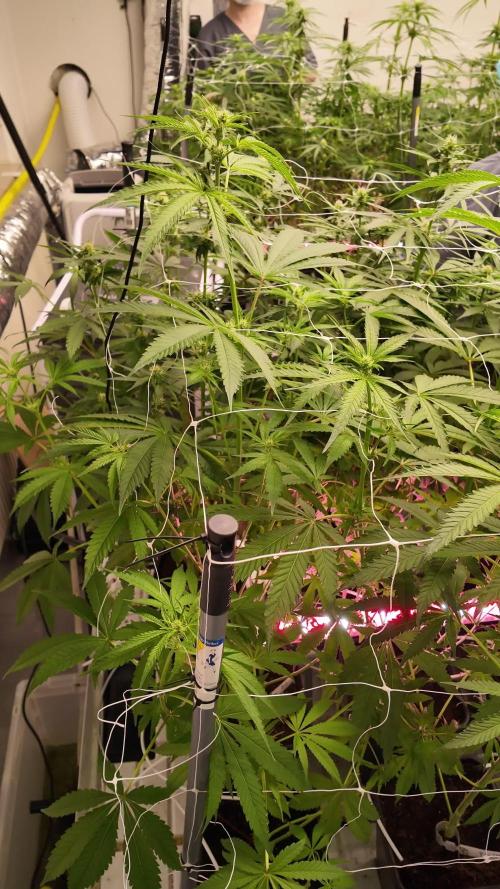
Another demanding week for these ladies but they have reached a milestone. Week 8, and my custom fit SCROG has been installed! ❤️
At Day 50 I separated my 7 gallon girls and my 5 gallon girl. Once done, I began the very easy process of adding my “floating” SCROG. I use ratchet straps, just like the ones that come with lights to secure the four corners of the screen to the top of my tent.
This allows me to adjust the screen height as necessary when 1) first installing and 2) once the full stretch of flower has occurred, I can tweak it a bit to balance the canopy as best as possible. It’s not 100%, I still get some over achievers, but I find it useful as another option.
I like to do a major defoliation before I set the ladies in. Typically till this time, I have done almost no defoliation, just LST and some HST techniques. I adjusted the ladies placement to allow growth out all sides of the screen, set the screen height and began tucking and bending. The defoliation and bending allows light to penetrate all those side shoots that would have amounted to nothing, and they become top shoots as they grow up and form an even canopy.
I don’t like to weave, it can damage the new shoots and cause growth problems, but the goal is to get as even a coverage as you can while allowing for plant growth in all directions.
Once complete, I will give the girls about a week to recover and grow those new shoots. I like to have about 80% coverage of the screen, before I change my light cycles to flower 12/12… and if they are healthy and strong. I’ll decide this weekend if it is time ❤️👊🇨🇦😎 Happy Gardening!

Likes
8
Share
@greenkeepers
Follow
Week 4 – Flowering (Day 22–28) 🌸🌱
At the end of Week 3 (Day 21) we carried out a deeper round of defoliation and some lollipopping. By now the stretch is coming to an end, with the plants settling close to their final height.
We’ve also stopped foliar feeding, since every single plant is now covered in developing buds. To keep everything protected, we refreshed the beneficial insects, better be safe than sorry, how we say in German, sicher ist sicher.
Already in this early stage of flowering, we can clearly spot differences in structure, bud formation and even the first aromas. Some phenos are showing exceptional promise — those will be the ones we’ll highlight more in the coming updates.
🔎 Pheno notes so far:
ZR 43 – very nice structure, already showing early bud size.
ZR 68 – robust side branching, healthy development.
ZR 70 – compact flowers, stacking well.
ZR 82 – tall, vigorous growth, strong flower initiation.
ZR 30 - Fasciation, looks very interesting, I'm quite interested on how it ends up looking, having mutations like these in the grow room are not necessarily what one is looking for commercially speaking but for me is quite special, like a Zoap Rosé special edition! 😝
Zoap Rose phenos bring floral aromas with acrid undertones, giving them a distinctive edge already at this stage.

Likes
155
Share
@deFharo
Follow
Bienvenidos cultivadores de marihuana clandestinos y también a los que tienen la fortuna de no serlo!🖐️👨🌾👍
Este es un diario semanal de técnicas de cultivo y Bio preparados orgánicos caseros, los cuales llevo experimentando dos años en cultivos de marihuana interior.
Esta semana dos en uno:
1) ELABORACIÓN DE AUXINAS EN POLVO EXTRAIDAS DE ALUBIAS NEGRAS GERMINADAS.
La primera vez que hice este preparado y lo publiqué en GD fue en Octubre de 2019, lo volví a hacer en Junio de 2020 y llevo dos años usándolo, me ha costado el precio de 2kg de alubias negras.
INGREDIENTES:
- 1kg de alubias o frijoles negros, porque son las semillas que más concentración de auxinas contienen, comparándolas por ejemplo, con lentejas o cualquier otro tipo de leguminosas, también se puede usar granos de maíz.
Preferentemente, se deben usar semillas de alubias nuevas y cultivadas cerca de tu zona.
- Agua pura.
PROCEDIMIENTO:
- Se cubren las alubias con agua y se dejan a remojo durante una noche.
- Al día siguiente se separa el agua. Esta agua la puedes usar para riegos, contienen varios minerales.
- Se mantiene la humedad en el recipiente de las alubias por unos días, hasta que germinen. Se pueden cubrir con un paño húmedo y compensar la perdida de humedad rociando agua. Se debe observar que la mayoría de las semillas hayan germinado.
- Cuando las alubias, en su mayoría estén germinadas, se añade unos dos litros agua pura y se bate todo.
- Ahora filtramos con malla y escurrimos los restos sólidos. (Reservamos esta materia para un segundo lavado)
- Dejamos reposar el líquido durante dos días, hasta que se vea acumulación de materia en el fondo.
- Retirar la mayor cantidad posible de agua clara.
- Dejar al sol cubierto con una malla, hasta la completa deshidratación del producto.
- Moler y guardar en un sitio seco y oscuro, en estas condiciones puede ser efectivo durante años.
-- A los residuos sólidos recuperados del primer filtrado, les añado agua, los bato y los filtro con doble malla, lo embotello y guardo en el frigorífico (no más de 15 días, pues fermenta), lo uso para mezclas de riego. Los residuos finales se aprovechan, para aquellos que tengan tierra en exterior o hagan compost.
QUE SON LAS AUXINAS Y USOS:
- Las auxinas son un grupo de hormonas vegetales naturales, que regulan varios aspectos del desarrollo y crecimiento de las plantas, en la marihuana sobre todo en el periodo de crecimiento vegetativo y en el comienzo de la floración, después no hacen falta.
- Uno de los aspecto más característicos es el efecto que causan en el desarrollo del crecimiento radicular, promoviendo sobre todo la formación de raíces secundarias y adventicias gracias a la estimulación celular que provocan las hormonas.
- Otro aspecto de las auxinas es que distribuye su energía principalmente al ápice primario, reprimiendo el desarrollo de las ramas laterales, lo que provoca dominancia apical, pero esto es en el caso de plantas de marihuana sin corte apical y donde se quiere conseguir un cogollo principal monstruoso, su uso puede dar muy buenos resultados en cultivos SOG... pero ¿Qué pasa si hacemos un corte apical para promover el crecimiento de ramas laterales y que por ende, de buenos cogollos en cada una de ellas? Cuando se hace un corte apical al ápice principal las hormonas se reorganizan por la planta, ahora para mandar energía a todas las ramas y sus ápices, promoviendo el crecimiento!.. es un buen momento, después de un corte apical, aplicar auxinas para potenciar el proceso.
- Finalmente os dejo un gráfico de la actuación de las auxinas en las diferentes etapas de un cultivo, también se ve la importante relación con otras hormonas (Citoquininas o Ácido Giberélico) y los nutrientes claves que no deben faltar para finalizar todo el proceso hormonal. Las Citoquininas y el ácido Giberélico naturales se encuentra en el agua de coco, y es muy interesante conocer como actúan, en la quinta semana de este diario hablo sobre las propiedades del agua de coco.
Bien, una vez dicho lo anterior, yo uso las auxinas en polvo de las siguientes formas.
- Como mezcla del sustrato donde germino las semillas y donde mantengo las plántulas hasta el trasplante a la maceta definitiva, para potenciar el enraizamiento.
- Por la misma razón, lo espolvoreo sobre el cepellón de raíces de la plántula, en el momento del trasplante a la maceta final.
- Lo uso como enraizante de esquejes, impregnando el tallo de polvo antes de enterrarlo.
- 10 días después de realizar el producto, todavía tenía en la nevera un litro de auxinas líquidas, provenientes del segundo lavado de los restos de las alubias molidas... y entonces pensé que sería buena idea incorporarlo a un fermentado, y de aquí vienen esta segunda parte...
2) LACTO FERMENTO DE AUXINAS ENRIQUECIDO CON NUTRIENTES Y MINERALES
En esta ocasión, para la fermentación anaeróbica, elegí hacerlo con suero de leche como base de microorganismos (Ácido láctico, Bacterias Acidolácticas BAL y Lactobacillus) que harán el trabajo de solubilizar los nutrientes y quelatar los minerales, es un preparado muy eficiente para riegos y aplicaciones foliares, en este caso lo hice enriquecido, mezclando diversos materiales orgánicos con otros minerales. Puedes ver la lista arriba.
Sobre esto tengo que decir que después de dos años haciendo diferentes lacto fermentos, ahora los hago más específicos, sin mezclar tantos nutrientes, por ejemplo, si quiero solubilizar guanos, harina de huesos o algas, lo que hago es crear un lacto fermento con cada uno de ellos, en el caso de lacto fermentos con minerales, sigo preparándolo mezclando varios, este preparado es muy eficiente en quelatar minerales, y sobre todo en solubilizar fósforo.
PROCEDIMIENTO:
A veces consigo suero de oveja de un vecino que hace quesos, a veces hago suero de leche cruda de vaca y cuando no tengo ninguna de estas fuentes, hago suero a partir de leche pasteurizada, como el caso de este.
- Mezclo el suero (1l) con la melaza y la miel, lo caliento a unos 30°C.
- Peso los ingredientes. Como regla general, en el caso de componentes orgánicos usar del 8 al 10% como máximo, respecto a la cantidad de líquido. En el caso de minerales del 4 al 5%.
- Añado la levadura al suero con la melaza y la miel.
- Añado los componentes secos al barril.
- Añado el suero con la melaza y la levadura al barril y agito.
- Añado el litro de auxinas líquidas y agito bien.
- Lo cierro hermético con válvula de gases.
- Guardo el barril a oscuras al menos durante 30 días, pero cuanto más tiempo lo mantengas cerrado antes de abrirlo por primera vez el resultado será mejor.
La fermentación comienza violentamente a los pocos minutos dura varios días así y después se hace más lenta.
USOS:
Este es un preparado que uso como complemento a las auxinas en polvo, lo uso para hacer riegos o aplicaciones foliares de disponibilidad inmediata.
- Hago aplicaciones foliares en plántulas, en las primeras semanas de vida.
- Lo uso al comienzo de la etapa de crecimiento vegetativo en conjunto con agua de coco.
- Riego con este preparado después de hacer cortes apicales.
- Lo vuelvo a usar en riego en conjunto con el agua de coco al comienzo de la floración, y esta es la última vez que lo uso en un cultivo.
Una señal inequívoca de la actuación de las hormonas, es que las plantas son más susceptibles al fototropismo, esto se traduce en una respuesta mayor a la incidencia lumínica, las plantas, sus hojas y brotes se inclinan y se dirigen hacia la mayor fuente de luz. Yo lo he visto muchas veces después de aplicar auxinas.
y esto es todo por hoy... 😅
Hasta la próxima semana...
GRACIAS POR ESTAR AHÍ, CULTIVADORES!!🖐️👨🌾💧💦🌞💡
=================================
Likes
7
Share
@RivenWaters
Follow
Topped today and getting ready for transplant to 5 gallon pots. Two weeks under new Mars Hydro 3000 and new AC infinity fan. The four plants are listed above, enjoy the video, my first!

Likes
9
Share
@rhodes68
Follow
9/4 Day 135 of the grow, wow 20 weeks
Plants doing well all depends on weather now I guess
9/4 Keeping tabs from here out in terms of day of flower, total grow length has no bearing.
Poly Day 55 of Flower 9-14 days remain
Zona Day 45 of Flower 19-24 days remain
9/7 Re-adding Big Bloom (Fox Farms) to nuet mix, plants seem to be missing it and I agree. Once a week at 3 tps/gal

Likes
6
Share
@gr3g4l
Follow
Visto que ya estamos a mediados de agosto y pareceria que quieren empezar a florecer voy a empezar esta semana con el bloom. Mitad bloom mitad grow
51d nuevo tratamiento preventivo con TD + Solabiol, Foliar.
Una vez el tratamiento para evitar que las lluvias limpien la planta suelo ponerlas bajo techo. En cuanto deja de llover las vuelvo a sacar.
dia 54 126ctms la nº1 y 102 la nº4 y una clara evidencia que ahora empieza lo bueno. Como puede observarse han ensanchado las ramas , han crecido notablemente y empiezan a mostrar claramente sus primeros pistilos.


Likes
6
Share
@Frosty905budz
Follow
So i decide to make the switch to green plaent nutrients...
Was not to happy with my advanced nutrients,
Having wired stuff happening in my resivor again .. not sure if a bottle spoiled or what but not older then a year ... anyways got the Gp3 going .. Flushed plants and now feeding gp3 feed/water ... wow these buds looked iced AF ..
Also my new light is killing it !! Noticed leaf tips little crispy so running lightb@80-90% power ...
Let me tell you these buds got way more dense then they would have been with the mars lights and so early still ...
The colours and aroma is really starting to stand out ..
Also clones are super healthy..
Put them under my old ts600 mars and they are really taking off... will keep 3 to mother in about 3 weeks im hoping, the rest will be given to good homes

Likes
8
Share
@weed_gastro
Follow
Week 3!
- day 21: Decided to top them
Also this is my first time topping, please feel free to let me know if I do something wrong.
-update on day 22: transplanted the one that was in the smallest pot, quite nice root system!
-upd. day 26: I gave them 12 hours of darkness, thereby flowering phase is ON! :P


Likes
18
Share
@PrinceOfHerbs
Follow
The first 3 plants have been harvested and are hanging (2x gyat, 1x bcg). The rest will flower for another 1-2 weeks
Flowering day: 69
Likes
2
Share
@51sGarden
Follow
Posting this as I’m on the last few days of the 3rd week from germination
Great progress, a lot of roots for such a short period but not too much plant growth, will start watering daily instead of watering every 2-3 days
Topped the girls today (Day 18 from germ) and starting to do mainline on all the Bubba kush.

Likes
48
Share
@xbrico
Follow
Day 8 - Girls starting to come on now. Looks like their roots have settled and starting to see some pokies coming out of the bottom of the root pouches so hopefully start to see some good growth beginning soon. Get them ready for training and the likes.
Not changed the water this week (really should have as temp has been up a bit...into the 25's in the tank but plenty of Great White in there and no roots in water yet but...) - topping up with plain water to keep the EC level and just pH adjusting. Last weeks solution was a bit hot for my liking but no burn signs so should be good for a couple more days yet.
Got some iceline procured so been cleaning/flushing/sterilising the Hailea for getting it installed (That's when the water change will happen...likely to last weeks strength & recipe). Cant wait to get that in to get tank temps down (as roots will be in the water in about 5 days by the looks of things...tops!!! Also have the Torus Hydro pH Perfect Inline run through for a couple of days so it will be ready to go in to keep the pH good for me (A grow off and my pH skills are out the window!!! 😜). Just waiting on a Sicce Syncra 3.0 to pump the chiller and the pH Perfect (Bit overkill @ 2700LpH but looking something for the URDWC I am building for next year...thought the extra pressure would help with the inline pH adjuster too).
Apart from that, will download the stills for the time lapse video and upload tomorrow.
Happy Growing all!!! 💪
Likes
2
Share
@Autower
Follow
Well it’s time to harvest 299 gram total wet weight with stems very happy with the outcome on these to say I messed up with nutrients at the most important stage bounced back and gave some very sticky buds with a hint of strawberry will update on dry weight in time thanks for viewing
