


Likes
Comments
Share

@eldruida_lamota
Follow
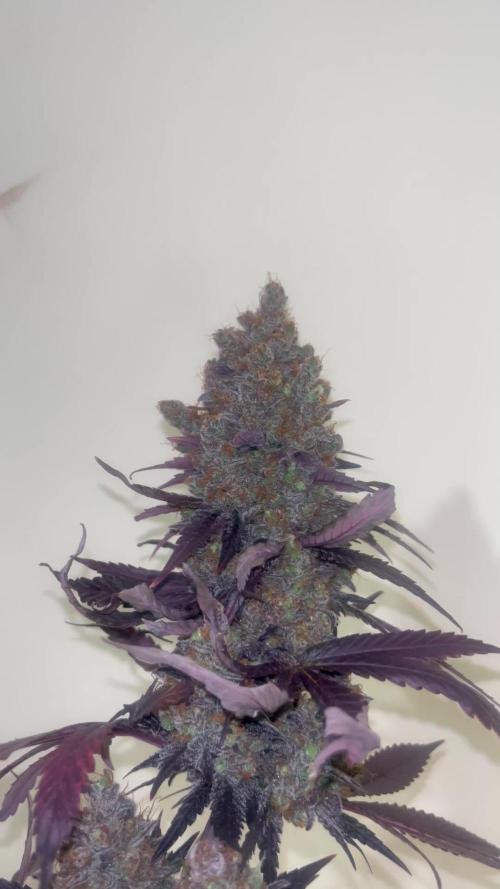
Venga familia ya viene la cosecha de estas Runtz de MSNL, que ganas que tenía ya de darles tijera.
Para empezar es buena variedad un poco tardía de lo que dicen pero me encantó cultivarla , aún con la plaga de trips que sufrí las 2 últimas semanas aguantaron y sacaron unas flores alucinantes.
Las flores aparte se ven resinosa y tienen colores llamativos.
La planta pues si creció vigorosa, no es muy frondosa y es resistente.
Fue una genética con la que disfruté bastante y es bastante fácil de cultivar.
Agrobeta:
https://www.agrobeta.com/agrobetatiendaonline/36-abonos-canamo
Mars hydro:
Code discount: Eldruida
https://www.mars-hydro.com/
Hasta aquí es todo , espero que lo disfrutéis, buenos humos 💨



Likes
7
Share


@Thckaos
Follow
15-05-21 Se cambia la solución y se realiza un lavado de raíces. Para bajar la conductividad de las raíces de 1.43 a 0.2 ms para que la solución nueva sea más efectiva. La solución tiene 2.23 ms y 6 PH. Se añade una pastilla de CO2.
16-05-21 PH 6.2 Conductividad 1.85 ms
17-05-21 PH 6.1 Conductividad 1.84 ms
18-05-21 Se corrige el PH 5.2 a PH 5.9 Conductividad 1.97 ms. Se rellena con agua del grifo ya que el nivel es bajo. Conductividad 0.92 ms
19-05-21 Se corrige el PH 5.6 a PH 6.1 Conductividad 0.97 ms.
20-05-21 Se corrige el PH 5.3 a PH 6.30 Conductividad 1.21 ms. Se rellena con agua del grifo ya que el nivel es bajo. Conductividad 0.74 ms
21-05-21 PH 6.10 Conductividad 0.78 ms

Processing
Likes
6
Share


@Ferenc
Follow
12/12, Fertilization goes on the same days with the nutrients above and water intake approx 300 ml per plant per day. Ventilation on at the same time also. They are crazily stretching:)


Likes
17
Share

@DogDoctorOfficial
Follow
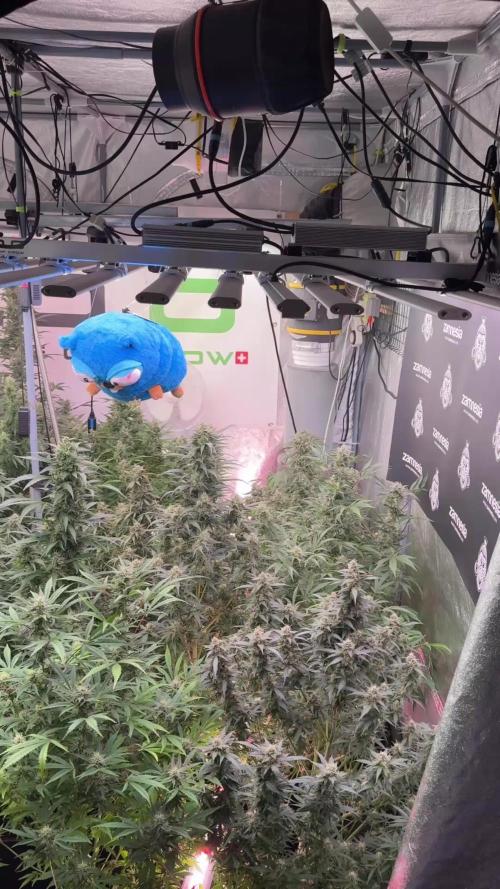
Animal Mints — Week 11 (Week 6 Flower)
“Legends of the Frozen North”
12/12 from seed — no traditional veg phase.
A direct transition from seedling into flowering rhythm.
This run was never about controlling the plant.
It was about creating the conditions… and letting the plant decide the rest.
⸻
🌱 How did we get here — 12/12 from seed
From day one, these plants were placed under a 12/12 cycle.
No extended vegetative phase, no shaping beforehand.
What you see now is the result of:
* Early root establishment
* Immediate flowering signal
* Structural decisions made by the plant itself
This creates a different type of growth:
Less stretch chaos, more compact intention.
Not bigger plants —
but often denser, faster-finishing expressions.
⸻
🌿 The Room — Controlled, but not forced
At first glance, some parameters might look “unusual” for this stage.
But everything is dialed based on leaf feedback (EPD) —
not charts, not assumptions.
* Temps: 26°C day / 18°C night
* RH: ~60%
* Solution & substrate: ~21°C
* PPFD: plant-grown into the light (~600–700 range)
We don’t chase numbers.
We read the plant — and adjust only when she asks.
⸻
❄️ Trichomes — The “Frozen North” is real
This is where she speaks loudest.
Trichome production is not just present —
it’s accelerating daily.
* Sugar leaves fully coated
* Bud surfaces stacking resin layer by layer
* That early frost has turned into visible density
This isn’t just aesthetics.
This is the plant investing heavily in protection and reproduction.
And she’s not done yet.
⸻
🌸 Pistils & Flower Development
White hairs still active, still pushing.
That tells us one thing clearly:
➡️ She’s still building, not finishing
Calyx swelling is underway, but not peaked.
Structure is set — now it’s about mass + resin + final expression.
⸻
⚖️ Weight, Structure & “The Lean”
Branches are starting to give in to gravity.
Not collapse — commitment.
This is the moment where:
* Density becomes visible
* Structure gets tested
* Support decisions begin
No stress signals — just natural load from proper development.
⸻
💧 Nutrition — Simple, consistent, intentional
Current feeding:
* Terra Bloom
* Pure Zym
* Sugar Royal
* Power Buds
* Green Sensation
* CalMag Pro
pH ~6.5 | EC ~2.0
Nothing excessive, nothing reactive.
The idea is simple:
➡️ Feed enough to sustain expression, not to force it.
Stable input = stable output.
⸻
💡 Under Canopy Lighting — Why it matters
This is where things get interesting.
Under-canopy lighting is helping:
* Lower bud sites stay active
* Improved light penetration in dense zones
* More uniform development across the plant
Instead of larf, we’re seeing usable structure deeper into the canopy.
It’s not about pushing more —
it’s about unlocking what’s already there.
⸻
🧠 Observations
This phenotype… has personality.
* Slightly dramatic structure
* Heavy resin production
* Compact but expressive
Not the tallest.
Not the loudest in height.
But easily one of the most present plants in the room.
⸻
🔮 What to expect next week
* Continued trichome stacking
* Calyx swelling becoming more pronounced
* First signs of pistil transition (some darkening)
* Increased weight → more need for support
We’re entering that phase where daily changes become visible.
⸻
🙏 Final Words
To everyone following this journey:
* The OGs who’ve been here from the start
* The new eyes discovering the process
* The skeptics, the questioners — always welcome
* The silent supporters
* The platform for hosting this space
* The sponsors and partners
* The genetics behind this expression
And of course… the plants themselves.
This room is alive.
And we’re just here to witness it.
From grower to growers 🤝🌱
📡 DELETED @ 1K Please stay tuned.we never quit https://www.youtube.com/@TheDogDoctorOfficial NEW 🙏 Thank you for your patience and continued support.
FOR DISCOUNT CODES AND MORE JUST FOLLOW THE LINK https://website.beacons.ai/dogdoctorofficial
📲 Don’t forget to Subscribe and follow me on Instagram and YouTube @DogDoctorOfficial for exclusive content, real-time updates, and behind-the-scenes magic. We’ve got so much more coming, including transplanting and all the amazing techniques that go along with it. You won’t want to miss it.
GrowDiaries Journal: https://growdiaries.com/grower/dogdoctorofficial
Instagram: https://www.instagram.com/dogdoctorofficial/
YouTube: https://www.youtube.com/@dogdoctorofficial Deleted by Youtube - https://www.youtube.com/@TheDogDoctorOfficial NEW
Vimeo : https://vimeo.com/dogdoctorofficial Under construction stay tuned ⸻
Explore the Gear that Powers My Grow
If you’re curious about the tech I’m using, check out these links:
🔆 Lighting & Environmental Control
• Future of Grow — Advanced LED lighting technology
https://www.futureofgrow.com/
DISCOUNT CODE: DOG20
• Lumiflora — Under-canopy LED lighting
https://lumiflorade.com/
• TrollMaster — Environmental controllers and automation gear (past collaboration)
⸻
Genetics
• Zamnesia Seeds — Genetics used in this project
https://www.zamnesia.com/
⸻
🌱 Soil, Substrates, Boosters & Root Support
• Plagron — Substrates, bio mixes, and supportive products
https://plagron.com/en/
⸻
🎒 Storage, Curing & Preservation
• Grove Bags — Curing and storage solutions
https://grovebags.com/
⸻
📸 Photography Equipment & Tools
(Not sponsors, but part of my creative toolkit)
• Sony A6700
• Sony full-frame macro lens + few more
• Stacking photography workflow - learning
• iPhone (for behind-the-scenes shots)
We’ve got much more coming as we move through the grow cycles. Trust me, you won’t want to miss the next steps, let’s push the boundaries of indoor horticulture together!
As always, this is shared for educational purposes, aiming to spread understanding and appreciation for this plant. Let’s celebrate it responsibly and continue to learn and grow together.
With true love comes happiness. Always believe in yourself, and always do things expecting nothing and with an open heart. Be a giver, and the universe will give back in ways you could never imagine.
💚 Growers love to all 💚
📸 P.S. – The Eye Behind the Lens
All photos in this diary (for now — except for the ones showing the camera, which I took with an iPhone) are taken with a Sony A6700 paired with a Sony full-frame macro lens and a few more.
Photography is part of the story — it’s how we share the fine textures, the glow, and the quiet details that words can’t always capture.
I’ve also started experimenting with photo stacking — a technique where multiple images, each taken at a slightly different focus point, are layered together to create one perfectly sharp image from front to back.
It’s not digital enhancement or AI; it’s pure photography — a way to reveal the plant’s beauty in microscopic depth, from trichome to petal.
You’ll even see a few shots of "ghost me" capturing the shots — camera, lens, setup — because every grow deserves not just to be cultivated, but documented like art.
FOR DISCOUNT CODES AND MORE JUST FOLLOW THE LINK https://website.beacons.ai/dogdoctorofficial
NEW DISCORD - Official Server Invite Link : https://discord.gg/ksjAkA5T74

Likes
15
Share


@VanHealzing
Follow
This week I didn't do much besides feedings.
Started noticing burnt tips, so time to lower my EC

Likes
15
Share


@Roope
Follow
Ewerything works and im so bananas right now and broud of those ladys that comment will be,
Start u'r own project and dont race becouse somebody may have 20+year of more info and they get moster no epic size planta but thats the goal be like pro at this lifetime.
Aint do any modification only extra bag of co2 and wery mild start nutriments so stay in tune!



Likes
10
Share


@Highclass
Follow
Day 79:
#3#4*: 1.5 L water + 2ml/l atazyme
#2#4: 1.2 ml water + 4ml/biogrow + 4ml/l biobloom + 1.5ml/l bibloombastic
Day 81:
#3#4*: 1.5 L water + 2ml/l atazyme
#2#4: 1.2L + 0,5ml /l bibloombastic + 2ml/l topcandy + 2ml/l atazyme
Waiting 5 days more, and see how is it going for flushing (#2#4) and choping (#3#4*)
Day 84: 1L + 2ml/l atazyme
Likes
34
Share


@BelSun_420
Follow
I would like to express my gratitude to Plagron and Zamnesia for organizing this incredible contest, providing the community with the opportunity to participate, showcase their skills, and learn from one another for free.
Initiatives like this strengthen the spirit of the community and highlight the talent of so many unknow dedicated growers.
I am BelSun, a 34-year-old guy who started planting in 2018, mainly focusing on autoflowers,indoor setups and organic grow .
Hope you enjoy my Journey on Eternity Grow Cup 2025 🏆💚
The main setup and a simple recipe on this journey as a thank you to Plagron and Zamnesia 👨🏻🌾
Runtz Automatic Zamnesia (3 seeds)
Fabric Pot 3x15L
RoyalRoom Classic C100
Electric Sky 180w v2
Plagron - Seeding & Cutting Soil
Plagron - BatMix Soil
Plagron - Perlite
Plagron - MegaWorm
Lurpe - Earth Vibes Super Soil
Lurpe - Volcanic Ash
Cultivers - Basalt Powder
THC - Epson Salt
THC - Delomite
Vithal - Bokashi
Mycoterra - Alfalfa Meal
Canna-BioRHIZOTONIC
Agrobactérias - Bactomatik Rex
Plagron - Alga Bloom
Plagron - GreenSensation
*Plagron Schedule 100% Natural
*Topdress amendments along the way if needed.
*Light Schedule: 20h
*Watering System: Manualy
*Paper Towel MethodI
I'm going to start in the middle of January, for now I still have some plants finishing flowering in the tent.
Good luck for all!
💚
-------------------------------------------------------------------
#10/01/2025
I’ve prepared my Super Soil mix, and it’s now cooking until I start germination, which will be in about 3 weeks.
-------------------------------------------------------------------
#03/02/2025
For germination, I leave the seeds in a bottle of water for 12 hours, then transfer them to a paper towel until they sprout a root. This method has worked well for me!
-------------------------------------------------------------------
04/02/2025
I’ve transferred the seeds to the paper towel method!
Now it's time to Pot preparation!
For my pots, I use a three-layer method, filling each layer while shaping them with different-sized pots:
- First layer: Super Soil
- Second layer: Regular fertilized soil (BatMix by Plagron in this case)
- Third layer: A light soil with mycorrhizae (Seeding Soil by Plagron)
-------------------------------------------------------------------
#05/02/2025
I’ve planted the seeds!
I'm using a cheap LED light from Amazon just to kickstart germination and gain a few extra days to finish flowering the plants in my tent. As soon as they sprout, I'll transfer them to the tent, where my old but fantastic Electric Sky 180W is waiting for them!
-------------------------------------------------------------------
#08/02/2025
Two of them have already germinated, but one still hasn’t. I’m struggling with low temperatures, as it's been only 12°C during the day and between 3°C and 7°C at night.
Unfortunately, I had a bit of bad luck—my lamp fell onto the pot, disturbing the soil and seeds of two plants. One of them is the one that hasn’t germinated yet.
Just in case, I’ve put two more seeds in the paper towel method as backups. If I don’t need them, I’ll give them to a friend!
🙂
-------------------------------------------------------------------
#10/02/2025
I placed them in the tent on the 10th. Two of them germinated on the 8th, while the other was affected by the lamp falling.
I’ll probably replace it with one of my backup seeds and offer #R03 to a friend, but it all depends on how things go in the next few days.
-------------------------------------------------------------------
#12/02/25
I replaced the seed that went into shock with one of my backups. So, from now on, #R03 will be the backup seed, and it will be about a week behind the others.
---------------------------------------------------------------------
#13/02/2025
The backup seed has sprouted! 🌱
---------------------------------------------------------------------
Likes
9
Share


@Dthebudguy
Follow
Moved into main grow tent with other flowers much cooler environment, on 12 /12 light schedule now and feeding kelp based Dutch science nutrients bloom

Likes
2
Share


@CannaIGrow
Follow
She’s growing well and finally starting to grow
out of her lil leaf mutation at the beginning.


Likes
9
Share


@wiz4rd
Follow
The plant is doing really well now. Although it isn't growing as much in height as expected, it is putting a lot of energy into flowering. Given its size, I don't expect huge yields, but I am still surprised and excited to see what comes next.
Through training, I managed to make the plant wider and produce more buds, which are now clearly visible and covered in trichomes. The plant's scent has become very strong, with a sharp lemony and earthy aroma, reminiscent of a lemon soda, or even Sprite. The buds are incredibly sticky and have grown well, although the plant remains very compact.
Next week, I will keep using the wooden plant stakes with wire to support the plant and continue the LST gently, but I will soon remove them.
In addition to the regular fertilized watering, I am also giving tap water from the bottom, both of which are well absorbed.
In the video, you can see the trichomes clearly and also get a good size comparison of the buds.


Likes
7
Share


@GrowGuy97
Follow
Update, this thing is a MONSTER!!!! Honestly a little scared to see how big she gets in flower lol😂😂

Likes
13
Share


@SzkolaZiola
Follow
Four of five plants will ba harvested right after taking those photos.
Strawberry Cough will stay longer - as long as I can keep her alive - she already lost most of leaves but she is far from being ready.
She now have whole tent for herself 😂 I need to give her another ScrOG net - she is starting to bulk and already colas are too big to stay vertical by themselves.
Thank you 👉 TrolMaster 👈 for providing the Tent-X controller. It was awesome!





Likes
4
Share


@Krusty13
Follow
All photos are from the last day of week 3.
This week we had some problems with the temperatures, not to mention the broken fan.
We solved the problem by removing the power supply from the Lumatek ats 300w pro lamp and taking it outside the tent.
Everything seems to be fine even if there are some yellowish leaves.

Likes
7
Share

@Ninjabuds
Follow
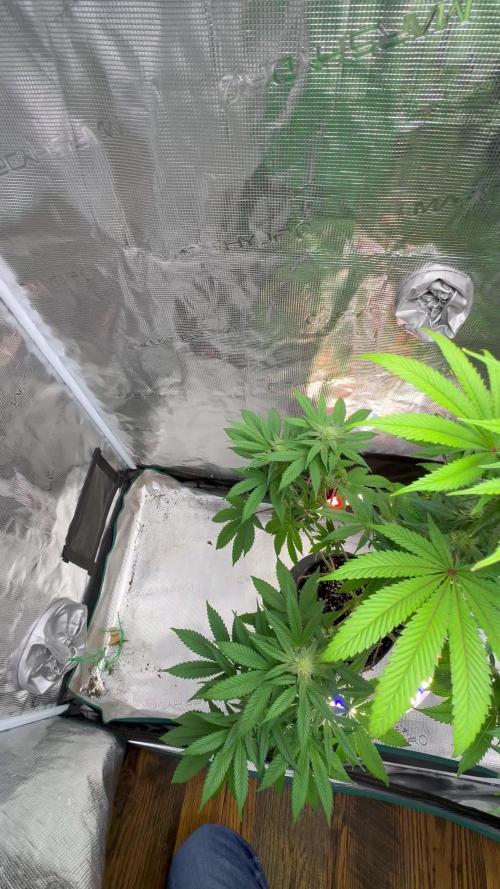
My ELUFAH UAP 1500 test grow is showing excellent results, with the plant thriving under my care. The addition of the ELUFAH Saturn Ring under canopy light has been a game-changer, significantly boosting growth. It's clear that the supplemental lighting is providing the plants with the extra energy they need for robust development and impressive yields.