
Likes
Comments
Share


Likes
10
Share


@Herbz_Unkraut
Follow
nice strain with a rich terpene profile! sweet, gelato like, hard hitting smoke!
sadly my phenos had no banana taste but still very nice

Likes
52
Share


@Sparkles
Follow
Pics and vid taken day 33
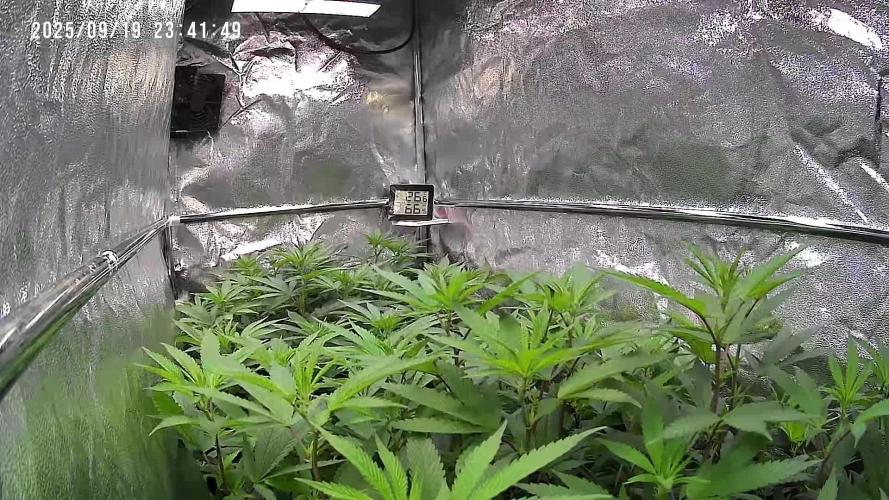
Pink Milk - starting to frost up and stacked like a tank. Smells like a candy store with a lil bit of teatree.
Black Kush - I didn’t burn shit, no spots, no necrosis, no bleaching. Leaf curling is just the way she grows. Frosting up like crazy. Smells like orange gummy bears and the kush smell is coming in hard and strong the past few days.
Uv back up to 2.5hrs a day. I think I’ll just leave it at that.
Dialing down to mid flower feed for a couple of more weeks. I hate mixing nectar.
Thanks for stopping by. Happy gardening 🌱🌱


Likes
44
Share


@MadeInGermany
Follow
Info:
Unfortunately, I had to find out that my account is used for fake pages in social media.
I am only active here on growdiaries.
I am not on facebook instagram twitter etc All accounts except this one are fake.
Hi everyone :-)
This week it has developed really well again :-).
I didn't train her this week, I'll do it again next week :-).
It was poured twice this week with 1.2 l each time (see nutrient table above for adding nutrients).
I sprayed them all with GreenBuzzLiquida Fast Plant spray.
I also cleaned the entire tent and checked everyone's health.
Fresh osmosis water was prepared and filled into canisters.
Yellow boards against flies have been put up and blue tags to prevent trips.
Unfortunately I still struggle with them but they have become significantly less pushed.
I think in a few weeks the last story should be :-).
Otherwise, like every day, they were looked at and petted for a while ;-).
I wish you lots of fun and stay healthy 🙏🏻
You can buy this Nutrients at :
https://greenbuzzliquids.com/en/shop/
With the discount code: Made_in_Germany you get a discount of 15% on all products from an order value of 100 euros.
You can buy this Strain at
https://www.amsterdamgenetics.com/product/super-silver-haze/
Type:
Super Silver Haze
☝️🏼
Genetics:
Haze x Skunk #1 x Northern Lights
Type:
70% Sativa – 30% Indica
👍
Vega lamp:
2 x Todogrow Led
Quantum Board 100 W
💡
Bloom Lamp :
2 x Todogrow Led
Cxb 3590 COB 3500 K 205W
💡💡☝️🏼
Soil :
Canna Coco Professional +
☝️🏼
Nutrients :
Green Buzz Liquids :
Organic Grow Liquid
Organic Bloom Liquid
Organic more PK
More Roots
Fast Buds
Humic Acid Plus
Growzyme Big Fruits
Clean Fruits
Cal / Mag
Organic Ph - Pulver
☝️🏼🌱
Water: Osmosis water mixed with normal water (24 hours stale that the chlorine evaporates) to 0.2 EC. Add Cal / Mag to 0.4 Ec Ph with Organic Ph - to 5.8

Likes
50
Share


@Terra_Farma
Follow
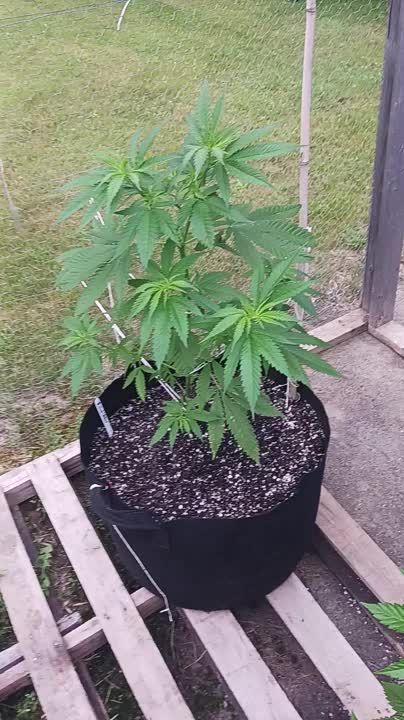
First week of the flowering phase and things are already looking promising. Pistils appearing already as you can see in the photos, and all 5 plants stretching out nicely.
I’ve now defoliated all of the fan leaves that were on the main stem, they were huge and had done their job of providing energy to the side branches and were now probably just taking up too much water and nutrients and were too low to absorb much light.
So now all growth is concentrated on the side branches, all of which are nice and uniform and giving several tops on each plant.
I’ve moved the light to 18inches/45cm away from the tops for the flowering phase. Temperatures have been a lot more ideal this week.
Applied the BioBloom powder as a top dressing, using the lower dose of 3g per litre of substrate, so 36g top dressed onto each pot.
Love how easy these nutrients are to use. Very simple to weigh and top dress rather than mixing up liquid nutes into water every time. Much less effort and much less time consuming.
And the plants look the some of healthiest I’ve ever grown. No sign of any deficiencies so far!

Likes
3
Share


@123Grow
Follow
48 days left to veg 😖😖😖 Getting close
Soooooo ya, full steam ahead. 1 more week and I will transplant 2 of the RuntZ into 5 gallon containers.
Hulkberry- the lateral branching is going wild now. The extra SST’s are helping in a big way.
Side Note: the nutrients listed are for the Hulkberry.
RuntZ Nutrients: 2-2-2 All purpose Dr Earth - 1 TBSP, a sprinkle of recharge , earth worm castings 1 TBSP

Likes
5
Share


@Nvchods3
Follow
empieza la 7ta semana de floracion.
se sigue alimentando con top crop
se le realizo poda de bajos para aprovechar al maximo la luz y engorden esos bellos cogollos tan apreciados.


Likes
5
Share


@Wenz004
Follow
Experiment explanation see week1
This week the two living soil pots got one big shot compost tea...otherwise only water
No1 plagron experiment (gelato auto...other diary) got each two days some plagron plus one from aptus nutrients mixture...same as last week but added alga bloom....thow grow of this plant is the best from my trio so far.
End of this week ppfd increased to 550-580


Likes
11
Share


@AtticGrowing
Follow
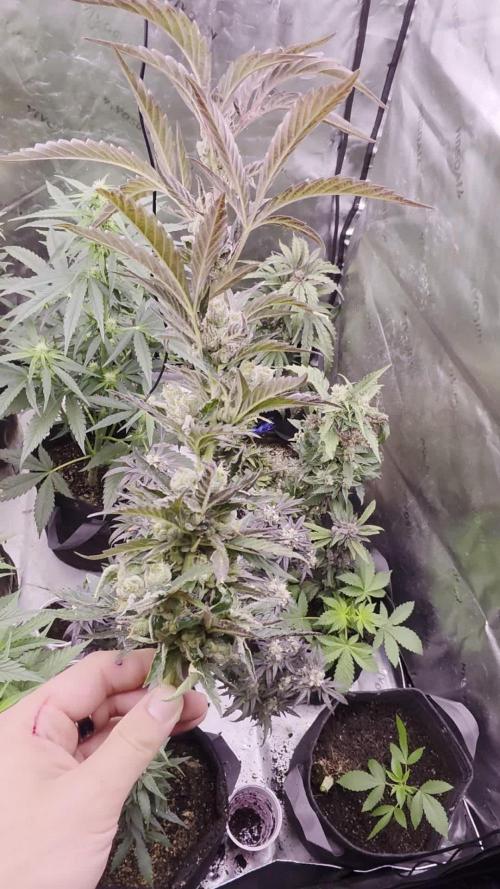
Very strong genetics on this one, I would definitely grow it again for those dense buds fully covered in trichomes.
Thanks to the FastBuds team for the seeds!
Likes
88
Share


@PEAKYPLANTERS
Follow
Hi to all friends!
Peaky is back in style.......... : )
Feminized to go go! .... power and plenty
Happy Harvest for everyone!
SEE YOU AROUND ...............................
Likes
49
Share

@masterofsmeagol
Follow
6/23 Due To The Two 8 Day weeks this week will only consist of five days to get me back on track. SEE LAST WEEK FOR DETAILS. I DID ANOTHER EIGHT DAY WEEK. I'LL DO THIS WEEK AS SIX DAYS. THAT WAY IM BACK ON SCHEDULE. WATERED 6/22. WENT BACK AT NIGHTCAND WATERED ANOTHER GALLON WITH 1/3 TSP Armor Si. I mixed the solution with kelp you kelp me but I dumped it out. I've mixed silica with other nutes before but I had read something earlier about bioavailability issues and I didn't want to risk it. My plants are the healthiest I've ever grown. I'm considering transplanting the large 10th planet that I'm light depping. I also need to develop my ipm and my nute schedule. Still gonna have to keep an eye onvthe water situation. Luckily I have a buddy in my corner that's co tinualkt Bern a great help.
WENT BACK OVER AROUND NOON. BEAUTIFUL OUTSIDE AND THE PLANTS WERE LOVING THIS SUN. I DEFOLIATED SOME BURNED LEAVES AND MIXED A SOLUTION IF KELP ME KELP YOU THAT I PLAN TO FEED TO THE GARDEN TODAY. IM HAPPY WITH HOW THINGS ARE GOING. WE HAVE SOME RAIN AND THINDERSTORMS COMING. I NEED TO GET MY IPM UP AND RUNNING AND THE NUTES ONLINE. I ALSO NEED TO DECIDE IF IM GOING TO TRANSPLANT THE LIGHT DEP 10th PLANET. Went back over to put the girls to bed at six and if was still 90 degrees. The water from yesterday had dissipated. The tops were dust dry. I mixed two gallons of kelp you kelp me and fed it to the garden. Afterwards I pointed qbd found a couple plants that were more open to the wind were a little lighter. I know tomorrow will be very hot. Maybe quarter inch of rain. However after that it will rain (showers) off and on for days. I wanted to make sure the girls had what the needed to make it through tjis heat wave until they get that rain. I had another gallon mixed up and I'm thinking I should've given it to them. Oh well. I'd rather underwater than overwater any day. I did notice a burnt top on the plant furthest from the tarp that the sun JUST BARELY TOUCHES when the rest are in shade. I'll just raise the tarp a little. These are tiny problems. Can't upload video until tomorrow.
6/24 Good thing u gave the plants that water. I know it wasn't much but we didn't get any rain. Suppised to get a qtr in today and another qtr in tomorrow. Then rain a couple more days. It's working our really good for my watering schedule lol. Yesterday the girls got there first dose of a bottled nute. They got two gallons of kelp me kelp you (1/3 tsp per gallon) and another gallon of just phed water. I was going to do another gallon but held off due to the threat of syring rain. Didn't get it bur it looks like the plants loved the kelp. It had reached 90 yesterday. They look better today. It's 70 at 9 today. I LST the 10th planet in the 3 gallon. It's getting huge. I should start a separate diary for those three light dep plants. Its cool as hell watching this. One of the purple punches is flowering pretty good. I probably should start another diary for them. I'll be starting to feed my plants soon. Wondering if I should pinch plants again. TUCKED THE LITTLE GIRLS IN AT SIX AND SHOT A VIDEO AND TOOK SOME PUCTURES. PLANTS LOOKED PHENOMINAL! GOT HOME AND AROUND SEVEN IT JUST STARTED RORREBTIAL DOWNPOURS! THE TYPE OF RAIN THAT BREAKS STEMS. I SHOULDVE PUT MY OTHET TARP UP BUT I DIDNT. I WISH I HAD. IM A LITTLE NERVOUS. I KNOW THESE GIRLS ARE STRONG THOUGH! TOMORROW. ILL ROLL THE RARP UP AND SECURE THE BOTTOM FOR FAST ACCESS. IM ALSO GOING TO KOOK INTO FINDING A TOP FOR MY CAGE I CAN USE IN INCLIMENT WEATHER.
6/25 That little qtr in of rain we were supposed to get turned into torrential downpours and high winds. Luckily no REAL damage. If you watch the video you'll see what I mean. I'm going to havecto be cognizant moving forward. Noticed a few chunks from leaves butvplants are still healthy. I'm surprised how well these girls withstood this storm. They are certainly resilient. The 2 purple punch 1 10th planet that I'm light depping are flowering nicely now. They missed all the commotion from the storm as they were inside. It's smelling good. I'm happy.
6/26 It's what a friend would say is "maineing") out. That mistcthe plants love. I'm surprised the plants are doing as good as they have been considering the wind. Will be adding nutes soon. Need to add extra supports too. Light dep
6/27 Brief periods or torrential downpours. Light depped 3 gallon 0lants are under an overhanfcwhete the hatsxrain can't hurt them but they still get sun. They are really starting to flower now! I'm going to begin feeding with a base nute and a flower nute I think. I'm thinking about giving the light dep some open sesame or something similar. I need to set up a nute program soon but the plants ALL look so healthy! And it's been raining! I've only watered like once or twice since they've been in the big pots. I've seen zero pests aside from a chunk missing from a grasshopper. Usually by now I'd have battled half a dozen things and be battling another half dozen. However I was posing from clones. These are seeds and boy don't I see the difference!


Likes
8
Share


@Sir_Freddy
Follow
Bis jetzt bin ich wirklich sehr über diese Sorte von Green House Seeds beeindruckt!
Sehr tolle Züchtung, sie wächst schnell und und ist sehr einfach.
Aktuell fängt Sie an viel Wasser zu trinken, ich denke es sind schon über 1 Liter am Tag.
Dies ist auch mein erster Grow bei dem ich auf den PH Wert achte.
Ich hoffe auf wirkliche Big Buds 😎
Meine Spitzenreiter waren bis jetzt LSD-25 und Purple Lemonade von Fast Buds.
Tag34: Die süße fängt nun gut an zu duften und entwickelt ein Haufen Buds.
Tag36: Ich habe das Gefühl, dass Sie nicht aufhört zu wachsen 😅
Sie bildet derzeit so abnormal viele Blüten, ich denke das es eine sehr gute Ernte wird.
Entweder ist diese Sorte einfach nur extrem gut oder es liegt am PH Wert da ich diesen vorher nie beachtet hatte.
👉FRAGE!: sollte ich bald mit der Entlaubung anfangen oder hab ihr vielleicht ein paar andere Tipps? 👈


Likes
34
Share


@Canna96
Follow
This is my second run of Dutch Passion with my first being a monster Blueberry Auto. Massive plant, and her pungent odor overtook my entire home while trimming her today. While trimming her it smelled like I was in an earthy Pine Forest with a hint of berries, and it was one of the strongest smelling plants I've ever run. Very easy to grow, responded to all training methods with VIGOROUS growth.
I topped her above the 7th node and removed the bottom one so I had 12 mains total. It took me almost 8 hours and I even had help for 4 hours.. Trimming is definitely my least favorite part of cultivating this species.
I am super impressed with this strain and really everything Dutch Passion. They have not even sent me a single seed or even acknowledged me on here but this is my second run of their autos and I anticipate each will be a massive yielder. I will probably take a month off then start a run of a few photoperiod mainlines.
I will be back with a final smoke report after she's cured, Stay Safe and Blaze On!!! 💪
Website: https://medicgrow.com/
https://growdiaries.com/grower/medicgrowled

Likes
15
Share


@NorCalCloset
Follow
At 112 days from seed, 70 days from when the lights were switched to 12-12, 57 days from when the first flowers were observed, I was seeing a few more amber trichomes everyday so I chopped her down. I was thrilled with the harvest. We'll see what the dry weight is but wet weight is 19.5oz ~ 554grams. Not a huge mistake but I wish I would have either used a scrog screen or done manifolding or vegged a little shorter and given more attention to guiding and managing the stretch. I think manifolding would have been best as she is a tall, stretchy plant. I didn't have the support I wish I did. The breeder says that she'll probably need some support and I think my consistency would have been better with a more uniform canopy height. Zero issues with mold, bud rot, root rot, pests, etc. Great plant!0
After letting her dry for 5 days, I weighed the harvest again and put it in jars. Buds are still sparkly and sticky and resiny. Not super compact, but my growing conditions were a little warm so I can't fault the genes. Dried weight is only 19% of wet weight which is less than I expected. She had a little more water weight than I thought when I chopped her down. I had my first sample of her. One good hit is all you'd want. I'd call the affect balanced. Great, strong hybrid. Somewhat in your head and up, but also a relaxed feeling in your body. I wouldn't want to over do it but a little is very nice! I'm glad I have almost 4 oz of it. :-)000

Likes
8
Share


@DonPerion1983
Follow
Well this week I’ve tried lollipop on my main plants also removed a lot of fan leaves that we’re stopping air circulation also light reaching down to growing flowers beneath! Introduced canna flores and more cal mag to my feed! Also introduced another led light and turned up ballast light upto 400w keeping temperature at 26 when lights go out also it’s hitting temperatures of 28! When lights are on! Is this is an issue as I’ve removed my humidifiers! As been getting good readings without using a humidifier in a good few weeks now! They seem to be looking good! But still having to do research as would love to create some big colas!!!
Second week into flowering now!

Likes
22
Share


@Bigdreams
Follow
Ok had to start flowering this week because of overall height now I see I should have got a taller tent but oh well. Started 12 on 10th I believe also moved some wires around and got a few more inches out of the light so I'm at 19 and 20 inches from lamp can't get no more unless I move exhaust fan light is now 75% started feeding terpinator its supposed to increase taste we will see later on also gave first dose cal mag I think I was borderline calcium deficiency plants really looked good after cal mag also feed unsulfered blackstrap molasses half dose tiger bloom and full dose open sesame cutting down on my nitrogen a little. To bad I can't smell shit right now been sick past few days probably got covid for real. The one branch on my one plant has an extra thick stem on it and at top extra leaves coming out guess its a mutant from to much nitrogen unless someone else know what it is overall it's been an ok week can't wait for the next few just hope I don't get to tall