
Likes
Comments
Share

@BushDoctor740
Follow
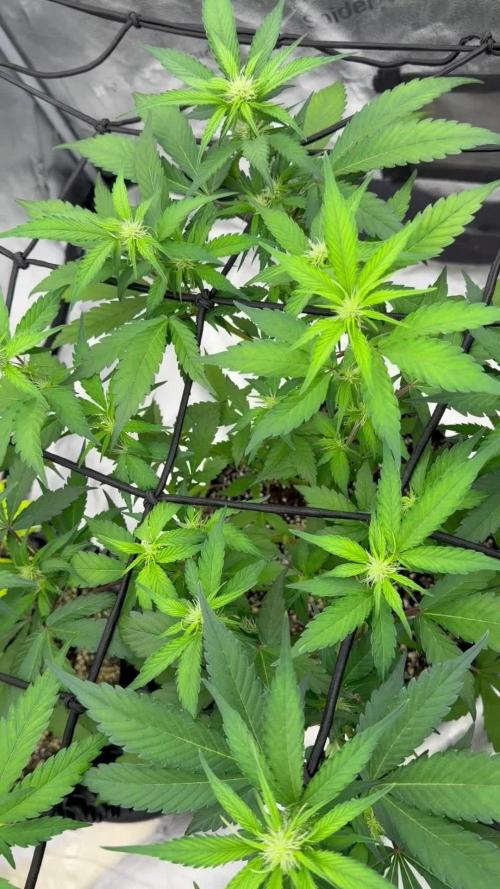
I ended up adding a scrog net just to open them up some more and get that light penetration.Two of these ladies have took on a really good stretch on the main cola and have a Christmas tree appearance.The other two are short and bushy as I did break off the top cola on the one and trained her nice and even.These photos were taken on Christmas Day :)

Likes
12
Share


@WoEsWar
Follow
9/30-10/6
10/4: Today, we are halfway through the third week of flower. Bud sites everywhere. Leaves look great. Environment on point. No issues.
The smaller plant has completely caught up and is now the larger plant by a little. The plants are sliiiiiightly different colors. It's not yet possible to tell if it's phenotypic variation or just different N levels in the medium. Curious to see how things turn out. The one other time I grew a Barney's Farm plant was the only other time I've grown two plants at once. They looked extremely different from one another. One looked like the pic on the package, and one didn't at all. One had the advertised terpene profile, one didn't.
pH upped to 6.1-6.2
I got really paranoid about the pot bases because people online were complaining that roots grew into the wicks and stopped water flow. So, I pulled off a delicate and difficult operation where I pulled out (one of) the bases and swapped in a clean one. In the second one I replaced the wick lines. Neither seemed to be particularly rooty. I think that's because I didn't use the bases through most of the veg stage when the roots are growing. Anyway, the bases are clean now.
One last thing: I put ArmorSi and CalMag in the reservoir of the "smaller" plant. In the other one, I only put ArmorSi. It seems like the branches are pretty flimsy, but it's still early in flower.

Likes
9
Share


@coucoulacreature
Follow
Another really wet week
The small one on the front right is not in a good shape
I tried to add more water and to let it dry more but she didn't change
The buds at in the center of the tent are growing crazy
It does not smell too much (and I have allergies haha)

Likes
21
Share


@Tckfui
Follow
Ph was way too low the last 2 weeks but ignored it, since super soil. A few plants are very not happy about it
So I drained the reservoire and cleaned everything out and PH'd the water to 6.8 with some sodium bicarbonate 🤞

Likes
22
Share


@Fatnastyz
Follow
Cut her on day 74
She grew amazingly! She even handled my over feeding like a pro! Her buds and some of the beat to sit and stare at! Her colors are vibrant which sparkle more off her resinous gleam!
She has a very pleasant sweet smell.
Thank you so very much Clarissa and Weedseedsexpress for these awesome beans!
I am very grateful for the opportunity! 😁💚
They have quite the selection for any needs!
Go get ya some beans, always got a deal!
www.weedseedsexpress.com
Happy growing and ty for the support! 💚😻🤘

Likes
8
Share


@Jmaninthemidde420
Follow
Did some good slow pruning and defoliating taking off 2 leaves or 2 branches every other day. Gave it a locally made soil conditioner specifically made for cannabis plants in flower. For those of you in central NY check out green tree hydro store and check out there different bio soils. There bio all has given me almost 100% germination rate. The bio flower gave my autos a kickstart for flowering with an additional worm casting tea made of 2 gallons ph water, 2 handfuls worm casting, spoonful of alfalfa meal, spoonful kelp meal, 2 spoonfuls plain epsom salt, 2 spoonfuls unsulfured molasses(organic). Added an air stone and brewed it for 38 hours exactly. Got some good bubbles on it too. I don’t check the ppm or nutrient levels or whatever you super experts do. I just use dry ammendtments with either compost tea, molasses, or coconut water as a liquid nutrient. Keeps it more simple for me. Tbh I don’t even know what ppm stands for I’ll look it up after I write this lol

Likes
209
Share


@Rock_n_Roll_Randy
Follow
CHANGED MY EMAIL ADDRESS ON GROW DIARIES AND IT WONT LET ME DO A CONFIRMATION FOR MY NEW EMAIL, SO NOW I CANT LIKE ANYTHING, COMMENT ON ANYTHING OR CHAT. SORRY MY FRIENDS. I HOPE GROW DIARIES TEAM WILL HELP ME OUT SOON🙏🙏🤞🤞
Day 114 for the 54 plant grow. 42 different strains of photoperiods and 12 different autoflower strains in the:
8X8 GROW TENT WITH THE NEW FC-E6500, FC4800 AND TSW2000 AND THE NEW 5X5 GROW TENT WITH A TSW2000 👍and they are being fed GREEN BUZZ LIQUIDS all organic/vegan fertilizers🤘.
I only pinched the tops on 2 or 3 plants but I defoliated every plant ALOT. it slowed the vertical growth alot but it's exactly what I wanted. I can keep track of the plant sizes, how they grew, how healthy they were, how easy they were to grow and how good the final product is👍 every plant was given the same strength of GREEN BUZZ LIQUIDS and I'm keeping track of which plants were happy with the suggested amounts and which plants seemed to want more or less🤘
ALL THE AUTOFLOWERS ARE NOW CHOPPED.
The girls are loving their MARS MANSION and WITH THE 5X5 INLAW SUITE and everything is doing good and looking nice and getting bigger👍 They are all starting to look like buds now and the bud sacs are swelling and they are all getting nice and frosty and starting to stink ALOT. MARS HYDRO ALWAYS GETS EM FROSTY👍.I AM NEVER DISAPPOINTED With how awesome these lights are🤘. KEEP KILLING IT MARS🤘👏👏
BREEDERS AND SEEDS:
DIVINE SEEDS:
MAZAR, OPIUM, WHITE WIDOW, OG KUSH, PABLO ESCOBAR, DIVINE INDICA.
AUTO WHITE WIDOW
AUTO PABLO ESCOBAR
AUTO WHITE RUSSIAN
AUTO FRACTAL
AUTO MONTREAL
AUTO OPIUM
AUTO KABUL
AUTO MAZAR.
WEEDSEED EXPRESS:
GREEN CRACK, GHOST TRAIN HAZE, LITHIUM OG, CHEESE.
DOCTORS CHOICE:
DC KUSH, AUTO NIAGARA, AUTO ROCK MACHINE.
EXOTIC SEEDS:
HIPPIE BERRY, MALASANA GELATO, EXOTIC ANIMAL.
GENE/MEME SEEDS:
BLACK HELL.
ORIGINAL SENSIBLE SEEDS:
PURPLE PUNCH COOKIES, WEDDING CAKE, PURE KUSH, GORILLA COOKIES.
SWEET SEEDS:
BLACK JACK, GORILLA GIRL, SWEET ZKITTLES.
EMERALD TRIANGLE SEEDS:
GORILLA GLUE, MASTODON KUSH.
SEEDSMAN SEEDS:
BLACK SUGAR, PEYOTE FORUM, PEYOTE WIFI, BADAZZ COOKIES OG, PURPLE GHOST CANDY, STRAWBERRY BANANA GRAPE, L.A. PEYOTE KUSH, PEYOTE WIFI CBD, FUEL DOG, CRITICAL PURPLE KUSH.
AMSTERDAM MARIJUANA SEEDS:
GIRL SCOUT COOKIES EXTREME, GREEN CRACK.
QUEBEC CANNABIS SEEDS:
BRUCE BANNER, GREEN CRACK, QUEBEC CBD 20:1.
I 💚 GROWING MARIJUANA:
SKYWALKER OG, BANANA KUSH, BLUEBERRY CBD.
FOR EVERYTHING MARS HYDRO VISIT:
www.mars-hydro.com
www.marshydroled.ca
PROMO CODE: rocknroll
VISIT THE ALIEXPRESS STORE:
@marshydro_aliexpress
Instagram: @marshydropenny
https://youtube.com/channel/UChU5ZWwNi-DvnO3oWVU3ceA
https://greenbuzzliquids.com/
#greenbuzzliquids
@GreenBuzzLiquids
https://greenbuzzliquids.com/en/shop/
PROMO CODE: rocknroll
https://www.youtube.com/watch?v=8hEqyS1jPpI
https://growdiaries.com/diaries/112437-grow-journal-by-rock-n-roll-randy/week/593118
Thanks for taking the time to read and check out my diary🤜🤛
FC-E6500 LED GROW LIGHT:
FC-E6500 grow light with 3978pcs OSRAM BridgeLux Diodes & Moso Driver, market-leading PPF 2.7 µmol/J, Max 2.5g yield/watt with 30% higher Average PPE, more cost-effective when compared to same style type lights. Only consumes 650W, perfectly cover 5x5ft (personal), 4x4ft (commercial) grow space. Innovative Precise Uniform Lighting-Built-in removable bars interval & dimmability enable the exact & dynamic PPFD control over each of the plant growing stages, FC-E6500 detachable bars deliverSuperior Heat Dissipation: Real Aluminum heatsink together with 6 slim profile passive cooled bars (THINNER & LARGER surface) and detachable Meanwell Driver, create less heat. save 50% hydro than other old grow lights! Driver can be mounted remotely on the side of a grow tent/rack or on an adjacent wall to remove heat from grow space. Full Spectrum UV IR LED: With Yield Max spectrum (660nm Osram enhanced Deep Red,2800k-5000k,730-740nm IR,380-410nm UV LEDs), Average PPFD the FC-E6500 LED grow lamp enables cultivators to produce BIG FAT Dense Buds, perfect for full-cycle hydroponic, soil, grow tent/grow room.
Dimmable Commercial Grow Light: Cost-efficient, easy dimming & daisy chain With a max up to 20 lights, IP65 Waterproof, master light easily controls the rest. Perfect for commercial & home horticulture.
FC4800 LED GROW LIGHT:
GET THE MAX FROM MARS👍: Welcome one of the newest members of the Mars Hydro family🤜🤛🤘. The Mars Hydro FC 4800 480W LED Grow Light can accommodate up to a 4' x 4' area for flowering. It has OVER 2000 LED chips consisting of the best selling Samsung LM301B diodes which has a Luminous Efficacy of: 220 lm/W
0.2 W, 3 V mid power,
Osram 660nm Diodes, Infrared light and UV LIGHT👍. It boasts the incredible efficiency of 2.8 µmol/J, maximum 2.5gram yield per watt with 30% higher Average PPFD. This High-intensity spectrum is beneficial for plants at all stages - from veg to bloom, and creates Big dense Buds👍. achieve 50% higher yields & quality compared with the old lights! Only consumes 480W for 4x4ft personal grows, and 3x3ft for commerical grow. It comes with a dimmer and daisy chain function with a maximum of up to 15 lights, the master light controls the rest👍. Wide 6-bar design offers even & wide canopy coverage and can maximizes your grow space. slim 180° FOLDABLE DESIGN... YES I SAID FOLDABLE🤘🤣 , making it compact and easy to install, it's IP65 WATERPROOF and will give you no worries while growing in a humid environment and makes it a flexible high performance commercial grow light for enormous SUPER FROSTY yields.😛😛😛. MARS GETS EM FROSTY BOYS👍
AWESOME HEAT DISSIPATION: The Low energy consumption FC4800 growing light has 6 passive-cooled bars and an aluminum heat-sink a removable driver you can upgrade later or have it outside your tent. with zero noise you can save up to 50% in your electricity bill compared to HID's or HPS lights!
It also has a removable driver so you can upgrade it in the future or have it outside your grow space for better heat control in your growroom👍
UPGRADED FULL SPECTRUM: Yield Max Spectrum with enhanced red (Top-Bin Samsung 3000k-5000knm, Osram 660nm Deep Red), speed up blooming & fruiting, perfectly suited for full-cycle growing. The FC4800 LED grow lamp was born for Big Buds, perfect for commercial, grow tent, grow room, hydroponics, and all soil grows.👍
THE BEST SAMSUNG DIODES: THE FC4800 has Top Bin genuine Samsung Osram Diodes, combined with remarkable 2.8 µmol/J Efficacy, 30% higher Average PPFD, 50% less energy consumption, to maximize your yields. They give you a TRUSTED 3 years warranty 100% Satisfactory guaranteed!!!
X2 TSW2000 LED GROW LIGHT:
INCREASE YIELD AND CROP QUALITY WITH MARS HYDRO LED GROW LIGHTS: NEWEST SMD LED technology provides the highest PAR/LUMEN output (1122umol@18") and can make you get 30% higher yield compared to OLD blurple led lights. Max 2.5g yield per wattage and achieve maximum quality and quantity, much better than traditional HPS grow systems
LOW ENERGY CONSUMPTION LED GROW LIGHT: Consuming only 300W true output with 684 LEDS! It saves up to 50% energy than other led grow lights. Perfect for 3.5x3.5ft bloom stage, 4x4ft veg stage. Over 90% light energy can be absorbed by plants, it will have higher intensity in a MARS HYDRO grow tent with diamond design mylar, or by crossing over using multiple TSW2000
HIGH EFFICIENCY FULL SPECTRUM INDOOR GROW: 3000K 5000K and IR 660nm 760nm RED, makes it close to natural light, highly engineered to provide improved growing performance for plants at all stages of growing, rapid plant response from seed to flower; Uniform and wide-beam light distribution for your plant's optimal growth
8x8 & 5X5 GROW TENT:
The MARS HYDRO 8x8 and 5x5 Grow Tent interior is made of a unique diamond design mylar which is highly reflective. (Other companies mylar and reflective rate is as low as 50%, and it won't provide efficient light. They use thick 1680D oxford canvas, and being double stitched, it is tear proof and perfect for locking in the light. Their grow tent keeps 100% of the light inside the tent and helps your plants absorb more light. EXTRA-THICK material means No light leaks or rips at all.👍
Strong Stable metal corner adapters and poles are the trustful supporters of the tent. It's very sturdy, neither rusting or paint flaking off. quick and easy tool-free setup. They use heavy-duty metal zippers, with double layer black lining, by far the best on the market which creates a light-proof seal.
Likes
36
Share


@MadeInGermany
Follow
Info:
Unfortunately, I had to find out that my account is used for fake pages in social media.
I am only active here on growdiaries.
I am not on facebook instagram twitter etc All accounts except this one are fake.
Have fun with the update.
Hey everyone :-)
Quick update this week.
It was poured twice with 0.8 l each time.
Everything is going as it should and I'm really looking forward to the next week.
until then I wish you all the best and stay healthy 🙏🏻
You can buy this Strain at
https://www.barneysfarm.com/blue-cheese-34
Type:
Blue Cheese
☝️🏼
Genetics:
Blueberry
X
Original Cheese
👍
Vega lamp:
2 x Todogrow Led
Quantum Board 100 W
💡
Bloom Lamp :
2 x Todogrow Led
Cxb 3590 COB 3500 K 205W
💡💡☝️🏼
Soil :
Bio Bizz Coco
☝️🏼
Fertilizer:
Green House Powder Feeding
☝️🏼🌱
Water:
Osmosis water mixed with normal water (24 hours stale that the chlorine evaporates) to 0.2 EC. Add Cal / Mag to 0.4 Ec Ph with Organic Ph - to 5.5 - 5.8


Likes
9
Share


@HUMO_Cultiva
Follow
Update of Goofiez 2 !! It’s incredible this strain is so strong and fast grow !! Stay tu ed

Likes
23
Share


@Zuppler
Follow
🍦**Grow Report by Zuppler - Week 3 Flowering Phase** 🍦
Yo yo, what’s poppin’? It’s Zuppler back with that grow update straight from the heart of the city, ya feel me? We’re in Week 3 of the flowering phase, and let me tell you, the ladies are lookin’ fresh as hell right now. Everything's running smooth, no stress. The buds are starting to show up like diamonds in the rough, you know what I’m sayin’?
The girls are growing like real queens, standing strong and firm, like they know they’re about to take over the spotlight soon. Nodes are tight, no stretchin’, everything stayin' solid like a real OG. Lights are on that 12/12 cycle, and the nutes are mixin’ in just right – no overfeedin’, no deficiencies, just smooth sailin’, bruh.
Water game is on point too – pH is dialed in, no dry-out drama. Roots are doing their thing, and the ladies are sucking up that H2O like they’re thirsty in the desert. We’re usin‘ that clean and pure Osmosewasser.
So far, everything’s rollin’ as planned. I’m hyped to see how these next few weeks turn out – buds gettin’ fatter, stickier, and that smell’s gonna get even crazier. Stay tuned, yo – Zuppler out.
Peace!
Likes
7
Share


@fabialien
Follow
Así va estar London mint de batalla de Growers, lamentablemente no pudimos hacer mucho por el tiempo del concurso, pero satisfechos de seguir en el concurso


Processing
Likes
29
Share


@ChiefGrowAutoflowers
Follow
I have been super excited with everything up to this point . I have made all my preparations that I think need to be made and did some trial runs on my environment. I starting preparing around the 15th of January and my set up was complete around the 19th of February. I spaced my purchases out based on budget constraints. I wanted a cheap and efficient grow area. Some thing I paid more
for because through all the research I did I felt quality was more important. If you are as excited as I was, you get pretty anxious when awaiting order status when you first order your seeds. You should remember you are ordering from an online seed bank not amazon. Most work Monday - Friday and are in a complete different time zone. I ordered my seeds from seed supreme Seedbank. I placed my order on 31 January and mailed money as directed. This was the scariest part for me especially when I didn’t hear anything back. I finally received a email on the 12th if February saying my invoice was paid and then subsequently mailed out on the 15th and I received on the 20th. One thing I would like to note that recommend to anyone mail cash is to make sure you spend the extra cash and track your payment.
I’m currently germinating all five GSC I received I placed them in water for the first 24 hours and then a paper towel for approximately 40 Hours.
I’ll add links to most of the items I purchased below. Some items I purchased through offer up and let it go app to save money.
VIVOSUN 48" X48" X 80" Hydroponic... https://www.amazon.com/dp/B07GNBCVPZ?ref=ppx_pop_mob_ap_share
LED Grow Light 1000W Full... https://www.amazon.com/dp/B074MBP32M?ref=ppx_pop_mob_ap_share
AcuRite 00613 Humidity Monitor... https://www.amazon.com/dp/B0013BKDO8?ref=ppx_pop_mob_ap_share
Hydrofarm Grow!T Premium Coco... https://www.amazon.com/dp/B01DA4PZI4?ref=ppx_pop_mob_ap_share
iPower LGTESTSOIL 3 in 1 Soil... https://www.amazon.com/dp/B075LRY5M7?ref=ppx_pop_mob_ap_share
Unco Industries (WWSB15LB) Wiggle... https://www.amazon.com/dp/B00062KQ42?ref=ppx_pop_mob_ap_share
General Hydroponics pH Control Kit https://www.amazon.com/dp/B000BNKWZY?ref=ppx_pop_mob_ap_share
VIVOSUN Air Filtration Kit: 4... https://www.amazon.com/dp/B06XFRNPR8?ref=ppx_pop_mob_ap_share
VIVOSUN pH & TDS Meter Combo, 0.05ph High Accuracy Pen Type pH Meter & +/- 2% Readout Accuracy 3-in-1 TDS EC Temperature Meter https://www.amazon.com/dp/B06XKMH86J/ref=cm_sw_r_cp_api_i_2xyCCbK4MKNN4
Botanicare CAL-MAG Plus Plant Supplement 2-0-0 Formula, 1 Quart https://www.amazon.com/dp/B004JKBMRW/ref=cm_sw_r_cp_api_i_LyyCCbY8SMFTK
Century 24 Hour Plug-in Mechanical Timer Grounded https://www.amazon.com/dp/B00MVFF59S/ref=cm_sw_r_cp_api_i_ozyCCbHG8Q2PB
Day 1 - 2/23/19:
I planted my seeds today about a fingernail length down with tap root pointed and gave a light watering with plain tap water at a PH of 5.8.
Day 2 - 2/24/19:
Nothing new to report no activity on the surface, misted watering at 5.8 PH.
Day 3 - 2/25/19:
Plant number 1 which had the longest tap root broke the surface I started a time lapse on it to cover the first moments of birth 😭 daddy is already so proud lmao. I have another light watering today with my humidity domes on, the intent is to have the plants roots work to get the required water and hopefully promote root growth. I also added 1ml of Rapid start and diluted into 1 gal.
Day 4 - 2/26/19:
Checked the status this morning prior to work and two more have reached the surface only two more remaining which I suspect will reach by the time I make it home from work. Misted this morning pot was looking pretty dry with the exception of the humidity domes, which I removed on all the sprouted seedling. I intend on shifting to a 20 on 4 off cycle and starting my other fans.
Day 5 - 2/27/19:
All five plants have broke the surface. I did a normal watering this am still utilizing the dome to avoid watering on top of the plants. I lowered the light again some of the early sprouters we stretching a little more than I wanted and appeared leggy to me.
Day 6 - 2/28/19:
Nothing really to report today. Excited for the name reveal tomorrow. I did a light watering. I played around with my ppm meter and ec I definitely plan on using in conjunction with my first feeding this weekend.
Day 7 - 3/1/19:
Was watering this morning normal levels. I also mixed a new feed to be ready for them tomorrow. While I was watering # 5 fell over I accidentally tipped it with the spout. I grabbed some left over soul to help prop it up hopefully she is ok.
Likes
62
Share


@Santica_Garden
Follow
Cheese has always been my all time favourite Strain, really surprised how I haven't grown none yet since I started growing.
So I went with my usual germination method, Cup of water for 24hrs then move onto the wet paper towel for another 24hrs in my tent with the heater turned on to keep temps around 26 degrees.
Initially I am planning on running her underneath my Mars Hydro TSW 2000 in my 3x3 but depending on how much space is available in Flower I might switch them to one of my 4x4 tents.
Really excited to see what I can do with the Cheese, wish me luck guy's & Happy Growing 👍🏾🌱💚

Processing
Likes
5
Share


@MyloGrow2019
Follow
Just at the end of week # 2 in bloom , LST training is going well and the canopy is pretty full , cooler outside temps allow me to use my co2 burner and they are all looking great with lots of bud sites and liking the nutrient balance, made new nuits today and it went from 1400 to 1150 in two feedings , one more week of stretch and then I will finish the under canopy cleanup and plan on a light defoliation at week 4 of bloom. The 8 Ball Kush is really showing great growth and it’s early on , should be some huge buds this crop , the Blue OG Kush is healthy , it’s my first time with it so I’m not sure what it grows like . Stay Tuned

Likes
27
Share


@RDWCGrowing
Follow
1/20/2023- So much to do pre grow and over the next 16 days, absolute first order of business is that I have to take down my current Grow---TIMBER-- Then I have a list of things I have to get done in order to be ready to start this grow 1 Feb.
With that said
T - 2 days until start 48 hour Flush
T - 2 days until Start 48 hours of Light
T - 4 days until TIMBER!!!
Items that need to be done before 1 Feb 2023
1. I need to clean the tent out
2. I need to clean the equipment- Proper Sanitization between grows in Hydro is a must!!!
3. I need to get the hole in the ceiling above my tent repaired- For my last grow I had a deep sink installed in my grow room, to make Hydroponics a little bit easier and have a water source in the same room. The seals on the pipes they were installing broke and leaked through the ceiling causing some damage all the way across my grow room, I was already weeks into my grow and couldn't risk them working above my tent and it would have been very awkward positon for them to be working in as well, so have to get this done quickly between chop and germination.
4. I have to install my new light- I was using a Vivosun 4000 and for this grow I am switching up to a Spider-farmer SF 7000.
1/20/23- For this upcoming grow I am working with M/F photo seeds so I ordered 4 Sex determination kits. I recieved my my 4 Sex determination testing kits from Rimrock Analytics today. I will be using these to test my plants at week 2 of Veg so that when/if I take clones I know I am taking them off females. As well as I don't want to accidently pollinate my tent during this grow I am looking for big beautiful buds not seeded buds. :-)
1/24/2023- Harvest of current grow- Started at 2:00pm and finshed wet trim and firt batch into the freeze dryer.
1/25/2023- Next batch into the freeze dryer and cleaning all my equipment for this Grow.
T-1 Day until the workers are supposed to be here to fix the hole in the Grow Room.
T-3 days until I instll my new Gorilla Grow Tent and my New Light Spider Farmer SE-7000 for this grow.
T-7 Days until Start of Germination
1/26/2023- Harvest is done ran through the Freeze dryer and dry tim completed.
1/27/2023- Grow Room repairs completed. Hole is gone Letting the paint dry before I install the new tent.
T-2 days until Install the New Gorilla Grow tent and the new Light
T-3 days until I put the hydro equipment in the new tent
T-5 days until Germination
1/29/2023- Day 0- Final Pre Germination activities
Germination Start T-3 days
The paint on the ceiling was dry and it was time to finish prepping for Germination. I got the following items knocked off my list.
New 4X4 Gorilla Grow Tent is up and ready
New Spider Farmer SE-7000 Light is installed- Thanks Moony Grows for the suggestion and for the Code that got me some money off and free shipping (Moonygrows)!! I turned the lights all the way up to max and set the timer to 18/6 0600-0000. I will keep an eye on the temperature and humidity without my plants and see how hot it gets with the new light.
I put my Hydro system back together and put in 40 gallons of water into it, time to monitor for leaks the next few days.
I Setup my cloning machine for Germination Days 3-11
1/30/2023
let me break down the situation, ROOM in the TENT.. Enough said.. No really I tried putting my exhaust system up in the new tent with my new light, The light is so big corner to corner that it really didn't give me enough room for the lights be be raised, with the exahust hanging the buckets my plants are Starting in are 2 and 1/2 feet off the ground, great for plenty of room for roots but not so great for upwards space for the plant to grow. In a 6' 11 tent with the exauhst in side and hanging that only gave me a little over 4 feet of grow room to play with. My last grow if you saw my diary, anyone could tell I was struggling to keep the buds off the lights. No good, Since space was such an issue I was running my carbon filter inside on the ground but It really needed to be up sucking the heat out not shooting the cool out. With that setup I was sucking air through the filter and pushing it out the tent at a bottom exhaust hole cold out. Wasn't doing me any good for my heat. I was hitting temps of up to 85 degrees. I bought a portable AC unit and have been running it in the grow room to try and keep temps below 85 and I have had to lower the power on my lights during grow also not ideal.. With that said a friend of mine MoonyGrows (Check out his diary) took the time to look at my issue send me a picture of my grow tent setup with detailed instructions on how to suck the air out from the top but putting my filter and fan on top of my tent so no room issue and I am sucking the air out from the top where the heat is instead of pushing the air out from the bottom where the cool is... THANK YOU MoonyGrows For taking the time to help me get this straightened out.. Now I have room and I have the exhausts working right and now my temps with everything at 100% are topping out at 80 this dropped the temp by 5 + degrees at 100% max.
T-2 days until Start of Germination
Prepped my seed tray with humidity dome
Prepped my Rapid Rooter plugs. I Used RO water, and I added a few drops of Hydrogen peroxide to Oxygenate the water. I then PH balanced between 5.7-6.0 the same that they will be getting in the Cloning Machine and when they get to thier final grow pod. I perfere the 5.8x range and I hit 5.84 for these rapid rooters. If you want to see a complete video on the process HowWeedGrow has an amzing video that shows step by step how to do it and explains it better than I ever could including how to plant the seeds. Which I will cover when I get to that step on Wed. https://www.howweedgrow.com/how-germinate-weed-seeds-cannabis-rapid-rooters/
1/31/2023
T-1 day until Germination Start
All set and ready have my Rapid Rooter plugs ready to go have my seeds out.. Have my seed tray warming up tonight. Tomorrow morning right into the Rapid Rooter then strait into the tray. I will spray the dome to start the humidity in there.
2/1/2023
Germination Day!!
Let the games begin!
0600am Put the seeds into the Root Riots. And then put the seeded Root Riots into their first home the Seed tray. I have them under the light 24/7. Sprayed the dome
7:30pm Sprayed the Dome to keep humidity going on the dome.
2/2/2023
Day 1 of Germination
Sprayed the Dome in the morning
Sprayed the Dome in the evening
2/3/2023
Day 2 of Germination
Roots are starting to come out the bottom of the root riot plugs and the heads are slowly popping out of Number 4 just below the surface.
Afternoon- Number 4 has popped up
Evening- Number 3 has popped up as well. Happy Dance!!
2/4/2023
Day 3 - Germination
Surprise Surprise Surprise- all 4 have now poked their heads up.. Happy day!! 100% Germination succeeded.
Now major milestone to track is how many are female and how many are male.
I will take look at the roots this afternoon/evening and see if they have enough root to go into the cloning machine for the next 7 days before they go into their Hydro Pods.
Day 3 - Germination - Evening..
Roots looked good and they were tall enough to make it into the cloning machine.
Now that they are all in the cloning machine I have switched the lighting to veg state 18 on 6 off.
2/5/2023
Day 4 - Germination - Morning
All the Ladies (fingers crossed) looking great stretching nicely and look nice and green, Photo synthesis underway....
UPDATE!! After a very interesting POD cast on FSTS by Dr. Bruce Bugsbee from Utah University, I have shifted my lighting to 24 hours on through seedling and then I am going to shift to 20 hours on the rest of Veg.
2/6/2023
Day 5 - Germination
While Checking on my conditions inside the new tent last night, I found that the Humidity was down to 39 Percent. I added an AquaOasis Cool Mist Humidifier, the reason I selected this humidifier is that I needed one that could be turned on and off utilizing my Inkbird Humidity Controller IHC200 that I have my Pro Breeze Dehumidifier currently running with.
Root structures are starting to get there about 1/4 of an inch.
2/7/2023
Day 6 - Germination
Everything seems on track more roots poking out of each today. They are each getting a little taller as well.
Checked in the evening and number 3 was drooping the Root riot plug on the bottome was dry and the roots were not in the water yet. I raised the water just enough that the longest root that was sticking out is now hitting the water.
2/8/2023
Day 7 - Germination
Everything looked good while checking in on them this morning number 3 is now full up and no droop again.
2/9/2023
Day 8 - Germination
T-2 days until Plant into Forever Pods and we start week 1 of Veg .. :-)
Surprising thing to me is that number 1 and 2 were later in popping then 3 and 4 but the roots are growing longer in 1 and 2.
2/10/2023
Day 9 - Germination
Number 1 and Number 2 are definitely ready for transplant today.. Based on how they were yesterday and where they are today I am hoping by tomorrow 3 and 4 are ready. Today they look to me where 1 and 2 did yesterday.. I really hope 3 and 4 catch up by tomorrow since..
T-1 day until transplant to new/ final home for grow.
Need the roots long enough to have some clay down in the basket to keep the root riot out of the water and only roots in the water..
2/11/2023
Day 10 - Germination
Today they got placed in thier forever Home, 7 days from Sprout and 7 days until Week 1 Start.
PPM- 180 this is water out of the Tap
Temp Water: 70.7
Temp Tent: 77
Humidity: 40% I have a humidifier going 24/7 to try and bring this up.. I also have Humidity Domes on each plant.
2/12/2023
Day 11 - Germination
Sprayed the domes, all are looking good.. Nothing much to do at this phase but Keep monitoring the PH level in the system and making sure they have a comfortable home.
T-6 days until Week 1 start
2/13/2023
Day 12 - Germination
Sprayed the domes, They were looking a little yellow today so I moved the light down to assist. Nothing much to do at this phase but Keep monitoring the PH level in the system and making sure they have a comfortable home.
T-5 days until Week 1 start
2/14/2023
Day 13 - Germination
Sprayed the domes, They were looking a little Florissant yellow today, with what looks like slight burn on the tips, I talked with a fellow grower and we agreed that It was probably that I was drowning them, Yes you can drown you plants even in Hydro, but only early on.. :-) It usually happens with the water being too high, which soaks not only the roots but the medium (root Riot plug in this case). I lowered the water from touching the bottom of the pot to about 1" away. This will probably take 3-4 days to resolve. I will continue my daily monitoring.
T-4 days until Week 1 start
2/15/2023
Day 14 - Germination
Sprayed the domes, continue my daily monitoring they look a little darker green instead of lime green now that I lowered the water levels in the system, so I think that I might have resolved the issue but it will take a few days for recovery to happen.
T-3 days until Week 1 start
2/16/2023
Day 15 - Germination
I looked in on them this morning, 3 and 4 look like they are doing well and recovering nicely. Number 1 not so much it has brown spots on the leaves, this very well can still be a side effect of the overwatering but I decide to go ahead and add Nutes earlier than I was planning just incase. I was going to wait until Saturday but I think intervention is necessary now especially after drowning them early on.
I added 1/2 what I am planning on adding for week 1 start. I also think I am going to adjust my chart to add 1/2 2 days after plant from now on. I don't think it would hurt it to have some Nutes to pull from.
.25ml/Gal Calmag = 12.5ml
1ml/gal GH FloraMicro= 50ml
1ml/gal GH FloraGro = 50ml
1ml/gal GH FloraBloom = 50ml
T-2 days until Week 1 start = I will drain the system and start it over on Saturday with Week 1 Nutes.
2/17/2023
Day 16- Germination
I didn't even want to post today after looking in on them this morning, 3 of the 4 are now showing signs of dronwing.. Brown spots on the leaves, the water levels were still too high.. I drained about another inch out of the tanks.. Will see how quick they recover.. I start week 1 tomorrow and will have to ensure my water levels are at least 1" away from the basket on this round.

Processing
Likes
10
Share


@O_ABSOLUTELY
Follow
Once again not much of an update as Iv been busy just a few poorly taken photos a few days into week 2 flower, bud sites are forming nicely, also give her a little trim after I took the photo to get better light penitration.... Took some more pics today (week 2 day 6) flower, not the best of pics but can only work with what I have unfortunatel. Give this girl a drink yesterday an think I over done it as she was looking sad few hours after watering, she seems to have bounced back nicely tho:) she looks light green almost yellow in colour around the flowers any idea what it could be? Always open to tips :)

Likes
105
Share


@Green_Friends_Inc
Follow
Commencing Week 14 - 6th week of flowering - Day 92 from germination - Day 42 of 12/12 on January 23rd
D.98/48 wooooooooooooooooh this Garden is super stinky right now in a good way 👃💪👍👌👏😁
The colors are changing up beautifully signaling the end of life and the beginning of a whole new level of appreciation for these beautiful flowers 💚 - 💛🧡💜❤️
I'm currently under the impression that hydroponics can speed up production, (in my experience with organic growing growth is a little slower and as well as the ripening / muturation rate) so I'm may even be able to harvest a majority of this a few days early. There is also a few tricks I might employ in order to speed this process up. It's fine by me either way I can wait so we'll see 😁
So far this has been my first successful indoor DWC grow in quite some time and I am very patiently yet very anxiously awaiting the time when I can enjoy the fruits of my labor.
at this point as long as I don't mess anything up it should be smooth sailing right up to the very end which is now what I am looking forward to the most coming up: the harvest and smoke report
To all the breeders so I put in the hard work for for me and allowed me to grow their strains thank you!
To all the fellow growers and enthusiast who have been paying attention and chiming in from time to time I especially appreciate you and thank you for your patience in dealing with my late updates. I promise my smoke report will be incredibly thorough and make up for your patience throughout the recording of this journal.
As usual if anyone has any questions about any specific techniques I use or why or nutrient lines or strain related to this grow information please feel free to ask, comment, etc


Likes
15
Share


@Colo420
Follow
19/12 Ayer se regaron con solución nutritiva pensando en el ultimo mes de floración y considerando su respectivo tiempo de lavado.

Processing
Likes
11
Share


@Sgtoso
Follow
Finished transplanting the girls earlier this week. Based on the stretch from the mother plants I can get these clones roughly 36" tall (from the floor in a 5 gallon pot) before flipping to flower. So I can pretty much double these in height to maximise the final yield. We'll be on cruise control here for the next 2-3 weeks before transplanting up to 5 gallon pots.Then I'll have them in veg for another week after transplant so the roots will expand. By this time I should also have a pretty good idea how long they'll take to flower based on my information from the mother plants.
