
Likes
Comments
Share

@AKGorillaGrow
Follow
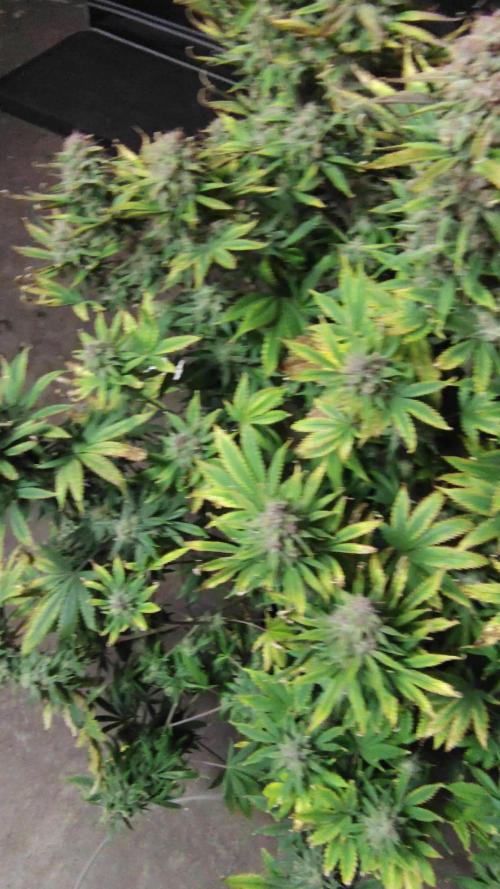
Well it is time to see what all my work will produce dry. 10 days in dry room then into the mason jars with a vivi cure can't wait. This grow I changed a lot from my water source from fox Alaska natural water to RO. Man was this a challenge. Not a single person I watched said anything about how unstable it is. To some research and problem solving to figure out how to stabilize it. Well if your wondering I added air to my AC infinity self wicking basin and set a timer to run 5 minutes on and 10 minutes off. I also went constant feed after week three. Will need to do some adjustments but it seems to be viable. More to come. See you next post


Likes
34
Share


@ScotlandHaze
Follow
Hopefully she continues to fatten up! Can't wait to see the final result but still a fair bit to go.

Likes
15
Share


@Geili_Seili_fireinfireout
Follow
Spargeln extrem!!
Sicher 3 mal so groß wenn fertig. Als beim start


Likes
7
Share


@Squaregrouper
Follow
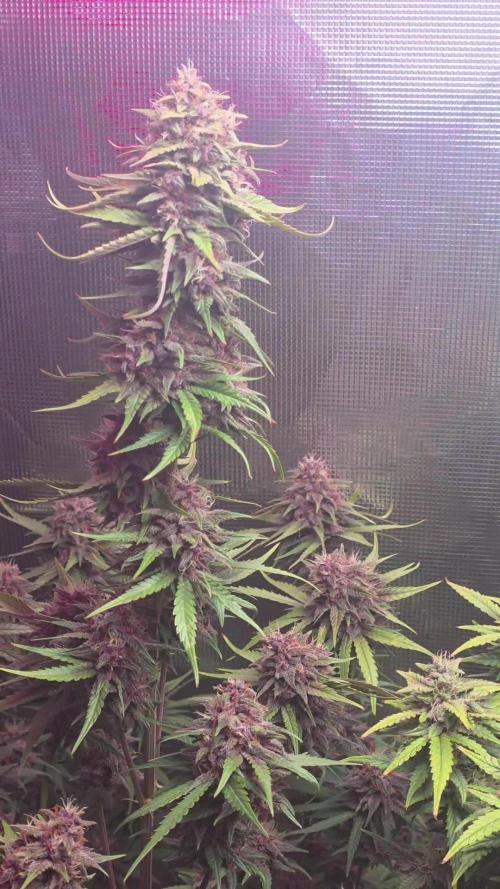
Beautiful plant mold resistant keeps on stretching will have nice long colas😋


Likes
16
Share


@UnkleSkunk
Follow
continua il training
devo dire che sono un po' arrugginito (non piu bravo come una volta) cmq il tutto va al meglio
la cima apicale risulta un po' piu alta del resto ma ci puo stare anche perche, come si vede, tutte le cime sono ben illuminate
problemi di fertilizzazione quasi nessuno a differenza delle altre che hanno sofferto,come al solito,di carenza di calcio e magnesio
il profumo si fa sentire...non vedo l'ora di vederla in fioritura piena
cosa ho fatto questa settimana:
fertirrigazione ogni 2 giorni perche ho aumentato le dimensioni del vaso e le radici devono ancora espandersi anche se escono gia dai fori in basso...
nelle prossime settimane la fertirrigazione sara' giornaliera
aggiustamenti al LST con rimozione delle foglie piu basse e qualche rametto esterno


Likes
42
Share


@Gabarram
Follow
Transplant is very close, in a few days she'll be resting in a 10 gal fabric pot !
Unfortunately, a glitch in the page erased all the comments I have been recording here during the past days :(
This is Day 44 (24/10/2019) and she looks well recovered from the very many toppings yesterday.
Day 45 (25/10/2019) I inserted the plant's small plastic pot into the coco/perlite mix of the big pot to create a niche that fits perfectly for the rootball when I remove the plastic pot tomorrow; spraying the niche with fertilizer solution and root excelurator may help. I hope she'll never realise she has been transplanted. The run off EC from the big pot is 1000 uS/cm and pH about 5.8.
I had to perform some operations using tape because the stem near the tip snapped and below the crack, I saw lacerations caused by the twist tie, those need to be fixed right now.
Day 46 She's transplanted and the scrog net set up. I'd say that now the journey begins.
Day 47 I fertigated by 5.30 am because I had to spend all day working and on Day 48 back to normal, morning fertigation and a little supercropping. The plant has recovered fully from transplant (if she has been ever stressed during the procedure). From now on I'll be fertigating once a day with a liter and a half fertig solution to get a 20-30% run-off. Also, I fertigate other vegging and blooming plants with the effluents I collect.
Likes
10
Share


@Jbcultivates
Follow
First week of flower has been great! They’re stretching very nicely, I backed the nutrients down a little bit this week because I saw some leafs curling in when adding some bloom nutrients. But all is well. My critical +2.0 in soil is growing very well and keeping up with the canopy, the Alaskan Purple isn’t quite stretching as much.

Likes
6
Share

@Dottgreenthumb
Follow
Ho annaffiato con il cannaflush fino ad ottenere uno scolo di 2 litri circa ad un ec di 0.5 adesso continuerò ad annaffiare solo con acqua ancora una settimana i colori sono sempre piu vivaci e le foglie vanno ingiallendo la i tricomi sono 80 lattiginoso colora bianco latte aspetterò fin quando ci saranno piu ambrati per il raccolto


Likes
19
Share


@Canna_Enthusiast
Follow
As expected the signs of deficiency started to dissappear once the roots were formed
D19: topped #1
D21: did some cleaning of the roots of #1
D22: topped #2 and switched the light to 20/4

Likes
8
Share


@AERO_Grower
Follow
2° Semana- Aeroponía - Ligera mejoría de las plantas, el daño de la primera semana aún sigue afectando, sin embargo ya comienzan a tomar forma. Se mantienen las condiciones de cultivo. Los dos videos son de la misma semana pero en distintas etapas.
---------------------------------------------------------------------------------------------------------------------------------------------------------------------------------------------------------------------
2° Week- Aeroponics - Slight improvement of the plants, the damage of the first week is still affecting, however they are beginning to take shape. The two videos are from the same week but in different stages.


Likes
16
Share


@3lementa1
Follow
I saw some white dots and I was worried there was some kind of infestation. The grow area wasn't really isolated from the rest of the house so I think it was just dirt but I wanted to be safe so I sprayed then with insecticidal soap and rinsed them off in the tub.

Likes
12
Share


@ZzTooRightOGzZ
Follow
She looks so good 🔥🔥🔥🔥
Gave her 5ml of micro boost from living Soils.
Likes
3
Share


@ghost8782
Follow
thanks for the comments guys ! im switching to 20 hour of light tomorrow
Likes
12
Share


@medicalcannabelfast
Follow
I had a few problems with these girls at the start , well truth be told they had a few problems with me ,
But they have come on great despite my over feeding ,the many bud sights are thick and covered in bud sights
These two girls look similar and smell amazing, I think we are extremely close to harvest .