Likes
Comments
Share
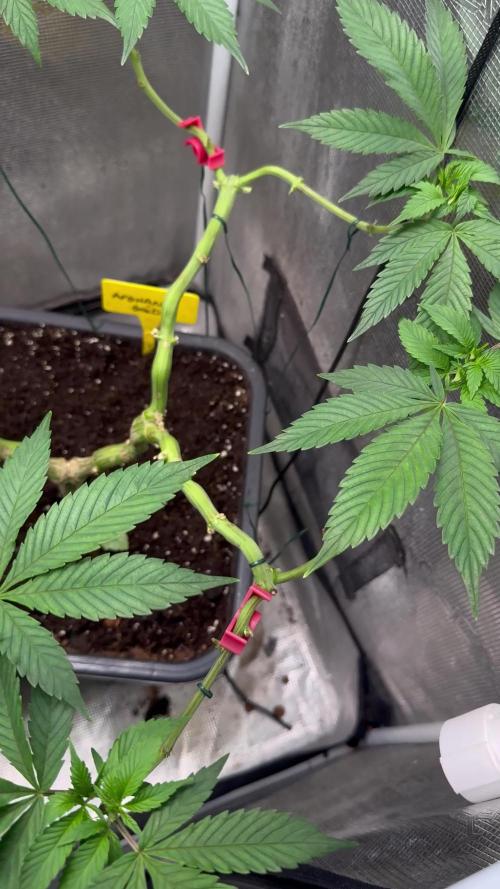
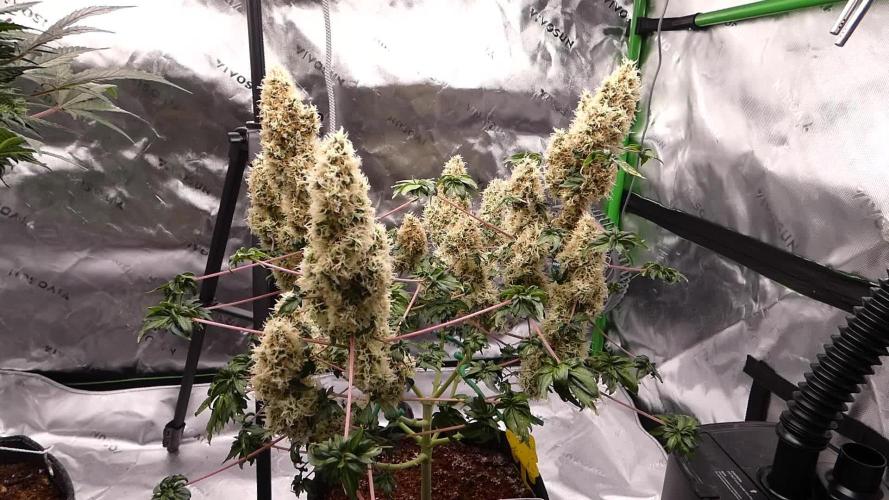
This week I topped each main cola at the 3rd node as usual and performed a selective defoliation to improve light penetration and airflow. From now on, I won’t be doing any more apical cuts. In a few days, I plan to introduce a scrog net to start guiding the branches and prepare for an even canopy 🌿💪
Likes
12
Share
The 3rd and final girl has been trimmed, weighed and placed into curing jars! She added another 78grams making the total come to 219grams! I'm fairly happy with the result of my first grow! Id like to thank the community here on growdiaries. Without the hours I've spent looking through diaries, getting ideas, and learning, I've found this site invaluable! I hope my fellow growers keep on taking pics and sharing their experiences! Being my first grow and having to deal with manitoba flood humidity during late flower i believe i ended up with a decent harvest sitting in my jars. I really look forward to growing another photo strain in the future and perfecting my results but I think I'll be doing a run of autos first so I'll be back 😎😎 Post cure edit: These frosty buds matured into a dream to smoke. They really kick your ass and leave you breathless in a nice indica daze. Would not recommend for medical use for anyone with lung issues or super old smokers... but if you got some young lungs and wanna get fucked up, some good old OG kush will get it done boy! Happy growing if you check this strain out! I really would like to thank Quebec Cannabis Seeds for giving out such quality freebie photo seeds. All germed, all were female! Hope you have the same luck!
Likes
7
Share
Momentan fokussiert sich die Naughty Dawg vollständig auf die Endreife ihrer Fruchtstände. Die Triebspitzen sind mittlerweile so schwer, dass sie ohne mechanische Hilfe kaum noch aufrecht stehen würden. Ein Blick auf die Details zeigt eine beeindruckende Harzentwicklung: Die Trichome überziehen die Kelchblätter in einer dichten, klebrigen Schicht, während die Buds stetig an Umfang gewinnen. Das tiefe Chlorophyll-Grün des Blattwerks bleibt stabil und versorgt die schweren Köpfe optimal. Geruchlich wird es jetzt richtig ernst – die scharfen Gas-Noten paaren sich mit einem schweren Moschus-Aroma zu einem intensiven Bouquet. Es ist faszinierend zu sehen, wie dieser unbändige Teil meines Gartens nun die Zielgerade ansteuert.
Likes
4
Share
Growth is picking up. EC is at 2.9 with big bud as this is with shared res.
Processing
Likes
1
Share
@Andres
Follow
Let's hope it is. Female. and spring is coming and goodbye cloudy days...
Likes
14
Share
@Naujas
Follow
She's super, she's just bursting with energy :) although it's a bit chilly in my grow tent right now, it doesn't cause her any problems :)!!!
Likes
22
Share
Day 37: Watered each plant with 0.8L with nuts 1516 ppm, 3221 us/cm, 3.2 EC Still giving sensi grow to the gorilla cookies Day 40: Watered each plant with 0.8L with nuts 1594 ppm, 3391 us/cm, 3.3 EC Still giving sensi grow to the gorilla cookies Did some defoliation
Likes
32
Share
@BudVision
Follow
Hi Growers, Midweek defoliation of the lower growth was done to improve airflow and direct energy to the upper canopy. The plants handled it well, so two days ago I flipped them to 12/12. ——————————————————————————— V polovině týdne proběhla defoliace spodního patra pro lepší cirkulaci vzduchu a nasměrování energie do horní části. Vše zvládly dobře, tak jsem je před dvěma dny přepnul na 12/12. Peace and happy growing ✌️
Processing
Likes
15
Share
Buenos días familia, increíble, sin palabras con esta variedad, lástima la lie y perdimos una a principio, pero estas 2 crazy cookies crecen una locura. Ph controlado en 6,5 y una humedad por encima de 40% así que todo fenómeno. Una cepa bastante fácil en sus primeras semanas. Veremos próximamente como se forman nuestras flores familia
Likes
6
Share
Semana de transición entre el abono para el periodo vegetativo (Bio Vega) y el abono que utilizaremos durante el periodo de floración (Bio Flores). El primero más rico en nitrógeno y el segundo, en fósforo, magnesio y potasio. Mezclo Bio Rhizotonic + Bio Vega + Bio Flores y riego con 50 litros de agua, todo el cultivo... Alterno riegos cada tres días, unos con abono y otros con agua. La próxima semana, elimináremos Bio Vega.
Likes
209
Share
Day 66 for the 54 plant grow. 42 different strains of photoperiods and 12 different autoflower strains in the: 8X8 GROW TENT WITH THE NEW          FC-E6500, FC4800 AND TSW2000 and green buzz all organic/vegan fertilizers🤘 The girls are loving their MARS MANSION and everything is doing good and looking nice and getting bigger👍 lots of hairs clumping up now and some are already getting frosty. MARS HYDRO ALWAYS GETS EM FROSTY👍.I AM NEVER DISAPPOINTED With how awesome these lights are🤘. KEEP KILLING IT MARS🤘👏👏 BREEDERS AND SEEDS: DIVINE SEEDS: MAZAR, OPIUM, WHITE WIDOW, OG KUSH, PABLO ESCOBAR, DIVINE INDICA. AUTO WHITE WIDOW AUTO PABLO ESCOBAR AUTO WHITE RUSSIAN AUTO FRACTAL AUTO MONTREAL AUTO OPIUM AUTO KABUL AUTO MAZAR. WEEDSEED EXPRESS: GREEN CRACK, GHOST TRAIN HAZE, LITHIUM OG, CHEESE. DOCTORS CHOICE: DC KUSH, AUTO NIAGARA, AUTO ROCK MACHINE. EXOTIC SEEDS: HIPPIE BERRY, MALASANA GELATO, EXOTIC ANIMAL. GENE/MEME SEEDS: BLACK HELL. ORIGINAL SENSIBLE SEEDS: PURPLE PUNCH COOKIES, WEDDING CAKE, PURE KUSH, GORILLA COOKIES. SWEET SEEDS: BLACK JACK, GORILLA GIRL, SWEET ZKITTLES. EMERALD TRIANGLE SEEDS: GORILLA GLUE, MASTODON KUSH. SEEDSMAN SEEDS: BLACK SUGAR, PEYOTE FORUM, PEYOTE WIFI, BADAZZ COOKIES OG, PURPLE GHOST CANDY, STRAWBERRY BANANA GRAPE, L.A. PEYOTE KUSH, PEYOTE WIFI CBD, FUEL DOG, CRITICAL PURPLE KUSH. AMSTERDAM MARIJUANA SEEDS: GIRL SCOUT COOKIES EXTREME, GREEN CRACK. QUEBEC CANNABIS SEEDS: BRUCE BANNER, GREEN CRACK, QUEBEC CBD 20:1. I 💚 GROWING MARIJUANA: SKYWALKER OG, BANANA KUSH, BLUEBERRY CBD. FOR EVERYTHING MARS HYDRO VISIT: www.mars-hydro.com www.marshydroled.ca PROMO CODE: rocknroll VISIT THE ALIEXPRESS STORE: @marshydro_aliexpress2 Instagram: @marshydropenny https://youtube.com/channel/UChU5ZWwNi-DvnO3oWVU3ceA https://greenbuzzliquids.com/ #greenbuzzliquids @GreenBuzzLiquids https://greenbuzzliquids.com/en/shop/ PROMO CODE: rocknroll https://www.youtube.com/watch?v=8hEqyS1jPpI https://growdiaries.com/diaries/112437-grow-journal-by-rock-n-roll-randy/week/593118 Thanks for taking the time to read and check out my shit🤜🤛 FC-E6500 LED GROW LIGHT: FC-E6500 grow light with 3978pcs OSRAM BridgeLux Diodes & Moso Driver, market-leading PPF 2.7 µmol/J, Max 2.5g yield/watt with 30% higher Average PPE, more cost-effective when compared to same style type lights. Only consumes 650W, perfectly cover 5x5ft (personal), 4x4ft (commercial) grow space. Innovative Precise Uniform Lighting-Built-in removable bars interval & dimmability enable the exact & dynamic PPFD control over each of the plant growing stages, FC-E6500 detachable bars deliverSuperior Heat Dissipation: Real Aluminum heatsink together with 6 slim profile passive cooled bars (THINNER & LARGER surface) and detachable Meanwell Driver, create less heat. save 50% hydro than other old grow lights! Driver can be mounted remotely on the side of a grow tent/rack or on an adjacent wall to remove heat from grow space. Full Spectrum UV IR LED: With Yield Max spectrum (660nm Osram enhanced Deep Red,2800k-5000k,730-740nm IR,380-410nm UV LEDs), Average PPFD the FC-E6500 LED grow lamp enables cultivators to produce BIG FAT Dense Buds, perfect for full-cycle hydroponic, soil, grow tent/grow room. Dimmable Commercial Grow Light: Cost-efficient, easy dimming & daisy chain With a max up to 20 lights, IP65 Waterproof, master light easily controls the rest. Perfect for commercial & home horticulture. FC4800 LED GROW LIGHT: GET THE MAX FROM MARS👍: Welcome one of  the newest members of the Mars Hydro family🤜🤛🤘. The Mars Hydro FC 4800 480W LED Grow Light can accommodate up to a 4' x 4' area for flowering. It has OVER 2000 LED chips consisting of the best selling Samsung LM301B diodes which has a Luminous Efficacy of: 220 lm/W 0.2 W, 3 V mid power, Osram 660nm Diodes, Infrared light and UV LIGHT👍. It boasts the incredible efficiency of 2.8 µmol/J, maximum 2.5gram yield per watt with 30% higher Average PPFD. This High-intensity spectrum is beneficial for plants at all stages - from veg to bloom, and creates Big dense Buds👍. achieve 50% higher yields & quality compared with the old lights! Only consumes 480W for 4x4ft personal grows, and 3x3ft for commerical grow. It comes with a dimmer and daisy chain function with a  maximum of up to 15 lights, the master light controls the rest👍. Wide 6-bar design offers even & wide canopy coverage and can maximizes your grow space. slim 180° FOLDABLE DESIGN... YES I SAID FOLDABLE🤘🤣 , making it compact and easy to install, it's IP65 WATERPROOF and will give you no worries while growing in a humid environment and makes it a flexible high performance commercial grow light for enormous  SUPER FROSTY yields.😛😛😛. MARS GETS EM FROSTY BOYS👍 AWESOME HEAT DISSIPATION: The Low energy consumption FC4800 growing light has 6 passive-cooled bars and an aluminum heat-sink a removable driver  you can upgrade later or have it outside your tent. with zero noise  you can save up to 50% in your electricity bill compared to HID's or HPS lights! It also has a removable driver so you can upgrade it in the future or have it outside your grow space for better heat control in your growroom👍 UPGRADED FULL SPECTRUM: Yield Max Spectrum with enhanced red (Top-Bin Samsung 3000k-5000knm, Osram 660nm Deep Red), speed up blooming & fruiting, perfectly suited for full-cycle growing. The FC4800 LED grow lamp was born for Big Buds, perfect for commercial, grow tent, grow room, hydroponics, and all soil grows.👍 THE BEST SAMSUNG DIODES: THE FC4800 has Top Bin genuine Samsung Osram Diodes, combined with remarkable 2.8 µmol/J Efficacy, 30% higher Average PPFD, 50% less energy consumption, to maximize your yields. They give you a TRUSTED 3 years warranty 100% Satisfactory guaranteed!!! TSW2000 LED GROW LIGHT: INCREASE YIELD AND CROP QUALITY WITH MARS HYDRO LED GROW LIGHTS: NEWEST SMD LED technology provides the highest PAR/LUMEN output (1122umol@18") and can make you get 30% higher yield compared to OLD blurple led lights.  Max 2.5g yield per wattage and achieve maximum quality and quantity, much better than traditional HPS grow systems LOW ENERGY CONSUMPTION LED GROW LIGHT: Consuming only 300W true output with 684 LEDS! It saves up to 50% energy than other led grow lights. Perfect for 3.5x3.5ft bloom stage, 4x4ft veg stage. Over 90% light energy can be absorbed by plants, it will have higher intensity in a MARS HYDRO grow tent with diamond design mylar, or by crossing over using multiple TSW2000 HIGH EFFICIENCY FULL SPECTRUM INDOOR GROW: 3000K 5000K and IR 660nm 760nm RED, makes it close to natural light, highly engineered to provide improved growing performance for plants at all stages of growing, rapid plant response from seed to flower; Uniform and wide-beam light distribution for your plant's optimal growth 8x8 GROW TENT: The MARS HYDRO 8x8 Grow Tent interior is made of a unique diamond design mylar which is highly reflective. (Other companies mylar and reflective rate is as low as 50%, and it won't provide efficient light. They use thick 1680D oxford canvas, and being double stitched, it is tear proof and perfect for locking in the light. Their grow tent keeps 100% of the light inside the tent and helps your plants absorb more light. EXTRA-THICK material means No light leaks or rips at all.👍 Strong Stable metal corner adapters and poles are the trustful supporters of the tent. It's very sturdy, neither rusting or paint flaking off. quick and easy tool-free setup. They use heavy-duty metal zippers, with double layer black lining, by far the best on the market which creates a light-proof seal. The Easy observation windows are made by double layers of cloth. Observe the growing conditions of your plants without opening the tent and avoid disturbing your plants. The observation windows also serves to dissipate heat and ventilate the air. The tent includes 2 removable waterproof floor trays to hold soil and water. The removable tray can be taken out to wash easily. They guarantee the grow tents are easy to install even if you've never done something like this before. Clear Instructions and no tools needed! They also offer 30-day unconditional refunds for quality problems. Just contact their friendly 24 hours customer service 👍  
Likes
2
Share
@Wazowskid
Follow
Las plantas van creciendo estupendamente, de momento no les he dado ningún tipo de fertilizante. He aplicado LST.
Likes
59
Share
She is vegging well under the 600w, will be topping and training her in the next day or so, i'll give her a water and let her settle in before stressing her too much with the lst. 23/10 Topped, it was hard to do on this lovely lady but she will get too tall for my tent so i had to do it. She seemed to recover well after the topping, so all good so far. 24/10 Sprayed her with Plant Magic Evolution last night, lights out folia spray. Usually once a week in veg. Watch me Cloning in the video clip. https://en.wikipedia.org/wiki/Acapulco_Gold 👈 velly interesting.
Likes
44
Share
Hello fellow growers! 🌱 Despite a few bumps along the way, I'm thrilled to share that my contest journey is officially underway. After some delivery hiccups with the controller, the third attempt was the charm – it finally made it to my doorstep! 🚚💨 The initial excitement hit a snag when I faced issues connecting the controller. 🤔 Thankfully, the fantastic support team guided me through the troubleshooting process, and voila! 🛠️ My controller is now up and running smoothly. As I eagerly await the next stages, I haven't ventured into using the light adapter just yet. Stay tuned for updates on my growing adventure! 🌿
Likes
3
Share
Quarta settimana di fioritura anche queste runz layer cake sta venendo very strong 😂🙏💪
Processing
Likes
7
Share
@x_grower
Follow
Last week I neglected the fertigation beyond the low humidity all that delayed the first topping and leaf burned the most thirsty girls, by the end of the week I had already recovered them and succed topping, they are looking very healthy.
Likes
27
Share
1/20/2023- So much to do pre grow and over the next 16 days, absolute first order of business is that I have to take down my current Grow---TIMBER-- Then I have a list of things I have to get done in order to be ready to start this grow 1 Feb. With that said T - 2 days until start 48 hour Flush T - 2 days until Start 48 hours of Light T - 4 days until TIMBER!!! Items that need to be done before 1 Feb 2023 1. I need to clean the tent out 2. I need to clean the equipment- Proper Sanitization between grows in Hydro is a must!!! 3. I need to get the hole in the ceiling above my tent repaired- For my last grow I had a deep sink installed in my grow room, to make Hydroponics a little bit easier and have a water source in the same room. The seals on the pipes they were installing broke and leaked through the ceiling causing some damage all the way across my grow room, I was already weeks into my grow and couldn't risk them working above my tent and it would have been very awkward positon for them to be working in as well, so have to get this done quickly between chop and germination. 4. I have to install my new light- I was using a Vivosun 4000 and for this grow I am switching up to a Spider-farmer SF 7000. 1/20/23- For this upcoming grow I am working with M/F photo seeds so I ordered 4 Sex determination kits. I recieved my my 4 Sex determination testing kits from Rimrock Analytics today. I will be using these to test my plants at week 2 of Veg so that when/if I take clones I know I am taking them off females. As well as I don't want to accidently pollinate my tent during this grow I am looking for big beautiful buds not seeded buds. :-) 1/24/2023- Harvest of current grow- Started at 2:00pm and finshed wet trim and firt batch into the freeze dryer. 1/25/2023- Next batch into the freeze dryer and cleaning all my equipment for this Grow. T-1 Day until the workers are supposed to be here to fix the hole in the Grow Room. T-3 days until I instll my new Gorilla Grow Tent and my New Light Spider Farmer SE-7000 for this grow. T-7 Days until Start of Germination 1/26/2023- Harvest is done ran through the Freeze dryer and dry tim completed. 1/27/2023- Grow Room repairs completed. Hole is gone Letting the paint dry before I install the new tent. T-2 days until Install the New Gorilla Grow tent and the new Light T-3 days until I put the hydro equipment in the new tent T-5 days until Germination 1/29/2023- Day 0- Final Pre Germination activities Germination Start T-3 days The paint on the ceiling was dry and it was time to finish prepping for Germination. I got the following items knocked off my list. New 4X4 Gorilla Grow Tent is up and ready New Spider Farmer SE-7000 Light is installed- Thanks Moony Grows for the suggestion and for the Code that got me some money off and free shipping (Moonygrows)!! I turned the lights all the way up to max and set the timer to 18/6 0600-0000. I will keep an eye on the temperature and humidity without my plants and see how hot it gets with the new light. I put my Hydro system back together and put in 40 gallons of water into it, time to monitor for leaks the next few days. I Setup my cloning machine for Germination Days 3-11 1/30/2023 let me break down the situation, ROOM in the TENT.. Enough said.. No really I tried putting my exhaust system up in the new tent with my new light, The light is so big corner to corner that it really didn't give me enough room for the lights be be raised, with the exahust hanging the buckets my plants are Starting in are 2 and 1/2 feet off the ground, great for plenty of room for roots but not so great for upwards space for the plant to grow. In a 6' 11 tent with the exauhst in side and hanging that only gave me a little over 4 feet of grow room to play with. My last grow if you saw my diary, anyone could tell I was struggling to keep the buds off the lights. No good, Since space was such an issue I was running my carbon filter inside on the ground but It really needed to be up sucking the heat out not shooting the cool out. With that setup I was sucking air through the filter and pushing it out the tent at a bottom exhaust hole cold out. Wasn't doing me any good for my heat. I was hitting temps of up to 85 degrees. I bought a portable AC unit and have been running it in the grow room to try and keep temps below 85 and I have had to lower the power on my lights during grow also not ideal.. With that said a friend of mine MoonyGrows (Check out his diary) took the time to look at my issue send me a picture of my grow tent setup with detailed instructions on how to suck the air out from the top but putting my filter and fan on top of my tent so no room issue and I am sucking the air out from the top where the heat is instead of pushing the air out from the bottom where the cool is... THANK YOU MoonyGrows For taking the time to help me get this straightened out.. Now I have room and I have the exhausts working right and now my temps with everything at 100% are topping out at 80 this dropped the temp by 5 + degrees at 100% max. T-2 days until Start of Germination Prepped my seed tray with humidity dome Prepped my Rapid Rooter plugs. I Used RO water, and I added a few drops of Hydrogen peroxide to Oxygenate the water. I then PH balanced between 5.7-6.0 the same that they will be getting in the Cloning Machine and when they get to thier final grow pod. I perfere the 5.8x range and I hit 5.84 for these rapid rooters. If you want to see a complete video on the process HowWeedGrow has an amzing video that shows step by step how to do it and explains it better than I ever could including how to plant the seeds. Which I will cover when I get to that step on Wed. https://www.howweedgrow.com/how-germinate-weed-seeds-cannabis-rapid-rooters/ 1/31/2023 T-1 day until Germination Start All set and ready have my Rapid Rooter plugs ready to go have my seeds out.. Have my seed tray warming up tonight. Tomorrow morning right into the Rapid Rooter then strait into the tray. I will spray the dome to start the humidity in there. 2/1/2023 Germination Day!! Let the games begin! 0600am Put the seeds into the Root Riots. And then put the seeded Root Riots into their first home the Seed tray. I have them under the light 24/7. Sprayed the dome 7:30pm Sprayed the Dome to keep humidity going on the dome. 2/2/2023 Day 1 of Germination Sprayed the Dome in the morning Sprayed the Dome in the evening 2/3/2023 Day 2 of Germination Roots are starting to come out the bottom of the root riot plugs and the heads are slowly popping out of Number 4 just below the surface. Afternoon- Number 4 has popped up Evening- Number 3 has popped up as well. Happy Dance!! 2/4/2023 Day 3 - Germination Surprise Surprise Surprise- all 4 have now poked their heads up.. Happy day!! 100% Germination succeeded. Now major milestone to track is how many are female and how many are male. I will take look at the roots this afternoon/evening and see if they have enough root to go into the cloning machine for the next 7 days before they go into their Hydro Pods. Day 3 - Germination - Evening.. Roots looked good and they were tall enough to make it into the cloning machine. Now that they are all in the cloning machine I have switched the lighting to veg state 18 on 6 off. 2/5/2023 Day 4 - Germination - Morning All the Ladies (fingers crossed) looking great stretching nicely and look nice and green, Photo synthesis underway.... UPDATE!! After a very interesting POD cast on FSTS by Dr. Bruce Bugsbee from Utah University, I have shifted my lighting to 24 hours on through seedling and then I am going to shift to 20 hours on the rest of Veg. 2/6/2023 Day 5 - Germination While Checking on my conditions inside the new tent last night, I found that the Humidity was down to 39 Percent. I added an AquaOasis Cool Mist Humidifier, the reason I selected this humidifier is that I needed one that could be turned on and off utilizing my Inkbird Humidity Controller IHC200 that I have my Pro Breeze Dehumidifier currently running with. Root structures are starting to get there about 1/4 of an inch. 2/7/2023 Day 6 - Germination Everything seems on track more roots poking out of each today. They are each getting a little taller as well. Checked in the evening and number 3 was drooping the Root riot plug on the bottome was dry and the roots were not in the water yet. I raised the water just enough that the longest root that was sticking out is now hitting the water. 2/8/2023 Day 7 - Germination Everything looked good while checking in on them this morning number 3 is now full up and no droop again. 2/9/2023 Day 8 - Germination T-2 days until Plant into Forever Pods and we start week 1 of Veg .. :-) Surprising thing to me is that number 1 and 2 were later in popping then 3 and 4 but the roots are growing longer in 1 and 2. 2/10/2023 Day 9 - Germination Number 1 and Number 2 are definitely ready for transplant today.. Based on how they were yesterday and where they are today I am hoping by tomorrow 3 and 4 are ready. Today they look to me where 1 and 2 did yesterday.. I really hope 3 and 4 catch up by tomorrow since.. T-1 day until transplant to new/ final home for grow. Need the roots long enough to have some clay down in the basket to keep the root riot out of the water and only roots in the water.. 2/11/2023 Day 10 - Germination Today they got placed in thier forever Home, 7 days from Sprout and 7 days until Week 1 Start. PPM- 180 this is water out of the Tap Temp Water: 70.7 Temp Tent: 77 Humidity: 40% I have a humidifier going 24/7 to try and bring this up.. I also have Humidity Domes on each plant. 2/12/2023 Day 11 - Germination Sprayed the domes, all are looking good.. Nothing much to do at this phase but Keep monitoring the PH level in the system and making sure they have a comfortable home. T-6 days until Week 1 start 2/13/2023 Day 12 - Germination Sprayed the domes, They were looking a little yellow today so I moved the light down to assist. Nothing much to do at this phase but Keep monitoring the PH level in the system and making sure they have a comfortable home. T-5 days until Week 1 start 2/14/2023 Day 13 - Germination Sprayed the domes, They were looking a little Florissant yellow today, with what looks like slight burn on the tips, I talked with a fellow grower and we agreed that It was probably that I was drowning them, Yes you can drown you plants even in Hydro, but only early on.. :-) It usually happens with the water being too high, which soaks not only the roots but the medium (root Riot plug in this case). I lowered the water from touching the bottom of the pot to about 1" away. This will probably take 3-4 days to resolve. I will continue my daily monitoring. T-4 days until Week 1 start 2/15/2023 Day 14 - Germination Sprayed the domes, continue my daily monitoring they look a little darker green instead of lime green now that I lowered the water levels in the system, so I think that I might have resolved the issue but it will take a few days for recovery to happen. T-3 days until Week 1 start 2/16/2023 Day 15 - Germination I looked in on them this morning, 3 and 4 look like they are doing well and recovering nicely. Number 1 not so much it has brown spots on the leaves, this very well can still be a side effect of the overwatering but I decide to go ahead and add Nutes earlier than I was planning just incase. I was going to wait until Saturday but I think intervention is necessary now especially after drowning them early on. I added 1/2 what I am planning on adding for week 1 start. I also think I am going to adjust my chart to add 1/2 2 days after plant from now on. I don't think it would hurt it to have some Nutes to pull from. .25ml/Gal Calmag = 12.5ml 1ml/gal GH FloraMicro= 50ml 1ml/gal GH FloraGro = 50ml 1ml/gal GH FloraBloom = 50ml T-2 days until Week 1 start = I will drain the system and start it over on Saturday with Week 1 Nutes. 2/17/2023 Day 16- Germination I didn't even want to post today after looking in on them this morning, 3 of the 4 are now showing signs of dronwing.. Brown spots on the leaves, the water levels were still too high.. I drained about another inch out of the tanks.. Will see how quick they recover.. I start week 1 tomorrow and will have to ensure my water levels are at least 1" away from the basket on this round.
Likes
45
Share
Likes
14
Share
Did defoliation on all three never done it before not sure did k over do it but they needed the trim I had a lot of fan leaves blocking bud sights Jan23 started to use the self watering pots from acinfinity gallon in each pot with fish shit