The Grow Awards 2026 🏆 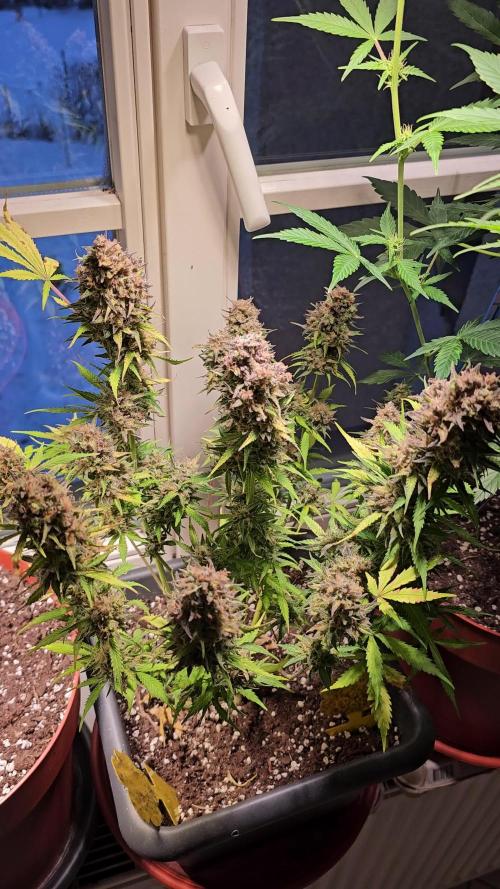


Likes
Comments
Share
@pareto
Follow
Looks so nice... lets see what she brings in weight!
-------------------------------------------------------------------------------------------------------------------------------------------------------------------------------
Set up cost (fixed costs)
-Lamp: 40€
-Timer: 3,5€
-Pot: 4€
-Total fixed costs: 47,5€
Given 5 years (or 15 grows) usage time translates to around 3,17€ per grow in materials.
Variable costs:
-Seed: free (own cross)
-Soil: 4,5€
-Fertilizer: 3,50€
-Power (100 days 18h/day): ~25,92€ (exact figure after harvest)
-Total variable costs: ~33,46€
-Total costs per grow: ~37,09€
Likes
16
Share
@Ultraviolet
Follow
A cutting requires roots to uptake water, we must create an environment so humid the plant can absorb moisture through its one set of leaves, 70+RH% but also a good supply of fresh air and full temperature control. Once I see light lime green it will signify new growth of the plant, I will know it has started to re-root.


Likes
6
Share
@mikheil007
Follow
Vanilla Latte from Huboldt Seed Company seems to be very stron strain! others still going very well...


Processing
Likes
76
Share
@MagnoliaFrost
Follow
SETUP:
-MIGRO 100
-Grow space 60X60X160 (Mammoth PRO 60).
-Grow medium is Gold Label Special Mix Gold edition Premium, Airpot (10l).
_____________________________
14th September - Day 22 (Day 24 "Beer Cup") - I have given them booth some 💧same here... Just been going on feeling now by checking the weight on the pot before and after watering.
Today I'm giving them some nutes for the first time. Because the smaller pot is around 20% of the size as the bigger one. I'm going to try to split 1L (100ml) of water with nutes like this:
Final pot got 800ml water and "Beer Cup" got 200ml of water. (Both got 1ml Sensi Bloom A & 1ml Sensi Bloom B / L)
_____________________________
16th September - Day 24 (Day 26 "Beer Cup") - I have given them booth some 💧
Final pot got 600ml water and "Beer Cup" got 300ml of water. (Both got 1ml Sensi Bloom A & 1ml Sensi Bloom B / L)
_____________________________
19th September - Day 27 (Day 29 "Beer Cup") - I have given them booth some 💧
Final pot got 600ml water and "Beer Cup" got 300ml of water. (Both got 1ml Sensi Bloom A & 1ml Sensi Bloom B / L)
_____________________________
20th September - Day 28 (Day 30 "Beer Cup") - Increased the LED from 3/5 of strength to 4/5 of strength.

Likes
6
Share
@RegadorDeCactus
Follow
#BIGGER:STRONGER:FASTER
#NITROHAZE
#OUTDOORGANG
D70 16Junio. Crecimiento lento aun bajas temperaturas en mi region (5°C nocturnos y 18°C dia) realice un riego foliar y algunas gotas por las bajas temperaturas nocturnas me quemo ciertas hojas.Espero no influya mucho en el crecimiento aun dudo en hacer corte apical en ramas bajas para no ver afectado su crecimiento. Mismas horas de luz diaria pero cambian las de horas directas de sol. Hay dias en las que ah estado nublado y ah sido cero horas. Pero es un cultivo de Invierno y una guerrera en el camino.
Temperatura nocturna : 6°C-90%Humedad-2%precipitaciones.
D72 Comienzo con realizar LST para dar posicion a las ramas bajas y comiencen a estirar, recibir mas luz para su crecimiento.
Aun dudo en cortar apical ramas bajas.Comence a entrar la planta al lavadero porque siento que las noches estan siendo demaciado frias y ya sufrio quemaduras de agua y frio.
D74 El LST ah funcionado de maravilla ya se estiraron las ramas y creo que hoy les realizare otro amarre a unas ramas que ya comenzaron a levantar. La idea es que estiren hacia los lados un poco antes de que levanten.


Likes
8
Share
@n1mbu5
Follow
Ok guys here they are, just over 1 week of life
Fed them and watered today 09.11 400ml per plant
PPM - 397
EC - 0.7
Ph 6
Likes
47
Share
@MadeInGermany
Follow
Info:
Unfortunately, I had to find out that my account is used for fake pages in social media.
I am only active here on growdiaries.
I am not on facebook instagram twitter etc All accounts except this one are fake.
Have fun with the update.
Hey everyone 😀.
A week with a wonderful development is over again 😃.
I decided to stay in the vegi for another 10-14 days and to top it off a few more times.
Then it is put into bloom.
Until then, I wish you all the best 🙏🏻.
You can buy this Strain at :
https://www.exoticseed.eu/
Type:
Herz Og
☝️🏼
Genetics:
Larry OG X Kosher Kush
Indica 60 % / Sativa 40 %
👍
Vega lamp:
2 x Todogrow Led
Quantum Board 100 W
💡
Bloom Lamp :
2 x Todogrow Led
Cxb 3590 COB 3500 K 205W
💡💡☝️🏼
Soil :
Canna Coco Professional +
☝️🏼
Fertilizer:
Green House Powder Feeding
☝️🏼🌱
Water:
Osmosis water mixed with normal water (24 hours stale that the chlorine evaporates) to 0.2 EC. Add Cal / Mag to 0.4 Ec Ph with Organic Ph - to 5.5 - 5.8 .

Likes
16
Share
@Dunk_Junk
Follow
I notice her Ovules are very large in size. Quite unlike any plant I have seen before. I don't know if this is a 'primative' strain but it's quite unusual.
So far: 147g wet
Day 77 - Staggered harvest started. When I see a couple of amber trichomes on a bud I will harvest it and leave the rest.
Day 84 - The other colas are getting there slowly. I don't know if it is the heat stressing her out 30 c in tent. We have a heatwave here right now....
Day 84 - 2.11g dry ground up
Day 89 - 1.72g dry ground up
Day 91 - What is left of her. She looks a mess lol.
Day 94 - Final harvest trimmed up and drying. Final dry total to follow in a few days.
Day 100 - Final weigh up. Well we got 72.46g on the scales today. I never did wet weight after the first harvest so dismiss that. In total I got 74.57g. It is a very small harvest for me but I don't think this plant has the genetics to be a big yielder.000

Likes
11
Share
@SteffenX
Follow
18.10.2024
very humid and little sun on the west side
21.10.2024 day 187
Beautiful sunny day, then powdery mildew discovered and started the 3rd harvest.

Likes
10
Share
@CanarianGrow92
Follow
Week 3 for our ztrawberries from fastbuds 🍁
We removed the 2 lower branches and leaves. We gave some master root this week.
Some of the plants already showed the first preflowers, flowering is starting soon!
We also placed a net above just in case we need to sustain the buds in later flowering


Likes
3
Share
@MindFlowers68
Follow
This week was similar to last week. Rain every other day with intense sun. There were no major changes I made. I did slide my pots over a few feet to try to catch more sunlight. Mainly just been on scouting duty making sure there are no questionable bugs hanging around. A few things seem to take a liking to them but leaving them lone for the most part. One thing I noticed with the autos is that they seemed to adapt a whorled phyllotaxy along with the lemon ak that started with 3 from seed. They got their weekly does of boogie brew, but think I will stop feeding after this week.


Processing
Likes
3
Share
@DivineIndependence
Follow
This week shows a lot of stem growth as well as the presence of some clones! Too excited about how big the girls are getting have a feeling they are going to be getting bigger at a fast rate at this point. I am still keeping them on the same nutrient and light schedule at the moment. I have a lot more pictures and videos this week because lets be honest I am still getting the hang of this thang!

Likes
6
Share
@Magical_Surgeon
Follow
After you found some good sector and clone it you let the mycelium grow and fill almost all the petri dish like I did last week.
So now you're ready to move forward.
Making grain spawn!🍄🍄
For grain you can use Organic Rye Berries, but you can also get away with wheat berries, or brown rice or even corn kernels(which I used myself) !
And you'll need some mason jars or honestly I used some jars that I had home just clean them very well and sterilise before using
Making a grain spawn can be broken down into 6 easy steps.
🍄Hydrate Grain By Soaking
🍄Make Specialized Lids
🍄Simmer, Drain and Dry The Grain
🍄Sterilize
🍄Put your agar in the jar
🍄Colonize
🍄Soak the grain by placing it in a bucket, covering in water, and leaving it for 12 -24 hours. Easy.
🍄Drill 1 hole on top of the lid. Right in the center and cover with a small dab of high temperature silicone sealant, and leave it overnight to dry. And your jars are done. There other diff types for different methods like liquid culture etc. But I'm just going roughly through what Ive done.
🍄The next step is to simmer the grains on the stove. This will thoroughly hydrate the grains, and will soften them to make them easier for the mushroom mycelium to consume.
Cook soaked grain on the stove for about 15 minutes. You don’t want to cook it too long, because eventually all the grain will crack and you’ll get some mushy grain spawn. We don't want that. 🧐After the grains have simmered on a low boil, you’ll need to drain them off. What I did is I drop them in the sink with the drain cover on. The grains will drain over an hour or so, after which you can go ahead and fill your jars.
🍄Once your jars are filled, they need to be sterilised.This kills off all the other nasty contaminants in the grain cover the lids in tinfoil (to prevent water dripping into the lid) and then just pressure sterilise them for about 90 minutes at 15 psi.
🍄After that let them cool down. Get your SAB, wipe down the walls with some alcohol wipes and place the jars inside. And wait untill they will be warm to the touch... not hot and painful 😤patience is key. Bring in your plates that had been stored by you in a dark place. And what u have to do is sterilise your scalpel and just accurately and efficiently decide your mycelium into about 10 pieces and quickly place them in your jar. And complete for every jar u make. You have to be very quick. The more you keep you're jar and your agar plates lids open the more cans they will get contaminated. There certain technics you can see online..
🍄Ones you're done close all your jars lids tight and Jake your jar so the mycelium pieces will mix around the jar and place them in the dark place to colonize. And just keep waiting... 😅 Untill the mycelium will conquer your grain. Keep your eyes on the jars, any weird smells or colour during the waiting time.. because that would mean you got a contamination going on. Oh yeah and when about 55% of your jar is filled with mycilium shake the sh*t out of it so it will break the mycilium inside and make spread more faster.
Likes
Comments
Share
@McDavis
Follow
Esta semana una de las plantas presentó rápidamente un amarilleo de sus hojas debido a unos ácaros de raíz que se le estaban pegando y un estrés de golpe, eso hizo estresar la planta y no quise que el problema llegara hasta los cogollos, le faltaba más o menos 1 semana, pero están olorosos y resinosos, aún faltan 2 plantas en el armario esas van por una 12 semana, y son los cogollos con mas tricomas de la cosecha 😮💨
Likes
6
Share
@RealGrowDiary
Follow
Day 63
Most pistils have darkened and started to recede, while a few fresh white ones are still appearing. Aroma has intensified and is now much more pronounced, Leaves are beginning to show slight fading, which seems normal at this stage.
Some Temperature isssues are makibg the bud purple .The plant is focusing energy on flower maturation.

Likes
7
Share
@WakeAndBake
Follow
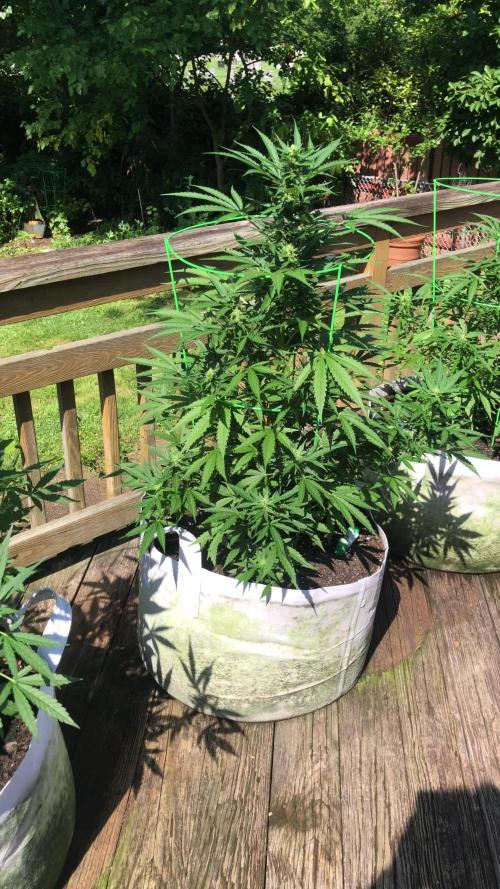
Had no time for them through the last week but they are still alive and growing massive heads 🥦🥦🥦


Likes
4
Share
@Kelly420
Follow
Okay. Sorry for the slacking where I slacked here. But here we go. I have one photo when I transplanted to my 8 bucket system. They were very mistreated, left in a cloner with plain water for months. They looked haggard. But after a couple months of tlc. I vegged them back to perfect health and flipped to flower. Not going through the weeks of vegging because honestly it’s the auto pilot part of the grow. I selected this mozzarella out of 3 moms. Now for my first harvest replicated. I started day 0 flower Jan 19th of 23. They were about 12 weeks of veg and stretching to get these where I wanted for my scrog. Mozzarella stays very short. So turning my lights down and spacing far away was necessary to stretch. She is a heavy feeder and rewarded. tolerated ppms of 1400 in the past. No Co2 used. Yet. My lights draw 800w each 2 in a 5x10 tent.
