


Likes
Comments
Share

@DogDoctorOfficial
Follow
Week 15 From Seed | Lemon Cherry Gelato 🍋🍒 | Drying, Trimming & Curing Begins
Well…
Here we are again 😄
Another chapter of this Lemon Cherry Gelato run officially closes, and honestly, this update feels like the moment where the entire grow finally becomes “real medicine.”
First of all, once again, apologies for dividing the harvest into multiple reports lately. I know the updates have been stretched across several weeks, but honestly… with the amount of documentation, photos, macros, videos, trimming sessions, resin collection, curing observations, and extraction experiments we have been doing lately, trying to compress everything into a single update would almost feel disrespectful to the process itself.
And this run deserves the proper attention.
So for everyone arriving now, quick recap:
These Lemon Cherry Gelato girls were grown entirely under 12/12 from seed.
No traditional vegetative phase.
No massive training sessions.
No giant bush shaping.
Just letting the genetics express themselves naturally while documenting the process from beginning to end.
And what these girls became honestly surprised me.
Compact plants.
Thick trunks.
Heavy branches.
Dense stacking.
Ridiculous resin production.
And some seriously loud terpene expression.
The previous report reflected harvest itself:
- the fade,
- the structure,
- broken branches,
- resin-covered fingers,
- hanging flowers,
- drying environment,
- and all the beautiful chaos surrounding harvest week.
This report becomes the next important stage:
Drying.
Trimming.
Finger hash.
Final flower preparation.
And the beginning of cure.
The girls dried for roughly 10 days under controlled conditions:
- around 18–20°C,
- roughly 60% RH,
- with the first couple of days slightly lower around 45% to help surface moisture leave the flowers safely before stabilizing the room again.
And honestly… the dry came out beautifully.
Dense flowers like these always make growers slightly nervous during drying because chunky buds can trap moisture surprisingly easily. But breaking the plants into branches instead of hanging full plants ended up being absolutely the right decision here.
The branches slowly reached that perfect moment growers wait for:
not snapping aggressively…
not bending softly…
…but that beautiful little “click.”
That tiny sound telling you:
“Okay. It’s time.”
So naturally…
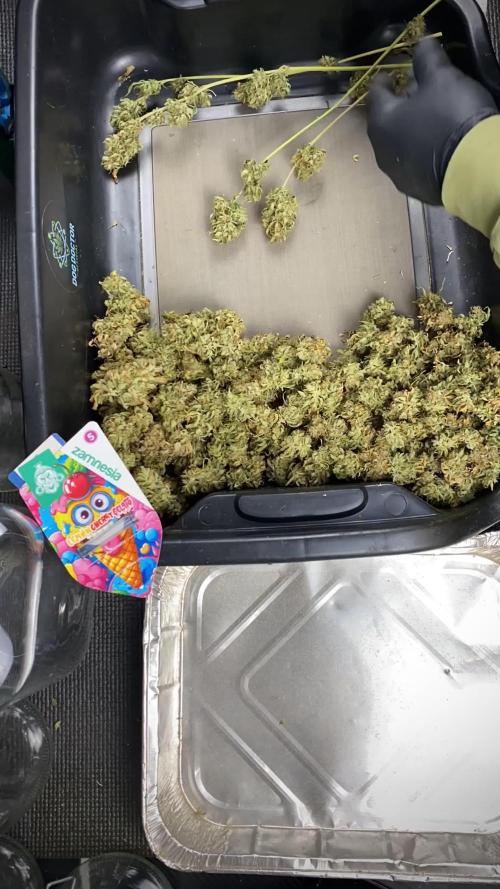
Mr. Baggy joined the trimming session 😄
Studio lights on.
Trim bin ready.
Scissors ready.
Music playing.
Gloves on.
And branch by branch, these girls slowly transformed into jars full of finished medicine.
And honestly?
These plants were absurdly sticky.
Not just frosty visually.
Actually greasy.
The kind of resin that keeps building layer after layer on the gloves until eventually you stop trimming for a moment and realize you accidentally created little hash sculptures on your fingertips again 😄
Which brings us to one of the best parts of this report:
Finger hash.
Or more specifically in this stage:
classic trimming resin collected during dry manicure.
Every session slowly left behind beautiful sticky resin on the gloves and fingers, and instead of wasting it, everything got collected carefully with patience and love.
And wow…
These girls made AMAZING finger hash.
Soft.
Oily.
Extremely workable.
Instantly greasy with just body heat alone.
No aggressive heat needed.
No real pressure needed.
Just the warmth from the hands was enough to start transforming the resin into beautiful little temple balls almost immediately.
That alone already says a lot about resin quality.
We even documented the full process:
- trim collection,
- kief separation,
- resin handling,
- pressing,
- shaping,
- and the final little temple balls.
And honestly, seeing the transformation from loose resin into a perfectly smooth little sphere never gets old. There’s something deeply satisfying and strangely ancient about it.
The final dry numbers honestly made me extremely happy too:
Plant 1:
304.5 grams dry trimmed flower.
Plant 2:
163.5 grams dry trimmed flower.
Total:
468 grams of dry cured manicured medicine.
And for a 12/12-from-seed run?
That’s honestly fantastic.
Especially considering how compact these plants actually were physically.
Small-ish structure…
massive output.
Exactly the kind of run that keeps teaching you not to judge plants purely by height.
The flowers themselves turned out gorgeous:
- dense,
- compact,
- extremely resinous,
- loud aroma,
- beautiful coloration,
- swollen calyxes,
- and surprisingly heavy for their size.
The terpene profile already started evolving beautifully during trimming too.
That loud fresh-harvest sharpness slowly began softening into something deeper and sweeter:
- creamy citrus,
- candy-like fruit,
- gas,
- soft cherry sweetness,
- earthy backend notes,
- and occasional creamy dessert-like moments depending on the jar.
And this is where curing now becomes incredibly important.
Because harvest is not the finish line.
Curing is where flowers slowly begin becoming complete.
For storage and cure, we decided to use both:
- traditional glass jars,
- and Grove Bags.
And honestly, both have their strengths.
Glass jars remain timeless:
simple,
effective,
reliable,
beautiful for long-term observation and burping routines.
Meanwhile Grove Bags bring modern humidity-control technology into the process and honestly make maintaining stable curing conditions dramatically easier when used properly.
The idea is not “one replacing the other.”
It’s more about understanding different tools and seeing how each behaves over time.
And speaking of beautiful details…
Huge thank you to Zamnesia for the gorgeous storage jars with the engraved lid design because honestly… they look incredible 😄
Little details matter.
Especially during cure.
Because curing becomes ritualistic in a strange way:
opening jars,
checking aromas,
observing moisture,
feeling texture changes,
watching flowers slowly mature week after week.
The medicine almost feels alive during this phase.
We also included:
- trimming timelapses,
- resin handling,
- branch breakdowns,
- finger hash photos,
- hanging flower shots,
- studio trimming moments,
- and a bunch of closeups because honestly these girls deserved proper documentation until the very end.
And next week…
Next week becomes the final chapter.
Smoke review.
Full cure review.
Flavor translation from smell to smoke.
Effect profile.
Breakdown texture.
Ash quality.
Terpene evolution.
Final impressions.
And the real question:
How did this Lemon Cherry Gelato actually become as medicine after all this time?
Because now the grow part is mostly over.
What remains is experience.
And honestly…
that’s the most important part.
Huge thank you once again:
- Zamnesia,
- Plagron,
- the LEDs,
- all the gear involved,
- GrowDiaries,
- the community,
- the old followers,
- the silent supporters,
- the curious new visitors,
- and everyone spending even a few minutes following these updates.
And of course…
Thank you Mr. Baggy 😄💙
He survived another trimming session somehow.
See you all in the final chapter 🌱


Likes
Comments
Share
@DogDoctorOfficial
Follow
🌱 Folder 10B | Guava Auto
Week 2 – The Elegant Sister Begins to Stretch
Welcome back to another week of the 8×8 Adventure, where every phenotype receives its own individual diary, allowing us to appreciate the subtle differences that make each plant unique.
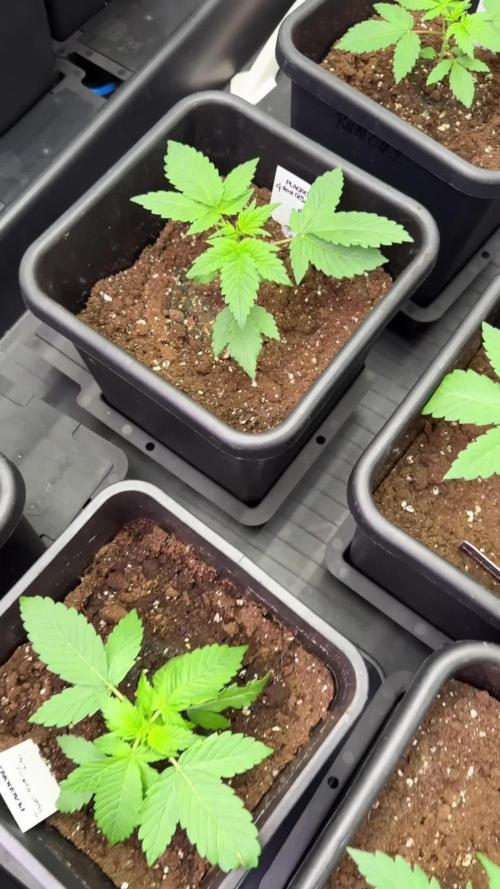
Meet Frosted Guava Auto 10B.
Although she shares exactly the same genetics, growing medium, feeding schedule and environmental conditions as her sister, she has already chosen her own path.
Where Plant A remained exceptionally compact, Plant B immediately showed a little more ambition toward vertical growth.
Not excessive.
Not uncontrolled.
Simply a slightly more open architecture that gives her a graceful appearance while still maintaining excellent structural balance.
This is exactly why pheno hunting is so rewarding.
Even sisters have their own personalities.
⸻
🌿 Growing Conditions
Every plant in this project grows under identical controlled conditions, allowing the genetics—not environmental differences—to shape each phenotype.
Environmental Conditions
* 🌡️ Day Temperature: 27°C
* 🌙 Night Temperature: 25°C
* 💧 Relative Humidity: 55%
* 🌱 Root Zone Temperature: 21°C
* 💦 Nutrient Solution Temperature: 20°C
* ⚡ EC: 1.3
* pH: 6.0
* 💨 CO₂: 666 ppm
* 💡 Light Schedule: 12/12 From Seed
* ? Pot Size: 15 Litres
The consistency inside the grow room continues to provide an ideal environment for comparing every individual phenotype fairly throughout the entire project.
⸻
🌿 Feeding Program
Throughout the week Guava Auto 10B continued receiving the complete Plagron Terra feeding schedule.
Weekly Feeding
* Terra Grow — 1.8 ml/L
* Power Roots — 1 ml/L
* Pure Zym — 1 ml/L
* Sugar Royal — 1 ml/L
* pH Plus — when required
* Lemon Kick — when required
The goal remains to encourage strong root development while supporting healthy vegetative growth before flowering begins to accelerate.
Healthy roots today become heavy flowers tomorrow.
⸻
🌱 Plant Development
Watching these two sisters side by side has been one of the highlights of this week.
From the first few days after transplant it became obvious that Plant B was expressing a different growth pattern.
Her internodal spacing is just a little wider.
The central stem continues extending steadily while producing beautifully symmetrical branches from every node.
She still remains compact compared with many autoflowers, but there is a noticeable elegance to her overall structure.
Rather than forming one dense cluster of leaves, she naturally creates a slightly more open canopy that allows light to penetrate deeper into the plant.
The result is a structure that feels balanced, relaxed and incredibly healthy.
Every photograph taken this week reflects that quiet confidence.
⸻
🌿 Training Progress
As with her sister, this week focused on gentle canopy management rather than aggressive manipulation.
Leaf tucking became part of the daily routine, exposing developing secondary branches and improving airflow throughout the centre of the plant.
A small amount of low-stress training encouraged the side branches to begin catching up with the main stem while preserving the plant’s naturally elegant architecture.
One thing quickly became apparent.
This phenotype almost seems to cooperate with the training.
She opens naturally.
She responds quickly.
She seems eager to build multiple flowering sites without needing much encouragement.
Sometimes a plant simply tells you how she wants to grow.
The best growers know when to listen.
⸻
📸 Behind This Week’s Photos
The photographs beautifully capture the difference between the two Guava sisters.
Early in the week, the camera highlights a strong central leader with perfectly healthy new growth and vibrant colour.
As the days pass, the overhead images reveal a wonderfully symmetrical arrangement of fan leaves, creating an almost star-shaped canopy.
The close-up macro shots show vigorous new shoots emerging confidently from each node, while the side profile demonstrates her slightly taller, more graceful posture compared with Plant A.
She isn’t trying to become oversized.
She’s simply expressing a little more vertical elegance while maintaining excellent balance.
The camera tells that story perfectly.
⸻
🌱 Looking Ahead
Next week should become particularly interesting.
With every new node, Plant B is creating more opportunities for lateral branching while continuing her gentle upward growth.
As low-stress training progresses, I expect those side branches to begin forming a beautifully even canopy capable of supporting numerous flowering sites.
Her slightly longer internodes may ultimately provide excellent light penetration during flower, reducing congestion while still maintaining impressive bud density.
She may not look identical to her sister.
But that’s exactly what makes her special.
Two sisters.
Two personalities.
One incredible genetic line.
⸻
💚 Thank You
Thank you for joining me for another chapter of this incredible journey.
Every week reminds me that growing isn’t about creating identical plants—it’s about discovering the unique personality hidden inside every single seed.
A heartfelt thank you to GrowDiaries for giving growers around the world a place to document, learn, inspire and celebrate this incredible hobby together.
A huge thank you to Plagron for providing the complete Terra nutrient line that continues to support this project with remarkable consistency from seed to harvest.
To the breeders whose dedication makes these genetic expressions possible—thank you for years of passion and hard work. Every phenotype tells its own story, and it’s a privilege to watch those stories unfold.
Finally, thank you to everyone following along.
The growers who share advice.
The newcomers asking their first questions.
The supporters who never miss an update.
The skeptics who keep us thinking.
The silent readers.
The friends made along the way.
Every one of you adds something valuable to this adventure.
The 8×8 Adventure continues…
One phenotype.
One lesson.
One discovery at a time.
Growers Love 🌱💚
Likes
Comments
Share

@cdxxbuds
Follow
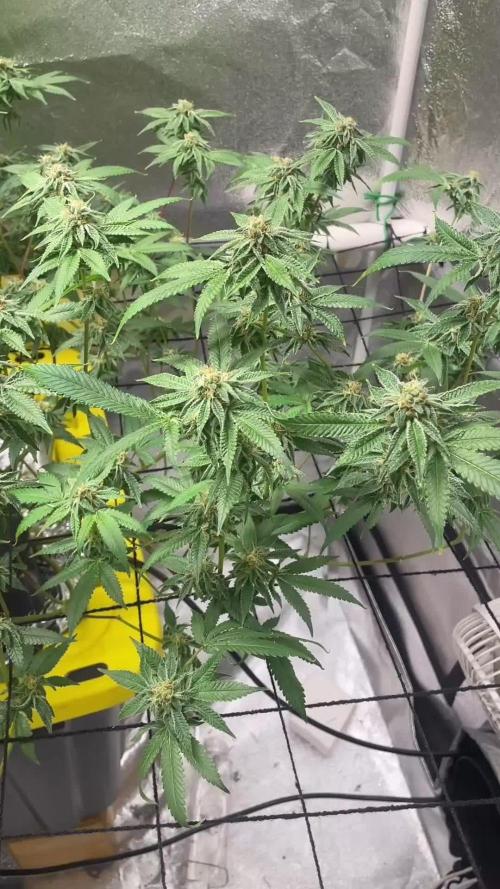
Bulking timex ladies are iced out. Looks like we might have 3 weeks more. Fingers crossed.
Cheers yall thanks fr stopping by


Likes
19
Share


@Naujas
Follow
I think it will be really big :) a few leaves are a little brown, I don't know why, but it's not spreading.:) She's a real lady, she keeps getting taller :) like with high heels:)

Likes
6
Share


@MG2009
Follow
08/13/2019
She cleaned up nicely and ready for flower taking a couple clones this week to preserve this girl I love this plant!

Processing
Likes
2
Share


@Valedor
Follow
Seguimos retirando las fan leaf's que ya no son tan necesarias en todas las nenorras, el sistema de las automáticas continua en el lavado de raíces, el sistema regular continua floreando y madurando, considero que la próxima semana estaremos cosechando la White widow y la mamá mía


Likes
71
Share


@CrazyHorse
Follow
Hello Boys&Girls 😁 😁 😁
I think the comment is unnecessary here. Girls bloom beautifully as you can see. With new and crazy things, I had to put an extra lamp... and I'm proud of it 😅
Have a sunny Sunday, You Lovely Girls Growers
Likes
60
Share


@m0use
Follow
Alright! This week is finally done and this will be the last vegetative growth week for the plants. Switching to flower tonight :D
I have done some defoliation and a bit of lollipopping to the 3 plants, I was noticing the shadows where quite dark on the tent floor and the plants where not crazy tall so they needed to be managed, If I was outdoors I would just LST them some more and not worry about any of it but indoors the airflow is tight and it was needed, cleaning up the undercanopy was none negotiable or some bad things would have happened in flower. Mainly molds or worse WPM. I also removed the string supports I has on the plants when they broke from some LST I did a few weeks ago.
In the stripping down of the plants I removed a lot of lower immature growths and took out some immature branches, I have all these sitting in a glass of water and will clone them out for shits and giggles, I think their is about 15 of them or more, maybe I will go and plant them aorund my neighbourhood in municipal planters. Plus now I can work in the topdressings that will be required in the upcoming weeks to keep these plants happy and healthy. Going to continue amending in some of the bokashi in the feedings as well as worm castings as they give off a nice ammount of microbes for the soil. I wish I had some of my LABs for this grow but I did not make any.
The clones from before are doing fine, just did not take any pics of them.
The butterwort is doing a fantastic job of eating up the gnats. I have some nematodes on hand for when its had its fill as I won't want them getting into the flowers as they ripening.
Big shoutout to Medic Grow for sponsoring the lighting in my tent, They have provided me with 2x Mini Sun 2's in the 240w configuration, They use the v1 growing spectrum that is a all purpose seed to harvest spectrum so their is no hassle of switching it mid grow. If you interested in learning more about Medic Grow products please visit the web link below.
https://medicgrow.com/
https://growdiaries.com/grower/MedicGrowLED


Likes
5
Share


@GODAXE
Follow
2024.09.08 D70
a cold week so far, remember that summer slowly pass by.
As expected the fast berry get a nice purple tone dress, with a lot a trichrome shining like diamond on this late summer cold rain. The 3 top cola gain weight and its became hard to have this lady sit in their bucket, she keep dancing with this fall raising wind.
black berry is not apart, she start smelling really heavy, and is bud coverred...
we are good for another week...maybe two.... untill next time keep growing
Likes
7
Share


@Nikkov
Follow
well, another week goes by and it's growing not like I expected hehehe but that's ok, living and learning, and for now I'll just wait for this cycle to end to start a new one and post it here and I'll tell you right away that I ordered a kit advanced nutrients starter and will test it on the new cycle. =D
Likes
37
Share


@Ganja_Victoria_Aus
Follow
Hopefully another week. I got another house inspection line up. They selling the house. I hove to rent a new house soon. I may have to stop grow😭🧘♂️🏻🙏

Likes
2
Share


@GrowYourMind
Follow
Starting to smell like chocolate 🍫, I'm going for 2 more weeks before chop


Processing
Likes
88
Share


@Fergie
Follow
hey guys so not much happen in last week girls are filling out nicely ,going to repot next week have new 10gallon smart pots coming . still on r/o water with 10ml calmax every gallon . Til next week😀


Likes
Comments
Share


@Chamed33
Follow
Just feed her ph water for the last couples of days I’ll be chopping her down this week due to heat wave in my area ..
wish I could let her go few more days
At this stage she’s releasing nitrogen still