


Likes
Comments
Share

@DogDoctorOfficial
Follow
GMO Cookies Served with Extra Curiosity ?🍪
Week 14 — Harvest Report | Fresh Frozen Experiment
And here we are.
Week 14.
Harvest week.
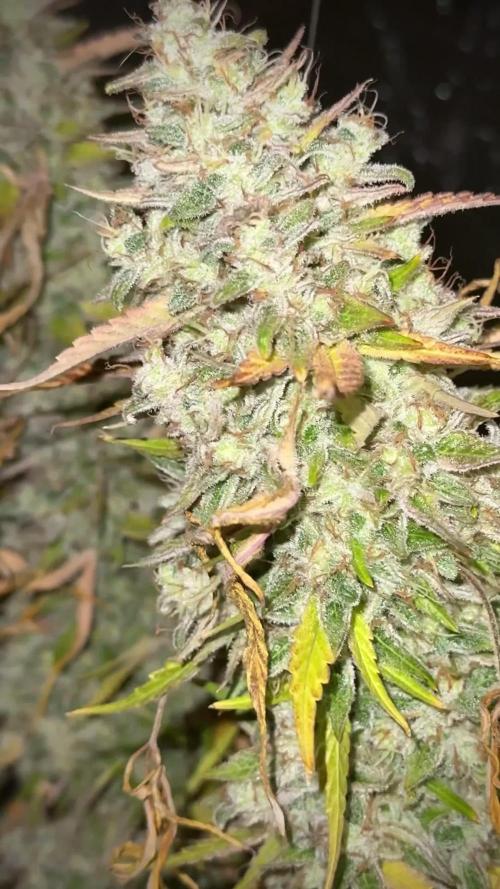
And honestly… the room looked absolutely unreal.
Before we even touched the scissors, before a single branch was cut, before the freezer bags started filling up, there was already this feeling in the room that these girls had become something special.
Massive structures.
Heavy flowers.
Long spears.
Dense tops.
Colors everywhere.
Deep greens.
Fading yellows.
Lime tones.
Hints of gold.
Dark shadows between swollen calyxes.
And then the smell…
Oh man.
The smell.
This is one of those cultivars that genuinely makes the room feel less like a grow room and more like walking into a kitchen where someone is preparing something loud, greasy, savory, and unforgettable. The GMO side of these genetics speaks immediately and unapologetically.
Garlic.
Onion.
Savory funk.
That unmistakable “food terpene” profile that GMO became legendary for.
But underneath all that aggression, there is still sweetness hiding in there too. Cookie dough warmth. Earthiness. Creamy backend notes. A weird balance between offensive and delicious that only certain genetics can truly achieve.
And honestly?
We loved it.
But before diving fully into this week, let’s do what we always do and quickly recap the journey, because by now many people arrive only at the final reports and never see the earlier stages of the diary.
So first of all:
yes… once again we divided the harvest into multiple reports 😄
And honestly, we know it starts becoming a cliché at this point.
But there is simply too much here:
* too many photos,
* too many details,
* too many observations,
* too many experiments,
* too much resin,
* and too much love for the plant itself
to throw everything into one rushed update.
This run deserved time.
From seed until now, this GMO Cookies run was grown under a 12/12 from seed cycle using the F.O.G. LED setup, inside the Mammoth Elite tent environment, with careful environmental management throughout the run. The girls received multiple rounds of LST, selective defoliation, and continuous observation to maintain airflow and light penetration while still allowing the plants to express themselves naturally.
And express themselves they absolutely did.
These plants developed huge vascular systems and incredibly thick stems by the end of flower. Once harvest began and we started cutting branches down, the insides looked almost like miniature tree trunks. Thick water highways running through the center, dense supportive tissue everywhere, strong skeletal structures carrying massive tops from beginning to end.
You could physically feel how much water and energy these plants had been moving daily.
Some stems genuinely felt more like wood than plant tissue.
And that strength translated directly into the flowers themselves:
dense,
heavy,
greasy,
stacked,
and extremely aromatic.
Now here comes the part that will probably make some people cry a little 😄
Because normally, growers harvest and dry most of their flower for smoking… while only freezing smaller amounts for hash washing later.
We did the exact opposite here.
Most of these girls went directly into the freezer.
And yes…
intentionally.
Why?
Because this plant was screaming hash potential from the beginning.
The resin texture,
the greasy leaf rub,
the finger stickiness,
the way trichomes smeared across gloves,
the density of the heads,
the aroma intensity…
everything about this cultivar felt like it was asking to become fresh frozen.
So after removing fan leaves and preparing the flowers carefully, we separated the majority of the buds specifically for freezing.
Not whole plants.
Not stems.
Not unnecessary material.
Just flowers.
Pure bud material prepared for future washing.
Final fresh frozen numbers landed around:
755.5 grams total including bags,
which leaves us somewhere roughly around the 700–730g range of actual fresh frozen flower material once packaging weight is removed.
And honestly…
that is incredibly exciting.
For anyone unfamiliar with fresh frozen:
this means the flowers are frozen immediately after harvest instead of being dried first.
The goal here is preservation.
Fresh frozen material helps preserve volatile terpenes, delicate aromatic compounds, and resin characteristics that can partially disappear during traditional drying and curing.
Later, this material can be processed into:
* ice water hash,
* bubble hash,
* live hash,
* live rosin,
* or other solventless extractions.
And despite some people debating whether water itself should technically count as a “solvent,” the reality is that this process remains one of the cleanest and most beautiful extraction methods in cannabis culture.
Ice.
Water.
Movement.
Separation through resin density.
That’s it.
And based on what we already felt from simply handling these plants?
This could become something truly beautiful later on.
Even during harvest, the resin behavior was already honestly ridiculous.
The gloves became sticky almost immediately.
Fingers started collecting greasy residue after only small amounts of handling.
The scissors became coated quickly.
And the texture of that resin…
dark,
oily,
greasy,
almost greasy-food-like in character,
which feels incredibly fitting for a GMO cultivar.
This is the type of resin that makes hash makers smile instantly.
Now of course, we did not freeze absolutely everything.
We intentionally kept select flowers aside for traditional drying and curing because we want to compare the expressions later:
* cured flower terpene profile,
* versus fresh frozen hash expression,
* versus eventual solventless extraction results.
That comparison itself is part of the experiment.
And honestly, that is one of the beautiful things about growing:
sometimes the harvest is not the end of the project.
Sometimes harvest is simply the beginning of several new ones.
The flowers we kept for drying are currently hanging under controlled conditions while the frozen material quietly waits for its transformation later on.
And yes…
there will absolutely be future reports about the washing process.
About the ice water extraction.
About the resin quality.
About the yields.
About the terpene preservation.
About the final hash itself.
But for now?
This week belongs to the harvest.
To the skeletons.
To the colors.
To the smells.
To the giant branches hanging in silence.
To the freezer bags packed full of greasy flowers.
To the excitement of possibility.
And honestly… to experimentation too.
Because growing is not only about repeating safe formulas forever.
Sometimes it is also about curiosity.
Trying things.
Learning.
Observing.
Comparing.
Taking risks.
Seeing what happens.
And this entire harvest feels driven by exactly that spirit.
We also brought these girls into the studio before harvest because honestly they deserved their final photoshoot.
And wow.
They looked incredible.
Some shots leaned cinematic and dark.
Others focused on vivid greens and flower structure.
Some highlighted the towering spear-like colas.
Others focused on greasy closeups and texture.
And under the studio lights, the resin coverage became even more obvious.
The flowers looked almost wet in certain angles.
Sticky.
Alive.
Heavy.
Exactly the kind of flower that instantly tells you:
“This is not going to stay clean for long once trimming starts.” 😄
Which brings us to next week.
Next week will likely focus on:
* drying,
* trimming,
* resin collection,
* finger hash,
* scissor hash,
* handling techniques,
* curing preparation,
* and possibly the beginning of the washing process if time allows.
If not, the washing report will arrive later as its own chapter.
And honestly?
That feels right.
Because this run deserves patience.
Now before ending this report, as always:
Thank you.
To Zamnesia.
To Plagron.
To F.O.G.
To the gear.
To the platform.
To the community.
To the growers sharing knowledge every day.
To the silent supporters.
To the curious people discovering the diary for the first time.
To the macro lovers.
To the hash makers.
To the flower lovers.
To the skeptics 😄
To everyone spending even a few seconds here with us.
This plant may already be harvested…
but honestly?
This story still feels far from over. 🌱
📲 Don’t forget to Subscribe and follow me on Instagram and YouTube @DogDoctorOfficial for exclusive content, real-time updates, and behind-the-scenes magic.
GrowDiaries Journal: https://growdiaries.com/grower/dogdoctorofficial
Instagram: https://www.instagram.com/dogdoctorofficial/
YouTube: https://www.youtube.com/@dogdoctorofficial Deleted by Youtube - https://www.youtube.com/@TheDogDoctorOfficial NEW
Vimeo : https://vimeo.com/dogdoctorofficial Under construction stay tuned ⸻
Explore the Gear that Powers My Grow
If you’re curious about the tech I’m using, check out these links:
🔆 Lighting & Environmental Control
• Future of Grow — Advanced LED lighting technology
https://www.futureofgrow.com/
DISCOUNT CODE: DOG20
• Lumiflora — Under-canopy LED lighting
https://lumiflorade.com/
• TrollMaster — Environmental controllers and automation gear (past collaboration)
⸻
Genetics
• Zamnesia Seeds — Genetics used in this project
https://www.zamnesia.com/
⸻
🌱 Soil, Substrates, Boosters & Root Support
• Plagron — Substrates, bio mixes, and supportive products
https://plagron.com/en/
⸻
🎒 Storage, Curing & Preservation
• Grove Bags — Curing and storage solutions
https://grovebags.com/
⸻
📸 Photography Equipment & Tools
(Not sponsors, but part of my creative toolkit)
• Sony A6700
• Sony full-frame macro lens + few more
• Stacking photography workflow - learning
• iPhone (for behind-the-scenes shots)
As always, this is shared for educational purposes, aiming to spread understanding and appreciation for this plant. Let’s celebrate it responsibly and continue to learn and grow together.
With true love comes happiness. Always believe in yourself, and always do things expecting nothing and with an open heart. Be a giver, and the universe will give back in ways you could never imagine.
💚 Growers love to all 💚
📸 P.S. – The Eye Behind the Lens
All photos in this diary (for now — except for the ones showing the camera, which I took with an iPhone) are taken with a Sony A6700 paired with a Sony full-frame macro lens and a few more.
Photography is part of the story — it’s how we share the fine textures, the glow, and the quiet details that words can’t always capture.
I’ve also started experimenting with photo stacking — a technique where multiple images, each taken at a slightly different focus point, are layered together to create one perfectly sharp image from front to back.
It’s not digital enhancement or AI; it’s pure photography — a way to reveal the plant’s beauty in microscopic depth, from trichome to petal.
You’ll even see a few shots of "ghost me" capturing the shots — camera, lens, setup — because every grow deserves not just to be cultivated, but documented like art.
FOR DISCOUNT CODES AND MORE JUST FOLLOW THE LINK https://website.beacons.ai/dogdoctorofficial
NEW DISCORD - Official Server Invite Link : https://discord.gg/ksjAkA5T74

Likes
38
Share


@Skunkman
Follow
She’s starting to really fatten up now!! The buds feel dense all ready and she’s still got another 3 and a half weeks 👊🏻 She’s mad sticky too 😆😎

Likes
4
Share

@CWolcott1991
Follow
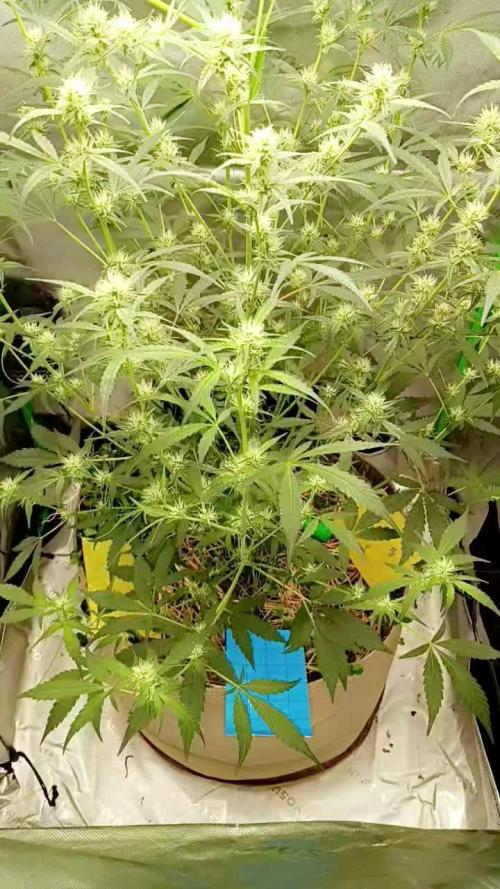
11/12 start of week 3 of flower hoping she is done stretching cus I'm out of room when it comes to height. Gave all the goodies plus added Fulpower and molasses
11/15 stretching seems to have stopped. Dropped humidity and raised vpd to stay around 1.5 and raised light intensity so it's 1000 ppfd at top of plant super cropped the main top to match the height of the side branches.
11/16 watered her with some wdg3000 and saps.


Likes
12
Share


@Froggman
Follow
Flowering nicely now. Not drinking a ton of water but I attribute that to lower temps lately.

Likes
8
Share


@emeraldlabs
Follow
Enjoying her progress over the last week. Lowered humidity today a tad to slightly increase vpd. Also lowered light a few inches and may do so again. Will keep it here until we progress in flowering. Expect to start LST this week.
Will include plant and light height and distance details once I begin LST.
Her sister, punch berry cookies, moved to flower tent. PoG will finish in veg tent, alone, as I’m shutting down for vacation in April.
Video/photos taken 14 days after breaking soil.

Likes
5
Share


@Bear_Grows_Green
Follow
02/12 start of week 6 of flower. I dropped light to 500 watts it's about 750-800 ppfd now on canapoy temps should come down a couple degrees to.
02/14 got watered with wdg3000 and BB
02/17 got 7 gallons plain water 3.5 gallon with goodies in it. Pretty light now. Starting to fade and throw purples nice! Watch video for full commentary on them all
Likes
27
Share


@valiotoro
Follow
Pheno 1 dark purple : On the nose, it reveals a sharp burst of fresh lemon, layered with a powerful eucalyptus aroma that’s both invigorating and camphorous. A truly refreshing and vibrant terpene profile😈🍋
Pheno 2 Green : this one is a real surprise! If I close my eyes, it’s like Nutella! It’s as if you’ve just walked into a kitchen where hazelnuts have been freshly roasted 🤤🌰
Pheno 3 light purple : It’s a mix of the first two with a hint of amarena cherry at the end🍒🍧
Likes
17
Share


@Hashy
Follow
Week 9
Light cycle=12/12
Light Power=170w
Extractor controller settings
High temp=24c
Low temp= c
Temp step=0c
High Rh= 50%
Low Rh= %
Rh step=0%
Speed max=10
Speed min=1
Smart controller settings (during lights on).
Lights on=10.01-21.59
Radiator on= below 22.0c
Radiator off= above 23.0c
Smart controller settings (during lights off).
Lights off=22.00-10.00
Radiator on= below 18c
Radiator off= above 19c
Fri 16/2/24
💧💧💧💧💧💧💧💧💧💧💧💧💧💧💧💧
Method= automatic
Feed=bloom nutes.
Neutralise=0.1ml/L
Silicon=1.0ml/L
Calmag=0.75ml/L
Terra Bloom=4.0ml/L
Sumo Boost=2.0ml/L
Roots=0.2ml/L
Easy Ph down=0.11ml/L
Ec=1.85 PH=6.4/6.6
Time start=12.00pm
Finish time=13.45pm
(11×5 minute runs with 5 minute gaps)
Total flow rate=190ml/min
Flow rate per plant=47ml/min.
Total volume made=13L(13.5L)
Total volume left=3L
Total volume used=10.5L
Volume per plant=2.6L (Est)
Runoff.
Total runoff=1.2L
Ec=2.13 PH=6.1/6.3
💧💧💧💧💧💧💧💧💧💧💧💧💧💧💧💧
#1 (Day 57)(Day 19 flower)
📋 she is starting to show signs of light stress. Lowered light power from 180w to 170w. New DLi=65.0
Sat 17/2/24
#1 (Day 58)(Day 20 flower)
📋 H=96cm D=17cm DLI=67.8
Sun 18/2/24
#1 (Day 59)(Day 21 flower)
📋 Lowered light power again as they are showing a bit of stress from the light. Power was 170w now 160w. I'm going to have to have a think about my next grow, either I stick with this tent and hit the plants hard with light when I flip to flower to keep them small, or try and cram a slightly bigger tent in the space allocated for it. This tent is 61×76×150cm with the option to extend it to 173cm. Mine is configured to the 150cm height, but because its extendable the top 30cm is inaccessible at the best of times let alone when the plants reach a decent height. Extending this tent will be pointless because that's another 23cm of inaccessible space. Besides I only have a max head room for 160cm where the tent is.
Mon 19/2/24
#1 (Day 60)(Day 22 flower)
📋 H=96cm D=17cm DLI=67.8
HST
Tue 20/2/24
💧💧💧💧💧💧💧💧💧💧💧💧💧💧💧💧
Method= automatic
Feed=water
Neutralise=0.1ml/L
Easy Ph down=0.01ml/L
Ec=0.2 PH=6.2/6.2
Time start=12.00pm
Finish time=13.45pm
(11×5 minute runs with 5 minute gaps)
Total flow rate=190ml/min
Flow rate per plant=47ml/min.
Total volume made=13L
Total volume left=2.4L
Total volume used=10.6L
Volume per plant=2.6L (Est)
Runoff.
Total runoff=1.25L
Ec=1.33 PH=6.4/6.4
💧💧💧💧💧💧💧💧💧💧💧💧💧💧💧💧
#1 (Day 61)(Day 23 flower)
📋
Wed 21/2/24
#1 (Day 62)(Day 24 flower)
📋
Thur 22/2/24
From today I'll have to pull out the front 2 plants to get any pictures of the back 2.
#1 (Day 63)(Day 25 flower)
📋 H=97cm D=15cm DLI=67.8
Lowered runoff rack. Pots may be sat in runoff slightly.
Lowered light power from 160w to 150w.
H=97cm D=18cm DLI=60.0
She is developing quite quickly, because of the short distance between the light and the tops I'm seeing a bit of light stress, I'm going to keep my eye on that and push it as much as possible.
Back soon.
Take it easy.
Likes
2
Share


@DrJekyll_MrKush
Follow
Hi folks, hope you are doing great!
Here pretty much everything is under control.
We are trying some LST and it's getting better ans better.
We have found the screen, so why don't use it ans test some scrog after all?
I will use the screen just to disciplinate the colas, but I won't cut any branch or leaf.
Normally this is going to be the last week of veg, knowing that they will stretch quite a bit normally :)
Stay safe folks!

Likes
Comments
Share

@Borberad
Follow
Woche 3
Das Fundament wird gelegt und Umtopfen steht an.
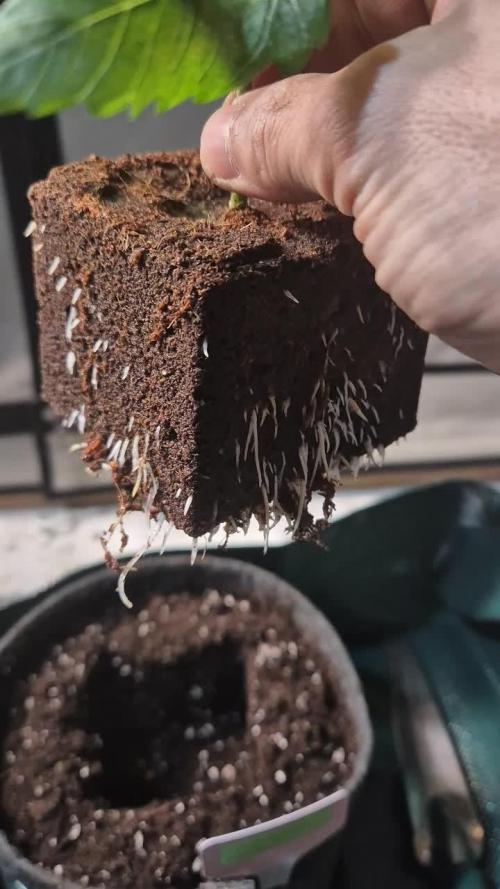
Die Schoki ist in der dritten Woche ihres Lebens. Die ersten Seitentriebie bilden sich und die Pflanze ist gesund gewachsen mitlerweile hat sie 3 Nodien. Und ist über ihren Cube hinausgewachsen und hat diesen kräftig durchwurzelt. Somit wird jetzt in den 3l Stofftopf umgepflanzt. Danach gibt es zum ersten Mal die standart Düngedosis, angepasst an das Pflanzenbild 2,5 -5ml Hesi TNT für ordentlich Nährstoffe im Wachstum, 5 ml/l Hesi Root für eine kräftige Wurzelentwicklung und 2 ml/l Calmag, um unser Osmosewasser aufzuhärten. Der DLI wurde auf im Laufe der Woche auf 40 erhöht.
* Zustand der Pflanze: Die ersten "echten" Blätter sind vollständig entwickelt und wie durch die EasyCubes zeigt sich wie eine kräftige Wurzelbildung.
* Wichtige Ereignisse: Beginn der Nährstoffgabe. Anhebung des DLI. Umtopfen in 3L Stofftopf
* Düngung & Messwerte:
* Gießwasser: pH ca. 6,0. Leitwert ca.1,4 - 2 S.
* Drain: Wir messen sporadisch, um die Abweichung von +/- 500 S einzuhalten.
* Anpassungen: Wir sind überrascht wie gut sich die Pflannze im Easys Plug System entwickelt hat.


Likes
12
Share


@GarciasGarden
Follow
Let me just say I had to combine 2 grow cycles because this strain was a bit of a pain in the ass ..as you can see the first time all my plants hermied but on this last run I came out with some pretty great looking /tasting bud that gets you almost too high!


Likes
21
Share


@Shaunofthedank
Follow
Plants responded well to topping/fimming. They all have 4/6 main stems. Training them to get a bit of a canopy going. Cookies kush is def a keeper. Gonna try clone it. My clone games weak though.


Likes
13
Share


@DeepRootsGrowTrees
Follow
SHERBERT QUEEN AUTO / RQS
WEEK #12 OVERALL
WEEK #7 Flower
This week she started to get some density to her buds she's got nice trichome coverage and a nice little aroma to her. Stay Growing!!
Thank you for stopping by and taking a look it's much appreciated!!
Thank you ROYAL QUEEN SEEDS!!
SHERBERT QUEEN AUTO / RQS
Likes
8
Share

@PapaTerps
Follow
The Keeper - Wizard Trees
Week 4 Bloom
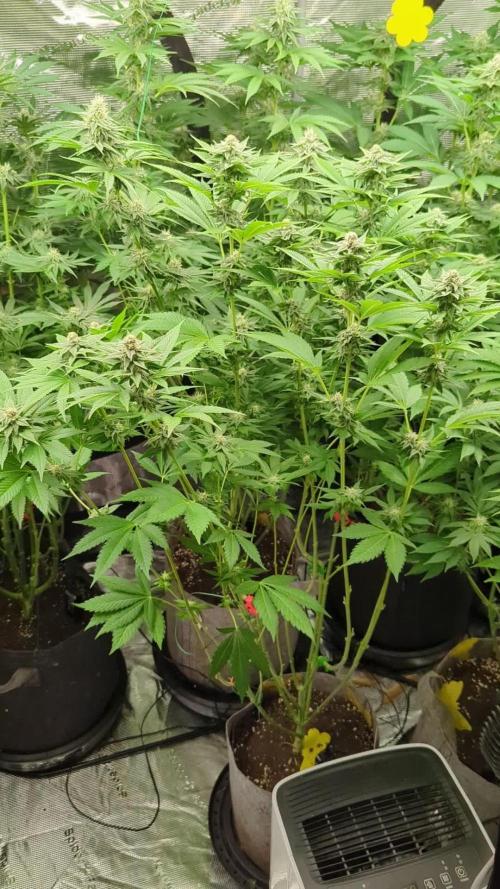
🌸 Solid week for this girl, she has developed her flower well and is starting to bulk her flower now! Her scent is also coming through, with a strong earthy/woody scent backed with a subtle citrusy fragrance. All the girls have been moved into the Spider Farmer 8x4, because the 5x5 and 4x2 were too difficult to manage 👍🏻
✂️ No work this week, she has good airflow and light is penetration to the lower budsites👌🏻
💧 Watered every three days with 4L of RO water - nutrients were mixed individually, in order and then finally pH'd to 6.3. I've increased her nutrients again to keep up with her flower production.
💡 PPFD: ~800
♒ VPD: 1.53kPa
🌱 Days from seed: 88
🌸 Days in Bloom: 29


Likes
5
Share


@DawgHaus
Follow
Day 1: A large root can be seen at the bottom of each cell pot. Filled 3x 3 gallon pots with coco perlite 60/40 mix and transplanted each seedlings into its forever home. Not messing with micro-bacteria and all this time round as the nutes have everything that’s needed, fresh coco and a good feed will be more than enough for these girls. Watered them each with 100ml of water mixed with with a small amount of Velokelp and stuck a bag over each to lock in the humidity. Once the transplanting was over I setup a little DIY drip irrigation system with a 10L reservoir. Feeding schedule will be at 1/4 strength of advise dose as recommend by FastBuds and Remo Nutrients. Set up the timer for the lights and drip irrigation system to kick in tomorrow. The lights will change to 18/6 and drip irrigation will kick in just after lights on.
Day 2: Lights turned off for the first time after 24 hour light for the past few days. After 6 hours of darkness the seedling are looking healthy as fuck. The first true leaves are now developed and they’re all bright bright green. Drip irrigation timer did its thing for the first time today and I’m well happy with the result from my little DIY kit, hopefully all runs smoothly with it for the rest of the grow.
Day 3: The cotyledons have started praying upwards towards the light. The bags over the top of the plants have a good amount of condensation on the inside so I’ve cut a couple small holes in the top of each bag to let a little air in. Turned drip system off for a couple days to avoid over watering.
Day 4: Tiny second set of leaves can be seen in the centre of each plant. Made the air holes on bags bigger to get the ready for them to be removed. Drip system still turned off.
Day 5: Drip irrigation system is working as it should and environments holding up so all is good. Plants are looking good and seem fairly well rooted. Removed the bags from the top of each pot and turned on the humidifier and set it to 60%. Only thing left to do on this setup up is get some trays under the pots so they’re not sitting in puddles during the feeds.
Day 6: All of the plants first true leaves are praying up to the light and the second sets are starting to properly develop. Really happy with all the seedlings so far. When it comes to autos these seem like the business. Fans turned on today and drip irrigation set back on its timer. Found some old metal grilled shelves that have worked out perfect for trays for the irrigation.
Day 7: Second set of leaves are beginning to rise up, another week I reckon and I’ll look into hanging the MH bulb so these girls can explode. Very happy with these seeds so far. Gave them their first foliar spray with a 5ml of Velokelp and 5ml of Magnifical mixed into 1L of water. Turned the oscillating fan up a notch too as I’ve got it set up a fair distance away and I didn’t feel the breeze was catching them enough. Mixed up a new stronger feed this evening so it’s read for the droppers coming in tomorrow.


