
Likes
Comments
Share

@DogDoctorOfficial
Follow
# The Frozen Archive #1 ❄️📚
## First Steps Into Ice & Water Extraction | Unboxing, First Washes & New Beginnings
Hello GrowDiaries family! 👋❄️🌱
Welcome to the very first entry of a new series that I have wanted to start for a long time.
Today we begin The Frozen Archive.
This series will follow our journey through fresh frozen material, ice & water extraction, solventless concentrates, curing experiments, storage methods, and everything that happens between harvest and the final product.
The goal is simple:
To create an honest archive that allows both the community and myself to follow the evolution of these extractions over time.
Some entries will focus on specific genetics.
Others will focus on techniques, equipment, observations, and experiments.
This first entry is all about beginnings.
And like many beginnings, it starts with learning.
---
## A Huge Thank You To Zamnesia
Before anything else, a huge thank you to Zamnesia for providing the Bubbleator machine and for making this new chapter possible.
The machine arrived extremely well packaged and protected.
Everything inside the box was carefully wrapped and secured, ensuring that every component arrived in perfect condition.
Alongside the machine were accessories, filtration bags, instructions, and everything required to begin exploring the world of machine-assisted ice & water extraction.
As someone who has performed hand washes in the past but never worked with a machine like this before, I was genuinely excited to finally put it to work.
This is my first documented experience using a Bubbleator.
There will be successes.
There will be mistakes.
There will be lessons.
And all of them will become part of this archive.
---
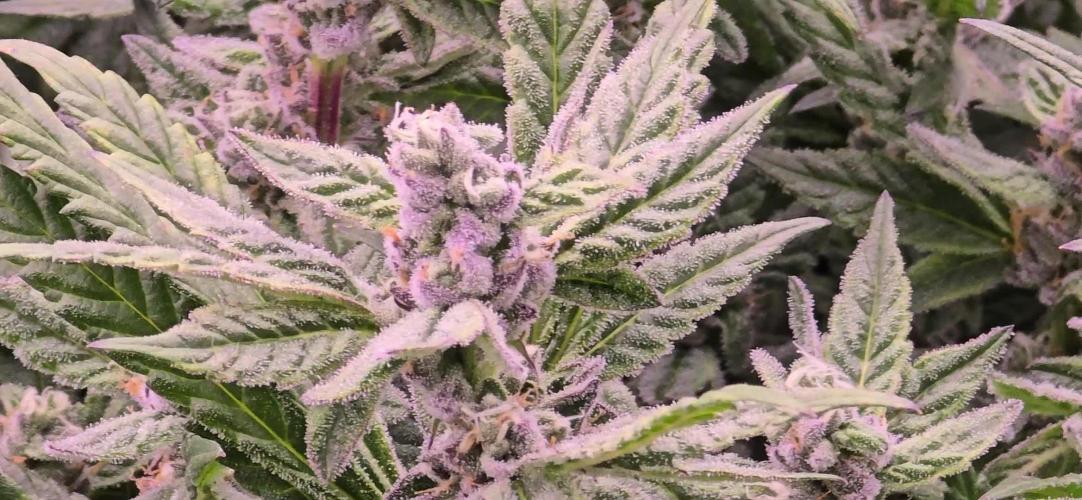
## What Is Fresh Frozen?
Before we begin the extraction process itself, it is important to explain what fresh frozen material actually is.
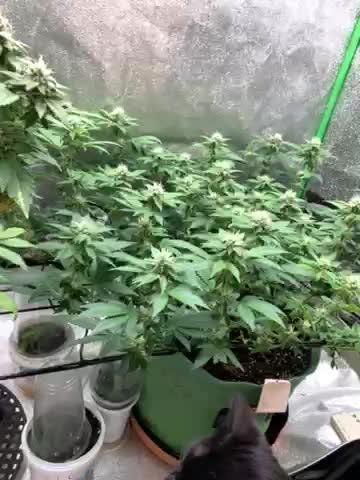
Instead of drying and curing the flowers after harvest, the material is frozen immediately after being processed.
This helps preserve many of the volatile compounds that can be lost during drying and curing.
The goal is to capture the plant as close as possible to its living state.
In this case, the material being used comes from the previous run, which many of you have already followed through harvest.
Throughout those diaries I intentionally collected and preserved material specifically for these future extractions.
Today, that material finally leaves the freezer.
---
## What Is Ice & Water Extraction?
Ice & water extraction is one of the most traditional solventless extraction methods available.
The concept is beautifully simple.
Cold temperatures make the trichome heads brittle.
Gentle agitation helps separate those trichomes from the plant material.
The resulting mixture is then filtered through a series of micron screens which allow the resin glands to be collected while removing unwanted plant matter.
No chemical solvents.
No hydrocarbons.
No shortcuts.
Just ice.
Water.
Movement.
Patience.
And trichomes.
---
## The First Wash
With the machine prepared, the process could begin.
Ice was added.
Fresh frozen material was loaded into the 220-micron work bag.
More ice was placed on top.
Cold water was added.
And then the waiting began.
Watching the machine start spinning for the first time was exciting.
The water slowly changed color as resin and plant material began moving through the system.
Temperatures remained extremely cold, hovering around freezing conditions and helping maintain the ideal environment for extraction.
This was the first true wash performed with the Bubbleator.
Not only were we processing material.
We were learning the machine itself.
Learning timing.
Learning technique.
Learning observations.
And documenting every step.
---
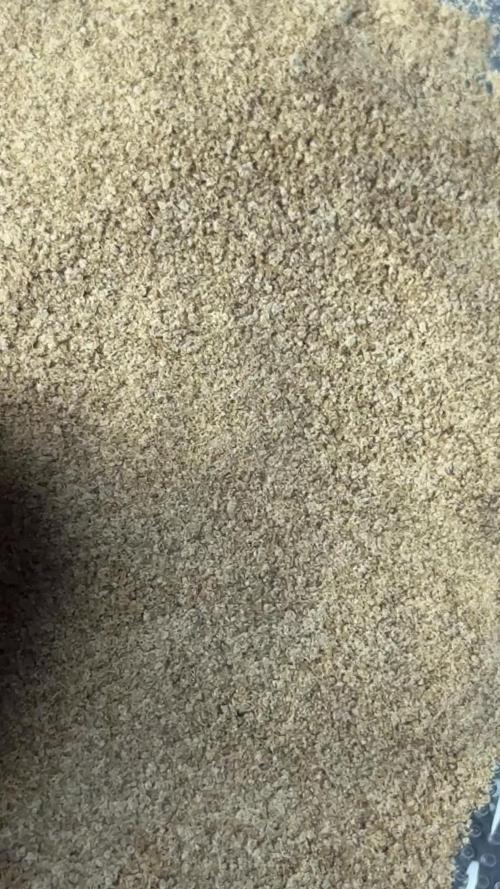
## Collecting The Resin
Once the wash cycle was complete, the water was drained and passed through the filtration system.
This is where the magic starts becoming visible.
The trichomes that had previously been attached to the flowers now began collecting inside the filtration bags.
Seeing those first collections appear is one of those moments that never gets old.
The resin was carefully gathered and prepared for drying.
Even at this early stage it was already obvious that the material held incredible potential.
---
## Drying & Preparing The Hash
After collection, the resin was gently broken apart into smaller pieces to increase surface area and encourage proper drying.
Drying remains one of the most important stages of the process.
Rushing this step can compromise months of work.
Patience here is rewarded later.
While the first collections dried, additional washes continued, allowing the extraction process to move forward while the earlier material slowly prepared for its next stage.
---
## Temple Ball Experiments
Once properly dried, part of the collected resin was worked into a traditional temple ball.
This is one of the oldest and most beautiful forms of hash preservation.
Heat.
Pressure.
Patience.
And resin.
Nothing more.
The resulting temple ball displayed beautiful characteristics.
Excellent texture.
Wonderful aroma.
A clean melt.
Beautiful bubbling behavior.
And the unmistakable appearance that makes handcrafted temple balls so special.
Watching it transform from loose resin into a unified sphere felt almost like watching the extraction complete its final step.
---
## A Second Wash & A Different Approach
The second material was processed using the same extraction methodology.
Ice.
Water.
Agitation.
Filtration.
Collection.
Drying.
However, this time a different preservation method was chosen.
Instead of forming a temple ball, the dried resin was left loose and placed inside a vacuum-sealed bag.
All possible air was removed.
The goal now is long-term observation.
How does this material evolve?
How does the aroma change?
How does the texture develop?
How does it compare to the temple ball?
Those questions will be answered in future entries.
---
## This Is Only The Beginning
Although this report marks the end of the first extraction session, it is far from the end of the story.
The temple ball now begins its cure.
The vacuum-sealed resin begins its cure.
Additional fresh frozen material remains waiting.
More washes are coming.
More genetics are coming.
More lessons are coming.
And every step will become part of The Frozen Archive.
For now, this first chapter closes with gratitude.
Thank you to Zamnesia for the Bubbleator machine, the genetics, and the opportunity to explore this side of cultivation.
Thank you to everyone following along and supporting these projects.
And thank you to the plants themselves.
Months ago they were seeds.
Today they continue teaching us in entirely new forms.
Grower's Love everyone. 🌱💚❄️
The Frozen Archive has officially beg
P.S.
A special thank you to Plagron for supporting this entire cultivation from start to finish.
From the very first watering to the final harvest, drying, freezing, and extraction stages, every plant involved in this project was grown using the Plagron lineup, including Terra Grow, Terra Bloom, Pure Zym, CalMag Pro, Power Buds, Power Roots, and Green Sensation.
As always, this is not about claiming that any product creates magic on its own. Healthy plants are the result of genetics, environment, nutrition, observation, patience, and consistency all working together.
Still, after following these plants from seed to harvest and now into the extraction stage, I believe credit should be given where credit is due. These flowers, the fresh frozen material, and now the resin itself were all produced under the Plagron feeding program, and I am grateful for their support throughout the journey.
Grower's Love. 🌱💚

Likes
2
Share


Likes
4
Share


@DivinePineMan
Follow
I have my Electric Sky 180v2 now in instead of the cheap 40$ for 4 lights i bought on facebook. Which were growing but nothing like this thing has been doing the past week. Im still blown away by the light but back to the plants. Doimg great i took some clones. First time ever so hopefully they root. I been sprayin em 4 -6 times a day. My 3rd g6jetfuel i took out of my tent with es180v2 and put in closet by itself with the 40$ cheap leds. It hasnt grown a whole lot compared to the tent plants g61 and 2...i thought maybe it may of had a male or hermi part but honestly i dont think it did bc i cant find it now. But its still in there bc i decided to throw it on 12-12 in closet to find out sex forsure. Ive been foliar spraying in my tent 3 timez a day. And 2 times a week i get 2 little drops of fox farm grow bif in my 10oz spray bottle of water.
Likes
5
Share


@grazi2706
Follow
Another good week, just waiting for them to ripen. I'm planning on another week. That will put us at 9.5 weeks and they should be good to go.


Likes
13
Share


@PatriciaGant
Follow
Dane, We all should help one another.
Human beings are like that.
We should live by each other’s happiness - not by each other’s misery.
We don’t want to hate and despise one another, share the Joint.
And mother earth is rich and can provide for everyone.
We can Grow enough Happiness, In this paradise, there is room for everyone.
We only exist to bring joy into the world and The way of life can be free and beautiful,
but we have lost the way.
Grow High and Give the world A smile.
At the end we own nothing more then all our memories, lets make them amazing for everyone,
nothing to loose only everything to win.
A last kiss goodby, a second one, softer and long as a sign, that you are woth it.
That Everyone worth who loved and give.
Enought Hippie Talk, now have a nice day and an even better grow, thx for watching by.
.

Likes
5
Share


@CanadianFillmore
Follow
Start of week 5. Week 4 went well and like the OG Kush, the leaves dropped overnight from day 6 into 7 of week 4. She's a bit hungrier and will need a bit extra feed. Overall the plant is looking good, bud sites are filling in and she's starting to smell. She's already incredibly sticky!

Likes
1
Share


@zzzzzzz064
Follow
Explosive growth this week as usual! the plants getting bigger and bigger, and they started flowering, the first white pistils started to appear at the mid of the week approximately

Likes
26
Share


@Batista
Follow
This week we increased the quantity of fertilizers and transplanted it into a 5 liter container.
Next week we will start LST.
The total height decreases due to the transplant.
We use mycorrhizal fungi (Mykos) in the transplant.

Likes
6
Share


@color
Follow
I'm sorry I picked up too early but the botritis was taking over, I preferred an unfinished product than losing everything


Likes
1
Share


@Organic_G
Follow
Kleines Süppchen gekocht um das Bodenleben nochmal anzuregen,
Bat Guano Flüssig
Fermakor
Zuckerrohrmelasse
2x Bannanenschalen
24h Sauerstoff zugeführt und eben die Hälfte gegossen, hoffe das es die jungen Wurzeln nicht verbrennt
Likes
290
Share


@Ferenc
Follow
Hi there. So beautiful. We had really nice week compate to September in the UK sunny and good weather but all has changed this week seems to be crap. Rainy and now it is 11 celsus at 7:00 am in the morning. She would be so thick I can see but because of the weather I ain't gonna have that much buds. Still nice 👌 🤣
OMG the smell is incredibly nice like spicy citrus thing with sweet odour.... amazing! Very strong anyways strong smell LOL

Likes
10
Share


@Nicedreamsmaybe
Follow
I use Jacks aqua gold at 2.5 grams per gallon
Epson salt 5g per gallon and jacks 15-0-0 2.5g per gallon. I ran out of advanced nutrients 3 part and will not be purchasing more.
I will harvest everything on the 12th. Might pick off some of them before depending.
I am not flushing but reducing ec. Currently feeding 1.2 ec


Likes
2
Share


@TOMI08
Follow
Sziasztok
9.héten vagyunk
A sütinek adok melaszt+canna flush
Az ak47 valami szörny imádom
Likes
1
Share


@EvilGrower
Follow
This entry covers days 15-23. Same as last week, there is a timelapse! I hope you check it out. (Timelapse to be added ASAP! The internet is too slow to upload it now!
This past week I've upped the nutrients to about 410 ppm. This is a stronger nutrient solution than the one I used for my GSC at this age. I decided to up the nutrients so much because I noticed my leaves were a bit light in color, which I thought might be because it was lacking enough nutrients. Unfortunately the leaves are still this same light green at the end of this week, as well as some light splotches.
Today, day 23, has seen some confusion. I found what I thought to be root rot, but turned out to be a nutrient buildup. I treated this using Jef79's suggestion of rinsing with water than matches the pH and temperature of my reservoir. I know the brown roots were from this nutrient build up because simply rinsing them helped a lot. After resolving this issue, I bound her down for some low stress training.

Likes
10
Share


@Jbcultivates
Follow
Week 8 of Veg, preparing to flip to flower this coming weekend. Gonna do an extended light period but not quite the 24hrs of dark. LST is opening up light to the lower growth and making more room for big colas!


Likes
37
Share


@DrGreenfinger
Follow
Moin liebe Growgemeinschaft.
Es geht in die zweite Woche bisher läuft alles sauber die kleinen wachsen und gedeihen.
Die anderen 3 Runtz sind alle gekeimt zwar eine Woche später wie die F1 aber sie sind da. An dieser Stelle liebe Grüße an
Royal Queen Seeds👋. Der eine Runtz Samen war sehr sehr klein im Vergleich zu seinen Geschwistern in der Packung, wunderte mich das der überhaupt gekeimt ist. Schauen wir mal ob sie den Kopf in den nächsten Tagen hoch bekommt.
Grüne Grüße euer Dr.Greenfinger
