
Likes
Comments
Share


@EvilGrower
Follow
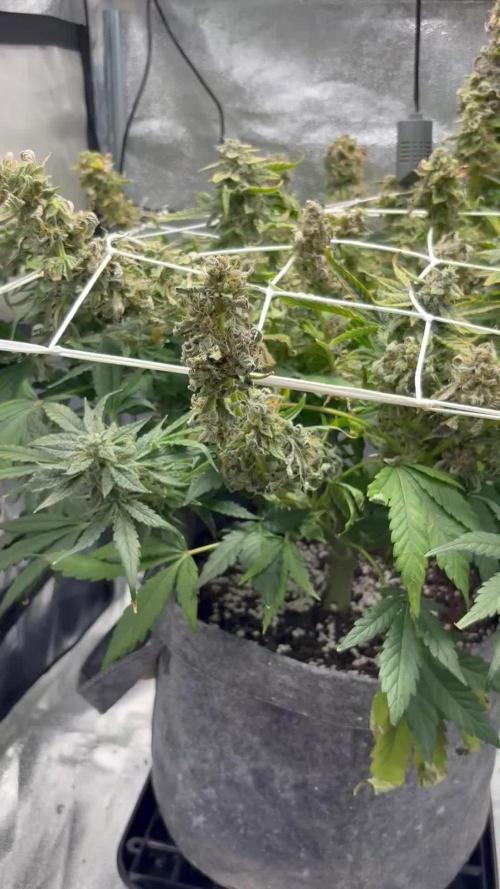
First off, I hope all who visit this journal watch the timelapse. I'm very happy with how it turned out. The GSC is in the foreground. Comparing the beginning to the end shows just how dramatically my plant has grown in the past week.
This plant now has a photo-period neighbor! I have changed the light schedule back to 18-6 to accommodate. Her chronicles will be in a separate journal.
Towards the end of week two, I noticed the leaves were forming brown spots that I took as a sign of calcium deficiency. To treat this, I used a gallon of (hard) tap water, adding calcium to the reservoir. Luckily this seems to have done the trick! The spots have been absent on all subsequent leaf growth. Sometime in the middle of this week, I had to re balance the pH from ~7 to ~6. Perhaps this pH fluctuation came from the tap water transfusion.
In an effort to raise the RH in the tent, I've repetitively spilled a small amount of water on the floor of the tent. Doing this keeps the RH around 45-50%. I've made some other small changes to my grow setup as shown in the pictures.
Prior to this week, I'd thought my plant was hopelessly behind developmentally compared to other user's because I'd compare their week two plants to mine. Luckily, this week has seen some growth! It's crazy how fast they shoot off after their first three-fingered leaves form. The first "real" set of leaves to grow in (not three-fingered yet), seemed to take forever to grow into their full size while not much else (besides the roots) seemed to grow. This week's three-pointed leaves have practically fully formed already. Alongside them, are the beginnings of yet more leaves!
I'm not certain what I will do this next week. I may start LSTing this plant, though I'm not sure when exactly I should do this. My original plan for my plants was to implement a screen of green using a trellis. I have sense realized this may not be the best approach while using a DWC, because water changed would be made much more difficult. Have any of you DWC growers experiment with this? Is it worthwhile?
I will likely not replace the water for another week, though that's not set in stone.
I appreciate any advise regarding the training techniques I mentioned, water switch outs and anything else that may be relevant to this grow. I will more than likely ask a few designated questions. To those who take the time to answer, thank you!

Likes
25
Share


@Ganjeiro420
Follow
Olá, sejam todos bem vindos a mais uma semana dessa semente maravilhosa da Fast Buds a Banana Purple punch.
Estou muito satisfeito com essa semana pois elas cresceram bastante e estão se preparando para começar a engordar os Buds.
Tive um pequeno problema no começo da semana, fui fazer o LST e acabei quebrando o caule principal de uma planta mais graças a Técnica já tinha bastante ramificações que fizeram os galhos laterais crescerem e evoluírem bastante.
Em relação aos fertilizantes estou colocando 1.5 ml/L e achei que o resultado foi incrível, vou manter essa dosagem mais uma semana e espero que na semana que vem eu já traga alguns botões pra vocês.
Agradeço a todos que estão acompanhando e aos que ainda irão acompanhar

Processing
Likes
24
Share


Likes
2
Share


@Ultraviolet_
Follow
"You will know them by their fruits"
46-47 days from germination, she fills the canopy herself, and the apical dominance is broken.
It's not all about the amount of light, but the ratio too, as this will dictate growth through the ratio of phytohormones. In order for correct bud development, there needs to be a correct ratio of RGB. Different wavelengths have different penetration depths. When one grows using top-down lighting, only the entire canopy is limited to 2-3 layers of leaf, meaning there will only be correct bud development in those layers, regardless of getting 45DLI.
The biomass potential of a plant is linked to root mass. Generally, when a plant reaches its maximum biomass, you can help to chop off parts of the plant that are in less than efficient areas of the plant (low light). So that it can create new biomass growing towards the light.
Strength is the maximum potential, and power is the rate of conversion. You can have the biggest veg period of 18 weeks, and it means nothing, as soon as you start flower, the chronological clock starts ticking, the only metric that matters to bud size is how much energy you convert each cycle, not by how long it took you to build the framework.
Each leaf is like a satellite receiver attached to an antenna called a stem; each leaf removed lowers the energetic potential of conversion.
Not saying you cannot defoliate for a reason, only that you should have one, and at the right time. Don't defoliate 30+% on autoflowers or 4 weeks into the flower period and expect an increase in yields; it doesn't work like that. There is certainly room for dictating growth patterns and clearing out overcrowded nodes, but it needs to be done in veg because once that timer starts and buds start growing, it's all just energy conversion. Most grows I barely defoliate at all in a 4x4 because with side lighting, turning a 2d canopy penetration into a 3d, even lower buds are 90% the quality and density of top ones. The rate of photosynthesis and the ultimate density of lower buds aren't just about the sheer number of photons PPFD. The specific ratio of R:G:B dictates canopy penetration and drives different photochemical reactions. The Electron Transport Rate (ETR) measures the speed at which electrons are driven through Photosystem II (PSII) during photosynthesis. The ratio of Red, Green, and Blue (RGB) light heavily dictates this rate.
Plant leaves continuously perform cellular respiration regardless of the time of day, using energy and oxygen to fuel essential metabolic maintenance. If you over-defoliate, the remaining canopy may be unable to produce enough net sugars during the day to offset the constant respiratory demands of the plant. Must balance fixation with assimilation; there's no point in capturing 45 DLI if you only convert 20% every cycle due to an extreme lack of respiratory capacity to perform cellular oxidative phosphorylation.
A crinkle-cut French fry has more surface area. When it cooks, it has a higher capacity for energy transfer/conversion, which is what makes it slightly crispier than a regular straight-cut French fry when it comes out of the oven.
You can have a 4x4 canopy or a 4x4x4 canopy. Oversimplified, but you get the idea, yes, we know that side lights are not as effective at absorption from the sides or underneath, but it's not about DLI, it's never been just about efficiency, it's about the penetration ratios of RGB that drive ETR of/photosynthesis and trigger correct bud development. The size of each bud is its own ability to perform the ETR required for its own personal growth, and bud development is dictated by the ratio of RGB. It drives localized growth and acts as a regulatory switch for that development. Turgor pressure is another very important factor in understanding if you want big buds, for it is the "steam engine" that dictates the rate of bud expansion. Simply, never going to happen playing it safe metabolically at ambient 75F.
Because buds have less chlorophyll, they do not suffer from the same photosynthetic shutdown that over-exposed, light-stressed leaves do. They can soak up direct light energy to swell in density and size. Their tolerance to intense light is heavily limited by the temperature and humidity, but if you can control those temps and keep the rot away, buds have a much, much higher tolerance to high light than leaves. Beneficial to hammer with high light before trichomes appear. Balancing this with trichome maturity is key for rich terpene and flavonoid profiles, want it just right, somewhere in the middle, not too much, not too little. Find cannabis plants can defoliate themselves come harvest, given the right signals. Every last ounce of potential is recycled into buds by the plant itself (senseceance), given you can keep the level of conversion high enough to prompt a need to do so.
Get the canopy @ optimal PPFD range, 45-55DLI, then let the plant "stretch" the stems into a "PPFD range much higher, one that leaves don't like to grow in, but buds thrive in. What is optimal for a bud is different than what is optimal for a leaf photosynthetically. Genes provide the blueprint, but the environment dictates how, when, and if those genes are expressed. Must first signal the condition to increase the expression you want to exist through stress and response, cause and effect. A well-buffered CEC medium prevents extreme nutrient swings, allowing plants to maximize their dedicated genetic expression.
A plant is either genetically expressing "growing" or "recycling" genes based on its nutrient starvation level in the medium. Constantly toggling between "growing" and "recycling" hormonal states creates a futile cycle that wastes valuable metabolic energy. Plants rely on sophisticated biochemical switches to manage this trade-off, and prevent rapid fluctuations that disrupt that balance.
This energy inefficiency is a recognized biological challenge. Plants avoid this costly "flip-flopping" by using hierarchical master regulators (like the TOR and SnRK1 protein kinases) that act as strict molecular switches. These networks enforce cellular commitment to either growth or survival, preventing mixed signals.
This is something that was missing from previous grows.
Under nutrient-rich conditions, TOR promotes protein synthesis, cell division, and structural expansion.
Under starvation, TOR is inhibited and SnRK1 is activated. This triggers autophagy—where the plant breaks down old macromolecules and organelles to scavenge and reallocate essential nutrients to critical sinks.
"What's the point in flushing?"
The core idea behind a PK booster is to deliver a massive, concentrated surge of P&K exactly when buds are swelling in conjunction with a N starvation. Because these are short, targeted windows, the nutrients must be highly bioavailable so the plant can process them immediately. As soon as you go "organic," that's out the window. Much slower release, uncontrolled, very difficult to "spike". to cause the ratio that will initiate a response.
High-volume PK spikes rely strictly on the immediate uptake capabilities of mineral fertilisers. Making it far less efficient in organic/living soil setups.
When you use organic nutrients, it changes the dynamic with which the plant delivers and trades its nutrients; organic is always releasing new nutrients into the immediate EC. This prevents a lot of autophagic responses from occurring due to a constant stream of new nutrients into the immediate medium's EC. This can prevent nutrient starvation signalling.
PK boost is essentially just N starvation, triggering an autophagic response. Concentrated ratio of P&K while tapering off the Nitrogen base. To the plant, the sudden drop in Nitrogen registers as a severe environmental stressor—essentially, the beginning of starvation protocols. She aggressively strips nutrients and proteins from older leaves and vegetative structures and shuttles them directly to the developing flowers and fruit. Ta daaa. Call it a PK booster and sell it. Nothing to do with the P and K itself, it's the ratio immediately available in the medium triggering a nutrient recycling mechanism within the plant itself; all the "booster" sells is the trigger to the signal.
Very difficult to initiate a response when organic nutes are doing their thing. It takes 4x5x more water significantly to leach or wash ammonia out than it does nitrates. This alone will prevent flushing from having its normal impact.
I'll be manipulating the C:N ratio in the medium instead. One autophagic response has multiple potential signal triggers. Nutrient starvation is not an option. Well, it is, just it's going to be manipulated Nitrogen starvation through Excess Carbon, instead of starving the medium entirely(EC).

Likes
3
Share


@SubliminalSociety
Follow
Did she stretch 2cm? I'm saying: yes!
Otherwise same old. Oh, just realising I didn't measure bud width. Man, it's depressing. So many leaves in the bud, it's going to be hell trimming these two sad colas. But she's doing her best, so I should do, too.
Chopping time is close.

Likes
2
Share

@gammacrowns
Follow
started flushing with clean water this week, harvest in the next 5-7 days. some buds are already dry

Likes
22
Share


@Strega
Follow
This is the last week 😍💚💚 I really want to say thxs to Sweet seeds for the wonderfull seeds. I love my mandarine and now, when this grow is at the end, I just have to wait

Likes
9
Share


@NewbieDoobies
Follow
Very impressed more bud sites starting to show, started adding some root juice into the feed also put some ground coffee into the soil which has made a noticeable difference(read it on internet) still had no issues with this plant yet EXCELLENT genetics hopefully it keeps up this progress. By the end of this week my runoff ph after watering was at 5.2 so did a flush and got it back up to 6.3 as a few leaves were showing early signs of nutrient deficiency. Ordered some AN ph perfect 3 part feed to keep it at the ph I need hopefully. We’ll soon see next week glad I noticed!

Likes
42
Share


@Hashy
Follow
Grow diary 11 stage 7
Day 61-70
She has come on a bit this last 9 days. Showing Iron deficiency in the tips but that's probably due to over watering a while ago. She is the 2nd farthest along.
Likes
9
Share


@HIAZ_urbanbudfarmer
Follow
So far she has been going well!
Planted her into make shift Dwc set up & put her into my cloning area under a 100watt VIPER SPECTRA led grow light.
Likes
2
Share


@MG2009
Follow
08/07/2020
Flowering week 2 for the bigger plant, all are cuttings of Red Sky I'm growing outside but this one is stinking some crazy smells not sure how to describe burnt rubber? And pine tar?
Best I can say.
Application of L A B this week to feed the microbial communities. Application to leaf surfaces to combat pw (prevent) bud rot.
Likes
2
Share

@Maindrugger
Follow
Завтра харвест. Я бы дал может ещё чуть чуть но не хочу. Поливал только водой давал по 5л. Последний полив был 3 дня назад. В последние 3 дня открываю окно чтоб ночью было холодно так что у него последние 2-3 ночи было градусов 15
Likes
2
Share


@Vcashout
Follow
Plants are growing! But so is my mold problem I recently got a hygrometer and noticed that my humidity was ranging from 64-70 percent which I realize is too high and maybe that is where my mold is coming From im starting to see it coming from the drain holes on the bottom of my pot. I’m going to get a dehumidifier and see how that works. Also I attempted lst to both plants . The doc og is a week older and definitely bigger than the apples and bananas but but are coming along nicely.

Likes
7
Share


@ganjawhat
Follow
the 2nd week of veg. one of my plant growing weird I need to top it! and it's working very well with new 2 benches for sure. Actually I'm not a fan of topping auto flower ( cause I'm not a professional grower yet ) but it's fine to try it once, Peace! thank you


Likes
153
Share


@DogDoctorOfficial
Follow
And it looks like they didn't mind that much going to the hairdresser as they keeps on drinking the same and evolving at the same pass. They are all becoming beautiful beast ladies and im loving them all in diferent ways , so far the mor advanced one is the somango followed by the water melon followed by the no idea what it is seed and in the end e have bruce banned, im loving t he fact that they all started same time and that they all are going to finished different, this means i will be trying me second harvest plant smoking my pervious one 😝 .
They are all drinking using the autopot system but the no idea what seed is not so im Daly giving her 2,5 liters from the autopot reservoir ,it sucks but its ok at the same time hehe eit is what it is and im not thinking on leaving anywhere, so i can easy do that every single day hehehe kind a lovit any way but dont tell anyone, its our little secret 🤫 😆💚🙏🙏🙏
As always thank you all for reading and checking out my diaries, im humbled by it all, much love to you all 💚💚💚🙏🙏🙏💚💚💚🙏
Thank you APTUSHOLLAND for having faith in my love for growing and for always being there wen my gardens need 🙏🙏🙏
Genetics :
- watermelon candy - Zamnezia Seeds https://www.zamnesia.com/
-Somango Glue - Advanced seeds https://advancedseeds.com/web/
- ?- buddah Seeds
- Bruce Banner - Fast Buds https://2fast4buds.com/
Grow tent - 4x8, but using 4x4 for this Auto Test
Ligth - LUMATEK ZEUS 465 COMPACT PRO
Food - HAPTUS HOLLAND
Filter - vanguard hydroponics Falcon Filters
Extraction - vanguard hydroponics 560 m3h
control - Trolmaster
All i grow is medicine for myself, for me and for my best friend with is me 😆 nothing to sell, so don’t even ask 😅💚💚💚
All info and full product details can be find in can find @
https://aptus-holland.com/
https://autopot.co.uk/
https://lumatek-lighting.com/
#aptus #aptusplantteck #aptusgang #aptusfamily #aptustrueplantscience #inbalancewithnature #trueplantscience #growerslove
With true love comes happiness 💚🙏 Always believe in your self and always do things expecting nothing in return and with an open heart , be a giver and the universe will give back to you in ways you could not even imagine so 💚💚💚
More info and updates @
https://growdiaries.com/grower/dogdoctor
https://instagram.com/dogdoctorofficial
https://youtube.com/channel/UCR7ta4DKLFMg2xxTMr2cpIg
💚💚💚Growers love to you all 💚💚💚


Likes
3
Share


@Organic473
Follow
They’re coming back nicely after the defoliation.
I feed her and let the soil dry out and the results are here.
Likes
20
Share


@Rubob
Follow
Plant 1 is starting to fatten up nicely , if I had to guess its got about 3-4 weeks left yippee...
Plant 2 is basically almost ready she is eating herself slowly , I'd give her about a week or two will see , all trics are milky so I don't know if I want to do amber as I have never tried a full milky sativa before .. Also plant 2 went much faster than I expected 10 to 12 weeks but now seems like its done... Obviously more of a hybrid pheno then ..the white pistols you see are just new ones that poped up the past couple of days..
Plant 3 is dying off unfortunately have no idea why..
Likes
6
Share


