


Likes
Comments
Share

@GrowerMario
Follow
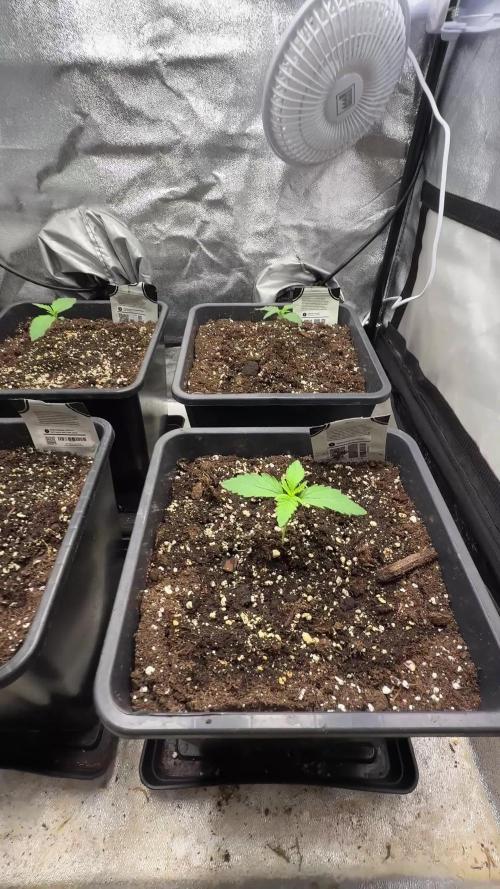
Ako som spomínal skôr , @MedicGrow 150W mini sun 2 bolo nahradené 240W mini sun 2 , predpokladám že dievčatám to pomôže vo vacsiom zacukrení v kvete . Samozrejme tieto premiérove odrody od @Fast_Buds su zárukou kvalitného harvestu . Taktiež musím spomenúť že tieto dievčatá už teraz ochutnávajú niektoré zložky od @AdvancedNutrientsLtd a veľmi im chutia 🌱

Likes
2
Share


@Bulbizorus
Follow
Day 38
The plant's are growing well and are very watered. I can start seeing the roots coming out of the 7L pots. I am thinking I about getting bigger ones in 2 -3 weeks.
Other than that, I cropped the top of three of them and I start seeing great results. I can't wait to share the pictures of the evolution.
Next week I will get them more space and start LST,.
Plan ahead:
Week 5-6: continue the vegetation stage. Starting of ventilation and Calmag
week 7: I will replace the pots to 20L
Week 8 start the flowering for 2 months

Likes
85
Share


@Tropicannibis_Todd
Follow
Start of day 84 ...... January 1 2022 Start of week 12 ........ 58 DAYS INTO FLOWERING
😕 LOOKS LIKE THERE GONNA GO A LITTLE LONGER THEN EXPECTED ? 😕
( HAPPY NEW YEARS😋 🎅 🎄)
( SMELLING GREAT ) !!!!!!!
Check out the full grow video on latest weekly update
Super Exceptional Growth Daily
Still adjusting LST when needed and leaf tucking.......
Water Only when needed but its drinking more every otherday and adjusting lights when needed......
Rain Water Only .......
( DAY 26 AND BOTH NL 1 & NL 2 SHOWED PREFLOWERS )
( DAY 49 AND RESIN PRODUCTION HAS STARTED )
( DAY 57 , EQUIPMENT FAILURE , main FAN , over heated😡 tripped breaker , reset light timers , lost a DAY, REPLACED new Main Fan 😁 back up running 👌)
( DAY 70 DID ITS FINAL FLUSHING TODAY TO GET RID OF ANY BUILDUP )
( DAY 77 AND IT SHOWS A SLIGHT DEFICIENCIE MAYBE A CAL/MAG GETTING CLOSE TO END OF LIFE ) IM ALSO DOING VERY LITTLE, SLIGHT DEFOLIATION
( DAY 89 AND ALL IS GOOD , THERE FATTING UP )
DAY 89 .....NL 1 SHOWS CLEAR TO MOSTLY CLOUDY RESIN HEADS , STILL AWAY TO GO .......
DAY 89 .....NL 2 SHOWS MOSTLY CLOUDY RESIN HEADS , JUST WAITING ON THE AMBER TO GET STARTED , GETTING CLOSE BUT MORE TIME NEEDED......
I hope you enjoy my growlog...

Likes
6
Share


@Mr_nugs_lover_David
Follow
She looks extremely healthy and happy let's see how she performs at the end,she's 100% organic grown without any chemicals from bottles. Starting to show the first pistils on August 24th

Likes
25
Share


@DeepRootsGrowTrees
Follow
FAT BANANA 🍌 AUTO / RQS
This week she was harvested she was easy to grow from seed to harvest really no issues with this strain her buds are covered in trichomes with red hairs and smell great 👍 she's a strain you want to keep in the rotation 😉 if you like banana strains!! Stay Growing!!
Thank you for stopping by and taking a look during this grow it's really appreciated!!
Thank you ROYAL QUEEN SEEDS!!
RQS / FAT BANANA 🍌 AUTO

Likes
18
Share


@DBQush
Follow
Dear diary,
Week 2 done and on the books!
Everything went mostly fine up until the very end of the week were I noticed some strangeness with G.C #2 that was transplanted.
That will be covered more overall in next weeks update as I try to fix any potential issues.
🍀🍀🍀🍀🍀🍀🍀🍀🍀🍀
⏰ Day 11:
Calmag foliar applied 2 times during the day at 0.8ms and corrected ph to 6.3.
They also got their regular feeding at 1.27ms 6.4ph with me increasing the light to 250ppfd.
⏰ Day 12:
They were given a foliar and watering of calmag water at 1.13ms and 6.3ph early in the morning as issues had not cleared up.
Later in the evening they got a regular feeding at 1.41ms, 5.9ph and lights were increased to 275ppfd.
⏰ Day 13:
2 calmag foliars, gave feeding at 1.54ms 5.8ph and increased lights to 285ppfd
⏰ Day 14:
They have reached 3 nodes marking the end of seedling stage and beginning of veg!
They were fed with 1.53ms 5.8ph and four 3 liter airpots was prepped with 75/25 coco/perlite and watered with the same feed until runoff before transplanting.
As I can only grow four plants G.C #2 and #3 were selected as the final two.
Temps are around 26 and RH 75% with lights on and 24C 80% off.
Will be taking down the RH slightly over the coming few days to 65%.
⏰ Day 15:
Gave the girls a feeding at 1.57ms 5.6ph.
Also increased light to 305ppfd and they do look a bit droopy, but that’s not to surprising after the transplant.
⏰ Day 16:
Daily feeding at 6ph 1.59ms and increased light to 320 ppfd.
Aiming for 465 ppfd by the end of next week as that would move us up from 20 to 30 DLI.
⏰ Day 17:
Sprayed a foliar coat of Leaf Coat from Biobizz as prevention for pest in the morning.
For the evening they got their feeding at 1.58ms 6.2ph and foliar spray of calmag as G.C #2 is showing some strangness like small white marks and drooping on the new leaves.
Will troubleshoot and give her a few days or so to see if she improves or else I will change in the plan-B G.C that wasn’t transplanted.
Processing
Likes
15
Share


@MG2009
Follow
06/02/2020
Gonna feed them today 1tbls of blood meal.
I snapped a branch on #2 (see video) her stems, I don't like break to easy so I will give some micro nutrients to help stems from breaking. Unless she is the HOLY GRAIL. I will cull her clone.
All others handed super cropping well. 🙏
#4 in hydro is in it's own diary called Small Batch Seed making some F1
#1 showed her sex today, clones well took cut on 05/20/2020 is rooting well outside in coco coir, in humidity dome just cut and scrape the stem,once rooted I cut off yellowing leaves i hope her smoke is as good as she looks.
5 days into week 10 and #2, and #4 are male so indoors they go for pollen collection. Will dust one bud of each female with each male and hunt for what I want. Also see what each passes on in the cross.
Likes
10
Share


@Slow_grower
Follow
This week I noticed a good and healthy growth. I decided to Top one of the plants and on another one aI applied the “main line”. On the third plant from the next week I will try an “LST”. The temperature on the grow box is under control and umidity is good. The only problem we found was on the “Tangie n.2” that is developing quite slowly and showed up some yellow leafs.
20/03 we apply LTS on tangie 3 and 4.
Likes
97
Share


@DudeGrowsWeed
Follow
Happy New Year!!!
Over the past week I cut down 2 of the 3 Blackberry’s, they are hanging and drying now. The 3rd is definitely looking better than the first 2. I think the first 2 will probably be turned into edibles, rather than smoked. The 3rd is looking much better overall and especially in terms of bud development, she will probably be smoked.
The lights went off before I was done taking pics, so some pics will look a little different. The pics with the lights on I had to color correct, they still look a little more on the yellow side than in reality, but much closer to reality than the pre-color corrected versions. Once the lights went off I turned the flash on for my camera, those pics did not need any color correction. You can see the differences in the pics of all plants, the first 2 are color corrected with the lights on, the last 2 are taken with a flash and no color correction.
I read several books on cannabis over the past few days, some good, some not so much. One that I liked was “Marijuana Cultivation Reconsidered: The Science and Techniques For Huge Indoor Yields” by Read Spear. This book is available on Amzon’s Kindle Unlimited service, which costs $9.99/month, but they offer a free 30 day trial (which is what I’m using at the moment). Reed’s book is broken down into 3 sections, the first and third go fairly deep into the science behind growing, he does a pretty good job at breaking it down in easy to understand terms, but I had to read several sections 2 or 3 times to really get it (or just move on with as much understanding as I could digest). The second section is the nuts and bolts of growing. Most was a review but there were several topics he touched on I hadn’t thought of in a while. And again its well written. He also offers the section only in a separate book called “Small Spaces, Big Yields”. If you are not interested in going deeper into the science behind growing, “Small Spaces, Big Yields” is what I would recommend (if interested in reading books on cannabis).
I took some notes while reading and I’m going to add some of these notes in my dairy updates over the next few weeks. This week I’m going to include a note on electrical, this should be a fairly basic concept, but it is super important IMO…
“Electrical Items In a sealed grow room or in a tent, you will have water pooling on the floor from time to time. There is no avoiding this. Mop it up when you see it, and never put your electrical gear directly on the floor. Never. Not even for a moment. In fact, let me stress this point in bold capital letters. ALL ELECTRICAL GEAR MUST BE MOUNTED SECURELY ON A WALL OR TENT POLE.”
-Read Spear
I’ll add more did bits like this in my diaries over the upcoming weeks.
If anyone has any good book recommendations please let me know in the comments. I’m looking for books that might not be as popular as the ones by Jorge Cervantes or Ed Rosenthal (I’ve read those). I did just order “True Living Organics” by The Rev which I’m looking forward to reading. But I’m looking for more. I really want to step it up and learn as much as possible. Your comments, feedback and recommendations are very much appreciated!
Until next time, Happy Growing! Stay Positive! And have an amazing 2019!!!


Likes
3
Share

@TruTraTri
Follow
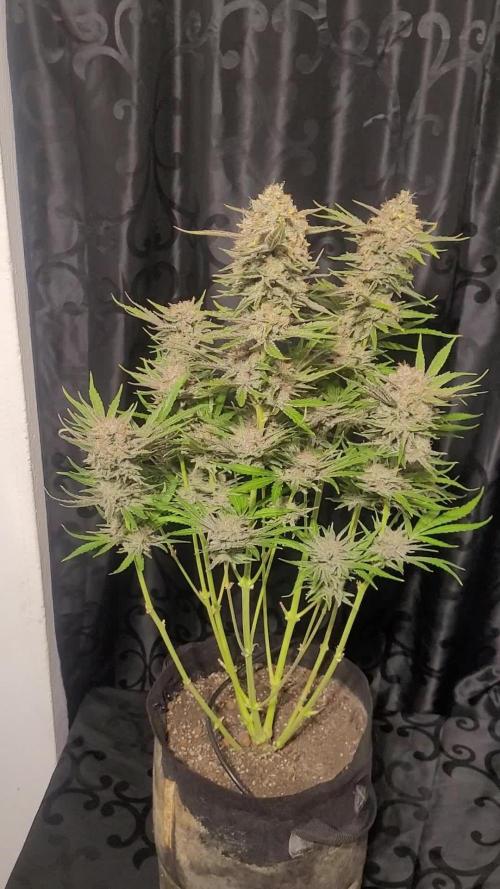
Didn't do wet weight, so I suppose something like that.
Great strain. Somehow not so many trichomes, but it feels like glue was poured all over the buds. (!)💪💪💪💪
65g dry. ~20g popcorn. I pressed the popcorn cold. Not the best material, and I was too lazy to pick up stems and remaining leaves. Nonetheless 3.2g. Nice.😎😎
It took a while for her to build up, but she did!
As the Zkittlez was going crazy... this is my favourite Greenway strain, up until now.
Recommendation for small setups!👌👌👌
“Your brain has turned into cottage cheese.” — Weird Al Yankovic
Likes
42
Share


@Natrona
Follow
Week 16 Happy Easter week. 4/9-15/23
Flushing, nights in the dark with cold feet.
This is week 2 of flushing before the harvest.
Sunday I flushed each plant with 1 1/2 gal of filtered water after layering ice the top of the pots. After flushing they were just put in the room not in the tent. I had an ocsellating fan moving on a medium speed. Moved to the garage for the night.
Tuesday flushed each plant with 1 1/2 gal of filtered water after layering ice the top of the pots. After flushing they were just put in the room not in the tent. I had an ocsellating fan moving on a medium speed. Moved to the garage for the night.
FOUND BUGS ON PURPLE CHILL. Harvest is moved to this weekend rather than next Tuesday as planned.
Wednesday all three plants were put in the dark room put ice on top of the pot.
No further flushing will be done.
Thursday, Friday, Saturday. Lights remained off Temp 73. Rh 71% when I opened the dark room. The dark room has black out curtains, however there is l8ght exposure around the edge of the curtain.
Saturday afternoon photos taken pre cut, tricomes photographed as best I could. Additional hands are Required as I must take 50 pictures only to get 5 acceptable ones. Cut from the base of her stem , weighed and hung in the tent in the dark with a small fan . The drying has begun. Wet harvest weight 253 grams 8.9oz.
April 15-19 Hanging in dark room with temperatures ranging from 73-77f Rh 49-74.
April 20 - 22 Hanging in dark room with temperatures ranging from 71-77f Rh 50-80. The higher humidity is a result of turning the home a/c off during the night.
Since its drying time and not much to say.
I decided to locate photos of the same plant at day 20 of flower when I did the last heavy defoliation and side by side comparison to the day of harvest. I don't know if this is a normal harvest or small yield for OG Kush. See last pic in week 16.
She will be drying for 2 weeks or so. I have been checking the stem stiffness or bendiness since the humidity fluctuates. It does not snap yet.
Likes
13
Share


@birdmountain
Follow
Fruit Bomb Punch "Die Ausladende".
Sie legt immer mehr in der Breite zu, so dass ich die großen Pflanztöpfe bereits umstellen musste, damit sie nicht zu eng aneinander stehen, was einerseits die Ernte beeinträchtigen könnte und auch Krankheiten schneller übertragen würde.
Sie fängt an sich zu strecken, bin gespannt ob sie die Zweimeter-Grenze im Höhenwachstum reißen wird.
Dank des angenehm kühlen Wetters ist der Wasserbedarf zurückgegangen auf nur noch zweimaliges Wässern täglich mit einmaliger Flüssigdüngung.
Ab und zu werden ein paar innere vergilbte Blätter entfernt, sonst ist nicht zu tun, außer sich an der fast schon "Hanfhecke" zu erfreuen.
Vielen Dank für euren Besuch, habt eine gute Growwoche!

Likes
3
Share


@TyRun
Follow
Intermediate Results
Overview
This grow was intense! Setting up the grow consumed so much of my time and focus that I started slacking at work, and it took me a month to get back on track. But hey, what’s the point of a job if it gets in the way of growing? 😉 In the end, everything worked out, and I gained invaluable experience.
This was my first grow using coco coir. At first, I didn’t get it, but then it just clicked! Now I’m hooked: "I’m here to stay." Coco is more controlled than soil, flushes easily, and you can introduce beneficial microbes, which thrive in it. My main takeaway from this grow? If you buy coco, don’t forget CalMag!
Next time, I’ll definitely install HEPA filters at the intake. The amount of dust was insane, and the grow box pulls air like a vacuum cleaner. Watching the timelapse, you can see the box sucking in every bit of dust. I vacuumed the intake filters weekly. The plant was incredibly sticky, but that also meant it caught a lot of lint and fibers between trichomes, especially visible under a microscope. Smoking microplastics? No, thank you!
---
On CO2
CO2 only works if everything else is dialed in. If the plant experiences stress from deficiencies or overfeeding, you can forget about it. Since CO2 supplementation requires turning off the exhaust fan, it’s hard to manage temperature and humidity. The plant releases so much moisture that RH jumps to 80% within minutes. It’s doable, but definitely a challenge.
---
On Magnetic Fields
No clue what’s happening here yet, but it’s fascinating! I’ll test again with a control sample.
---
Nutrients
Dreams do come true—I’ve tested almost everything Advanced Nutrients offers. It wasn’t all smooth sailing; their feeding charts need adjustments for your conditions, and you usually need to feed less than recommended. Overall, I’d say the nutrients performed 100%, and I see no reason to switch. I’ll stick with them for future grows.
---
Strain
This strain is reliable, though not the most productive. It flowered exactly as advertised and delivered a frosty finish. It tolerated all my mistakes like a champ—especially mold. Despite an abandoned SCROG plan turning the plant into a bouquet, there wasn’t a single mold spot, even in the densely packed lower buds that got almost no light. Zero mold issues!
---
Aroma
As advertised: pine, wood, and citrus. At first, I thought it smelled like grapefruit, but now I’m leaning toward bergamot. Bergamot with a classic weed aroma—a recognizable twist on the usual scent. During the grow, the smell was strong, but the carbon filter handled it perfectly.
---
Flavor
It’s too early to say, but the flavor is definitely there! Embarrassingly, all my past harvests tasted the same—like nothing. Just smoke. This one has a distinct sour taste. I’m excited to see how it develops after curing.
---
Effect
Too early for a full review, but I love what I’ve tried so far. The high lasts about three hours, with euphoria and relaxation. It’s the perfect evening strain. I’ve smoked a lot over the years, but I’ve never experienced true euphoria—until now. Guess I’ve been stuck with garbage and ditch weed before. 😅 It’s not a strain for productivity or chores, but it’s perfect for chilling, watching something, or chatting. No anxiety, just great vibes. It feels like having a beer after a long day: you relax, and life feels good again.
---
Roots
The roots were healthy—maybe too healthy! While the AirPot (20L) prevented root circling, it didn’t eliminate it entirely. There were dead zones at the bottom where roots circled around the perimeter. A dense root mat formed at the bottom (so dense you couldn’t poke a finger through it), which likely contributed to salt buildup. Breaking through that mat required more water, and I suspect this caused EC to spike 1.5x the next day if there was no runoff. Next time, I’ll mix some pumice with the substrate at the bottom, about 3–4 cm deep.
---
Timelapse
I only got the timelapse running after the switch to flowering, so it’s not from the beginning. Still, it’s an incredibly useful tool for understanding growth rates. I’ll definitely use it for future grows. Comparing yesterday to today is one thing, but rewinding a week to see how things were is game-changing. I recommend it! You can even use an old phone with a timelapse app if your camera doesn’t support it by default.
---
What’s Next
I’ve grown fat buds before, but I’ve always neglected curing. This time, I’m doing it by the book with full control. Drying in the grow box with RH controlled at 50–60% (averaging 55%) for a slow, even dry. Temps are kept between 20–23°C, with frequent venting to keep it below 21°C for terpene preservation. After 7–10 days, when small stems snap with a characteristic sound, I’ll trim and jar them with humidity sensors. For the first two weeks, I’ll burp the jars twice daily, then reduce to once daily for the next two weeks. After that, I’ll monitor the RH sensors and adjust as needed. I’ll share the details after curing is complete.
After drying, I’ll weigh the buds, take photos, and share another post in a month or two after curing to report on the flavor and aroma.
For now, I’m taking a breather, fine-tuning my setup, and preparing for my next grow: Wizard Trees - Zangria S1.


Likes
12
Share


@PolezGardn
Follow
week three flower everything looks fine so far :D
eight days after defoliation
I water them with 1.5l every 48h
the light I use was set to 80% and it hangs 80cm away from the tops
both gorillas had thrown a few balls, but I removed them as soon as I saw them, I will keep watching them!

Likes
89
Share


@BioBuds
Follow
The enormous growth and bud development this week is unbelievable. This strain keeps pushing and pushing, I can see already that these plants will be covered in bud.
Also, these plants are in size what my previous photoperiods grow in 8 weeks and some flowering.
Really amazing to see. So far my experience with autos has been meh at best. These plants are nothing like that and are resilient and forgiving.
The Mars Hydro SP-3000 is now on full blast, it gives me some white pointies and the temps go up in the tent. I'm on the threshold of heat stress and light burn.
I'm trying to push it maximally and to get to know the boundaries.
Thanks again for checking out my grow!
Processing
Likes
58
Share


@Dahoola
Follow
---------------
Start week 3
--------------
We started week 3 as we ended week 2, which is great. She continues strongly at the beginning of this week and seems almost unstoppable. She clearly enjoys her surroundings and looks very healthy. She has started preflowering and seems to be gearing up for another explosion in growth. She is very good at leaftucking and has already developed a good number of shoots. On to more! A new update at the end of this week.
-----------------
Update Week 3:
-----------------
End of another fantastic week for MBAP. This week was all about pre-flowering and you can see that she is preparing for an explosive bloom. She has benefited enormously from the LST that I applied and has a good number of shoots ready to explode during flowering. In addition to leaftucking, have also removed the lower shoots so that she can concentrate her energy on the upper shoots. I also did the biotabs in the ground in the middle of the week. We have opted for 3 biotabs in 20-25l soil. Have waited several weeks before putting the tabs in the ground because we work here with aitoflowers. And they prefer a light feeding regiment for the first few weeks. We are going to gradually lower the humidity and get ready for flowering and week 4! Until next update

Likes
Comments
Share


@KannaGrowing
Follow
Esta semana, poca cosa a añadir, tan solo que continuamos como la semana pasada.
Riegos alternos entre abono y agua, según tabla de fertilización de JUJU Royal by BioBizz.
Hemos aumentado la potencia de extracción para evitar olores.
Likes
2
Share


Likes
5
Share


@gr3g4l
Follow
Iniciamos la semana de bajo estrés doblando las ramas y terminamos podando bajos dejándolas ya listas para pasar a floración.
