
Likes
Comments
Share


@XoticGROW666
Follow
2ND WEEK ON THE SS ON THE RITE GSC ON THE LEFT G41 ON THE GROUND. ALL ORGANIC GROWN NO BOTTLES NO NUTES STR8 COMPOST TEA N SST TEA(Y)


Likes
28
Share


@AlpAge_Cino
Follow
2024/05/12 : nothing special to do this week, but there is yellowing too early...
No more height gain, stretch is over. I set DLI to 36~45 and let LED at 20 cm from the tallest cola.
RH still about 65% despite deshumidificator... biggest problem (for me) with Autopot system. I hope it will be OK.
2024/05/14 : I saw burned tips, that and the yellowing made me quick flush blueberry with 20 L of rain water at ambient temperature, pH=6.0. I thought I would avoid yellowing this time... 😅
I guess last shot of PK was a bit too much : I'll go for half of it for the next one.
As plant was out of its grow space, I checked it and removed a few dead leaves, nothing more to notice.
It was not easy to remove and reset plant without breaking anything!

Likes
64
Share


@Roberts
Follow
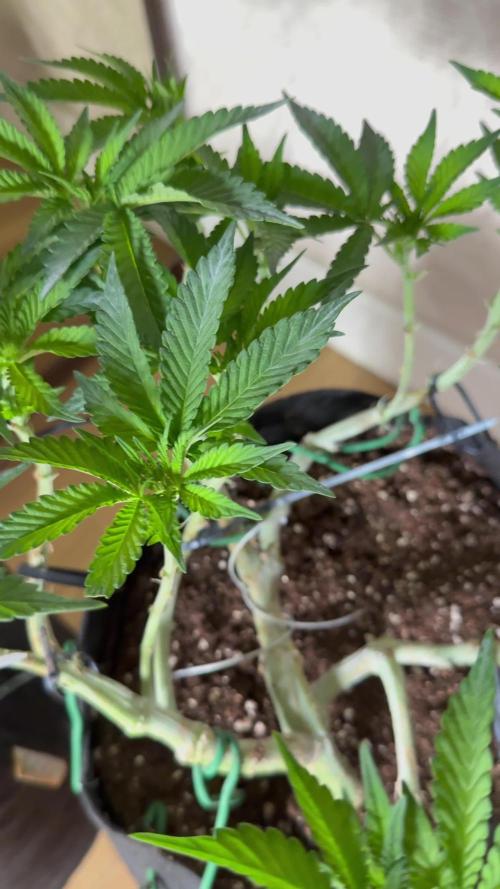
Baked bomb is doing great. She got a few spots on the leaves from getting wet. It is not anything I am worried about. She will only get so big in this potter. I imagine she will still turn out nice size if I keep up on her. She got her first lst and selective defoliation. She has been getting fed about every other day with ph water put on to keep wet between feeding. She is good to go. Thank you Bomb seeds. 💣🤛🏻🌱🌱🌱
Thank you grow diaries community for the 👇likes👇, follows, comments, and subscriptions on my YouTube channel👇. ❄️🌱🍻
Happy Growing 🌱🌱🌱
https://youtube.com/channel/UCAhN7yRzWLpcaRHhMIQ7X4g

Likes
3
Share

@hinterhofgrower
Follow
.
🌱 :
💧 : 3l day 35, 3l day 37, 3l day 40
💡 : Dli: 40 mol/m²/d
🤔 :

Processing
Likes
7
Share


@Cogollo_eu
Follow
**Encontrarás la traducción a español al final de la descripción**
From/Desde: 12/04/19 || To/Hasta: 18/04/19
From day/Desde día: 50 || To day/Hasta día: 56
You can find the Gorillas Diary here:
** Podéis encontrar el diario de las Gorilla aquí:**
https://growdiaries.com/diaries/25675-makingmoney-with-gorilla-mm-vs-gorilla
-----IMAGES & VIDEOS-----
I'm sorry for not having a tlapse video this week, i slaved the cam onto my 60x60 tent to record the first growing week of another plants, next week i will return with more tlapse videos.
-----WEEK SUMMARY-----
To have a visual size of the plants take into consideration that the SCROG net it's fixed 24 cm abobe the top part of the soil.
Remarking what i've told last week, i must say the SCROG is not a true SCROG, as some colas begin below others, and also colas are of different heights among all plants. Anyway i'm very happy on how everything is going. And insisting again, I have very very few experience growing cannabis, this is my 3rd grow, 2nd indoor, and first time with photo-period at indoors, and of course is the first time too i'm trying to apply growing technics on a serious way. I really don't know if i'm doing things right or wrong.
-----WATERING CALENDAR-----
13/04/19 - 1.250 ml with all week nutrients -(Sensizym, bloom stimulator, bloom nutrition & amino complex) @ PH6.4 & 1.3 E.C.
17/04/19 - 1.250 ml with Silica Power, Pro Active, Bloom Stimulator, Bloom Nutrition, Sensizym & 5 drops of Amino Complex @ PH6.5 & 1.3 E.C.
*****ESPAÑOL*****
-----IMÁGENES Y VÍDEOS-----
Siento no tener vídeos timelapse esta semana, he esclavizado la cámara en el armario de 60x60 para grabar la primera semana de crecimiento con otras plantas que tengo en el.
-----SUMARIO SEMANAL-----
Para tener una idea más o menos certera del tamaño de las partes de las plantas, tened en cuenta que la red está fija a 24 cm de la parte superior de la tierra de los tiestos.
Remarcando lo que dije durante la última semana, he de decir que el SCROG no es un SCROG real, ya que las colas no empiezan desde la misma altura ni son de la misma altura, ni las plantas son de la misma altura. Pero yo estoy muy contento con como va la cosa, vuelvo a insistir que es mi primera vez con foto-dependientes indoor, mi segundo armario indoor y el tercer cultivo de mi vida, y por supuesto la primera vez que aplico o intento aplicar las técnicas de cultivo. Lo estoy intentando realizar bien y de manera eficaz, pero realmente no se si lo estoy haciendo bien o mal, yo simplemente me lio y veo como responden las plantas.
-----CALENDARIO DE RIEGO-----
13/04/19 - 1.250 ml con todos los nutrientes semanales -(Sensizym, bloom stimulator, bloom nutrition & amino complex) @ PH6.4 & 1.3 E.C.
17/04/19 - 1.250 ml con Silica Power, Pro Active, Bloom Stimulator, Bloom Nutrition, Sensizym & 5 gotas de Amino Complex @ PH6.5 & 1.3 E.C.

Likes
17
Share


@DutchFarmer
Follow
Week 4
Please check the previous Triple scoop i grew
(https://growdiaries.com/diaries/183670-grow-journal-by-dutchfarmer)
Check out my Cannabis Community, please👇like👇, follow, comment, and subscribe to my YouTube channel👇. ❄️🌱🍻
https://www.youtube.com/@DutchF4rmer
Join our discord community for weekly giveaways 👌
(Join the patreon for help advice and mentoring)
https://www.patreon.com/DutchFarmer
(Discord Server)
https://discord.gg/VMu6rH4a7V
IG
https://www.instagram.com/dutchfarmer1/
It will be appreciated! ❤️
Happy Growing 🌱🌱🌱

Likes
14
Share

@Stoney_Stark
Follow
Sticky Broccoli Auto – Week 8 Update (Week 4 Flower)
Overall Plant Status
Week 4 of flower and things are… interesting. All 4 plants are showing excellent health overall—no visible deficiencies, strong color, and vigorous growth. However, there are some growth irregularities across the canopy.
• Bud structure is developing oddly and slower than expected
• One plant (back left) is showing re-veg–like traits
• Another (back right) is absolutely dumping trichomes early
• Front two plants appear the most “normal,” but still not bulking heavily yet
Despite being labeled an 8–9 week auto, this run is clearly trending longer. Estimated finish now looks closer to 11–13 weeks, likely leaning toward the longer end.
⸻
Environment & Light Notes
• UV was being applied but has now been turned OFF (3/15) to rule out stress-related responses
• Light schedule unchanged otherwise
• Feeding timing:
• Auto irrigation ~30 min after lights on (2:30 AM)
• Secondary feed mid-day (~1:30–4 PM)
Observation:
The re-veg–like growth (3-finger leaves, excessive leafy growth) is unusual for autos but can be triggered by:
• Spectrum imbalance (UV/IR stress)
• Genetic instability (more likely with some autos)
• Environmental stress (though unlikely here given overall health)
⸻
Watering & Nutrients
General Range This Week:
• PPM: 860 → 1200
• pH: 5.7 – 5.9
• Runoff: 0% → 20% depending on day
⸻
3/11
• 4 gallons total
• Split feeding (AM + PM)
• Minimal runoff initially, slight runoff later
• 1200 PPM / 5.8 pH
Per gallon:
• .5ml Silicium Bloom
• 2ml MagCal
• 5ml Cocos A
• 15ml Cocos B
• 4ml Pure Zym
• 3ml Green Sensation
• 2ml Power Buds
• 5ml Ruby Fulvic
• 5ml Photosynthesis Plus
⸻
3/12
• 4 gallons total
• ~20% runoff achieved
• Plants evened out in height
• 1000 PPM / 5.8 pH
(Same mix minus Photosynthesis Plus)
⸻
3/13
• Split feeding again (AM + PM)
• ~15% runoff
• 1000 PPM / 5.7 pH
(Photosynthesis Plus reintroduced)
⸻
3/14
• Light defoliation + lower branch cleanup
• ~15% runoff
• 860 PPM / 5.8 pH
⸻
3/15
• No feed
• Observed abnormalities:
• Back left plant showing re-veg–like growth (3-finger leaves, excessive foliage)
• Back right plant heavily coated in trichomes
• Front plants stable but slow to bulk
• Action taken: UV turned OFF to troubleshoot
⸻
3/16
• 4 gallons total
• 10–15% runoff
• 947 PPM / 5.9 pH
Mixing order adjusted:
• Silicium Bloom → MagCal → Green Sensation → Base nutrients → additives
⸻
3/17
• 4 gallons total
• Initial 0.5 gal per plant (low runoff)
• Second feeding planned later
• 940 PPM / 5.9 pH
⸻
Plant-Specific Observations
Back Left Plant (Problem Child)
• Throwing 3-finger leaves
• Excessive leafy growth vs bud formation
• Appears to be in a partial re-veg expression
• Most likely cause: genetics or light spectrum sensitivity (UV suspect)
Back Right Plant
• Frost monster
• Heavy trichome production early
• Slightly behind on bulk but resin production is top tier
Front Two Plants
• Most stable phenotype
• Normal structure
• Slightly slow bulking but otherwise on track
⸻
Next Week Game Plan (Week 5 Flower)
• Monitor re-veg plant for normalization after removing UV
• Maintain:
• 900–1000 PPM
• 5.8–5.9 pH
• Watch for:
• Bud set transition → bulk phase
• Consider:
• Slight increase in PK (Green Sensation / Power Buds) if bulking still lags by end of Week 5
Likes
9
Share


@HIAZ_urbanbudfarmer
Follow
Hi gromie's, well were at day 29 of flowering & day 64 in total.
She has grown some really nice chunky dense buds & has a fairly strong sweet/ lemon/citrus smell to her.
She is getting closer to harvest, starting to get cloudy trichomes & pistills starting to change colour, Calyx closed & swelling. Nice & sticky!


Likes
5
Share


@CannaIGrow
Follow
This plant seems to have grown much denser and better than my first plant. I just got the ac infinity ventilation setup with controller 69 for my 2x2, still trying to learn, hopefully grow #3 goes even better. Stay tuned
Likes
7
Share


@Fat_Olsh_Farms
Follow
Day 70. Gorgeous plant. Leaves are changing color exactly how the advertisement looks. Fastbuds is dope.
Likes
10
Share


@CHILLING_RACOONS
Follow
Hi Dear Friends, 👨🌾 👩🌾
Responded well to topping, plant is developing good and strong!
✅ VEGETATIVE week #5
📅this week goes from 12/12 to 18/12.📅
💡💡💡Viparspectra XS2000 is working at 50% power.
💉🔍Fertilization schedule:🔍💉
14/12 eposom salts 2g/l foliar and 1g/l irrigation
WE ARE BACK!!!
We are back after a little pause.
We take a break because we were too busy to post high quality diaries. In the last diaries we tried to post as good as possible and we have to publish about 6 or 8 diaries (in addition to these that we will publish shortly). We opened also an educational Instagram page, we growed a lot in a short amount of time BUT, Instagram suspended our account and we lost all our posts, I was so sad and disappointed... a lot of work lost in a night....
Now we started a new grow with six awesome strains!!!!!
In this diary you will see our journey with MOBY DICK by our friends Seeds Mafia, sit down and enjoy the show!
We are growing in a 15L Smart Pot with Light Mix soil by BioBizz
Moby Dick is a potent and productive strain that may reach a maximum of 21% THC. Although it may be grown indoors, it will yield the maximum results when grown outdoors thanks to its sativa genes that make it resilient to pests but also because it needs much light and lots of space to reach its full potential.
Its flowering period is about 60 days, and when grown indoors it reaches the maturity in about 9 weeks and gives a harvest of 650 grams per m2. When grown outdoors, it is harvested in early October and may even reach 1000-1500 grams per plant.
Speaking of the effects, it is a typical indica which produces a high level of relaxation with some mixed sativa effects that stimulate the brain. It also has intense and long-lasting effects. Speaking of the flavor, Moby Dick Feminized mixes the floral accents with the coniferous and woody ones and leaves a persisting spicy taste in the mouth. If you want to be high, you should definitely try this one!
💸💸💸💸💸 Here you can buy seeds of this top shelf strain: https://seedsmafia.com/en/feminized-cannabis-seeds/moby-dick-feminized.html?search_query=MOBY+DICK&results=2
🔧💡OUR SET UP💡🔧
✔️ 💲💲💲VIPARSPECTRA 🚀🚀🚀🌕🌕
ViparSpectra®️ XS2000 240W Infrared Full Spectrum LED Grow Light:
Excellent ratio between wattage and ppfd, excellent light penetraton, perfect light spectrum (it also has IR 🤩) and it has the best build quality on the market. Until now, built quality is really awesome. You can touch that quality. Materials are really strong, excellent driver and the best leds on the market. Heat dissipation is perfect, the lamp is never too hot and it has a passive dissipator so you will have zero noise. It also has IP65 certification. I like that this lamp is bigger than others, so the 240w of power are well distribuited on the space. Viparspectra has an awesome customer service, and shipping was creazy fast!
This awesome brand also offers 3 years warranty.
This lamp has no rivals.
A special thanks to Emily of Viparspectra ❤️❤️❤️❤️
HERE YOU CAN BUY THIS PROFESSIONAL LIGHT: https://www.viparspectra.com/products/xs-series-xs2000 or https://amzn.to/3dyUoJl
and here you can buy other awesome stuff: https://www.viparspectra.com
✔️ 💲💲💲MARSHYDRO 🚀🚀🚀🌕🌕
📦120X120 GROW TENT: an awesome box, easy and fast to assembly. Made by strong materials, solid zips and it is totally lightproof. The position of holes is optimal and the two lateral windows will make easier the work inside the box. There is also a double end, so you are 100% sure that dirt or liquids will not spill out. You can find it here: https://www.mars-hydro.com/grow-tent/buy-mars-hydro-grow-tent-48x48x80-1680d-4-x-4-size-keeps-all-light-in-top-quality-1680d-canvas-is-tear-proof-and-double-stitched-light-blocking-fast-installation-for-sale
💡TS 600 FULL SPECTRUM 100W LED GROW LIGHT : with this light you will achieve excellent buds, you will not need anything more. This lamp replace a 150w HPS lamp, but, with this Led Light you will smoke bigger, harder and tastier buds because Led have a complete spectrum and a powerful light penetration, so your plants will work as much as possible to make you happy. Psssssss it it extremely cheap and it is only 100w, your bills will never be too high, YOU HAVE NO EXCUSES!! Here if you want this little beast: https://www.mars-hydro.com/led-grow-light/mars-ts-series-led-grow-light/mars-tsw-600-led-full-spectrum-hydroponic-led-grow-light
Thank you Eleen of Marshydro❤️❤️❤️❤️
💣Quantum board - 480w - 4x120w Boards by Zhoangshan Koray Opto-Electronic Ltd.
Samsung LM301B 288 led/board 3000K 0dB noise
+24led/board led Osram 660nm
Efficiency 2.6 umol/J 220 lm/w
Driver: Meanwell HLG-480H-36B
💣Quantum board - 240w - 2x120w Boards by Shenzen Yuanhui Led Ltd.
Samsung LM301H 504 led 3500K 0dB noise
+24led/board led Osram 660nm
Efficiency 2.7 umol/J 220 lm/w
Driver: Meanwell HLG-240H-48B
-ESTRACTION FAN:
Blauberg 125 Turbo Pro Series
Maximum air flow: 430-560 m³ / h 50W 32-44 dBA
-FANS:
A)OSCILLATING FAN D.15cm 2 speeds 20w
B) COMPUTER FAN Sunon DP200A – 230V 20w (Strong, reliable and quiet)
C)Cornawall Electronics Multifan Turbo, three speeds, can be used both on support surfaces and mounted on the wall. High capacity, about 740 m3 / h. High silence and reliability.
💊💉💊FEEDINGS:
We used BioBizz light Mix
TOP CROP:
-DEEPER UNDERGROUND: to stimulate roots system
-TOP VEG: for a excellent growth in the vegetative phase
-GREEN EXPLOSION: to promote creation of bud sites and to allow a faster growth
-MICRO VITA: bacterias for equilibrate the soil and to make the plant healty
-BIG ONE: to stimulate bud sites and to stimulate resin production
-TOP BLOOM: to achieve excellent big and hard buds
-TOP CANDY: to feed the buds with molasses for a tastier smoke and to gain weight
-TOP BUD: to enlarge buds and to gain weight
PLAGRON: PK 13-14 to have big and hard buds and to feed plants with lower effort
ADVANCED NUTRIENTS: Sensi Cal-Mag Extra-> for cal mag deficiency
GROTEK: CAL MAG for cal mag deficiency
HESI: PowerZyme to clean and balance the soil. It feeds the plant cleaning the soil.
GHE: - Final Part (ex Ripen) accelerate the final flowering phase, dissolves minerals in excess
- Flash Clean to flush the plant and to be sure that all excesses are out from plant and pot
These two products improve A LOT the smoke of our babies
-PURPINATOR to stimulate flavonoids and to have a better taste and smell.
____________________________________________________________________________________________
🙏❤️ THANK YOU FOR BEING HERE ❤️🙏
Please leave a comment with your opinions, it is very important to us to have a comparison.
If you like our job, tap the weed button and follow us. It will be really appreciated.🙏
We want to thank again everyone that help us in our project. You support us to support our dream. ❤️
SPREAD THE LOVE OF THIS PLANT ALL AROUND THE WORLD
🌿Thank you again🌿
❤️Sweet hugs❤️
👨🌾CHILLING_RACOONS👩🌾

Likes
41
Share


@MadeInGermany
Follow
Flowering day 30
since time change
to 12 / 12 h
Hey guys :-)
Every day when I look into the tent, the sight and the smell are a dream 💚.
They are all developing very well.
There is no tip of the leaf that looks funny at the bottom or at the top 😃.
They were watered every 2 days with 1.3 l each (nutrients see table above).
They were all checked and checked for their health.
Stay healthy 💚🙏🏻
👇🏼👇🏼👇🏼👇🏼👇🏼👇🏼👇🏼👇🏼👇🏼👇🏼👇🏼👇🏼
You can buy this Nutrients at :
https://greenbuzzliquids.com/en/shop/
With the discount code: Made_in_Germany you get a discount of 15% on all products from an order value of 100 euros.
👇🏼👇🏼👇🏼👇🏼👇🏼👇🏼👇🏼👇🏼👇🏼👇🏼👇🏼👇🏼
You can buy this strain at :
https://www.exoticseed.eu/
Water 💧 💧💧
Osmosis water mixed with normal water (24 hours stale that the chlorine evaporates) to 0.2 EC. Add Cal / Mag to 0.4 Ec Ph with Organic Ph - to 5.8 - 6.5
MadeInGermany

Likes
9
Share


@OrihimeDelta
Follow
Nothing notable this week. The ladybugs continue to have a grand time. LST is continuing well, and it’s looking nice and bushy!

Likes
28
Share


@Ryder
Follow
Day 43 and things are progressing well but I still have some time to make up if I'm going to stick to this year's planning and need to get this run done asap, I pulled the girls out and gave them a eco neem shower for preventative measures and I will flip them to flower by days end, hopefully they show no signs of nutrient deficiency I've encountered during flower while using up the old mega crop formula, I'm guessing it's a mag deficiency as Epsom salts seem to keep it in check. Any advice on this would be great. Stay safe and happy growing.

Likes
13
Share


@Canadian
Follow
Nothing to really say except that they are growing very well Thank you for reading I will continue to update have a happy grow

Likes
169
Share


@CRiSPrGrow
Follow
Gorilla came down three days and ten hours ago, had the whole grow room to spare so she was hung whole upside down after just a bit of trimming for the main fan leaves that sort of thing. First day 24°C 60% humidity, second day 26-28°C 50% humidity, third day 25.5 °C 35% humidity. I had the exhaust and the fan going which gave this very nice light indirect breeze on these ladies. Really amazing smell that i had not really noticed until D-day, pistachios and christmas pine. Thought i was golden until i realised they were drying faster than i wanted. Ended up with 65/70% humidity which made these buds kinda airy in a way. Also the way the gorilla grows there were loads of tiny stems everywhere was a killer trying to get them out, ended up mincen some of the buds somewhat. Gorilla glue is absolutely a great auto to run. In ten gal it was tripple the size of my stunted one. 370 wet, hopefully something close to 100 dry - let's see I'll update in a couple of weeks.
The gorilla grows bushy quickly, by week 3 it was noticeably more bushy than the rest. Kinda took an extra week to really start flowering then it stretched 20-50 cm a week for four weeks. In all it's close to 1.5 meters in height, loads of colas, maybe twice or three times as many as the GSC. Next time i'm gonna prune the flower nodes further down the cola.
The buds themselves are quite thin, but rock solid much harder than any other strain i've grown so far - but this is my first time growen so take that with a grain of salt. The buds are covered in frost, trykes all over, oily oily oily, if you touch the buds your hands smells great for a few hours. Fun ! The trykes started appearing quite early and took a while's longer than the rest to get ripe - like truly ripe. So there were absolutely no ambers, maybe i saw one or two, but basically no ambers - this lady got cut down at the height of potency
The grow tent. Once you dial it in it becomes your best friend, but if you're having trouble getting it stable it can become your worst nightmare. I made every mistake in the book. First off i set it up without really testing it with the lights on when using it as a germination room. Worked like a charmed until i turned it on. Took me weeks to figure it out. In the end running the AC the whole time through all of summer until it's very last day. 600W HPS through summer is not something i'm gonna be doing again. With my wing reflector there was nothing i could do except keep the lamps high, led to a lot of stretching. Cool tube is the only way to go. The HPS started flickering half way through veg and it died while I was away. I ended up going through 5 of those small fans until i realized & got a box fan. Once I accidently had it pointing straight at them for 8 hours or more a couple of times on max.… So i got a white 150W fan from china i also got Silent TT 123 W fan and hooked it onto the cool tube. Great fan, huge, black, strong, and with temperature control. I call him big dick cop killer because he's black and beats the heat. get it? Had two 90° bends outflowing for the exhaust and the heat just wasn't getting dissipated quick enough. Both of them together I could rest my hand on the cool tube with ease.
i was able to test out temps and lux at various points in the grow room and figured i could have up to 4 degrees difference between the base and the top of the plant, still got it pretty stable. I had differences in lux from several 100 to several 1000 different places in the tent, probably because I was hanging the filter, the fan and the cooltube all crooked by then, but at that point my grow was a slow moving trainwreck. I had everything I needed to dial in my lamp to plant distance too, but couldn’t.
I went bio which was nice, but i think I should try synthtetics or a mix next time. The soil spawned some flies which were easy to get rid of. Then when i tried measuring the EC of the soil, i'm afraisd that the soil particulates kind of skew results. Thought the soil could buff out anything really but rhizotonic had the better of me before i could get my PH strips in.... not that it matters but I broke my PH meter pretty quickly anyway. Live and learn !
Watering itself I think is something you should pay attention to, you don’t want to be pouring it out and getting your soil compacted from the water. Seedlings are a different thing, not too much water, don’t keep the medium too wet, maybe watering with precision is something that could be done. Using the liquid ferts was quite tedious, and I have doubts about using all bio in general, using liquid fertilisers regularly in soil, and following the labels. Thing is you shouldn’t really need much of these ferts in soil anyway, yet still got cal mag deficiencies so you tell me!
Well there's a fair few things i wouldn't do again, like grow in the heat of summer with a 600W HPS and the AC on. I fumbled around before I had my dimmable ballast, and stressed out the seedlings which is a no no. Once I got the ballast I lowered then raised the intensity from 250 to 600 in three weeks light stressing my poor babies even more. It never occurred to me to plan out a grow, next time i'll definitely plan it out and make sure I'm kitted out a bit better going in. Same for the grow room, avoid bends in the piping, set the thing up a run it before i throw the plants in there, wont hang my filter above that high, and keep the fan on the ground maybe. Grow room wise I’m kitted out, got everything I need, but next time will install some 70 micron mesh in all my intakes just in case. Also never growing without cal mag again even in soil ! I'll probably do straight drops into forever homes directly too, no sense faffing about like the @silverback_guerilla 😂.
It's not all bad news though, loads of things i would do again. I would even grow in soil again, especially now i have a bunch of soil ferts from america (thanks @mrs_larimar !!!). I wouldn't mind using the 600W HPS again, worked well enough ! most importantly i will be using TNB CO2 again because it makes a clear difference even if i don't have any of my own grows to compare it to. Another critical thing i did which i'll be using again is the chelation agents, i'm going to want to stay more on top of those and might even use as foliar spray on XXLs between weeks 3 and 4 veg. I ended up spraying rhiz second to third week, will definitely add some cal mag in the foliar spray. Mag sulfur supplement is going in next time too, if you put a lot of light, you need a lot of magnesium, so that's happening again for sure. I’ve been looking at predator insects pretty seriously, ladybugs are a must clearly, but I might throw in some other ones too just to be sure.
It's a lot about what you do when you're not growing , learning about it, meeting great folks (see the comments for all my thanks), and enjoying watching a plant grow slowly. I learned so much about a plant that’s been a part of my life since I was eleven, I think I was 15 when I first thought it was silly not to grow, fifteen years later I can’t believe how long it took me to try it out ! Getting a crash course in horticulture, using a tent, and generally learning about the bio-dynamic world that surrounds us was really rewarding.
Just got some cool ferts in the mail all the way from America, so thanks to growgreentrees.com and growcaps might try them side by side. Expecting some cool testers soon too so thanks to @pharmaz my boy past the bridge ! I’ll pop those right in FTB5, Auto Zkits, and something else I don’t know yet cream cookies or lsd35? I really wanted to get out of the dirt with some coco or DWCs but oh well another soil grow can’t hurt ! A big thank you to @mrs_Larimar GD and the folks at trim bag for the gear ! I’ve already got a spinning blade thing, so let’s see how this compares , but at least now I’ve got cool scissors to do all that trimming – bless ! Just wanted to say thanks for holding my hand to a few folks @mrs_larimar of course, thank you so much and looking forward to some fun times on gd; my main man @mudbug great hanging out with you growmie ; @pharmaz and @silverback_guerilla; new friends like @bigdaddyk @valhallasgarden and @slimsativa; My ghost brother @beans, check out his one leaf GONNA MAKE IT GONNA BEAST IT ; Everyone who stopped by to help me @B4RNS of course, @farmerbrett too, @hawkbo, @tryhard, @tonino, @tazard @mad_scientist @spinnergrow, @poleeg1986 – he’s an amazing European canna porno director check out his gorillas my good lord save me; special thanks to all the Growvengers, and the @dudegrowsweed ; @wheetobeme, @experimentgreen, @weedeep, @chi_town_white_boy @chillum_mafia and even @mulch – play your part man bless ! Thanks to Nico @fast_buds for some cool testers, my favorite hat and some fun times on GD !
A final recap of everything I learned (see for yourself in the diary) : never buy a kit, buy local, buy direct, less is more, go big on fans, keep refills around, always add CalMag CO2 and chelation agents, no bends in the pipes, cover your intakes with micro mesh, nail the first couple weeks of flower and it’s smooth sailing, always protect your eyes ! Just one last thing though: have to say it’s pretty great having access to all the best horticuralists from around the world. Shout outs to all my North American and South American grower friends, @russiangrower and all the east European growers, my Scandinavian friends, Spanish and German growers, and African and Japanese growers, I don’t understand everything you’re saying all the time but I like your style ! You won’t know until you grow ! Dassit 🚀000000


Processing
Likes
9
Share


@Goldenboy2020
Follow
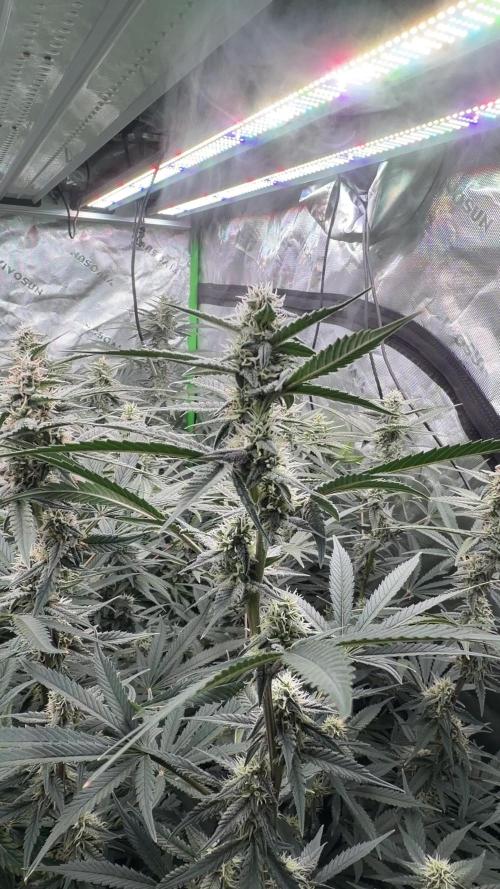
5th week of flower everything still looking good. Nugs getting bigger.
9/8 Middle of week 5 some of the buds are starting to flower and just thc everywhere. Will have plenty of trimmings for concentrates. Still wondering about the yield??? But see a little burn on edges of leaves. Probably go water only anyway cause still have organic toil soils working. Smells so good!!
Last day of week 5 looks amazing so much THC everywhere. Looking forward to them fattening up in next week or two.
