


Likes
24
Share


Likes
10
Share


@Stickygreens420
Follow
1/15/2024 - Day 15 Veg: today is the start to week 3, and she continues to look much better. She's a little smaller than I would like at this point, but after the damage from the foiler spray, I'm sure that slowed her down a bit. Hopefully she will be good from here. Have only watered with 6.0 plain water up to this point.
1/18/2024 - Day 18 veg: Did my first feeding today with about .5 gallons at a 6 ph. Mixed in Jay Plantspeaker Quillaja 60 as a wetting agent, Rootwise Mycrobe Complete, Rootwise Bio-Catalyst, BuildASoil Big 6, BuildASoil Cow Cal 24, Pure Protein Dry organic fish fertilizer, and Yah-Whey Thrive. Also, sprinkled some OptiVeg around the base of the plant, before watering in.
1/20/2024 - Day 20 veg: she seems to have liked the watering from the other day, because she is praying today. Trying to decide if I should top her. I'm a little concerned the damage I did in week 1, with the overly hot foiler feed, may have slowed her down a bit, so I'm worried about slowing her down anymore. Her side branching is coming in fairly well, but I'd like to help it along, so I decided to go with a minor super crop to bend her over a bit. We'll see how she reacts.

Likes
48
Share


@Focus420
Follow
11.týden
71 - den kontrola v pořádku
72 - den. Pohnojím všechny holky, kromě blackberry a brooklynu ty už jen vodou s ph - (5,8)
73 - den listy na autech začínají žloutnout. Jdeme do finále
74 den - kontrola trichomu kapesním mikroskopem. Trichomy se zdají být pořád nedostatečně jantarové
75 den - celoročky jsem dnes hnojil 😁
Blackberry gum, auto brooklyn a sleep proplachuji...


Likes
10
Share


@Sobreruedas
Follow
This week everything remains stable with no significant changes.
The plant continues developing well, so I’m just maintaining the current conditions and letting her do her thing 🌸💪

Likes
14
Share


@Fullmeltalchemist
Follow
Welcome to my Seedsman grow. This is my first real attempt at growing from purchased seeds. I didn't know too much about genetics when I bought these but hopeful they turn out dope. The idea was to have the tent filled with drastically different colored buds 😅I like symmetry
D1 - 9.13 - 3 fem White Widow Fast and 3 fem Black Sugar (Soaked/toweled) were dropped in to solo cups with bottom 1/3 NLS super soil and top 2/3 Fox Farms.
D4 - 9.16 - We got sprouts 100%
D6 - 9.18 - Third set of leaves making their move. Seedling station light is Phlizon 600W LED. I have it at 18in with full spectrum on.
D7 - 9.19 - Growin

Likes
34
Share


@CanadianFillmore
Follow
Let the flushing begin! Super pumped to finally be at the end of this first grow of this strain. 4 liters water for the flush. The last week she put on a little bit of size, but probably more density in the buds as well as terpenes and smell was gained.

Likes
41
Share


@gottagrowsometime
Follow
Welcome to my Auto Cinderella Jack(s) grows from Dutch-Passion.
Both ladies have been on water for 10 days. The synthetic got a hard flush and the organic was soft flushed (water for 10days to rid of excess nutrients in soil)
Was such a pleasure to grow both girls. The organic has lovely bright orange hairs with very dense hard big buds. Calyxes are nice and big with a nice leaf to calyx ratio. (Not much to trim)...The Synthetic girl has a completely different structure. Has shorter buds, that are very dense and has a lot more frost. Has lovely hints of purple throughout it. All buds are lovely and tight/dense and very stinky and sticky. Both plants needed the full dose of the FC 3000 and I've no doubt that I'd of gotten a different bud structure deeper into the canopy. (Its not larf) just not as hard the deeper down into the canopy, (some of the bud)
All ladies (autos) have been in a dark rest 24hrs now and will get another 24hrs in a dark tent. Hoping to see glistening resin upon harvesting.
Plants will be harvested in this grow week and dried, then after I taste and get the measure of both plants as for quality I'll rate them then.
HARVEST DAY. 48Hr rest. And they nice and glistening. Glad I rested them. You really can see the resin. I harvested whole. Pult the whole plant(s) up from the stem and broke away the clay and took the main roots that come from the stem. The organic, boy, she was bet in. Took me all my strength to break away her main roots. They were mm thick. Very nice root structure also. The synthic, the soil just broke apart before I could take out upon my pulling..put my back into it thinking would be the same. Strong, but nowhere near as good a root zone as the nearly all organic beat her hands down. As for bud size, she took that to. They equally smell very fruity and have a very light gasey smell. But very fruity. More that than anything. I'm sure I'll put my finger on it as the days go by. Let's hope they both dry nice and I can keep a steady temperature. (REMINDER if room drying this time of Yr. Turn off your radiators)
More pics to come and info on how the process is going..
Thanks for dropping by. Be sure to like so I can visit your diaries. Either way thanks for dropping by.


Likes
6
Share


@Mismatas
Follow
PRIMERA SEMANA DE FLORACIÓN, VAMOS PASANDO LAS RAMAS ENTRE LA MALLA, Y AÑADIMOS EL BUD IGNITOR A NUESTRO RIEGO

Likes
8
Share

@eldruida_lamota
Follow
Que pasa familia, vamos con la sexta semana de floración de estas Monster Maker feminizadas de Sweetseeds.
Vamos al lío, las plantas se trasplantaron a macetas de 7 litros.
El ph se controla en 6.5, la temperatura la tenemos entre 24/21 grados y la humedad ronda el 50%.
El ciclo de crecimiento puse 12h de luz, el foco está al 100% de potencia.
Tengo visitantes, trips que combatiremos con control biológico.
Me gustaría estar más encima este cultivo pero la salud me está impidiendo un poco este 100% con el proyecto.
- os dejo por aquí un CÓDIGO: Eldruida
Descuento para la tienda de MARS HYDRO.
https://www.mars-hydro.com
Hasta aquí todo, Buenos humos 💨💨💨

Likes
23
Share


@XperencdGmanXG
Follow
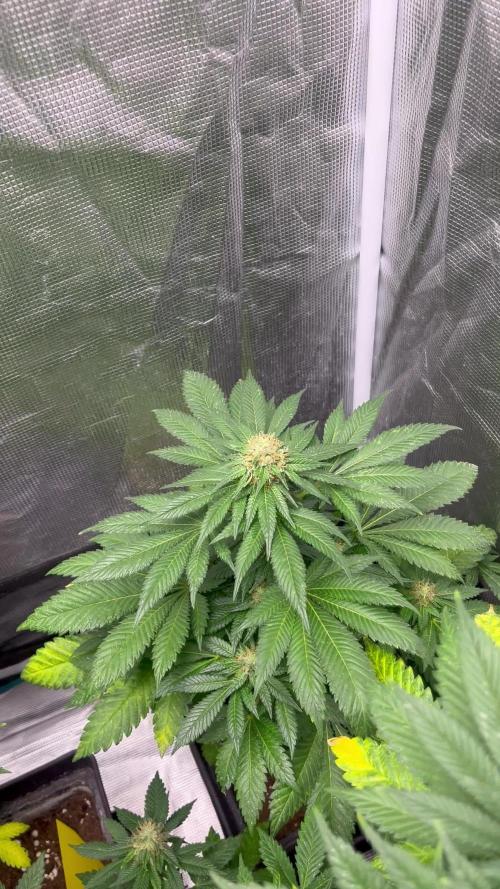
These girls are now entering full bloom and are just beasting! The size of the buds now will tell how big and dense they will be at the end. From here on in they will power thorough to finish.


Likes
11
Share


@Skinnytalls420
Follow
Just as difficult to grow as the first time I done Afghan kush but still managed to get some nice purple bud out of it!!!

Likes
10
Share


@StonedFarm
Follow
09/21/24 - Purple Punch 👊 & Green Crack 💚
Both these girls got the lollipop 🍭. All the winners stayed 🏆 😂. They got a bump up in the PPM, and we also increased the TPS Signal for the 3gallon dunk to now 3ml. 100% Bloom juice now. Runoffs are in the 6.3-6 4. So they thriving.
09/24/24 - Purple Punch 👊 & Green Crack 💚
Both these girls are drinking heavy, and already starting to see frost on the PP. We have them a top feed of just pH 7.2 water, to hit the 6.4 runoff.

Likes
12
Share


@MadeInGermany
Follow
Flowering Day 9
Since time chance
To 12 / 12 h
Hey guys :-)
She grows great and is doing well in the flowering tent :-) .
Today everything below was cleaned and defoliated :-) .
A lot was removed because this time it was quite cramped in the tent and you don't lose your energy in the lowest shoots :-) .
This week it was poured twice with 1.2 l each.
Everything was checked and it looks like all trips are slowly but surely gone :-)
have fun and stay healthy 🙏🏻💚
Was poured 2 times with 1 l each.
I'm looking forward to the start of flowering :-)
have fun and stay healthy 🙏🏻
👇🏼👇🏼👇🏼👇🏼👇🏼👇🏼👇🏼👇🏼👇🏼👇🏼👇🏼👇🏼
You can buy this Nutrients at :
https://greenbuzzliquids.com/en/shop/
With the discount code: Made_in_Germany you get a discount of 15% on all products from an order value of 100 euros.
👇🏼👇🏼👇🏼👇🏼👇🏼👇🏼👇🏼👇🏼👇🏼👇🏼👇🏼👇🏼
Water 💧 💧💧
Osmosis water mixed with normal water (24 hours stale that the chlorine evaporates) to 0.2 EC. Add Cal / Mag to 0.4 Ec Ph with Organic Ph - to 5.8 - 6.4
MadeInGermany

Likes
3
Share


@whenindoubtsmokeitout
Follow
Greetings, fellow growers! Let me share the latest progress of my LSD-25 Auto journey as I navigate through Weeks 9 and 10 of the grow cycle:
🌟 **Vibrant Bud Development**: My LSD-25 Auto plants have entered the final stretch of flowering, with buds reaching their peak size and density. The once-promising flowers have transformed into resin-coated colas, exuding the characteristic psychedelic aroma that hints at their potency. Trichomes are abundant, signaling the optimal cannabinoid profile and a potential journey into euphoric bliss.
📏 **Fine-Tuning Environmental Conditions**: As I approach harvest, my focus remains on fine-tuning environmental parameters such as temperature, humidity, and airflow. By carefully managing these factors, I aim to create the perfect microclimate for my plants to thrive and produce their most potent and flavorful buds.
🍃 **Leaf Senescence and Nutrient Management**: In these late flowering stages, some leaves may naturally begin to senesce as the plant reallocates its resources towards bud production. This process is a natural part of the plant's life cycle and signals that harvest time is drawing near. Meanwhile, my nutrient regimen continues to be meticulously adjusted to ensure the plants receive the essential elements needed for robust flowering and resin production.
🔍 **Trichome Assessment for Harvest Readiness**: With harvest approaching, I'm closely monitoring trichome development to determine the optimal time for harvest. Using magnification tools, I inspect trichomes for signs of maturity, aiming for a mix of cloudy and amber trichomes to achieve the desired balance of cannabinoids and psychoactive effects.
🌞 **Preparation for Harvest**: As I prepare for the culmination of my LSD-25 Auto grow journey, I'm gathering the necessary tools and supplies for harvest day. Trimming shears, drying racks, and storage containers are being readied, while my workspace is meticulously cleaned and sanitized to ensure the preservation of my precious buds' integrity. Proper post-harvest care and curing techniques will be employed to enhance flavor, potency, and overall quality.
In summary, Weeks 9 and 10 mark the final stage of my LSD-25 Auto grow adventure, where careful attention to detail and precise cultivation practices pave the way for a bountiful harvest of potent, psychedelic buds. Stay tuned for the next update as I celebrate the culmination of my journey into the realm of LSD-25 Auto. Happy growing! 🌿✨
Likes
19
Share

@eldruida_lamota
Follow
Bueno, empezamos por el final familia.
Gorilla girl, me parece una cepa BRU-TAL , ya partiendo de esa base, mi error, creo que e cometido , es poner estos ejemplares en macetas de 5L, que tonto... mínimo recomendado 7L y a ser posible 11L
Otro error fue no dejarlas una semana más. pero, escasez. (intentaremos curarla un par de semanas).
Cepa con flores muy compactas, hay bastante separación entre nudos pero compensa las flores de verdad.
Sabor muy dulzón a mi me recuerda a melón , es un pepino recomendado para amantes de la hierba que llevan tiempo en esto, un colocón muy fuerte, ahora mismo estoy bajo los efectos de esta vaina, aseguro que con cada frase, leo varias veces y detenidamente por que válgame.