
Processing
Likes
Comments
Share


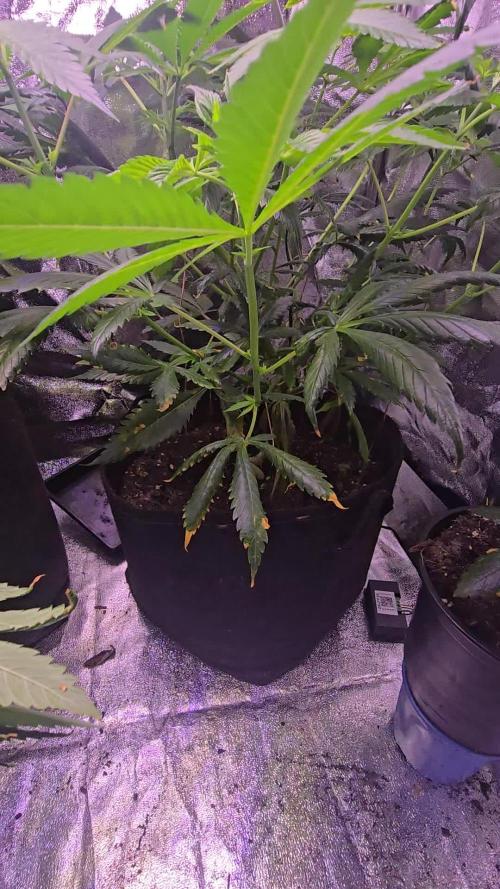
@Isle_of_dank
Follow
Flicked to flower 21th June under two 600watts LEDs in bloom humidity 47to53 temperature 20c to 25c will update with pictures on 26th June

Likes
Comments
Share


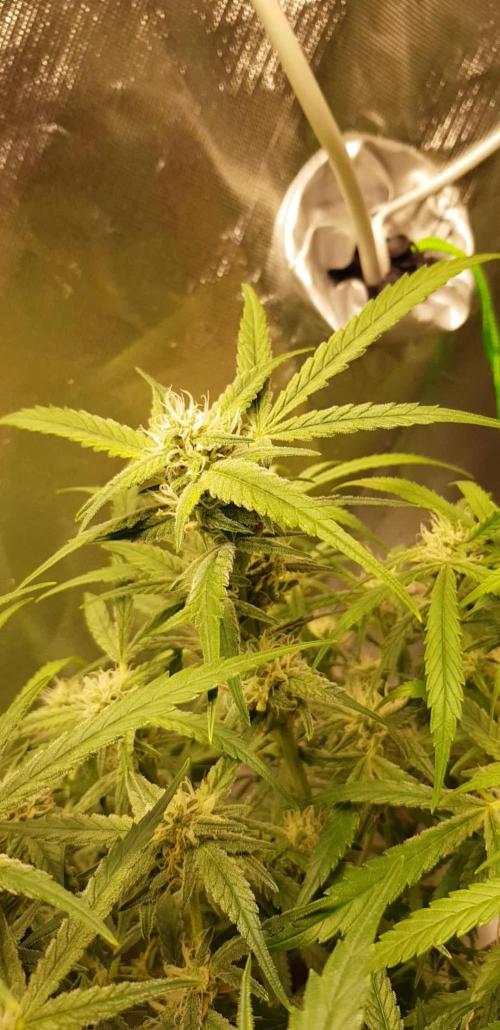
@Chefc14
Follow
impressive amount of resin on the sweet and spicy scent cheese x kush !!!
You cut !!!


Likes
7
Share


@Stickygreens420
Follow
5/1/2023 - Day 64 Flower: Beginning of week 10. Girls continue to fade. Dropped the light intensity one more notch to level 7 and keeping temps lower. Other than that, just watering as needed.
5/4/2023 - Day 67 Flower: watered with 4 gallons of water mixed with Coconut Powder. Seeing some pinks and more purple. Still not seeing much more amber tricomes, so I want to push these another week to 10 days.
Likes
22
Share


@BENY_TRUBY
Follow
La semana empezó con lluvia y poco sol, el crecimiento se ralentizó, aunque siempre las he protegido de la lluvia para poder abonar en los riegos.
Tras la lluvia llegaron los días de sol pero con mucho sol y viento seco. Humedad relativa 20% y temperaturas invernales. Las plantas pasan la noche dentro de casa y 2 de ellas reciben 4 h de iluminación artificial complementarias.
He comenzado a utilizar biobizz grow y un revitalizante de algas (1 vez en pulverización foliar y siempre com el riego). Todavia he utilizado el potenciador de raices.
El primer dia de la semana empecé el LST en las 2 plantas que reciben iluminación artificial (1 automaria y 1 white berry). Estoy muy sorprendido con su desarrollo en comparación con el resto (aunque no crecen en altura, tienen muchas hojas y se ve que las ramas se desarrollan).
Ayer empecé el LST con la otra white berry.


Likes
3
Share


@MrLahey
Follow
Day 54 update.
Gonna give her about another week maybe to let her ripen before I chop but it’s getting close!
Buds look and smell fantastic. Leaves are taking a beating from something or another.

Likes
19
Share


@Chubbs
Follow
420 Fastbuds
FBT2306 Week 7
What up Grow fam. Week 7 update on these amazing plants. Looking nice would be an understatement for these two. The flower sites are a thing of mesmerizing beauty when gazing upon them. You'll see shades of purple, pink, and white. Definitely a sweet smell to them. Still feeding nutes every 3rd water with water and calmag in between. Over all been easy Growing with no special treatments needed. Happy Growing


Likes
1
Share

@Dendegrow
Follow
🍬 Sweet Mandarine Skittles – Week 6 Update 🌿
This beauty is really starting to shine! ✨ The Sweet Mandarine Skittles has filled out nicely over the last days, with strong branching and a sweet citrus aroma already in the air 🍊🌸.
She’s showing her candy side now – colorful vibes and a really healthy look 🌈💚. Week 6 feels like the turning point where everything comes together beautifully.
Can’t wait to see those buds fatten up in the coming weeks 🔥🌱.
Follow along if you want to catch the sweetest rainbow in the garden 🌈🍬.
---
🍬 Sweet Mandarine Skittles – Woche 6 Update 🌿
Diese Schönheit fängt jetzt richtig an zu glänzen! ✨ Die Sweet Mandarine Skittles hat sich in den letzten Tagen super entwickelt – kräftige Verzweigungen und schon ein zarter Citrusduft in der Luft 🍊🌸.
Man sieht jetzt schon ihren „Candy-Charakter“ – bunte Vibes und ein rundum gesunder Look 🌈💚. Woche 6 ist echt ein Wendepunkt, wo alles perfekt zusammenkommt.
Ich freue mich riesig auf die nächsten Wochen, wenn die Buds anfangen richtig aufzublühen 🔥🌱.
Bleibt dabei, wenn ihr das süßeste Rainbow im Garten erleben wollt 🌈🍬.
Likes
6
Share

@GERGrowDesigns
Follow
Welcome to Flower Week 4-5 of Divine Seeds Auto Fractal
I'm excited to share my grow journey with you all as part of the Divine Seeds Autoflowering Competition 2025. It's going to be an incredible ride, full of learning, growing, and connecting with fellow growers from all around the world!
For this competition, I’ve chosen the Feminized Automatic strain: Auto Fractal
Here’s what I’m working with:
• 🌱 Tent: 120x60x80
• 🧑🌾 Breeder Company: Divine Seeds
• 💧 Humidity Range: 50
• ⏳ Flowering Time: 60 Days
• Strain Info: 23%THC
• 🌡️ Temperature: 26
• 🍵 Pot Size: 3
• Nutrient Brand: Narcos
• ⚡ Lights : 200W x 2
A huge thank you to Divine Seeds for allowing me to be a part of this amazing competition and Sponsoring the Strains. Big thanks for supporting the grower community worldwide! Your genetics and passion speak for themselves!
I would truly appreciate every bit of feedback, help, questions, or discussions – and of course, your likes and interactions mean the world to me as I try to stand out in this exciting competition!
Let’s grow together – and don’t forget to stop by again to see the latest updates!
Happy growing!
Stay lifted and stay curious!
Peace & Buds!

Likes
36
Share

@Mrs_Larimar
Follow
2025-10-02
And again a weather change- to clear weather and some sun-
thats fine
in the mornings some fog- and then sun until evening and quite cold nihgts
perfect
see you next week

Likes
13
Share


@Gram_Solo
Follow
Back in business
Got some Lst work to do on these to keep em low
I've been away for few weeks and they gone mental , started flower 12/12 3 days ago.
Will be keeping stems as low as possible.
Just ph water this week then onto flower nutrients.
They had a 13 week veg
Likes
144
Share


@TOTEM
Follow
She’s still stretching!
This week I removed Voodoo Juice, Tarantula and Piranha, and added B-52 and Bud Factor X (never tried this one before). Since the princess loves this 2ml/L dosage for NPK nutes, I’ll not be touching that for the moment. That seems to be the optimal dosage for a sativa like this. Very nice!

Likes
23
Share


@HideAndFly420
Follow
Hi all growers,
Day 64
Last week of big bud and last two week of fertilising, then two week opf flushing for the baby.
I decided to add calmag to reach a ggod ppm, and aptis regulator because olants are really stressed from the olight intensity in some spoot and i hope to make it stronger.
Let's see what's happen now.
Day 66
She absolutely needed calmag. I gave 0,5/1lt twice and I already can see the difference in leaves. I think I ll give 0,7/1lt next time. I broghut ppm to 950 last time. I desire 1000 ppm for last weeks of fertilising.
today:
with ph 7
Ppm 1150
Day 69
Today has been the last feeding day for this lady, i just checked with a micro and it looks like i ve got 15/20 days max left. So from day 71 i'll start flushing with ph controlled water at 6.2.
today:
-ph 7
ppm 1050
Less then 3 weeks now :)
ANY SUGGESTION IS WELCOME :)


Processing
Likes
21
Share


@LittleBigTrees
Follow
I've turned the light up to 35000 lux.
Up'd the bloom to 1.5ml/l.
There still stretching and could do with more room but there doing well 😎
Likes
25
Share


@RastaMouse
Follow
Realy looking forward to this grow. Two of my all time favourite blueberry and cheese combined in one plant. Thank you royal queen seeds lol. So I decided to give RQS starter pack a go. But I did modified it a bit. It’s a simple starter you make up 1l of water add the sachets stir then soak the tray for 10 secs and put seeds 5mm into the soil then wait 5 days. Well I grow in hydroponics with jiffy cubes as starting cubes so I just soaked jiffy cubes in the solution then placed seeds right in. Blow me down 3 days and 3 of the lady’s are out the soil well Impressed how well it worked and easy for this noobie grower. So far impressed with RQS got my eye on their pineapple Kush for next gen or the hulkberry maybe even north thunderfuck... to many to pick from will have to think it over lol. But happy with this starter kit and all going good so far.
Likes
11
Share


@Neetly
Follow
Week 0 Day 1
Alrighty my first grow ever but I’ve done my research through growweedeasy.com. And I’ve decided to go with 70/30 mix of coco coir and pelucite into 5 gallon fabric pots dosed with Cal Mag; and I’m planning on feeding it with FloraTrio next week.
Week 0 Day 2
They split around hour 19! Gonna wait for it to grow a little more then transfer into rapid rooter that came with the kit. Just Transferred into the rooter and keeping it warm on top of my pc, hoping to see some sort of sprouting by day 3/4 and good weather to transfer these babies over. So far, I’m just keeping the ziplok bag moist with 5.5-6.5 pH balanced water.
Week 0 Day 3
Transferred the rooters into the final pot for the rest of their growth, these puppies are fast growers ! pH is a consistent 6.0, and I’m keeping them in my garage since it’s 60F outside. Hoping for warmer weather, at least when she sprouts her first couple of leaves.
Week 0 Day 4
Just transferred the pots outside, hoping to get those sprouts some fresh sunlight. And hoping the good weather holds up. I think I should be able to start the coco coir nutrient schedule tomorrow. Going to base it off this schedule, Week 1
( https://www.growweedeasy.com/wp-content/uploads/2014/12/coco-coir-flora-series-schedule.pdf )
Week 0 Day 5
Growth has been good so far, unfortunately it seems like one of the super lemon haze girlies didn’t make it :( i’ve started to feed them the nutrients from the seedling section of the schedule. Keeping an eye out for any changes.
Week 0 Day 6
Spotted a couple of aphids, gonna look into natural insecticides/ordering ladybugs as a natural predator.


Likes
33
Share


@420DeepGrow
Follow
Gran cosecha de calidad gracias a Marshydro y XpertNutrients.
Una planta con distancia intermodal media y unos cogollos resinosos de un tamaño medio.
Su aroma esta muy conseguido, puro Zkittlez con un toque cítrico que recuerda a la mandarina.
Las manos se me impregnaban de resina al manicurar.
Processing
Likes
26
Share


@eldruida_lamota
Follow
Otra vez familia, estamos de vuelta con estas skunk de zambezaseeds, sin palabras de verdad fumetillas, son una cepa muy lograda las flores están formándose muy compactas , y empieza a engordar de verdad, ya me diréis cómo las veis? Yo las veo muy sanas 🙅♂️

Likes
6
Share


@blackhole
Follow
The auto flowering have started to flower...The feminized ones are growing very fast.