
Processing
Likes
Comments
Share


@Wicked_Stix
Follow
Been wanting to try out this auto ghost og from original sensible seeds for a while and finally got the opportunity to get one wet.
I originally started this setup to compete in the solo cup challenge, but I needed something that will be minimal maintainence and doesn't require hand watering. So this is what I ended up with. I will not be entering since I know it will bring controversy, but I am going to follow the rules and treat this grow as if I am competing.
I didn't want to use regular solo cups because last time I had a lot of algae growing in the root zone when I harvested. I opted to use a black light proof cup. These cups were 27 oz originally so I filled them with 16 oz of water, marked the level, then cut them down to 16 oz. I set the drain pipes about an inch from the bottom so they have a little reserve if I have pump or power issues. I know people will see the drains as a way for roots to grow out of the cup but in reality I have to keep the entire pipe free of roots or it will clog and overflow. So I am actually losing a little volume due to this.
I filled the bottom inch or so of the cups with river gravel to stop the perlite from washing into the reservoir.
I am running a 5 gallon reservoir with a small air pump and the plants will be getting irritated 24 hours a day from an aquarium power head pump. I set the system up to be totally self contained and easily portable. It was all built from things I had laying around other than 97¢ for the cups. I will be keeping the feed simple as always feeding maxigro and maxibloom with a couple flower boosters.


Likes
10
Share


@RandomStreetMerchant
Follow
So this week has been hot for these girls but they didn’t mind too much. Really need to get some new equipment but will take a long time. We all make do with what we got amiright hahaha.
This upcoming week will be interesting to see how the girls are and grow. Can’t wait to show you all.
Till then wish you all the best growing may your buds be dank as fuck /6/5/23/

Likes
16
Share


@Northern_Ent
Follow
Happy palindromic 4202024.
To help celebrate I’m starting a couple of Euphoria seeds and making the first diary entry of the season.
This year i’m doing two photoperiod plants, starting today, and two autos that I’ll start in mid-May.
Apr 22: moved into soil after about 48 h in 25 C water in the dark. Have a ripe apple beside the seeds under the foil because apparently the ethylene gas that is given off helps. Science paper I happened across last winter - will post reference when I remember.
Apr 25: removed foil (and apple) and left on a 25 C heat mat beside a light that is going for tomatoes and peppers. Weak light, warmth, and high humidity is what they need at this stage.

Likes
38
Share


@Epokwan
Follow
Howdy folks. This week had some turbulent weather, and is really testing the resistances of this strain. The days have either been hot and humid, or raining non-stop. Not exactly what you want late flower, but you get what you get with outdoors!
Spotted a few swollen calyxes so there must be pollen floating around. My neighbour just discovered a male plant over his side of the fence. Crossing my fingers that there were no open pollen sacks before he pulled it. Apparently the pods were tiny and hadn't opened yet but I never got to see and verify that. But... this is outdoors, and the area is very outdoorsy/foresty - so there's bound to be loads of stray males in the area.
Hoping that these don't turn into seed factories 🤞
What's the latest a flowering plant can get pollinated? Are you ever in the "safe zone"?

Likes
10
Share


@MadeInGermany
Follow
Flowering day 12
since time change
to 12/12 h.
Hey everyone ☺️.
Once again a wonderful week goes by 😀.
It has developed so far and is now slowly starting to develop its flowers :-).
As soon as the first forms of buds can be seen (I think in 5-10 days) 2 g GHSC Powder Feeding Bio Bloom per liter of substrate are added.
In the third week, 1 g per liter of substrate is added so that it lasts through to the end :-).
This week it was poured 3 times with 1 liter each 👍.
The entire tent was also cleaned and the electronics checked for functionality.
The humidifier was refilled every day and fresh osmosis water was drained into the tank for the coming week ☺️.
The plants have all been checked for health and pests 👍.
Next week the bamboo sticks are inserted towards the end for support and the lowest shoots are removed so that at the end the energy is not wasted in the lower area 👍.
Otherwise there is nothing more to report this week :-).
I wish you a lot of fun with the update 😎.
Stay healthy and let it grow 🍀.
You can buy this Strain at :
https://www.zamnesia.com/de/5165-zamnesia-seeds-kalini-asia-feminisiert.html
Type:
Kalini Asia
☝️🏼
Genetics:
Black Domina x Purple Kush
👍
Vega lamp:
2 x Todogrow Led
Quantum Board 100 W
💡
Bloom Lamp :
2 x Todogrow Led
Cxb 3590 COB 3500 K 205W
💡💡☝️🏼
Soil :
Canna Coco Professional +
☝️🏼
Fertilizer:
Green House Powder Feeding
☝️🏼🌱
Water:
Osmosis water mixed with normal water (24 hours stale that the chlorine evaporates) to 0.2 EC. Add Cal / Mag to 0.4 Ec Ph with Organic Ph - to 5.5 - 5.8 .

Likes
18
Share


@Dunk_Junk
Follow
Stick a fork in her, she's done.
Look at the timelapse how she goes yellow very quickly!
Shortly after these pics she was harvested.
I note she is VERY sticky.


Likes
28
Share


@Theia
Follow
I was going to chop these beautiful frosty sweet smelling girls down today but after getting in on the trichomes I've decided to go another week to get some more milky and ambers.
They are now in full purple dress all leaf is now a dark purple almost black and it's also started to form up on the flowers too.
The light is running at 100% and the girls all love it. SP3000 is just so good to me. I want another one just incase anyone from Mars hydro stops by.. I purchased this one myself and I am ready to run a second as an array so come on Mars hydro... Send me one over would you😝🤣👍👍.
The frost on these girls can only be down to the introduction on greenbuzz liquids. I grew mom out on biobizz and nowhere near any comparisons. The buds are denser and much more frosty. The smell is stronger and in general the plants feel more resilient..
If your about to buy some more nutes and fancy a change then I recommend this line of organic goodness with all my faith.. you will not be disappointed .
If you fancy a try I have been given a code you can use at their EU store
It gives you 15% Discount in their EU shop
There is a minimum Order value of 100 Euro but 15% is pretty good..👍🏼
https://greenbuzzliquids.com/en/shop/
Code: theia
I don't get anything from this except the warm feeling of knowing your plants will thank you..👍👍.
Until next week.
Stay safe 😷😷
Grow well 🌿🌱🌼

Processing
Likes
29
Share


@Grey_Wolf
Follow
Ginger Nut cookies & Aussie music video's 5th March 2020
Flowering Begins .......................................
My little creation is officially Flowering folks!!
After stretching upwards about 30cm all tips are developing little Budlets. I started to see minor signs of Nitrogen deficiency from a coupleof bottom leaves that
suddenly began to yellow. This is fairly normal as the plant would have needed as much (nitrogen) as it could get doing all that stretching.
I needed to feed half strength grow nutes ( professors nutrients) @1ml/L three times during the last 7 days.
Now that the stretch seems to have slowed right down I will start to add some Dr Greenthumbs Bud n Bloom mix ( aprox qtr of a cup).
I'll also keep using LST to allow as much light to penetrate as possible. 👍
**** Now for the Weekly Australian Music Videos ***
Last week I posted Links to songs from the Artist Paul Kelly , they were Sleep Australia Sleep and Dumb Things.
I hope you listened to them but that's your preference whether you choose to or not.
Anyhoo This weeks Artist is a real Blast from the Past!! The bands called Daddy Cool
and Ive selected a couple of their quite catchy tunes that were recorded way back in the 1970's
Firstly is a Classic here in australia this is....
Eagle Rock https://www.youtube.com/watch?v=oQfAZVsz6KM
And the other song is Come back again
https://youtu.be/oIG9osPPILM
I am sure these will have you bopping along to their cool and laid back Musical style.
Hope you Enjoy and please leave a like if you do
& I'll be back next week with another grow update and Aussie music Video 💪👌👍


Processing
Likes
12
Share


@Tazard
Follow
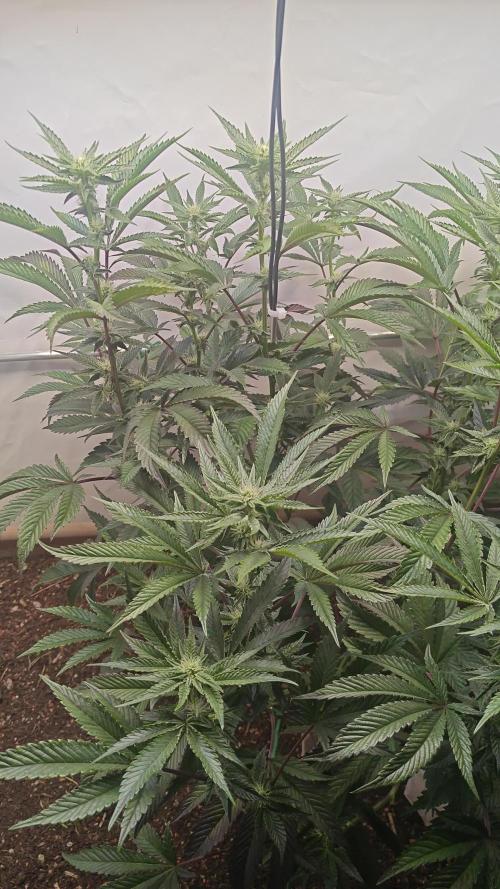
These are clones that I managed to take from my summer garden that became a disaster due to a heat wave that we had breaking 100 year records. I expect everything to be 48” in height at maturity.


Likes
247
Share


@PremiumBudsEU
Follow
Thanks to Ganja Farmer Seeds for the great genetics 🌱🌱
can't wait to taste my buds 😎😎😎
Thanks to my grower friends and growers family for the feedbacks and the support 👊🌱💚

Likes
13
Share

@Danylo
Follow
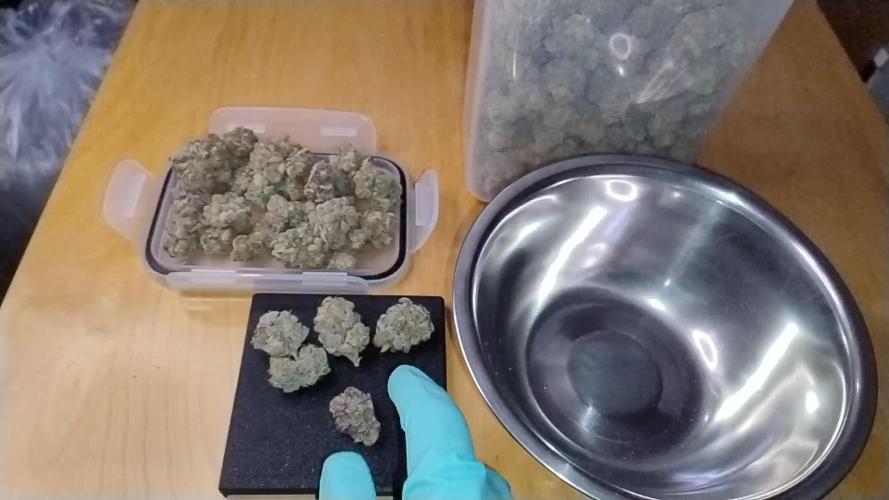
I am an irredeemable wet-trimmer.
Trimming this one was reasonably easy, but because there was so much of it ... it still took some time. Some of the "trim" was completely covered by trichomes but I treated her like any other plant in this regard and I'm satisfied with the results. The trim bucket looks ridiculous though. I added a pic of some of the last trim to the gallery.
I tried to make a few videos too - I think my videomaking style is called "spaceship flies over woodlands" so please don't judge.. at least there is no audio of me making plane noises.. 💩


Likes
47
Share


@L_Tetragrammaton
Follow
This week was explosive! I bumped up the grow nutrients and added the Bud Ignitor at 1/4 strength. I also increased the water amount progressively building up to a half gallon by the end of the week.
Mid week I stepped the exhaust fan up and increased the light to about 175w. I started the “new to me” training method as well getting some nice light down into the side shoots and lower canopy. Rings were left on during light cycle and misted with plain water and rings removed before lights out.
This week I also dropped the tower fan to the floor and brought the clip fan down a foot above the canopy and am running on the same schedule as the humidifier. Which is set to be on 20min before lights on and off 10 min after lights out.
Thanks for stopping by and happy growing!!! 🌞
