
Likes
Comments
Share


@CanadianFillmore
Follow
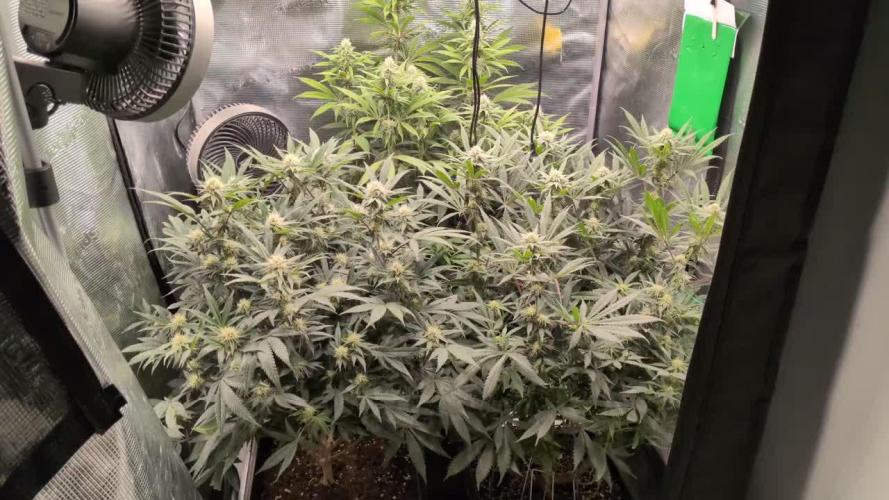
Week 8 begins for GG4, the last week of feeding nutrients. Week 7 went really well, the extra feeding definitely helped midway through the week. Looking forward to flushing this girl in a week's time.

Likes
5
Share


@GrowFunMD
Follow
Harvested Plant #2 and Plant #3 at 11 weeks. Still have #4 and #5 to go. They are just about ready. Been waiting until the leaves turn purple. These plants have been flushing for weeks because I thought they were going to be done sooner, but they haven't missed a beat. They have a very strong, sweet smell. I highly recommend Cobbler Crisp!!!

Likes
43
Share


@Growshh
Follow
Final week of flower, plain old tap water in thr . Almost 70% milk, ambs here and there, fade progressing and surprisingly still swelling!
I have a lot of larfy buds because I was lazy on the defol, so may do double harvest!


Likes
11
Share


@GREENPHOENIX6262
Follow
Week 3 Veg Update, (Please see the following)
Both Plants ( Seedsman -Critical +2.0 - Blimburn (Applefritter)
Thus far both plants are coming along nicely
WIll be using Bud clip bender this week to utilize PPF light usage.
*Mid-Week Update*
Introduced CaliMagic this week
LST and Bud clipped
Light Defoliation
Introduced Element Nutrient (Flower Fuel)
1 week until early Flower.
*End of week recap* 08/21
Light Defoliation
Bud Clip tie down
Thus far all is running smoothly, No changes from above.


Likes
1
Share


@Ferenc
Follow
Day 22: 600W LED 20 hours on 4 hours off, the same with ventilation. Humidity around 60-70%. Water intake 50ml per plant per day plus some triggering spray. Bat gunao, Epsom salt, Biobizz BioGrow, BioBloom and TopMax for fertilization. .. I will use these ones 3 x a week and I will use bat gunao every second day. I will see:) Critical Orange Punch is the fastest and biggest and Lemon Zkittle started coming up as well..
Day 24: Critical Orange Punch is crazy she grows so fast she looks like a palm tree now. Sour Orange and Lemon Zkittle is developing very well Sour Stomper remains small. Another Sour Orange is on the way in the corner she is the smallest but she was planted much more later.
Day 28: End of the week the tallest is Critical Orange Punch with 22 cm and the shortest is Sour Stomper with 10 cm.


Likes
14
Share


@eldruida_lamota
Follow
Que pasa familia, vamos con la cosecha de estas Gorilla Zkittlez Auto de FastBuds.
Por dónde empezar, es una autofloreciente que es normalita de cultivar, tiene un periodo corto de crecimiento y de floración igual no es largo, o igual tendría que haberla dejado alguna semana más no entiendo bien.
En cuanto a la alimentación , pues la aplique una vez por semana y a sido suficiente, se a comportado bien en interior, la flor pues no es muy prieta porque no deja de ser una autofloreciente, pero es una flor que va repleta de tricomas.
El periodo de luz pues de principio a fin a 18 horas, fue suficiente para completar el ciclo de vida como esperaba.
Agrobeta:
https://www.agrobeta.com/agrobetatiendaonline/36-abonos-canamo
Hasta aquí todo, Buenos humos 💨💨💨


Likes
14
Share


@Kakui
Follow
7 Diciembre: Se cambiaron las plantas desde la carpa de vegetación(120x120) a la de floración(150x150) en dónde hay más espacio para deshumidificador, ventiladores, etc.
Se sigue regando con 6.2pH y 3.0EC. Pronto se agregará una malla scrog.
10 Diciembre: ya hay claros signos de floración, se colocó una primera capa de malla scrog, el riego Generativo va como se planeó, con pequeños runoff llegando a 7EC, esperando subir hasta 10EC, con ese estrés controlado se mantienen las plantas en una altura óptima evitando que estiren mucho.
Hasta el día de ayer, las plantas estaban con 5 disparos(riegos) de 200ml cada uno aproximadamente, hasta obtener runoff, hoy sin embargo, habían 2 plantas con "wilting" lo que indica drybacks excesivos, por lo que hoy se agregaron 2 disparos extra, también llamados P1, y 2 mini riegos de 100 ML en la tarde, P2, para evitar el secado excesivo y el decaimiento de las plantas, las cuales están pidiendo más nutrientes.
El VPD se mantiene en 1.2~1.4.

Likes
23
Share


@Nonno_Fede
Follow
Sabato si taglia ✂️😪.
.Good morning, as they advised me, I won't cut it today but in a week. I'm still waiting impatiently.😔
Likes
9
Share


@Vega0284
Follow
Chopped them today, great coloring so far, really excited to see how they turn out by the end. There weren't any issues this week as it was just a flush and a few days of darkness. I've got to get better at lollipoping and maintaining the skirt in the future. Definitely a lot of wasted energy and nutrients going into flowers that never budded out.

Likes
5
Share


@Black_Widow
Follow
Привет садоводы !!!
Хотел уже срезать цветок , но так жаль такую красоту срезать
И я решил подержать ее еще недельку
Полюбуюсь еще такой красавицей
Шишки у нее как камень
оцень интересный экземпляр !!!

Likes
53
Share


@DogDoctorOfficial
Follow
Harvest Report: The Swift Journey of Blackberry Auto
Greetings, fellow cultivators! The moment we've all been eagerly awaiting has arrived – the harvest of my Blackberry Auto. This beauty has moved through her life cycle with astonishing speed and grace. Let's take a moment to reflect on her incredible journey from seed to harvest and celebrate the fruits of our labor.
Seed to Sprout: It feels like just yesterday when I planted the tiny seed of Blackberry Auto. Nestled in a Root Riot cube, she sprouted with vigor, her first delicate leaves reaching for the light. The conditions were perfect, with temperatures at a steady 28°C and relative humidity at 95%, creating an ideal environment for her early growth.
Transplanting and Early Growth: As she transitioned to a small pot filled with rich soil and Mycor Mix, Blackberry Auto continued to thrive. The Mycor Mix, with its blend of various mycorrhizae species, worked wonders in enlarging her root system and facilitating nutrient uptake. Her early growth was nothing short of spectacular, setting the stage for the robust plant she would become.
Rapid Vegetative Phase: Blackberry Auto quickly outgrew her initial pot and was soon transplanted into her final home – a 16L AutoPot. This setup allowed her to drink as she pleased, supported by the precise hydration of the AutoPot Aquavalve. With a foundation of Aptus All-in-One Pellets and Mycor Mix Soil, she had everything she needed for explosive growth. Her leaves grew enormous and lush, and her branches spread wide with gentle low-stress training.
Swift Flowering and Stunning Development: Entering the flowering phase, Blackberry Auto didn't slow down. Her buds formed quickly, each one a masterpiece of nature. The colors were a sight to behold – deep purples, vibrant magentas, and hints of dark blue. The aromatic symphony filled the grow room, a testament to her potent genetics and the meticulous care provided.
Natural Brilliance and Final Weeks: Observing her rapid progress, I ceased all feedings to let Blackberry Auto showcase her natural brilliance. Her final weeks were marked by a dazzling display of colors and an incredible pace of bud development. Each day brought new marvels, as her buds swelled and her trichomes sparkled like a constellation.
A Heartfelt Reflection: From the moment she sprouted to her final days of flowering, Blackberry Auto has been a true wonder. Her speed and beauty have exceeded all expectations, and it's hard to believe how quickly she reached this point. This journey has been a testament to the magic of cultivation and the resilience of a well-bred strain.
Acknowledgments and Gratitude: As we celebrate this harvest, I extend my deepest gratitude to @fastbuds_official for creating such a remarkable strain. To Aptus Holland, my main sponsor, your support has been invaluable in nurturing this beauty. A special thank you to Grow Diaries for providing a platform to share this journey, and to the community for your shared passion and camaraderie. 🌱💚
As we move forward, I eagerly anticipate the trim and smoke reports, where we'll dive into the sensory delights of Blackberry Auto. For now, let's revel in the joy of a successful harvest and the extraordinary journey that brought us here.
Genetics Blackberry Auto @Fast_Buds
Food - @aptusholland @aptus_world
As always thank you all for stopping by, for the love and for it all , this journey of mine wold just not be the same without you guys, the love and support is very much appreciated and i fell honored and blessed with you all in my life
Likes
49
Share


@masterofsmeagol
Follow
6/15. Glad I listened to my intuition and held off watering. IT Rained andctheb again last night. Plants seem to be doingvreal well. Slight burn on lower leaves where it was before from being in the garage and I found on spot that LOOKED like it could've been caused by a pillar but it's right on a burn. I sefoliated one leaf. This is minor stuff. Next watering I'll be adding silica. I'm not giving nutes until the plants tell the need them. The 3 gallon ones may receive nutes first as they'll run out. I'll update as I progress.
Went back over at 8:30. It's just overcast with showers. Plants seemed to like it. They all look good. Noticed a chunk out of a leaf and a POSSIBLE pillar spot. I'm going to have to get the BT out and and give the girls an application. I'm waiting until they settle in a bit more though. I need to start LST as well AND the light dep. Unfortunately "life" has made things difficult. I'll get back over there today though and I'll start the light dep. Kinda makes me wonder though. The 1pth planet I wanted to light deo is tge same size as the others in the much bigger containers. The thought came that maybe I should just hold on to them as extras in case something happens. I also am going to start silica next watering but it will be a few weeks before any nutes are given.
UPDATE: WENT BACK OVER AT FIVE AND TOOK ACSHOT TON OF PICTURES. IM TRYING TO UOLOAD NOW. THINGS ARE POPPING OFF AND IM GETTING A NICE SWEET SKUNKY ODOR. WHILE I WASCTHERE WE GOT A QUICK SHOWER. DIDNT LAST MORE THAN TEN MINUTES BUT IT RAINED HARD. I FOUND A TEMPORARY SPOT TO LIGHT DEP THE TWO PURPLE PUNCH AND THE ONE TENTH PLANET. I DONT SEE ANY LIGHT LEALS AND ITS SURE AS HELL DARKER THAN IT IS AT NIGHT. I'LL SEE HOW IT GOES LEQVING THE COVER ON ALL NIGHT. IF IT DOESNT WORK I MAY JEED TO ADD A FAN OR CHANCECTHE SPACE. I ALMOST DIDNT WANT TO DO THIS AS THE 10TH PLANET IS KEEPING PACE WITH ITS SISTERS, DESPITE THE SMALLER POT. OH WELL I WANT TO GIVE IT A SHOT AND I DONT WANT MY CAGE OVER CROWDED. I'M LOOKONG TO DO A 6:30 TO 6:30 SCHEDULE.
6/16 First night of light dep for the three little ones. I won't be able to call them that soon. I'm currently trying to upload a video. My grow buddy mentioned the droopiness of a couple of my plants in this video and how I hadn't been watering. This kinda scared me so I ran over and checked the too few inches on the two that had a little droop and came out dry. I had some water already phed ready to go (I'm hoping that the ph doesn't change if it's stored a day or two) and used the gallon to moisten the dry topsoil. Looking back over my diary we have had nothing but rain. I then tried the "lift the pot method" and came to the conclusion that these bags were indeed still holding moisture. I assumed they would be considering the thunderstorms we've had. I held off on fullt watering because the weather said the next dry day is going to be Monday. Today is Friday so thats two solid days of rain. Three if you count today through the night. I concentrated my watering of the one gallon on the couple plants that appeared to droop. If it doesn't rain like they say it will I will need to water. I need to set up a decent watering schedule but I need it to hold off raining long enough to do so.
UPDATE: I WENT BACK OVER AND PUT THE 3 GALS IN FOR BED AND CHECKED OUT THE REST OF THE GARDEN. I WATERED THE 3 GAL GIRLS A LITTLE MORE SINCE THEY WONT BE OUTSIDE. THE BIT OF WATER I GAVE SEEMED TO HELP LIFT SOME OF THE GIRLS. AT LEAST I THINK IT DID. THE RAIN SHOULDVE COME ALREADY. I WOULDVE WATERED MORE HAD THE BAGS NOT BEEN SO HEAVY.
6/17 Rained all night which is good. Brought the three transplants out but left them under the overhang so they. Dont get soaked. So far light depoing is going good. Well its only been two nights but we'll see. I'll update as I go. Not feeling well today. Went back over and checked on the plants and did a video. Probably won't get uploaded until tomorrow. I'm giving it a shot. It's raining in good shape. Plants looked fine when I was there. I need to get my supports and my trellis in place. Video won't upload. No suprise. I'll get it tomorrow.
6/18 Uploaded videos if they fuck up from me editing I'm gonna be pissed. Anyway it's still pouring with high winds. I added a couple supports where it looked like it needed it. I need to put my trellis up. I've been able to keep up with the light dep and those plants haven't been used and abused. They stay in the building facing the sun when the weather is this bad. I think they're looking great. I may start a new diary just for them. Sun came out around four. Trying to upload a couple videos but doesn't look like it's going to happen. Tucked the three little ones in at six. It had stopped raining and the wind died down some. If adverse conditions create good plants then I'm on the way to a great harvest. Minor bleaching and burns on a few lower fan leaves and some wrinkling on some from wind burn other than that plants seem to be acclimated. Did a video but will have to wait until tomorrow to upload
6/19 It's not raining! We got four inches this past storm lol. Having the bags raised on pollens I believe has greatly helped. As did the high winds that help dry the soil in the bag. Had to add a few temporary supports. Light dep is going good. Adjusted amd found a better spot. I'm considering getting "pool noodles" or some other thing like a Hulu hoops or pvc pipe and making either a frame on the roof for the entire cage or on top of each individual plants posts so I could roll clear plastic over it when it rains. I'm thinking about later on in the fall when this could really help. I found a roll of plastic. Also thought about putting that up on the back wall but I didn't. What I'm doing right now is working. I just need to keep up with it. I also need a solid watering schedule to stick too. It's hard when each plants needs are different. Oh well. I'm just happy to be growing again. I pray to the cannabis gods and the Lord above himself that I'm not plagued with the problems of last year.
6/20. I'm sick as fuck but I got the little girls out in the sun. Light dep is going good. Plants look great. I'll update when I feel better and if I do anything. Still feel like shit. Luckily I looked up just in time to get to the grow and put the little ones to bed. They were thirsty (especially the bushy 10th planet so I gave them about 3/4 of a gallon of water. Got lots of run off from 10th planet. Didn't notice as much from the others but I was hurrying. I'll upload later. Still sick.
6/21 Plants seem to be doing great. I removed some lower growth on a few just to see how they respond. I'm going to do some defoliation down low and I want to see how the plants respond. I'm planning my first full watering Thursday as we have a real good stretch of weather after that. Grow bags are still heavy as hell so they have sufficient water. I'll be adding silica nextcl watering. Not time for nutes but I think it would be okay to start the silica and in another week I might start small doses of nutes. The light dep on the little girls is go8ng great! It's cool I'll get to sample some of these strains before fall. I'll update after I do something. Tucked the girls in at 6. I might need to think about transplanting that 10th planet in the 3 gallon. I watered until runoff yesterday and it's light as hell today. Plus I fimked it and it's bushy as hell. I've Bern turning it si it gets all angles of the sun. I have a bag of 707 left and a 5 gallon bucket with holes drilled all over it like an air pot and a ten gallon grow bag. This will take some thought. Hot af today. I wad able to lift the grow bags so I decided tomorrow will be the girls first real watering. I think I'll be adding silica and possibly kelp me kelp you due to the heat stress I've been noticing. Nothing bad just a few tacoed leaves. I've had several people that have seen my grow in person tell me that this is by far the healthiest (not biggest I've had bigger) but by farcthe healthies5 crop I've grown. They believe I'll have my best year ever this year. I hope they are right. Vid won't be uploaded until tomorrow.
6/22 WATERED TODAY. I'm still a little gun shy with watering. That fusarium last year pretty much traumatized me. I left the container plants alone. I gave them a little water but not enough to do much. I used a pump sprayer on a mist setting and went one by one and back around gently watering the entire medium. This took forever and I'll be finding a different way to water. I hope this was enough water. I'll check later on and if they look like they want more I give it to them. I started LST on the light dep 10th planet and tucked some branches of a another under the tomato cage. I had missed that earlier. I also went around and cleaned up the bottoms on most. Getting rid of things that will amount to nothing. I noticed what looked like thrip damage on ONE leaf on ONE plant. I also saw a chunk missing from a grasshopper bite and a finger of a fan leaf petiol was broken so I'm going to need to get my ipm up and running. I'm unsure whether I'll be using chemicals or predators. Probably BT and spinosad. That's what I've had the best luck with. I also noticed bottom leaves dying off on the bottom of a couple plants. It was where the burns were though so I'm almost 100% its just related to the light burns they got when i first put them up. I'll be updating the diary as I do more stuff.


Likes
3
Share


@Wycofane
Follow
When I open the tent in the morning, the first thing I notice is the absolutely overwhelming smell that hits you in the face like a baseball bat. Every neighbor can probably smell it, with no filter to contain it. The buds have become so heavy that they're now bending the stems. This might be my biggest harvest yet. I'm visiting my girlfriend over the weekend, so I won't be home until Sunday. However, I'm fairly certain I'll be harvesting on Sunday.
Likes
3
Share

@Thedibber
Follow
Bottom left is the badazz og cheese she's smelling dank and hopefully gives me some dank medicine
Processing
Likes
14
Share


@Fullmeltalchemist
Follow
d43 - 9.26 - Recovering quite nicely. Was able do just about all the training and trimming I want to before I switch to flower around the end of week 8. My Fast White Widows are definitely more ground hugging, while the Black Sugars are reachers, but still manageable. They have all been trained to best fit the recovery of each individual plant, so my canopy definitely isn't going to be even 😅Nonetheless, grateful they have been resilient little buggers and happy for the chance to take them flower, regardless of whether I'll have the picture perfect tent. 🙏
D47 - 9.30 - I lied. I had to train a little more. One BS cola was really outgrowing the rest, and the opposite side of plant had taken for damage from bug treatment two weeks ago so i HST'd it back and spread the other. Still planning to flower them in 7-14 days!


Likes
39
Share


@LilCeeDaWeedGod
Follow
Week 10
December 13
-Had to super crop P4 again as this one is growing straight into the light
-water every other day and top dressing every two weeks
-not sure how long she’ll go but we looking decent

Processing
Likes
2
Share


@krst97
Follow
I cut the plant after 48 hours of total darkness. To flush the best, I ran a few dozen liters of water through the jar until the one that came out below was transparent. Although the flowers failed to close, I am satisfied with the result and the smell of the buds inspires a good terpene. To dry well, I moved the grow box to the room with an air conditioner. I'm keeping the temperature around 26-27 degrees and the humidity around 50%.
Likes
15
Share


@SamDo
Follow
Hello, nouvelle session, et 1ere expérience cette fois ci en coco. Avec une nouvelle gamme d’engrais de chez Canna, ainsi que le substrat en coco de chez Canna aussi
J’ai constaté que les graines de Quick Critical+ ont germées très vite par rapport à la terre, ici, à peine 72h pour les 1ères. Et un joli 100% pour la germination!! Merci dinafem!👍🔥
J’ai pu aussi constaté que le réglage du PH et de l’Ec prennent ici toute leur importance,, puisque pour mes 1er arrosages j’ai oublié de contrôler l’Ec, résultat, légère brûlure sur le bout des 1ères feuilles,, j’ai immédiatement corrigé en contrôlant et en ajustant l’Ec,, les choses devraient rentrer dans l’ordre maintenant.
Voilà pour cette 1ere semaine de découverte de la culture en coco,,,
A la semaine prochaine...
Happy grow...😎

Likes
3
Share


@Mr_nugs_lover_David
Follow
She has become a beautiful little bush full of fat dense nuggets completely covered in fruity and sweet resin glands with some purple no tones in the buds. Love It!
