


Processing
Likes
Comments
Share


@GrowGuy97
Follow
Day 49 - Still giving the ladies just PH water with no nutrients trying to see if I can fix whatever is wrong with them😅 All in all the White Widow & Orange Sherbet plants I took individual pictures of are growing great & should have a pretty nice yield! Thank you for following & make sure to check back for daily updates! Happy growing friends!🌱✌️🏼


Processing
Likes
10
Share


@StarletBud21
Follow
Few things came up been away a little while had to get a another phone as well but I’m back . This is the grow so far , obviously a heatwave recently so problems with the temp n humidity I’ll be trying to get this back under lock I’ll be more with the grow as well .. they seem to be doing alright few problems I think but I’ve put them on grow questions. As first grow I’m not sure whether they are right at this stage or should have been budding more
Happy growing 🤙🏾


Likes
17
Share


@420DeepGrow
Follow
📆 Semana 6
Blue Zushi está mostrando su lado más exótico esta semana.
Los cogollos han comenzado a compactarse con fuerza y se nota una producción de resina que va en aumento. Visualmente, empieza a asomar ese tono azulado que tanto llama la atención en esta genética, sobre todo en las puntas más expuestas a la luz.
A nivel nutricional, sigo con la base de XpertNutrients y ya se nota el empuje adicional de Sticky Fingers, que está potenciando claramente la formación de tricomas y dando un pequeño salto en la intensidad del aroma, que empieza a volverse más dulce y fresco.
Los Adlite están funcionando a la perfección: gracias a su uniformidad, incluso las ramas laterales están sacando cogollos densos y con buena pinta.
Temperaturas estables entre 22 y 25 °C y humedad en torno al 55%, controlada con buena ventilación para evitar condensaciones y problemas en la fase más delicada.
En cuanto a olores, empieza a destacar ese perfil afrutado y ácido con fondo kush, muy característico de la Blue Zushi. Los tricomas están en su mayoría lechosos, por lo que aún queda recorrido antes de pensar en cosecha.
Una planta vistosa y con mucha clase.
¡Seguimos creciendo fuerte! 💪


Likes
2
Share

@pareto
Follow
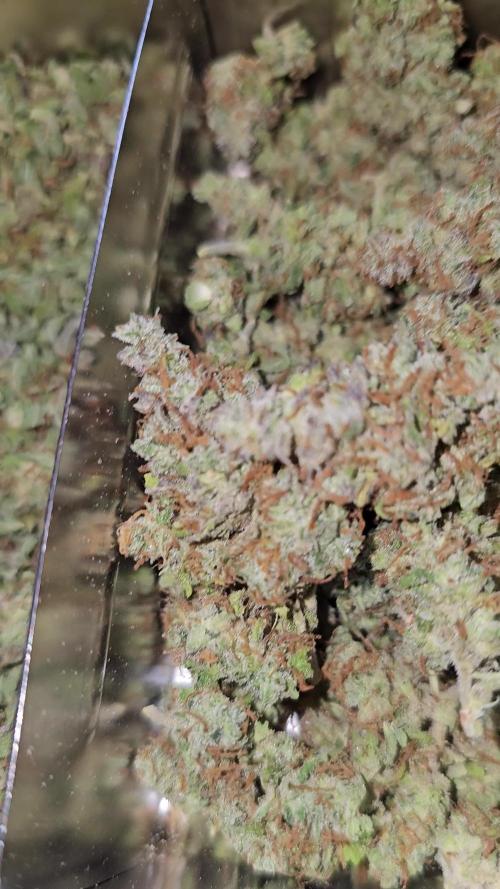
The summer was super wet and humid so she lost 2 of the big buds to mold.
Other than that she did great! really big, vigorous and heavy, dense buds. All arround winner. Really looking forward to the seeds.
These plants are not mine. I am just documenting them.
Total Runtime: 81 days
--------------------------------------------------------------------------------------------------------------------------------------------------------------------------------
Set up cost (fixed costs)
-Lamp: 40€
-Timer: 3,5€
-Pot: 4€
-Total fixed costs: 47,5€
Given 5 years (or 15 grows) usage time translates to around 3,17€ per grow in materials.
Variable costs:
-Seeds: 13,17€
-Soil: 6,00€
-Fertilizer: 3,50€
-Power: 21,00€
-Total variable costs: 43,67€
-Total costs per grow: 46,84€

Likes
20
Share


@4F1M6
Follow
I started germination of 2 Amnesiac Automatic beans on 01/01/2021. HAPPY NEWYEAR!
I am germinating them using rockwool cubes and a humidity dome. I pre moistened my plugs with ph balanced water to 6.4 . Than enlarged the pre made holes using a wooden dowel. Than sowed my 2 beans into the holes. I then ripped a small piece of rockwool off each plug and mulched it up. Than lightly filled in the holes using the mulched rockwool. Than it was into the humidity dome to marinate, and complete the germination process.
Will likely take roughly 4 days to get some sprouts. Starting my adventure with Spliff Seeds Amnesiac Automatic. After they emerge I will get the plugs planted into 5 gallon pots to rock and roll. Cant fucking wait!
Some background information on my experience with Amnesiac auto. I grew 2 of these ladies in one run. This variety stayed in veg for 6 weeks before it made the transition to flower. Produced 2 super branchy plants resulting in a mighty full canopy. Obviously resulting in quite a large yeild. Buds were relatively dense but super chunky! Fat colas were in an abundance.
Plants were great height roughly 3 feet, and Not super stretchy. Strain responded well to lst and had no stunting as a result of light bending and manipulation. Very easy going in the nutrient department. Had no trouble at all meeting their dietary needs. Buds were very resinous and unleashed quite a euphoria! I was VERY impressed with the first run. So let's see how the second run goes.

Likes
5
Share


@OnlyTomatoes
Follow
[ Introduction ]
Welcome to my first ever grow journal! I have been growing medically for the past couple years, documenting some of my grows on my Facebook and Instagram (@OnlyTomatoes) pages, as well as several cannabis cultivation subreddits. I've found that I do a lot of things differently than other growers, so I'd like to share a full cycle publicly in case I have the answers to somebody's questions.
[ Updates ]
Day 4 - Lights have been lowered to 18 inches off canopy, dimmed to 25%. They've recovered from both their transplant and their topping, new growth looks almost perfect. I'm going to keep the accidental sunflowers for a few more days and see if there's any significant difference between plants. They all received a foliar spray of neem, kelp, and a bit of calmag before lights off yesterday. I expect to be able to remove the remaining damaged leaves by the end of this week.
Day 7 - Lights increased to 30%, C02 increased to 800ppm, getting ready for week 2 of veg. Fed today, fairly low EC (<1.5) blend of Silica, Calcium, Kelp, Molasses, and Tribus Grow in a mixture of R/O and tap water. Very little runoff at 1gal per pot. Will most likely foliar again before lights off with a light fish hydrolysate mixture to help with any nitrogen issues. Any dead or dying leaves you see are from pre-transplant, I'm just waiting a few days longer for the existing rootballs' ph levels to swing back to a healthy range before removing all that unsightly growth. I'm really not sure when I'm going to remove the sunflowers growing in some of the pots, I've seen no negative effects yet. I could flip group 1 into flower if I wanted, the canopy is level and beautiful, however group 2 will take a while longer to fill a canopy.
[ Grow Details ]
Plant Count: 64 (Clones)
Mother Age: 17 Months
Strain: Gelat.OG (Phenotype 5)
Breeder: Seedsman
Hunter: OnlyTomatoes
Veg Time: 3-5 Weeks
Flower Time: 65 Days
Training: Multiple Toppings
Final Pot Size: 5 gal (Fabric)
[ Room Details ]
Room Size: 21'x9'x11' (190sqft, 2100cuft)
Canopy Size: 10'x9' and 5'x9' (135sqft)
Lighting: Grower's Choice ROI-E720 x6 (dimmed to 25% power during veg)
Cooling: Cooper&Hunter 36k BTU Minisplit
Dehumidification: Quest 225
Equipment Controllers: TrolMaster (Lighting, Cooling, and Dehumidification controls), AutoPilot (C02 Controls)
Watering System: Manually controlled drip irrigation, x2 1gph drip emitters per pot
[ Pre-Veg ]
These poor clones have lived an abused life during 2021, sitting around in solo cups for over 2 months waiting for a new home. Normally I would never allow pre-veg plants to have such obvious deficiencies, but constant hand watering led to some poor nutrient decisions on my part. They've been in their final pots for a few days now and were topped on day 0 of veg. I plan on lowering the lights to 18"-24" within canopy around day 3, I'm just allowing some extra time for the roots to really dig in. I've found that a batch of dirt that was used had sunflower seeds in it, possibly winter food storage from an outside rodent, so I'm debating how long I will let these sunflower seedlings grow alongside my plants. They do make a good cover crop with amazing root systems, I just don't think that really applies in pots of this size where plants can choke each other out.
Likes
7
Share


@Krautbauern
Follow
gorilla cookies is a resin producer of the very finest calibre. Her buds are covered with trichomes that start to mature after only about 60 days. A few more days and the lady will be harvested. She is so beautiful 🤩
Likes
92
Share


@gottagrowsometime
Follow
135 days 3 part harvest 1st was wk 16 430 wet= 97 dry: flowering 60+ days. 2nd part 105 wet= 20g Dry 3rd part well, I got a weight after 5 days of drying. It turned all the white hairs all amber and it actually finished off perfectly. The wet weight was a lot more than I was guessing. I got nearly 55g dry + 3 grams I've been picking up the last 2 days on bits that dried earlier as I hung it in my grow room. RH was 60% temp 21c. Had to remove nodes on the outside to allow the inner buds to dry. 40% was dry on day 3.5 rest took another 1.5 days to dry. This time I didn't over dry it. Still a nice bit of mostiure in it. I'd say the weight wait on this one was 200+ gave back 58Dry..
Was a task doing a 3 part harvest between partly flushing, restarting and then flushing and restarting and then finally I gave her a 10 day flush on flawless finish. She was dying off, showing she was coming to end of life. Really happy with the results of her, nice to get a decent amount of bud from the jars. This 1 plant will probably give more than the other 4.
Smoke report to follow soon.
Thanks for following, reading and commenting.
Be sure to like so I can visit your diaries
gottagrowsometime

Likes
4
Share

@GothBotanical
Follow
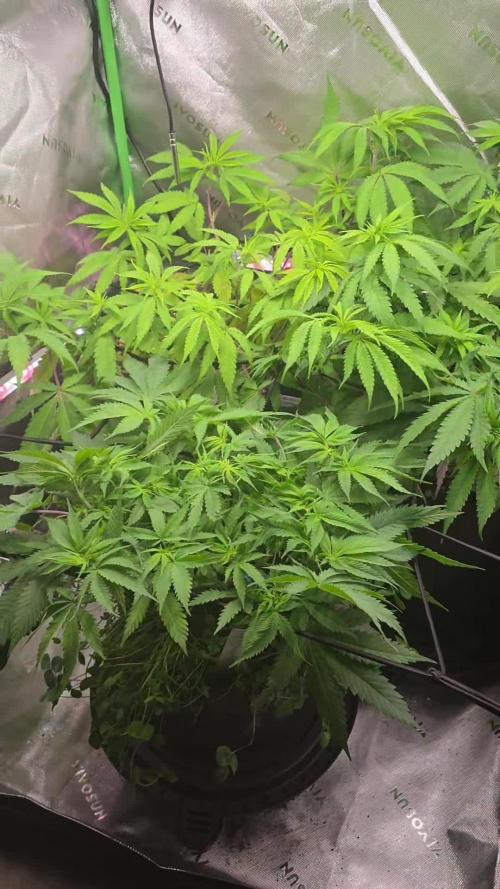
The tent made steady progress this week after the top-dress on the 17th had time to take effect. Oracle OG began showing slight improvement in leaf color, still pale overall, but newer growth looked healthier and more even. Blue Bitch continued thriving, holding her deep green color and pushing dense branching across the canopy. Strawberry Cola Sherbet showed the best response to the amendments, developing fuller leaves and stronger vertical growth. Soil moisture evened out midweek, allowing for a balanced watering with Cal-Mag and silica. Temperatures stayed around 77–81°F with humidity near 55–60%, keeping the environment stable for recovery and pre-flower prep. This was a transitional week focused on color correction and canopy management, setting the stage for the flip to 12/12 in early Week 9.
Likes
17
Share


@CanadianFillmore
Follow
Week 3 begins for DS and MD ladies. All four are developing nice bud sites, but the plants have not stretched as much as I was expecting they would by now.
Thank you to Kaoritracy from Mars-Hydro for the TSW2000 light, I am very happy with it's performance.
Thanks for stopping by growfessors 👽🌳💚

Likes
47
Share


@terpproducer
Follow
👇 This week:
---
Watered again as usual with the standard Plagron scheme + Calmag (last feeding with Alga Grow) (PLEASE CHECK YOUR WATER BEFORE USING CALMAG)
Phosphorus foliar spray - red stems pretty much gone now
PPFD at canopy height approximately 350-400, VPD ~1
Performed a major defoliation again
Ordered more Autopots 😂
---
Happy growing and thanks for checking out my report! I really appreciate you! 😁💪🙏

Likes
19
Share

@Tower84
Follow
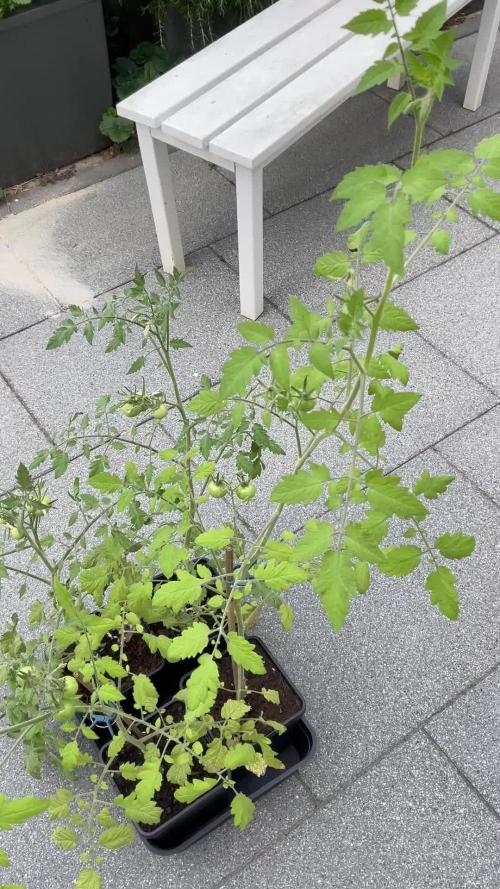
The two Sunviva tomato plants are now about 80 cm and 100 cm tall, while the Primabella plants are around 50 cm. All plants already have their first green tomatoes. After the Ice Saints next Saturday, they will be transplanted into 30 liters of Sonnerde vegetable soil each.
Likes
62
Share


@Tuki3
Follow
Pequeño update!
Pasamos a Pre Flora! Ahora si, estamos con 12 horas de luz y 12 de oscuridad, de a poco se pueden ver los "pistilos" (sé que no es el nombre, pero lo que se puede observar cuando sexa la planta).
Viene muy linda y adquirió buen tamaño para el espacio que tengo de indoor (50x50x110)
Veremos como evoluciona estas próximas semanas!

Likes
5
Share


@Bdawg
Follow
Good week goign from strength to strength. Introduced pk 13-14 at half dosage to start.


Likes
2
Share


@Grandillustrator
Follow
This week the plant finally gets the tent to itself and I began training for a wider canopy , poor girl looks tortured lol in this week I notice a mutation on one of the branches fasciation which I show in the video I’m unsure as what to do because in the week because I want to switch the plant very soon to flower and don’t want to waste a branch but I kinda wanted to see what the buds would look like if I left i ultimately decided to chop it

Likes
105
Share


@Natrona
Follow
Frostbanger Plants 1-6
Week 8 May 18– 24
FLOWER 4
Nutrients :
GH Micro 25 ml
GH Gro 10 ml
GH Bloom 30ml
CalMag 30 ml
Recharge 10ml
Green sensation 16.5ml
Power buds 7.5 ml
5/17 PH 6.3, PPM 1130, temp 71
1ltr each
5/18 PH 6.67, PPM 935, temp 68.5 1 ltr each
5/20 PH 6.67, PPM 1330, temp 68.5 2 ltr each
5/21 PH 6.66, PPM 984, temp 69 1 ltr each videos & pics
5/17 Defoliation of yellowing leaves, feed, pics
As I mentioned last week, I must monitor and control the tent environment manually. For the past month, the humidifier has been an issue putting out way too much humidity; often leaving water in the bottom of the tent. In addition, the temperatures are also out of control. I added an AC last week to keep the temperature below 80. I finally determined the exhaust vent is also broken and has been for some time. AC Infinity does not extend the warranty to the replacement parts. I guess that makes sense since they would be in a state of perpetual free replacements. I bought a new one from Amazon that came with a new controller which is different from the controller 69 currently using. I decided that while it is very inconvenient and inefficient to monitor the tent through the day, I would rather finish this Frostbanger run without introducing a new unknown variable. I will continue using 3 circulating fans, the 4” exhaust vent from my 3x3.
I have the AC pushing air in and the exhaust pulling air out. This creates a neutral pressure tent environment-neither positive nor negative.
It looks like growth has stopped and plant height has been reached. Now is the time for buds to fatten and frost up. All 6 of them are short remaining less than 3 ft. They range from 15 to 31 inches. #4, 5 &6 are showing some fade, particularly #4.
Upon opening the tent, a melon smell comes off the buds if I get close, and more stickiness was observed during the process of defoliation. They are living up to the new strain’s name. #5 is the frostiest followed by #2. Wow week 3 of flower and that much frost already. Before FastBuds announced the strain name and characteristics, I was disappointed that FBA2502 could be an indica sleepy strain but the universe provides what you need at the time. The new strain profile indicates a whopping 29%THC with mainly sativa uplifting, euphoric, social effects with sweet fruity flavors which I love and enjoy. In addition, I recently bought a dap press and this strain is frosty and resinous. She will be great to press for live rosin.
FBA2502 is FROSTBANGER. Meet Frostbanger Auto, an autoflowering and Indica-leaning hybrid packing a staggeringly high THC content averaging 29%, making this one of the most potent strains on the market. It was created by Fast Buds through crossbreeding Gorilla Glue and Chemdawg, two equally iconic strains. Growers must know that these difficult-to-grow plants will pose specific challenges in terms of environmental control and nutrition, making them best suited for cultivators with some experience under their belt. The flowering cycle is short, averaging only 50 days, and yields are usually around 300g/m². The Frostbanger Auto flavor and aroma are both mouthwatering with a delightful combination of sweet, fruity, and flowery notes. The high is mainly Sativa-driven with uplifting and happiness-inducing effects that lead to euphoria and a general sense of well-being. You might feel sociable and talkative, but too spacey to say something. Following this surge of energy comes a deepening sense of relaxation, leaving you sedated and completely at ease with the world. Due to its potency and these long-lasting effects, medical patients hail Frostbanger Auto for treating chronic pain, stress, and even depression.
Measurements:
#1 15”
#2 20”
#3 17”
#4 30”
#5 31”
#6 24”
Your likes and comments are appreciated. Thanks for stopping by.
Growers love 💚🌿
💫Natrona💫
Likes
6
Share


@GERGrowDesigns
Follow
Welcome to Flower Week 7 of Divine Seeds Auto Fractal
I'm excited to share my grow journey with you all as part of the Divine Seeds Autoflowering Competition 2025. It's going to be an incredible ride, full of learning, growing, and connecting with fellow growers from all around the world!
For this competition, I’ve chosen the Feminized Automatic strain: Auto Fractal
Here’s what I’m working with:
• 🌱 Tent: 120x60x80
• 🧑🌾 Breeder Company: Divine Seeds
• 💧 Humidity Range: 50
• ⏳ Flowering Time: 60 Days
• Strain Info: 23%THC
• 🌡️ Temperature: 26
• 🍵 Pot Size: 3
• Nutrient Brand: Narcos
• ⚡ Lights : 200W x 2
A huge thank you to Divine Seeds for allowing me to be a part of this amazing competition and Sponsoring the Strains. Big thanks for supporting the grower community worldwide! Your genetics and passion speak for themselves!
I would truly appreciate every bit of feedback, help, questions, or discussions – and of course, your likes and interactions mean the world to me as I try to stand out in this exciting competition!
Let’s grow together – and don’t forget to stop by again to see the latest updates!
Happy growing!
Stay lifted and stay curious!
Peace & Buds!

Likes
22
Share


@Mastr
Follow
Hi this week full strees for lady's I just top them from 4th node and done first lst for lower branches to get light this week I feed
1ml silica
1ml root powers
3ml grow
1ml heaven
Every 3days or 2 I give her 1L mixed nuts
Day 19 1plant is preflowering and from last node start fade purple this one definitely dark purple same last time 😍