
Likes
Comments
Share


@Mr_nugs_lover_David
Follow
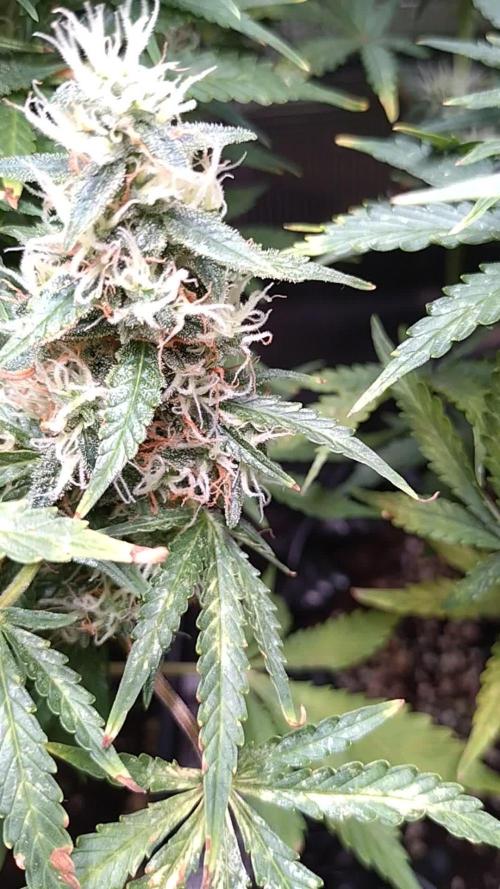
Una cepa bastante fácil de cultivar,yo al preparar un súper soil a base de guano,ácidos humicos,bacterias,mi suero de lactobacillus casero,algas marinas y humus,tan solo regue con agua por lo que no tengo mucho trabajo en ese sentido,ademas tampoco le aplique ninguna técnica de entrenamiento cosa que me gustaría hacer si tengo oprtunidad de volver a cultivar esta cepa, sin embargo vi que empezó la floración siendo pequeña de tamaño,término dando una excelente porra central y algunos cogollos bajeros con los que me fui haciendo algunas infusiones con leche entera y también con aceite de oliva para no tener que recurrir al mercado negro y poder asi añadir mis canabinoides a mi sistema para poder mejorar mi lumbalgia y descansar mejor. El aroma es sencillamente exquisito,ha sido todo un placer cultivar esta cepa,lo malo es que es muy poco para mi ya que soy un usuario que necesita una buena reserva de cogollos potentes sobre todo a nivel físico que me ayuden a lo largo del año.muchas gracias y espero que os haya gustado mi trabajo, paz compañeros Canabicos! 💚✌️❤️💛🌱

Likes
25
Share


@I_Identify_As_A_Dan
Follow
Week 5 of flower for Lemon Orange by Greenhouseseedco,
1 of the phenos is a super super early developer, when compared to the other 2 its night and day difference for sure.
The other 2 phenos are also struggling with the feeding abit again... they just seem to be such heavy feeders... I'm not sure if ive got a Nitrogen problem or magnesium? If someone wants to throw out their thoughts that would be great.

Likes
42
Share


@Grey_Wolf
Follow
Barneys Farm Pineapple Chunk Week 10 of Veg December 29th 2019
Hi Folks well we now have aproximately 6 weeks until The day lengths shorten enough to trigger flowering. My main goal now is to try to keep the plant in tip top
condition aswell as provide the support the branches will need when the buds start to get bigger. This is the biggest Ive managed to get this plant to grow before now, and with 6 weeks of veg still to go plus the stretch and I might just end up with a nice haul of juicy Pineapple chunk goodness for my efforts.
******As a side note I have two clones I took from this plant that I have already sprayed with my STS reversing mix for Breeding Purposes (see above pic)
Cheers for checking out my Diary once again see you next year 👊


Likes
11
Share


@Lahuertade_Bototo
Follow
🌱🌱🌱Continuamos este cultivo, con esta hermosa cepa de FastBuds, Girl Scout Cookies Auto, en las ultimas semanas de Floración .🌱🌱🌱
👨🍳👨🌾🏻 Nutrición y Bitácora 👨🌾🏻👨🍳
-Día 57. Se riega con una solución de 3 Litros con Plagron Sugar Royal (3 ml) y Plagron Pure Zym (3 ml).
-Día 58. Luce sana y fuerte la planta, se observan tricomas con lupa, la mayoría están claros y algunos blancos lechoso, muy pocos ambar, van madurando bien los tricomas.
-Día 59. Se riega con una solución de 3 Litros con Plagron Pure Zym (3 ml).
-Día 60. Los tricomas siguen madurando se comienza a ver tricomas ambar en las sugar leafs.
-Día 61. Se toman fotos y revisan los tricomas con lupa x40.
-Día 62. Revision de tricomas con microscopio electronico, está lista para cosechar, se hace prueba en fresco para comprobar la potencia, se nota su gran potencia con un efecto cerebral intenso seguido de una relajacion corporal completa, tiene un delicioso aroma dulce, afrutado y cítrico 👨🌾🏻.
-Día 63. El tan esperado dia llego! Dia de cosecha, una planta hermosa con colas grandes y gordas, llenas de flores, muy pegajosa y un tremendo aroma, incluso las hojas estaban cubiertas de resina, ideal para extracciones 🍪🍪🍪.
Fue un hermoso viaje, dio sus frutos el entrenamiento temprano con LST y SCROG
🚀Equipamiento🚀
Indoor de 60x60x159 cm y una iluminación BlackCob F320, se activa solo 1 modulo (160w) a 45 cm del canopy por el resto del cultivo. Intractor de 135mm, extractor de 135mm, filtro de carbón, ventilador "oscilofan", ventilador "clip fan", este ultimo ventilador se ajusta en la parte baja de la carpa para mejorar la circulación de aire bajo el canopy, 2 termohigrometros y una malla SCROG de kanovi a 15 cm de la maceta.
Acompáñenme para ver los resultados de este hermoso desafío, un saludo cultivadores 🔥🔥🔥

Processing
Likes
14
Share


Likes
17
Share


@Naujas
Follow
Although I am not a Super grower, I have not grown many plants, but for this girl, there were definitely bigger ones, but were there any more beautiful ones than this one?, I highly doubt it :) she looks fantastic, the finish is very close :)))) @FastBuds gorilla cookies auto. with small space, high temperature, high humidity, it copes without major problems :) which makes me very happy :) good luck to everyone :)
Likes
38
Share


@Esoteric_growing
Follow
Started flush day 49, very happy apart from a bit of heat stress from the crazy hot weather over the last week.
Quality again is looking 10/10.
Likes
4
Share


@EileanDonanCastle
Follow
It’s been a long day potting these girls into there new home.
All is looking well. Little bit of heat stress but ime sure they will cope 🤞
Likes
7
Share

@PhinolaGreen
Follow
13. Woche
Sieht soweit gut aus, sie ist ganz schön hungrig und durstig, ich bekomme auch 1L in den 6L Topf ohne Probleme rein so ist es nicht aber die legt schon ordentlich was drauf jedesmal. Ich habe den Düngerplan auch schon vor längerer Zeit gewechselt zu 2x die Woche statt einmal. Sonst ist der EC zu Hoch, lieber immer bisschen weniger aber dafür dafür dann regelmäßig 😄😊
Denke sie braucht noch 3-4 Wochen, ja das habe ich letzte Woche auch schon gesagt hehe 😅


Likes
3
Share

@I_roll_my_own_420
Follow
I have changed nutrients to Advanced Nutrients.
Plants are watered automaticly 2x a day. 0.5L each watering. Humidity is around 41%.


Likes
13
Share

@therealgrowmie
Follow
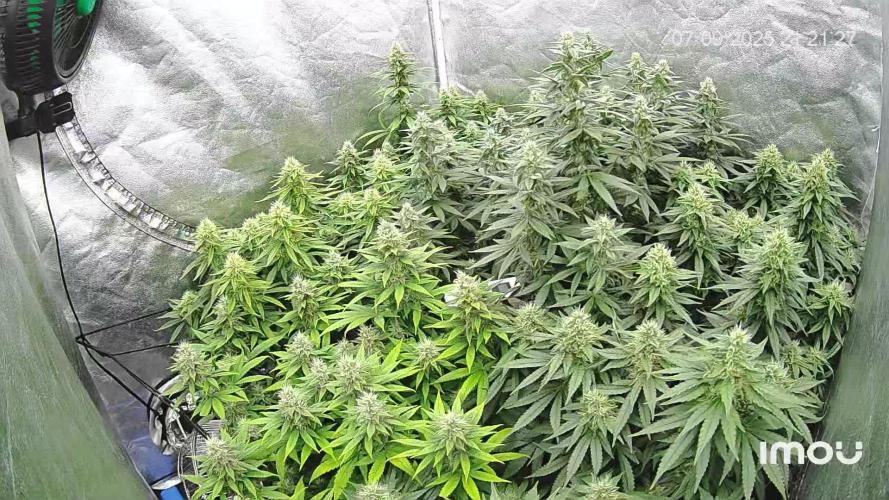
The canopy has spread out nicely, and I’ll be moving to 12/12 any day now. The structure looks balanced, and we’re close to that ideal fill before the stretch kicks in.
The single Critical Mass plant is still a bit limey in colour, but I won’t wait for it to fully even out. The fresh growth looks healthy, which is what matters most at this stage.
Now it’s time to flip and let them show what they’ve got.
Stats so far:
💧 Watering: Every third day
🌡️ Temp: 26–28°C
💦 Humidity: 65% RH
📈 VPD: ~1.18 kPa
💡 Light: ~600 PPFD

Processing
Likes
28
Share


@Elysian_gardens710
Follow
Day 22 and 23:
Going easy breezy so far!! I released some ladybugs in my tents on these Chocolate Mint OG's 21st day. So far so good lol.
Last night when I watered I gave a little real growers recharge to help with the recent transplant (it definitely gave them a boost!)
Its mid summer here in MI and 84+ temps 😬 keeping the house and tents cool has been a challenge to say the least. Thankfully all my plants are in Veg and seem to like the heat. Except the Choc Mint.they are showing mild heat stress on the top fan leaves(at least that's my guess) Tent temps have been around 86 down to 84 daytime. I lowered them so they are 24" from the lights 🤞 hopefully that helps. Other than that, no problems. And some generally happy plants! The recharge and soil combo burned them a very little bit as well.
Day 25&26
Nothing too eventful. I watered #2 on day 25. With some real growers recharge. The stuff is awesome! No nutrients needed if you have good soil!
Day 26: snip 2 fan leaves from #2(the topped one) she was getting a little bushy. And tucked the other fans under to promote some lower branch growth. #1 I'm letting roll totally natural unless I clean up lower canopy to prevent pests.
Day 27:
Plants are doing great! #1 is really getting tall and # 2 is staying short and squat because of the training. We are letting #1 go naturally. Today's update is we added some LST wire to #2 to pull down her lowest branches
My equipment and gear:
2x4 vivosun
Es300 lighting
Vivosun oscillating tent fan
Honeywell Hurricane fan
6" exhaust outside
15,000 BTU air conditioner
8,500 BTU in tent air conditioning
Some sick ass Genetics 😁

Likes
9
Share


@Yiyis_Grow
Follow
Elaboración de aceite Rick Simpson
-25 gramos de Bubba Kush macerando durante un mes en alcohol de cereal.
- Filtrado y puesto en baño maría en una olla arrocera.
- Al evaporar todo el alcohol, se colocó en jeringas.
- 50% se probará puro y 50% se mezclará con aceite virgen de oliva.
Buenos humos

Likes
Comments
Share


@Chamed33
Follow
Getting close harvest!! The fan leaves 🍃 started releasing nitrogen and buds are starting to ripe
I have have decreased amount of nutrients since she’s getting closer to harvest I’ll be watering her with water to remove any excess nutrients buildup from the bottom and to allow her to take the rest of nutrients left till her times comes..
I also did not add plant Height because I had done LST on her so I will be hard to know exact Height on mine
Likes
52
Share


@Ultraviolet
Follow
This week I was mostly smoking Panama Red.
Hit a wee bump as it seems I never learn my lesson by bringing outside plants inside, some sap-sucking greenfly aphids decided my grow tent was a perfect new home. The thing about trying to recreate a "perfect" environment for growth, it can also be perfect for a host of unwanted problems.
All the holes I've cut into the tent don't help I'd guess either.
The 5 species of Clover is far more dense a cover crop than I'd imagined it would be. The chaplain overdone his blessings it seems.
The blue borage companion plant was the first to be suckled on by unwanted visitors, I'd say 90+% of the aphids I found were eating on the underside of the borage leafs.
I gave her a good bath and thorough scrub with some soap, just need to give her time to bounce back.
If I can't beat them, I'll join them. Only I'll be the one who decides what predators lurk under the canopy!
This will need time and research.
Back to it I guess.
Word,
Phonetically, the term world sounds similar to the term whirled, which is the past tense of the term whirl, meaning “to turn around, spin, or rotate rapidly”. Before you were born, you were whirled into existence due to the fact that your physical body is made of atoms. What do atoms do? They spin and rotate very rapidly. The term world also sounds similar to the term word and the term word sounds like the term whir. One of the origins of the term whir is the Old Norse word hvirfla, meaning “to turn”. In English, the term whir is defined as “to go, fly, revolve, or otherwise move quickly with a humming or buzzing sound”. The definitions of the words in bold font in the previous two paragraphs are all related to the word spin. Why the word spin? Because everything in the Universe spins and we live in a galaxy that spins. The world/whirled known as Earth also spins on its axis and the people living on it use spoken words/whirred’s to create their reality.

Likes
4
Share


@AutoCrazy
Follow
This plant is getting close to the finish line. She doesn’t have the tightest buds I’ve seen but what she lacks in tightness she makes up with loads of trichomes and a nice sweet skunky smell.
I will likely take her down in the next couple days. She has been a pleasure to grow. Zero issues with mould/mildew or bugs! A true winner when it comes to resistance!
Cant wait to chop!!
Thanks for supplying the genetics sweet seeds!!
😎🍿🍻🌱

Likes
25
Share


@Gutismoke102
Follow
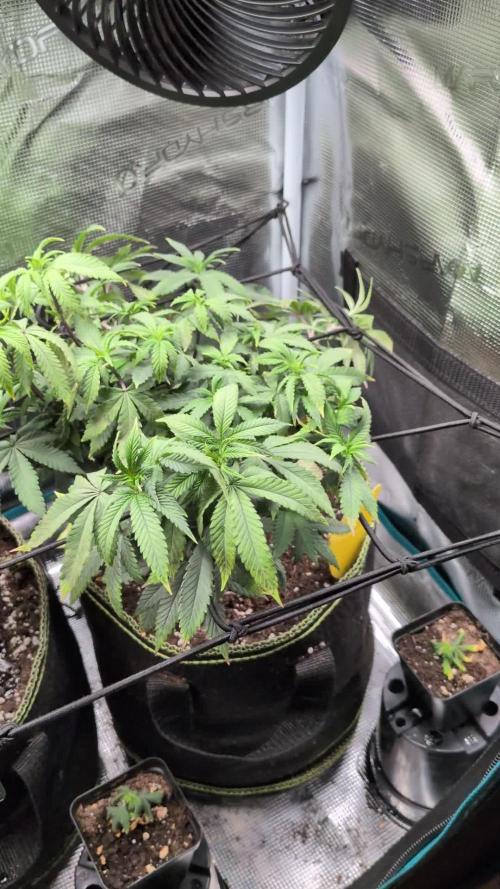
The girls are little stressed I topped them for the 3rd time and performed some super lst
I just released them of the lst and feed them some homemade labs and Recharge other then that they are doing great stay tuned thanks for following

Likes
46
Share


@MrJones
Follow
OSS Sherbet Moonrocks
🔹⊱╮🔹╰⊰🔹 GROW Started 03.10.24 INFORMATION 🔹╰⊰´🔹⊱╮🔹
🌞Environment - Maintaining 80F and 65%Humidity
🌾Training - The girls are recovering from last week's Pruning and Defoliation,
⚱️2-Gallon 📊6.2 PH
💧 Feeding - Using Horti Bloom and Horti Cal 12-0-0
🌞Medic Grow Smart 8 760 Watts
🕷️ IPM - CannControl from Mammoth and Mosquito Bits as needed
🔹⊱╮🔹╰⊰🔹 PLANT UPDATES 🔹╰⊰´🔹⊱╮🔹
📝 Notes - On 🗓️05.11.24, This week, we are on Auto-Pilot and just Fertigating as needed; the ladies are stacking up nicely, and the leaves have grown back. I am not sure if it is the genetics or the new nutrients; I would like to see less and will evaluate if more defoliation will be needed.
📝Fertigation injects fertilizers into an irrigation system to supply dissolved nutrients to crops.
🗓️05.11.24 Just feeding daily, sometimes twice; today, fed with Hort-Bloom @ 2.7 GRMS Per Gal and Horti-Cal @ 2.5 GRMS Per Gal.
🗓️05.12.24 Just feeding daily, sometimes twice; today, fed with Hort-Bloom @ 2.7 GRMS Per Gal and Horti-Cal @ 2.5 GRMS Per Gal.
🗓️05.13.24 Just feeding daily, sometimes twice; today, fed with Hort-Bloom @ 2.7 GRMS Per Gal and Horti-Cal @ 2.5 GRMS Per Gal.
🗓️05.14.24 Just feeding daily, sometimes twice; today, fed with Hort-Bloom @ 2.7 GRMS Per Gal and Horti-Cal @ 2.5 GRMS Per Gal.
🗓️05.15.24 Just feeding daily, sometimes twice; today, fed with Hort-Bloom @ 2.7 GRMS Per Gal and Horti-Cal @ 2.5 GRMS Per Gal.
🗓️05.16.24 Just feeding daily, sometimes twice; today, fed with Hort-Bloom @ 2.7 GRMS Per Gal and Horti-Cal @ 2.5 GRMS Per Gal.
🗓️05.17.24
╰⊰🔹╰⊰´🔹⊱╮🔹╰⊰🔹╰⊰🔹STRAIN INFORMATION🔹⊱╮🔹╰⊰🔹╰⊰🔹╰⊰🔹⊱╮
Introducing our latest powerhouse, Sherbet Moonrocks, one of our strongest weed strains to date, setting a new bar for potency and effect. A combination of US genetics, Sherbet Cake, and Purple Moonbow create this potent sedative with THC levels above 30% that will take you to celestial bliss.
An exquisite terpene profile offers a tempting treat of sensational fruity tastes, flavors, and aromas that will seduce your mind and body and take you to a serene place of pure tranquility. Ocimene, Caryophyllene, and Limonene are the predominant terpenes; they produce an incredible array of sugary berry fruit flavors with floral hints and spicy undertones.
Growing these feminized seeds is effortless and straightforward regardless of your growing skills, and at harvest time, you will be generously rewarded. Plants will mature to a manageable height with a flowering period of 65 - 70 days and will develop thick, dense buds glossed in thick layers of THC resin crystals packed with indica power that will lure into a deep relaxation. Expect an indoor yield of 600 - 700 gr m2 and outdoor production of over 1 kilo per plant.
Translate
