The Grow Awards 2026 🏆 


Likes
Comments
Share
@Inhaledmonkfish
Follow
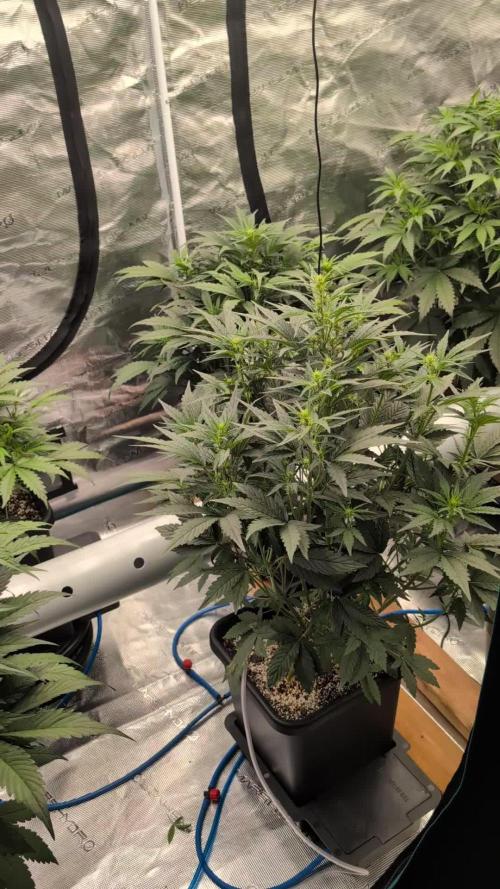
Amazing week buds have grown loads both plant really top heavy both smell amazing and look beautiful!!


Likes
1
Share
@Nickeluring
Follow
We have had another very hot week. All my girls are suffering and display some ugly looking leaves. But so far the buds are doing well.
Both plants look good but I prefer the sturcture of the mainlined plant. It gets cleaner and longer colas,

Likes
36
Share
@MadeInGermany
Follow
Unfortunately, I had to find out that my account is being used for fake social media sites.
I am only active on growdiaries here.
I'm not on Facebook Instagram Twitter etc.
All accounts except this one are fake.
Have fun with the update.
Hey everyone 😀.
The plant develops as it should 😍.
It grows very well and very beautifully. She also coped with the topping very well, so I will top it a few more times before it finally goes to the flower tent 😃.
Until then, I wish eucb a lot of fun until the next update.
Stay healthy and let it grow 🙏🏻
You can buy this Strain at :
https://originalsensible.com/original-sensible-seeds-zkittlez~20503
Type:
Zkittlez
☝️🏼
Genetics:
Afghan Kush Indica x Grandaddy Purple x Grapefruit hybrid
👍
Vega lamp:
2 x Todogrow Led
Quantum Board 100 W
💡
Bloom Lamp :
2 x Todogrow Led
Cxb 3590 COB 3500 K 205W
💡💡☝️🏼
Soil :
Canna Coco Professional +
☝️🏼
Fertilizer:
Green House Powder Feeding
☝️🏼🌱
Water:
Osmosis water mixed with normal water (24 hours stale that the chlorine evaporates) to 0.2 EC. Add Cal / Mag to 0.4 Ec Ph with Organic Ph - to 5.5 - 5.8 .

Likes
6
Share
@Mr_nugs_lover_David
Follow
This wonderful plant is amazing man, I have fallen in love with this strain and the hard rocks nuggets she has produced, beutiful orange pistils, it's just pure fire. Very dense and compact nuggets guys, she's been 100% organic grown, she has been watered with pure water and beneficial bacteria all the way and also with guano liquid by guanokalong, the aromas are very complex is very gassy stinks like a skunk however it's got some piney in and kush aroma,definitely awesome man need to keep growing this strain many more times no doubt.
Likes
Comments
Share
@Grow_for_Happiness
Follow
Well another week is done, and guess what we're now in flower! These girls shot up and really bushed out this week. Bud sites popping up everywhere, nice and bushy with very even tops. Main colas maybe 2" higher than the rest of the canopy. Gotta love blueberry strains for their even, wide canopies.
No work otherwise, just watching them do their thing and keeping the environment locked in. Lights 580 umol/s @ 30" hanging height. Humidifier barely running by the end of the week, will probably be able to pull it next week just to free up some space.
Processing
Likes
47
Share
@CRiSPrGrow
Follow
FBT1 is turning out to be a nice surprise, completely caught up, starting its flower stretch in earnest now. I'm really liking it's structure, stocky, stiff stems, thick leaves, tight internode spacing and bud sites coming on nicely. FBT1 got a co2 feeding, a foliar spray with kelp and micro, and a feeding with micro and beneficials. It's drinking more too, 3 more pints a week a total of 9 pints this week ! I went from worried to optimistic for this one ! Now the fun begins ! Hopefully i can get some nice macro pics in for y'all ! any suggestions or comments welcome 🚀

Processing
Likes
21
Share
@PrairieFrostGrow
Follow
********** Week 2 of flower - Sept 26 to Oct 2/20 ***********
It has been an exciting week with finding a crack in a main stem and started new supplemental nutrients as well.
On Sept 28 I found a crack and had to do some repairs. Gorilla Girl was better off than one of the Cream 47’s with a cracked stem. GG4 was caught early enough that she didn’t separate much at the base. Looks to be as though I have caused the issue by topping the main stem a little too low😢 Coming back though and when tied together and looked after, its crazy how these plants can heal themselves😀💪👍 Took the tips from fellow growers and decided to try and fabric something with some cushion so that the straps holding the branches together don't cut into the branches. Needed another tool of the trade.......DYNAVAP to calm the nerves😀 because the grow has been going well and this set back has me pissed off as it is grower error😡 Seems to have worked out pretty well.
Switching the PK booster at the end of the week to Big Bud and started to add Rezin from Green Planet. Not much for Bud Factor X left so will run with Terpinator and Rezin as a replcement.
2nd layer of SCROG netting added early in the week, Sept 27/20. They are pushing out a good amount of leaves now and stretching so need to provide that added support for down the road.
IPM spray again this week, last opportunity, with Plant Therapy. There has been something in the tent and I think I have killed them. One more shot though to make sure and before there are too many bud sites. Love this product!!!!!! Works so well at getting rid of thrips and mites.
Really good growth this week. I need these girls to stop now though!!!!! They getting really tall and have roughly 12” above the canopy now. The node stacking is really good and they are forming a number of colas. Looking very positive so far! This strain is so vigorous and she just want to go👍 They have gone from 18” tall to 34” in a week......crazy good growth.
Little more detail........
Sept 26/20, Day 8
- Little heavier feed as they have not been watered for two days
- 4L - CalMag @ 2ml, Sensi Bloom, B52, Bud Candy, Bud Ignitor @ 1ml
- 830ppm and 5.7pH
- will start to let the pH rise bit now over next couple of weeks
- side branching doing very well and coming up.
- GG4 a little bare in the middle of the plant with just four colas.
Sept 27/20, Day 9
- 2nd SCROG layer added.
- GG colas getting long........need to add more Silica as well.
Sept 28/20, Day 10
- more microbes today
- 4 L - Microbial Mass @ 1.5ml, CalMag @ 1ml
- 290ppm and 6.3pH
- pH was a little high but left it...wasn't moving and then boom,,,,,,,oh well.
- Good amount of runoff today.
- GG4 has one cola leaves not happy. Not sure if its light or wind. Moved the closest fan to her today.
- GG1 shooting lots of branches right now.
- GG4 bud stacking is happening already and doing very well.
Sept 30/20, Day 12
- Heavier feeding today
- 5L - CalMag, Vitathrive, Rezin @ 2ml Rhino Skin, Bud Candy, B52, Sensi Bloom @ 1ml.
- repaired the cracked stem a little better tonight......not as bad for this girl.
- Try and keep the paper towels wet now so the humidity is high around the wound.
- Should have left a little more branch from the node above when cutting the top.
Oct 1/20, Day 13
- Switching PK booster today to Big Bud......these two girls are past bud ignitor.....already stacking.
- 3L - CalMag, Sensi Bloom, B52, Bud Candy, Big Bud @ 1ml
- 665ppm and 5.9pH
- Since these girls are so tall I am not going to give them Green Planet Massive. I find they get quite a bit taller with that product. I am looking for chunky and not tall so I will keep up with Advanced PK boost.
- IPM spray tonight again with Plant Therapy. Think I have seen some bug damage on Cream 47 girls.
That takes us to the end of week 11 in growth and week 2 of flower. Time will go quick now that we are off and running. Will be done feeding by early week 7. Want a good flush and leeching on these girls to get all the nutes out. I have been missing it by a few days on the last few auto runs and want this photo run to be better as I have a better track of weeks and when she will be done..........should be the end of week 9 to first days of week 10 of flower, about 7 more weeks.
Cheers Growmies and have a great week. Thanks very much to Mr_Motalovah and spacecadet55 for sharing your comments on cracking the main stems. Should be avoidable next time and appreciate the knowledge🙏👍 Looking good Sweet Seeds, she is a grower and filling in already in first two weeks of flower........If you veg longer than 3 to 4 weeks, make sure you have allowed for height concerns💪
Likes
22
Share
@Rangaku
Follow
Good growth on the wedding glue , not quite ready to be tied down but she’s next on the list prolly at the end of the week . She was transplanted again into her forever home looking to double her size again the coming week . Life’s good .
Likes
14
Share
@Mr_Dior21
Follow
So It’s now week 8 on seedsman’s website flowering is done in 65 days so I have 1 more week left before the dark period. Yesterday I watered with a couple tbps of molasses other than that ive been doing regular watering with just tap.

Likes
7
Share
@prostetnic
Follow
Week 11 - 23.09.2024 - 29.09.2024
Well. Been a week, but I got a second larger grow tent (long story, but ran out of room in the 60*60 :/) so big one now in a 100*100, small one still in 60*60. Lots more room and tested the Light with Photone+Diffusor (tested against a 400Euro Light meter and they were the same +-1%.) plus the smaller plant is now at least 10cm smaller and was getting around half the PPFD, so gave them both seperate suns.
So. here is the kicker: My wife informed / reminded me, that I decided to start 3 seeds and only 2 made it. " 2*kalini and one SOMETHING ELSE..... Just proves the point my last grow was good :D
If anyone can identify the 2, I'd be grateful. I think it was OG or critical Kush.. but could have been anything really..


Likes
36
Share
@BrigadeDesTerps
Follow
Petite taille effectué, j’ai coupé l’apex et j’ai laisser seulement le noeud juste en dessous de celui qui étais le plus développé, pour vois si les deux repousse de l’apex et celle du noeud en dessous arrive à la même taille/croissance , afin d’être le plus symétrique possible.
Car avant tous je suis passionné par l’art végétal et le bonsaï, j’ai commencé à cultiver du cannabis il y a maintenant 3ans, un été j’ai planté une petite graines dans un bête terreaux vide de nutriments, et là tout a commencé. Mais comme dis précédemment j’aimais l’art, et ce plant en question je l’ai transformé en bonsaï, un magnifique bonsaï, un chef d’œuvre, au quel j’ai perdu toutes photos. L’année d’après j’ai recommencé le même scénario, une graine et on recommence, la se fut un échec, plant trop gourmand et trop sensible au stress, il m’a lâché à 3/4semaine de floraison, puis maintenant 1ans que je cultive en intérieur a rechercher une bonne recette de living soil, toujours à la recherche de perfection jusqu’à couper avant même la fin de floraison car j’étais pas satisfait du résultat. (C’est pour ça aussi que j’ai supprimé tous mes journaux) J’ai coupé deux cultures comme ça et j’ai fais qu’une récoltes sur la troisième. Maintenant celle qui m’excite le plus est la petite graine d’extérieur, oui comme on dit jamais deux sans trois, plus de 1ans que j’attends cette variété, la Frosty purple freak. Le mutant violet de chez Khalifa Genetic. Que je vais bien évidemment travailler comme un bonsaï, mais symétrique , je vais éviter de trop le stresser comme j’ai eu du retard sur la croissance du a certain imprévu de type limace et temps catastrophique. (2 graines bien planté dans mon derrière.) je vais essayer de bien le diriger tous en essayant d’avoir une certaine récolte, en faire un bonsaï crée d’énormes stress au plant et ralenti considérablement la croissance, pour essayer de récolter 50/100 grammes sur le plant en extérieur faudrais approcher les 3/4 mois de végétation si tu implique des haut stress training et de la coupe a gogo. Et j’avoue que j’ai pas payer plus de 50litre de living soil juste pour 15/20 grammes de récoltes sur le plant, même si la satisfaction d’avoir fait une œuvre d’art, ça ne vaut pas le coup, je ferais mieux l’année prochaines, je dois accepter cette défaite.
J’ai mis des vidéo de mon deuxième bonsaï, il étais en début de floraison et il avait environ 4mois, sans nutriments ,je lui estimais 30/50 grammes en fin de Flo, mais il m’a lâcher.
Dans les deux dernières vidéo, il y en a une où on voit bien le dépôt bactérien et nutritifs du thé de compost oxygéné.
Recette du thé pour la semaine
15litre d’eau de pluie
30 gr guano guali
15 gr Meal wormcastings
15 gr nettle
7 gr spirulina
7 gr Hydrosolat Kelp
225 gr wormcastings
15 gr hydrolysât de poisson
15 gr Comfrey
10 gr levure saccharomyces cerevisiae souches lycc 6420
60 gr Zeolit of chabasit
15 gr Azomite
45 ml de mélasse
15ml d’acide Humic et fluvic
J’ai arroser 6 litre pour la purple freak et le reste a d’autre plantes
Et un autre arrosage avec 500ml d’eau neutre avec 1gr bacilllus amyloliquefaciens x5 qui a été effectué le lendemain du thé
La culture se passe bien, du côté de la purple freak
Aucun problème à déplorer, plant très résistant, au changement de température et condition climatique supporte très bien les orages et les temps pluvieux et chaud, pas de signe de maladie, j’ai actuellement des ravageur depuis le début de la culture, pas un signe de problème. Réagit très bien au coupe, j’en suis plus que ravie, elle fait partis de mon top1.
Seul truc qui m’inquiète, c’est ce mauvais temps. Un mélange de chaleur et de pluie, qui a amené de l’oidium sur certaine de mes plantes extérieur, j’ai peur que cela se propage sur la purple freak. Je vais devoir traiter tous cas, sans traitement agressif bien sûr.

Likes
13
Share
@Oims_Finest
Follow
Third week on bloom and the ladies are in full overdrive. I had to increase the humidity up to 70% b'cause of my predatory mites which I released a couple of days ago to get rid of these bloody spider mites.
Rest is daily routine.
Servus🤘 Oim

Likes
56
Share
@MrGrow
Follow
10.11.2022
130 giorni dal seme al raccolto
70 giorni tondi di fioritura
1590 grammi il peso a umido delle 2 piante, sicuramente un buon risultato in un box con all'interno altre 8 piante.
La struttura della pianta si presenta con rami allungati tipicamente sativa, facilmente addestrabili sia con Scrog, sia con LST. Ho dovuto puntellare con aste reggi rami le infiorescenze che nelle ultime settimane piegavano i rami verso il basso.
il profumo che emanano questi fiori è qualcosa di straordinario, vanno dal dolce e agrumano, mandarino limone e caramello, si intercettano note floreali di lavanda ed erbe aromatiche.
Sicuramente aggiornerò il profumo e sopratutto il sapore ad asciugatura ultimata


Likes
37
Share
@DaddyPrime2
Follow
5/27 curious to see where this week ends up at
5/29 the one plant indoors is packing on weight. The one I put outside to finish (possibly stupid) seems to be maturing faster but bulking slower. She's seemed healthy this whole time. Not even a burnt leaf tip
5/31 attempting to take pictures in different lighting to get a better idea for yall viewers
Likes
10
Share
@AestheticGenetics
Follow
6/10/25 plant is stacking nicely. i had to move this and the prom night back into the aci tent because its been getting too hot and i need to have more control over everything and so ive had to cram them into the same tent

Likes
11
Share
@dubby_m
Follow
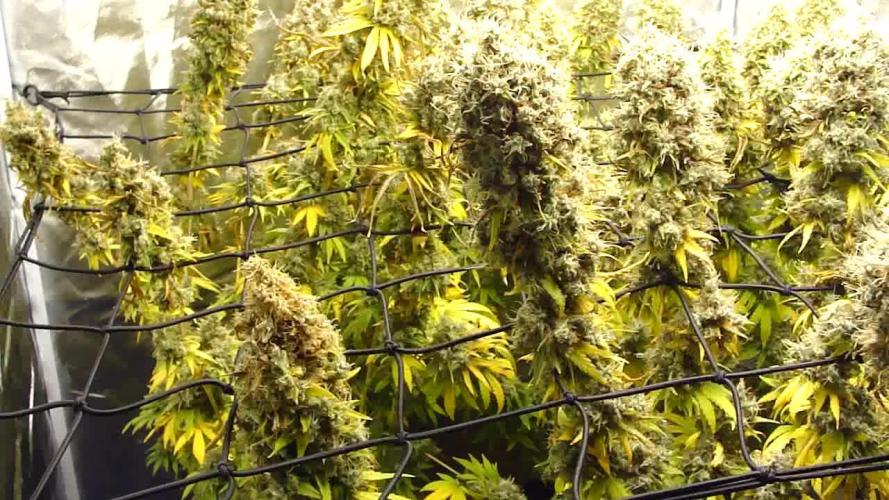
The plant was finally Ready to harvest. Buds were more on the leafy side, but no foxtailing, so wet trimming was pretty easy…
It will dry now for a week and then cure…
I will come back with final results… :))


Likes
12
Share
@2Stones1Bird
Follow
Checkout my Instagram @smallbudz to see the Small budget grow setup for indoor use, low watt, low heat, low noise, step by step.
06/02/2020 - Gave her 1,5l of tap water, checked the trichomes still transparent almost turning cloudy maybe a few more day!!
08/02/2020 - Showing her first amber trichomes going to harvest in 1 to 2 days !


