


Likes
28
Share


@Luv2Grow
Follow
Update 20 Jan 2021 - Well starting the cure a bit earlier than I’d like cause I’m having issues getting the humidity up so she dried up quick. Working on rehydrating her a bit and have her in mason jars now. Ended of with 88 grams of rock solid buds. Still want it to rehydrate and cure a bit before trying her out.
What can I say, a very simple and easy grow. Had absolutely no issues during the grow and ended up with 380 grams of SOLID wet bud. Even some of the lower buds that didn’t get much light are pretty rock solid. Going by the smell and solidness of the buds, I got a feeling this is gonna be a too 2 strain, if not number 1. Looking forward to growing this one again and as soon as I harvest another plant, I’ll probably start another one of these.

Likes
4
Share

@Hempface86
Follow
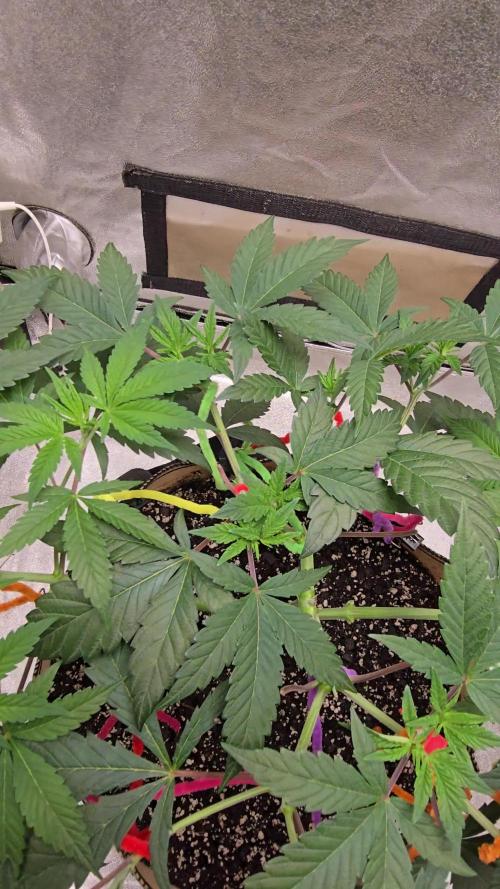
You can see this girl is getting big. I've done a few rounds of topping and she has spread out i'm going to put her in her own tent in a few days when my new fans come in... She's gonna be a big one =) .. Hope all is well.God bless and happy growing 🙏

Likes
152
Share


@SlowpokeFuegobud
Follow
🍪 🍒 🍰🍩 🎀🍪 🍒 🍰🍩 🎀🍪 🍒 🍰🍩 🎀🍪 🍒 🍰🍩 🎀🍪 🍒 🍰🍩 🎀
Day 95 chop time, harvest went fast, the stems were loaded with buds. Hehehehe.. Cannot wait to smoke this one! 😎😍
As you can see, we made a real break-up cake. 😋 You will find the recipe in the smoke report, down there! ⬇️ 😏 Beware! It's a really strong cake, I do not take responsibility whatsoever! ✌️😁
Thanks for showing up and supporting me and the girls, bless you, growmies!! 😘 ❤️
Shouts go out to my sponsors @GreenBuzzNutrients, thanks so much for your support!! 💚 💚 💚
If anyone would like to try their amazing organic products, you can find a generous discount code of 25% in my weekly comments! 😜 🙏
If you want a recommendation which product to get first.. BIGFRUITS!! 😍 I love the tasty terps with this one!!
https://greenbuzznutrients.com/
Thanks also of course @Kannabia, for the beautiful genetics!! 🧡🧡🧡
Pouring all my love into this grow, thank you for joining in, growmies!! 💚 💚 💚 😘 ❤️ ❤️ ❤️
Wishing you all the best for your beautiful gardens!🌱 🙏 Grower love!! 💚
_________________________________________________________
Strain Info:
https://www.kannabia.com/en/feminized-cannabis-seeds/break-up-cake
We need to talk
You’ve got to celebrate everything in this life, and that includes love and heartbreak. Since you’re all familiar with Wedding Cake feminised marijuana seeds, we’ve put a Break-up Cake in the oven at the Kannabia Seed Company – because things don’t always go well, and we sometimes need a friendly seed to lean on.
Break-Up Cake has a base of Girl Scout Cookies, one of North America’s best-known strains, which is earthy with a very potent indica effect. And we top it off with a delicious Cherry Pie which, in addition to giving it an elegant dark attire, adds a silky, deeply sweet flavour of cherries and berries. Look no further – it’s the perfect cake.
This seed will be celebrated for its ease of cultivation and abundant production. It’s one of the best investments you’ll make this year. But if it’s going to be memorable for one thing, it’s for its sweet complex flavour that’s full of contrasts. If we have to break up, let’s do it sweetly and amicably, right?
How to: Break-Up Cake
Break-Up Cake is an “all-terrain” marijuana seed, which will adapt to the place you allocate to it. An ode to independence, it’s a plant with only the most basic needs that knows how to grow by itself.
It’s a pale branching plant with tremendous dark green leaves, purple tips, and an icing sugar coating of trichomes. Its immense buds are some of the stickiest ones we’ve found in our seed bank recently.
Indoors, it needs 60 days of flowering to give no less than 600 grams per square metre. Use a Screen of Green method without hesitation, or plant it using hydroponics if you want to obtain the full benefit of its potency.
Outdoors, it reaches two metres in height with a harvest of 800 grams per plant, which is reason enough to give it a go. Like a good break-up cake, this plant doesn’t need to live with a partner, and knows how to live well in a Guerrilla plot. Between 25th and 10th October is its moment.
Taste and effect of Break-up Cake
Very relaxing but not causing lethargy, it’s a good indica-dominant plant. Its effect is mellow (we’re too old for childish games). It calms the consumer but it also gives rise to creative moments. Head on up to the top floor, later to make your way, little by little, down to the kitchen later (where you might want to give in to temptation if you need to stimulate your hunger).
The flavour is full of nuances. It will remind you of a vanilla sponge or cheese cake: you’ll notice a cherry topping, something sweet that you can’t quite distinguish, and an earthy undertone on a biscuit base… You’ve got to sample it to know it.
_____________________________________________________________________
SETUP:
80x80x180 cm Zelsius
240W Full Spectrum LED IR UV dimmable
DW240H-A6-HS
Heatsink color red
LED Chips:
512pcs SAMSUNG LM301H
24pcs Osram 660nm
8pcs Osram IR 730nm
8pcs UV 385nm
Color mix: 2700K
4000K
2,8umol/J
Driver HLG-240H-C2100B
Coverage: veg 5x3ft / flower 4x2ft
Product size: 628x205x68mm
Green Buzz Nutrients
Shouts go out to my sponsors @GreenBuzzNutrients, thanks so much for your support! 💚 💚 💚
If anyone would like to try their amazing organic products, use code GD42025 for generous 25% discount (for orders of minimum 75€) ✨
https://greenbuzznutrients.com/
Biobizz Lightmix
custom exhaust fan 320/270cm³/h
Carbon Active Granulate 240cm³/h
tab water pH 8 - EC 0,25 with Calmag to 0,5
Advanced Hydroponics pH minus Grow
Bloom to pH 6.2
🍪 🍒 🍰🍩 🎀🍪 🍒 🍰🍩 🎀🍪 🍒 🍰🍩 🎀🍪 🍒 🍰🍩 🎀🍪 🍒 🍰🍩 🎀

Likes
8
Share


@samuraifroggig
Follow
Still waiting on cure to weigh, prob a few more days first 2 plants gave 5.836oz dry

Likes
91
Share


@Salokin
Follow
Gu Guys,
she is continuing to develop as she should, however doesn't seem to be stretching all to much even with lower light intensities. I have therefore decided to push the ppfd to roughly 600 and let her finish her pre flower, no matter if she will fill the entire scrog or not. the roots are bit stained, however, this seems to be nutrient related, no slime or smelly roots thus far and it seems like she is constantly shooting out new ones from the net pot. She is going to be a nice little bonsai bush :)

Likes
6
Share

@GoodKarmaCannabis
Follow
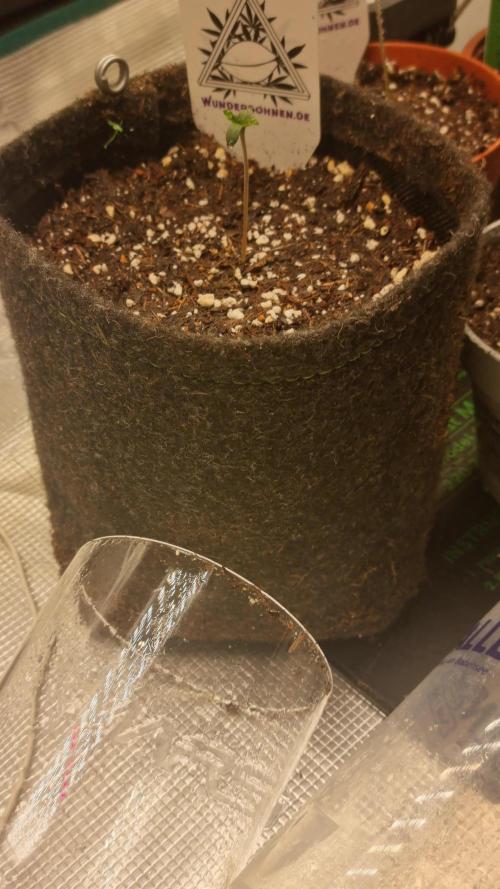
27.02 - 20Uhr: Samen wurde in Wasserglas eingelegt
01.03 - 10Uhr: 2cm Wurzel, wurde in Erde gesetzt


Likes
7
Share


@Lacremelabs
Follow
I still have ppm at 1000 and pH at 5.8.
The pistils have started to appear, and it's emitting a bit more of that green scent.
I'm looking forward to the flowering stage.


Likes
5
Share


@Ninjabuds
Follow
Obama runtz x gas tax sad to say both seedlings are super crappy so far. If it was not for the gas tax parent being the best flower ever then I wld just toss these but sometimes the crappy slow growing plants end up being super dank
It's looking like a good start to a week the plants are strong they are getting to the point I can let the dried dry out completely. I'm thinking by the end of this week the plants will be starting to be sold.
Last week I put all the plants into my bigger 2x4 tent with my medicgrow mini sun 2 the 500w version. Only a few of the plants were ready for that light. Seems like the only plants that really have good resistance and have a strong start are the weedseedsexpress.com seeds. Shout out to weedseedsexpress.com for the strong plants.
I ended up putting all the plants back into my 2x2 tent with the 55w amazon light it has alot more blue light in its spectrum. It's kinda weird b4 I switched the plants to the 2x4 tent they were getting 220umol under my amazon 55w led then when I put them under the 500w light 25% strength about 50in from plants and they were getting only about 195umol in that tent but it was stressing most the plants. I assume a larger light has more side lighting hitting the plants. I think when useing larger lights it's good to measure umols from the top but also coming from the sides. I think durring seedling stage they only need about 50% the umols coming from the side the plants as the top is receiving.
When I put the plants back in the small tent about the same umols as they were getting b4 the switch and they were still a little stressed. So for a few days I put the small light at the top the tent giving them 100umols for a few hrs then 130umols the rest the day.
Likes
2
Share

@MindFlowers68
Follow
Shes stoped growing in height for the most part but the buds are just getting started and already filling the space of the nodes. Already covered in trichomes and the smell is very sweet and citrus. Going to be some perfect mid summer smoke! I cant wait.

Likes
13
Share


@m0use
Follow
Plant did ok, not the best result and far below my expectations for it. I found that growing them in pots with other plant is a no go from now on for autos. they just don't grow all that well when their root space is being shared, all my autos from a few breeders did poorly when I grew them like this. however the ones I kept in their own pot did much better, the Ganja farmer brand is good, just wish they had some CBD/CBG strains in their catalogue. This will all be for friends and family.
@GanjaFarmerSeeds, If you like the images or videos I can send you raw files that have not been shrunk/resized and contain no watermarks, if you feel I am in the top 3 of your BDOTY Contest that is :D

Likes
5
Share


@Naujas
Follow
this is another one, my attempt, completely without any electricity since the first days :) next week I will take it out into nature, I will visit it once a week :) today there is not much sun, so the girl jumped up a lo,
Likes
37
Share


@Aleks555
Follow
🏆 Eternity Grow Cup 2025 with Plagron and Zamnesia 🏆
Zamnesia – Runtz
93 days from seed | 62 days in flower
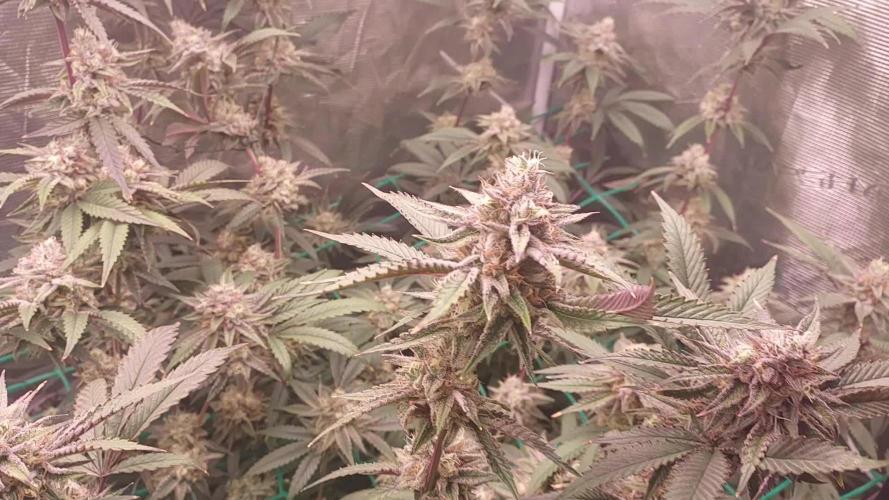
The time has come — harvest day is here, and our incredible journey with this beautiful Runtz from Zamnesia has come to a fragrant, frosty end. For the past two weeks, she’s been enjoying pure, clean water as we prepared her for the finish line. Her leaves gently faded to gold, signaling her maturity, while the trichomes turned from cloudy to amber — with about 15% showing that deep golden hue we were waiting for.
She grew strong and vibrant thanks to the outstanding genetics from Zamnesia Seeds, and we’re beyond grateful for this opportunity to cultivate such a top-tier strain. Her structure, aroma, and resin production were truly impressive.
A massive thank you to Plagron as well — your nutrients have once again proven to be the perfect fuel for our grow. Easy to use, reliable, and effective — we couldn’t ask for better support for our plant’s development.
Stay tuned — soon we’ll share the dry weight and a full smoke report. But for now, it’s time to celebrate the harvest!
Likes
6
Share


@wheedtobeus420
Follow
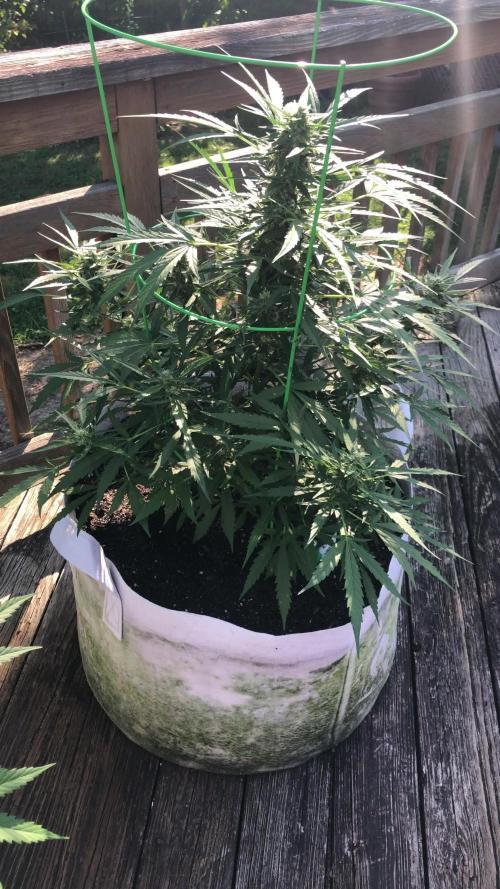
Day 47 or so I haven’t measured her so the height can’t be right she’s huge! And getting so heavy. Took some photos of her in the dark while I pretreated the tent for mites or any other fuckers who like to ruin the day. Just in case. Since I recycled soil it couldn’t hurt. She’s beautiful I’m so excited for her to be finished.

Likes
Comments
Share


