The Grow Awards 2026 🏆 


Processing
Likes
Comments
Share
@420keef
Follow
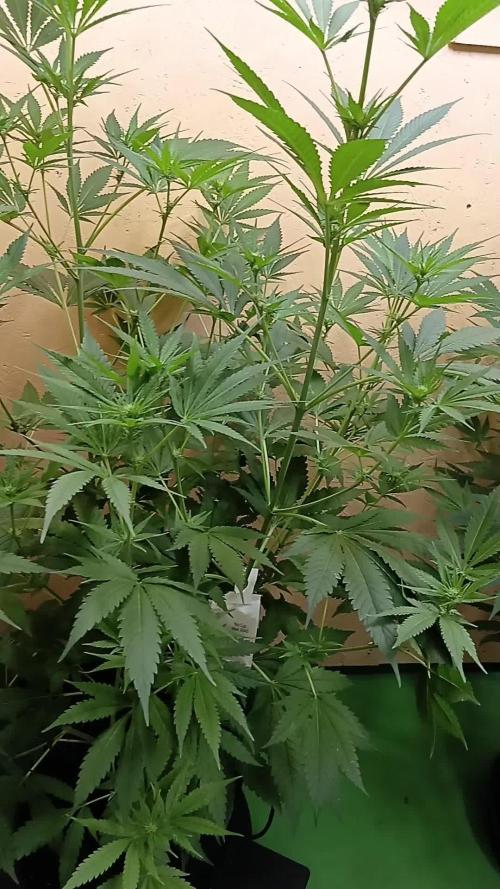
So i had to take all my plants inside because i found bud rot on 2 of them & the weather wasn’t going to get any better, had to transform my bedroom into a grow room😂 & i have 2 more plants which i am going to finish next to a window.. The smaller plant to the right is a Northern light by zamnesiaseeds that has a seperate diary if you are interested! I really hope the bud rot doesn’t spread anymore & if anyone has any tips or tricks for that they are always welcome!

Likes
18
Share
@Staffedition
Follow
Привет друзья. Моей растихе сегодня 96 дней.
Заметил паутинного клеща.
Сегодня обработал раствором.
Растение почти пришло в себя.
20.10 перевёл свет в режим 12/12
Начал применять LST технику на 19 дне и продалжаю применять её через день, а 18 августа добавил ДЕФОЛИЗАЦИЮ
С 20.08 ДЕФОЛИЗАЦИЮ делаю каждые 3,4 дня
С 20.08 LST технику делаю каждые 4.6 дней
На сегодняшний день влажность 54%
5.09.2023 заметил высокий Ph 7.9
С 48 дня Ph не ниже 5.8
На сегодняшний день Ph 6.0
Начал кормить с 60 дня Canna Terra Vega
PPM 770
Всем мира и добра!
Не забудь поставить лайк❤️, если понравилась как прошла неделя

Likes
24
Share
@TerpTurtle
Follow
Strawberry Truffle - White Truffle x Red Pop & limited seed it came with Chem 91 x Red pop
Likes
101
Share
@Papablob
Follow
05/04 petit nettoyage du bas pour avoir des têtes durs. (Ci possible avec la grosse qui bouffe la place au soleil) 🙏
Likes
24
Share
@DeepRootsGrowTrees
Follow
COLOMBIAN JACK BY KANNABIA
Week #8 Overall
Week #8 Veg
This week she recovered from being topped and being pruned she's going great it's also crazy hot right now and she's dealing with the heat she's got some great genetics!! Stay Growing!!

Processing
Likes
8
Share
@GermanGrowsCannabis
Follow
Was soll ich sagen ?? Ich denke das sie sich sehr gut entwickelt :) sie explodiert 19.1.2020


Likes
5
Share
@DaddyPrime2
Follow
4/28
Day 35 I wish this plant was bigger. Could be my fault. Her transition to flower was at such an odd time(3weeks) and that’s when her last feeding was coming to an end but should I give her flower nutes early? Do half an half? Or just wait and then give flower? I waited and I shouldn’t have considering that organic inputs take time to feed your plants. Depending on what you’re using. First time trying Gaia green. I do like the ease of it but it would take some adjustments for me to utilize it best. A month between feeding is too long for my impatient ass and it gives me too long of a commitment to not fuck up. I’m also using roots organics with some other plants and I’m really liking the weekly feedings. It makes more sense than a month. What if I have a strain that’s like 10 week flower? Do I just do another dose at week 7 and 8 and then because it’s “organic you don’t need to flush” thing. Probably over thinking it but yeah here’s my plant yall 😂
Likes
35
Share
@Santica_Garden
Follow
Sorry for the lack of update on these ladies, but everyone is doing fine, great amount of growth coming. Just been flipped to flower on a 12/12 schedule.


Likes
2
Share
@Robertgrowsit86
Follow
All theses photos are of going on end of week 6 of total life for these plants , it says we are getting close to the end of this paticular cultivars grow cycle but we will take it all the way till trichomes are milky ,amber to a ratio of my liking. They were stunted , I shouldn’t have transplanted them just started them off with a drip system in the autopot - pots ! But they are growing good. That is nearly trichome production on my number 3 girl. Will continue to post updates with better info. I’m rushing today, peace out
Likes
5
Share
@Foxbud420
Follow
Short Update:
tommorow i will lollipoping them and a light defoliation. Next week i will do more defoliation.
Next week i will post more. I show the cut from tommorow // the the aktual state after the cut.


Likes
1
Share
@Cannerd
Follow
How ya doing mates?? Awesome week last week - all photos and logs have been added so be sure to check it out! This week is going great so far! I've switched to an early vegetative state nutrient system. As you'll see in the daily logs early this week, this bumps up the micro and grow nutes, and keeps the bloom at 0.6ml/gal. A quick note about last week - I'm unable to update the measurements, but please note that those nutrient amounts are measured in ml/gal, NOT ml/l.
Anyhow, this week I'm just waiting to get my order of diatomaceous earth so that I can make up another batch of soil. I'm still debating between topping this week before repotting or letting them take root in the new pots first. Decisions decisions lol. I think at the very least I'll clean up some of the lower growth to make sure the energy is being spent at the right places. I've been switching back and forth between just LST and mainlining in the past - but I think I really like the ease and cleanliness of mainlining. The draw back is the recovery time they take in the process haha.
UPDATE:
The D.E. has come in, and I repotted the girls this week. I mixed in about 1.5-2 cups D.E. for the whole pot, as well as some Bat Guano and Kelp Meal for micro and macro nutrients to use on dry cycles.
I've also included some photos of the mother plant to give an idea of what's to come! I've just started to flower it, which is the first time for this strain - so I'm pumped!
Day 15:
M.C. 01-21 After reviewing the last set of photos from last week, I figured I'd play it safe and dimmed the light back down to 25% strength. The mother plant is almost ready for flower, and I'm down some tents so she'll be taking this one over shortly. These photos were taken shortly after the lights went off, and they look quite happy! You can see some of the side branch developement in today's photo for MC-01. The pots are fairly dry now, and I've decided to move to the next stage in the nutrient regime. This kicks up the Micro and Grow nutes, while maintaining the Bloom amounts.
M.C. 02-21 A nice top photo for MC-02, you can really see the lighter green in this photo. Not to worry though, as these will darken back to a vibrant green as long as I give her what she needs shortly! The pots are fairly dry now, and I've decided to move to the next stage in the nutrient regime. This kicks up the Micro and Grow nutes, while maintaining the Bloom amounts.
M.C. 03-21 Look at that little leaf poking out from the 2nd node! Some slight yellowing you can see too, but again, not to worry. The new mix should rectify that. I've decided to move to the next stage in the nutrient regime. This kicks up the Micro and Grow nutes, while maintaining the Bloom amounts.
Day 16:
M.C. 01-21 Today is the day - for the mother! I've cleared out some space and moved plants around. So back out to the grow room these girls go! MC-01 seems much better today with the reduction in light. The 5th node is almost flattened out and the 6th coming through still. Most notably though, you can really see the work she's put into the side branches! The branches at nodes 2 and 3 are starting to produce more leaves - great sign! The new growth at the top is also a nice dark green. Added 500ml water to the tray.
M.C. 02-21 MC-02 seems to have liked the adjustment of light as well. She's got nice dark green growth at the top, and the little branches at the 2nd node seem to have a full leaf! Added 500ml water to the tray.
M.C. 03-21 The photo from today is cool, because you can see how close MC-01 & 03 are, even though there's almost a full node difference. MC-03 is stretch out a bit to compete with her sister for the light haha. She's also put some more effort into the side branches that you can see. Added 500 ml water to the tray.
Day 17:
M.C. 01-21 I figured a video would be the best way to illustrate the changes today! They've been back in the grow room under the Veg dedicated light for a day now and seem to be loving it! MC-01 has its' 5th node out, splitting the 6th node, and I can JUST see the 7th node coming in. I don't think they'll get too much more height, as you can see that the side branches are starting to stretch now! She's definitely going to be well tangled in the roots by the end of the week when I hope to repot her.
M.C. 02-21 MC-02 is doing great despite the difference in height! You'll notice the side branches stretching out at nodes 2 & 3. The pots are also still fairly wet at their center, so I'll hold off on water most likely. At least this clone will have time to root more while we wait for the supplies!
M.C. 03-21 MC-03 also has great side branching! If you take a look at the group photo from today, you'll see that both MC-01 & 03 are practically the same height, but MC-03 snuck in there by the stretch haha.
Day 18:
M.C. 01-21 My order of D.E. came in last night, perfect timing! As you can see, her roots have fully reached the bottom, and have started to migrate upwards with the water that's absorbed. The soil was a little dry for my liking, which made things a little difficult/dusty but still no mishaps! Watered around the root-zone before covering with more soil to keep the gnats down.
M.C. 02-21 Not quite as much lateral root growth as MC-01, but still plenty enough for a repotting! Her soil was a little dry as well. Ideally I should have given them a light misting from the top of the soil and let is drip down to keep the dusty bits together haha.
M.C. 03-21 Nice and thick root growth, no issues with repotting, and strong stalk. The extra spacing in the nodes may prove to be helpful during the training phase.
Day 19:
M.C. 01-21 Some nice top shots today as they slowly get acclimated to their new homes. Once I see them push out a new node, I'll probably top them. This is to make sure that they're taking to the new pot without causing any extra stress before they can take it. Today I watered them with an early veg nutrient. I like to stay cautious with nutrient boosts since they're in soil - not to mention the added nutrients from the repotting.
M.C. 02-21 Top shots for the girls today. Not much change, but also no immediate signs of shock either, so I'll take it.
M.C. 03-21 You can't really see it in this angled shot, but the small branch at the second node is coming along nicely! I think the girls are happy that they each have their own tray not haha.
Day 20:
M.C. 01-21 Definitely noticing some slow changes to the top nodes when comparing the pictures from the previous day. The leaves are slowly starting to separate, and I'm not noticing too much yellowing yet which is good. Watered with 500ml water to keep water migrating upwards to meet the roots.
M.C. 02-21 Not noticing much change in this girl today, but that's okay. She's most likely focusing on the root developement instead which I can't complain about! Watered from the bottom.
M.C. 03-21 Maybe seeing some separation in the top leaves, however more notably are the small branches at the 2nd node that you can see better here. Still a bit of stretching with them as they get longer. I might even keep them on for clones later on. Watered from the bottom.
Day 21:
M.C. 01-21 Looks like she gained some distance last night, as the top node is now above the fan leaves, unlike 2 days ago. I'm really getting eager to top them, as I don't want them to waste too much time and energy growing tissue that I'll just end up cutting off. I'll be bumping the nutrients up starting next week to keep the progress going, moving to a mid-veg stage shortly. I'm going to let things dry up tonight for a fresh boost of water tomorrow to give it a dry cycle as the pot is still a bit heavy.
M.C. 02-21 MC-02 really worked hard last night it seems, as she almost completely flatted out her top leaves! I think she's ready for a topping, but I'll let her benefit from the headstart and let the other two catch up and root before. dry cycle for her tonight as well.
M.C. 03-21 MC-03 was busy last night too and is now slowly flattening out the top node as well! Maybe tonight they'll have enough progress to go topless afterall haha. Dry cycle in prep for watering tomorrow.
Likes
13
Share
@russrahl
Follow
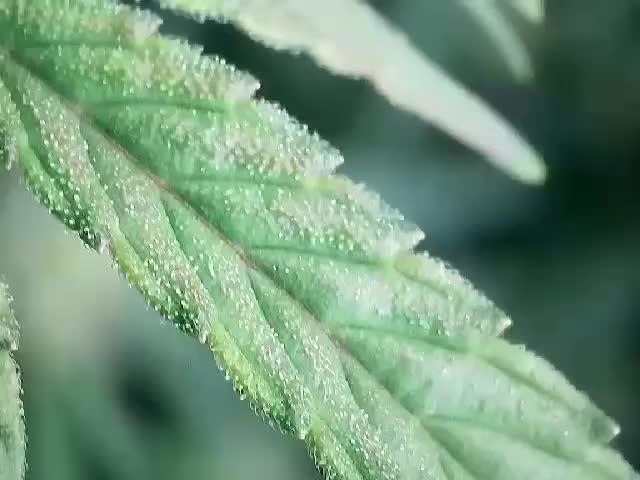
These girls are looking like they are sprayed with fake snow...lol so sticky icky to play with. Took off a lower outside branch for scoping and these girls are looking close. They have signs of some amber and we are gonna let them go a bit longer to harvest closer with the alien tech hopefully. They definitely didn’t like being neglected a little bit and ph/Ec swung a bit in the middle of flowering and cause some issues a bit, nothing major though. Definitely not for the beginning grower that’s for sure, very finicky...lol got the nutrients lowered for the last week and then there getting the chop! Lol got more girls needing the room, but there looking good. Till next week, Cheers 💨


Likes
6
Share
@Killerz224
Follow
Overall it was a great first time grow. The outcome was smaller than expected. This was caused by the heavy under watering, that stunted the growth of the plant.
However the 26g of weed that I got from this harvest is amazing! Smoking is very smooth and the sativa effects are great.
Likes
31
Share
@MadeInGermany
Follow
Info:
Unfortunately, I had to find out that my account is used for fake pages in social media.
I am only active here on growdiaries.
I am not on facebook instagram twitter etc All accounts except this one are fake.
Have fun with the update.
Flowering day 8
since time change
to 12/12 h.
Hey everyone ☺️.
As the flowering begins you can already see a clear stretch of the lady :-).
Yesterday 2 g GHSC Bio Bloom per l coco were added.
In 2-3 weeks I will add another 1 g per liter 👍.
The tent was cleaned and everything was refilled.
Have fun with the update.
Stay healthy 🙏🏻
You can buy this Strain at :
www.Zamnesia.com
Type:
Runtz
☝️🏼
Genetics:
Zkittlez x Gelato
👍
Vega lamp: 2 x Todogrow Led
Quantum Board 100 W
💡
Bloom Lamp : 2 x Todogrow Led
Cxb 3590 COB 3500 K 205 W
💡💡☝️🏼
Soil : Bio Bizz Coco
☝️🏼
Nutrients : Green House Seeds Company Powder Feeding Bio
☝️🏼🌱
Water: Osmosis water mixed with normal water (24 hours stale that the chlorine evaporates) to 0.2 EC. Add Cal / Mag to 0.4 Ec Ph with Organic Ph - to 5.8

Likes
38
Share
@Brujha77
Follow
So,
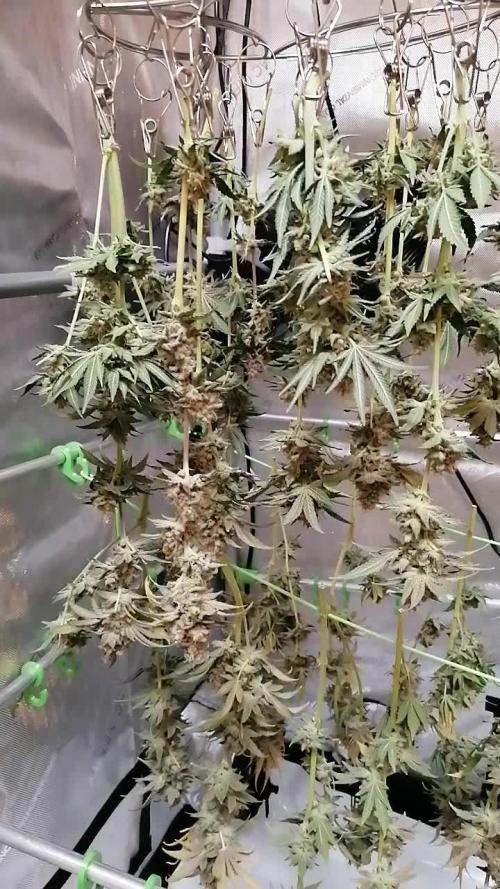
Die Damen haben es geschafft. 🍾🍾
Hängen nun zum trocknen im Zelt bei ca 22° und 55-57%Rlf
War wieder ein recht entspannter Durchgang.
Riechen tun sie mal sehr interessant, gute frage wie Man's beschreiben sollte🙄🙄
Die Airpots funktionieren einfach super, und auch das Scrog Netz (Inferno Harvest) ist extrem praktisch.
Likes
2
Share
@Mrs_Larimar
Follow
2025-10-16
The kush´n Cookies plant does really well,
i was tucking some leaves and shoots- she spreads like she gets it paid.
RH was lowered,
Predaors were added for pestprevetion
watertank was filled
The fun can start.
Container: 35L Smart Pots
Growing Method: Autopot System with "Water-Only" strategy
🌿 Soil Preparation
Base Mix Recipe:
5g per liter soil - Startrex
5g per liter soil - Silicium Flash
Mixed thoroughly for optimal distribution
5x Fertilizer Tabs - strategically placed near bottom (20cm height) for autopot compatibility
1 tsp Mycotrex - applied directly in planting holes
Bactrex solution - used for initial watering
🏗️ Layer Construction
Bottom Layer (10cm): Drainage material (clay + perlite)
Air Circulation: Airdomes positioned
Growing Medium: Pre-mixed soil with embedded fertilizer tabs
Root Zone: Mycotrex application + seedling placement
Initial Watering: Bactrex solution
⚙️ System Activation
✅ Setup Complete - Autopot system now delivering automated water-only feeding
From this point forward: Pure water automation via Autopot system
🙏 Acknowledgments & Partnerships
Special Thanks:
Biotabs - Premium nutrient solutions
🏭 Puraplants - Autopot system provider
💰 Exclusive Discount Codes
🌐 Puraplants (Hamburg, Germany)
www.puraplants.de
Code: GrowBigger → 10% OFF
Biotabs Webshop
biotabs.nl/en/shop
Code: GDBT420 → 15% OFF


Processing
Likes
12
Share
@BloodBath
Follow
I will be focusing this diary on the smoothie strain but you’ll be seeing some other plants in the tent that are not the same strain. I only have room in this tent so bare with me. There are 2 Smoothie, 1 CNC, and 1 Stardawg (dog). The smoothie are the two bigger ones in the back of the tent.
Now, the Smoothie from FastBuds is just killin it right now. Since I popped the beans they have done nothing but show signs of greatness. I don’t think this one is gonna slow down much either.
I’m going to push these plants harder than my last harvest. I had a really really amazing harvest last time. I was even able to pull sap out of all 4 plants. 2 Zkittles and 2 LSD-25. This was all done by feeding at the right times and keeping a “moist” soil. Also I want add that I ran pretty much the entire line of Nectar for the Gods at a little less then the recommended ratios. This time I plan on going a tiny bit over the recommended ratios just to see what these plants will do. Trust me, if the plants have a bad response I will go back to the recommended ratios.
The reason I want to do this is because I really think these auto strains can handle a lot more than a regular flowering cycle plant would. They can handle more stress, that’s for sure.
When do you think I should add a compost tea into my regimen? Soon or wait till the plant is a little larger?
Likes
17
Share
@Fat_Olsh_Farms
Follow
Day 14. Beautiful trileaf plant. Not quite ready for LST. Maybe tomorrow.
Day 15. Bent over nicely for me. This plant is gonna be a beast.