


Processing
Likes
Comments
Share


@Silverback_Guerilla
Follow
Harvested them on 10/4, washed them and hung them to dry for 4 days, then alternated them in brown paper bags and big jars for a few days until perfect.
Final thoughts:
Like most sativas I've grown, those biggass colas were kinda fluffy and shrunk up pretty bad once dry, but it's super frosty, tasty, and smells delicious as well.
It was very easy to grow, but a pain to trim...too leafy. No deficiencies at all with normal feed, and they bulked up really well in the last two weeks. They are thirsty girls because they have a lot of foliage. They can withstand being less than a foot from quantum boards for their final week or two without burning up too much.
I don't like that it took this strain almost two weeks longer than the others, but a good sativa usually takes quite a while longer than these did.
Plant A: 79g
Plant B: 75g
Plant C: 74g
Plant D: 88g (this is the one that split and had two colas)
Potency: 9/10
Flavor: 8/10
Aroma: 8/10
Yield: 7/10
Bag-appeal: 7/10
Ease of growing: 10/10

Likes
16
Share


@Roundhouse
Follow
The smell is in full force dank skunky orange
When I rub a bud you can really smell the sweet orange
The crystals are just insane .
The buds are gaining weight now still have 3 or so weeks so I’m not too worried
All in all a good week
Cheers friends.

Likes
22
Share


@Prilyfe13
Follow
April 28, 2024 Day 8
Transplant day so first day of the veg/seedling stage. Roots were showing through the plugs and needed to be planted. They went into soil. Bio365 BIOFLOWER. It's supposed to be comparable to Sohum Living Soil which is what I normally use. We will see how it does I guess.
3 of the 4 babies are about 3 inches tall and the 4th is 2 inches. I'll have to keep an eye on that one. I don't want any runts that can't keep up. It will just get cannibalized. So I may end up with 3 instead of 4 plants. We will see how the next week goes.
The environment is going to change slightly until I tweak it back into place. The water on the bottom of the tray will certainly get mostly absorbed by the containers, but there will still be enough to keep the temp and humidity in the area I want it.
The light intensity also changed. Due to the height of the nursery bags, each plant gained about 4" in height. The light was left alone with the extension already in place. I can't get a good DLI measurement. I'll have to come up with something. Anyway, that's it for the day.
Germination Center Environment:
Temp: 78.7°
RH: 82.2%
VPD: 0.60 kPa
April 29, 2024
All 4 seedlings are stretching nicely. The light seems to be on point for them their leaves have flattened out and look great. Good color too.
They got a misting this morning. And will get another 250 ml tomorrow. Only plain water from here to mid veg if not early flower. We shall see how things go with them. They seem to be doing fine with the new soil. I'll keep an eye over the next few days to see how it goes. The plain water should be good. Although, I'm not sure what it means, but the soil is not a fertilizer. I wonder if that means I need to add nutrients at some point. We'll see how it goes. If all goes as it should, I won't need nutrients until week 4 at the earliest.
The lighting is staying the same now. The plants seem to be quite happy with the intensity. In a couple days, I think I'll have to increase the light power to 90%. But not for a couple of days.
The Germination Center hydrometer needs a battery, so I'm kind of blind with the environmental readings. The humidity seems fine as there is condensation on the walls. Temp seems alright as well. It should still be around 80°.
Update: I increased the light power to 70% and dropped the heat mat temp down. The seedlings were all reaching a bit more than I like. They are already pretty stretchy, so I gotta control it. I also put in a different hydrometer for the time being. There's no VPD reading, so we will have to work without it for now. Also no daily average readings. That's a shame.
Germination Center Environment:
Temp: 80.3°
RH: 84.2%
VPD: unknown
April 30, 2024
All 4 ladies look great and are reaching a bit, so I increased the light power to help prevent stretching too much. They are developing really fast though. I will most likely be planting them in their final containers in a week or less.
The environment is pretty good with a temp of 78° and humidity at 83%. Still no VPD yet. But I don't really need it.
Germination Center Environment:
Temp 78°
RH: 83%
VPD: unknown
May 1, 2024
All 4 ladies have started spreading their leaves and rapidly. They will definitely be out of the Germination Center in about a week. Hopefully a week and a half, but I highly doubt it.
They are also the same height with the exception of that last one that wasn't really coming out of the soil easily. 🤔. I wonder if I should keep it. Let's see how things go in the next week. Maybe I'll be surprised.
They also got 250 ml of water poured into the tray so the plants can suck it all up. The top soil is still moist, so no sense in top watering. I'm mostly using the tray to keep humidity up. It works wonders. I also shouldn't have to do anymore bottom tray watering for a few days.
The lights are now set to 80% power and I think the seedlings are liking it. No more hard reaching, and the leaf growth. It just shows healthy plants.
The environment is still great at 78° and a humidity of 84%. I plan on keeping it there until the plants get too big for the Germination Center, then I'll do my best to drop it so 70% for the first week of actual veg and then down to 60% for the second week on through week 4 of veg. Then I plan to drop it down to 55% and another 5% every week until harvest.
Germination Center Environment:
Temp: 78.3°
RH: 84.5%
VPD: unknown
May 2, 2024
These Sour Diesel seedlings look phenomenal. The environment is fantastic as well. I had to increase the light to 100%. I want to see what happens. I don't think my Photone app is accurate for these lights. 60% power was showing a super high DLI of 36 mol/m²/d. The lights are only like 28 watts, so it should be at like 20 mol/m²/d at 100% power.
One thing I did notice is that all 4 plants stopped stretching and are focusing on building up those first sets of leaves. It's like the perfect height from the light and they are as tall as the extension. The extension is 4" tall, so the seedlings are as well. The actual dome is 4" tall as well, so we have a good 4" of light distance to a 28 watt light set up. I wonder if AC Infinity has the intensity specs. I may send them an email. Maybe.
Speaking of lighting, I can't speak for the intensity as my Photone app doesn't seem to work for this set up and I don't have a light distance to power reference. Or intensity reference.
The environment is spot on with a temp of 78° and the humidity around 84%. Plenty of wiggle room for night time environmental changes.
I added 250 ml of filtered water to the bottom of the tray again. The top soil is still pretty moist, so bottom it is. I'll probably do a top watering at the start of next week. That should coincide with the final transplant, so top watering will make the most sense and will be needed anyway to transplant the nursery bags.
Germination Center Environment:
Temp: 78.6°
RH: 84.3%
VPD: unknown
May 3, 2024
Not much to do for these ladies today. They have plenty of water and I'm keeping the humidity at 84%. The temp is a bit high at 81° where it should be around 78°.
I haven't quite figured out the lighting. The leaves are fine, everything looks good, but I honestly can't tell if they are stressed out or not. And if they are, is it the light or too much water or too rich of a soil? It could be any one of those factors or two maybe even all three.
There is one who's edges are curling up slightly. I'm assuming it's the soil being a bit hot. But I'm not sure. Honestly, it's been almost 3 months since I saw seedlings and I have no idea what I'm looking at. Lol. I might be overthinking things, but there is some sort of stress on at least one of the plants.
The smallest is looking good. It's just smaller than the rest. I'm still not sure what I want to do. As I said before, I'll wait for the transplant.
I'd like to run all 4 plants, but I don't think it's worth running one that will most likely get cannibalized by the rest. Just a waste of soil and nutrients. But we will see. I'll do my best to keep it in though.
Germination Center Environment:
Temp: 80°
RH: 81%
VPD: 0.65 kPa
May the 4th be with you. 2024 Star Wars all the way!
Today is the last day of week 1 of veg. All 4 plants have excellent growth and are each working on their second node. I'm still hoping I can keep them in the Germination Center for as long as I can. However, I have 2 plants that are ready for harvest. So when they come out, I should be able to put the Germination Center in the big tent. Then there is only 2 plants left to harvest and I after I can do the last transplant into their 3 gallon containers. I have the opportunity to run 5 gallons still. I have 3 yards of soil. I think it's enough for 4 plants. Definitely enough for 3. If I have to get rid of this smaller one, I'll definitely be running 5 gallon containers.
The lights are perfect at 80% power. I can only assume the DLI is around 14 mol/m²/d to 16 mol/m²/d. The plants are looking great with it. Just a slight reach and wonderful color.
The environment is quite nice indeed. The temp is hanging around 77° with the humidity still at 84%. I'll be dropping the humidity down to 75% starting next week. It'll drop down to 65% to 70% when the transplant happens.
Germination Center Environment:
Temp: 78.8°
RH: 82.7%
VPD: 0.58 kPa

Likes
21
Share


@Siriuz
Follow
Started Week 10
Day 64
Fed them some nutes
Day 65
Looking good
Day 66
Outdoors for 3 hrs in the morning due to blackout T_T
Rested like 6hrs zZzz no lights
Day 67
Back to 20/4 schedule
Everything is good
Day 68
Lil defoliation
Got some pics and videos for you all
Day 69 Cool Juicy Video
Day 70 End of week 10
Overrall she is great!
Plan on to give her last meal tomorrow
Floranova bloom


Likes
6
Share


@SmokeyJoeExotic
Follow
This week she’s bloomed after all that time thinking it was an auto it turns out she’s a photo which is weird because Top Tao seeds do not do photoperiod seeds to my knowledge as I tried to purchase some could only find autos however this Taomatic is not an auto I had another one growing as well which I tore down as these plants were nearly 3 months in and not a single sign of showing sex well you live and you learn BUT on a good note she’s smells very danky not a usual danky smell either it’s different, as of now I would say Top Tao seeds are good they take to topping and heavy training well I cracked 8 regular seeds and only had 2 males maybe it’s luck? we’ll see anyway happy growing peace ✌️🏾

Likes
6
Share


@eldruida_lamota
Follow
Que pasa familia, vamos con la sexta semana de floración de estas Papaya sherbet feminizadas de fastbuds.
Vamos al lío, de las 3 plantas, me quede con 2 por espacio, siempre pongo alguna semilla de más por si no abriese alguna por no perder ese hueco del indoor.
También se trasplantaron a su maceta definitiva, en este caso de 7 litros, que el mismo trasplante provocó un shock, que también fue solucionado inmediatamente.
El ph se controla en 6.2 , la temperatura la tenemos entre 20/22 grados y la humedad ronda el 50%.
Las flores empezaron a formarse y progresan a buen ritmo.
Hasta aquí todo, Buenos humos 💨💨💨

Likes
14
Share


@Cannabot
Follow
Much better side branching on this strain.Pleased to see I have one definite Purple pheno possibly the other might be too but a bit early to tell on the one.Smells are coming through and growth has been decent.Once again very happy about the good lateral growth

Likes
21
Share


@Jackweed77
Follow
La Watermelon 🍉 auto della RQS💚🔝 ha fatto un bello scatto di crescita in questa settimana settimana di vita, la terza di fioritura ,e ha incominciato anche a gelare le cime....ora lei dovrebbe mettere il turbo visto il periodo di fioritura molto breve che ha questa genetica...vedremo cosa succede nelle prossime settimane....la sp3000 sta facendo un ottimo lavoro queste saranno le prime cime da me prodotte in idroponica 💦sotto Marshydrø 🛸🔝 e sono proprio curioso di vedere il risultato finale💨💣💐 Le ragazze hanno anche incominciato a fare molto odore e il kit di ventilazione della Marshydrø 🛸fa ottimamente il suo lavoro dal box non esce nessun odore sospetto👍🛸🕺

Likes
58
Share


@GreenHouseLab
Follow
I didn’t take pictures before defoliation but these pics are from after the fact So you can only imagine. So many bud sites she should be stacked!!!
The game plan is to move her into a 5 gallon once I get a chance this week. Glacial, 2-8-4 and some kelp meal will be used.
Likes
32
Share


@AsNoriu
Follow
Day 37. Girls are flowering !!!!
Yesterday I gave them heavy feed . Checked ppm only at the end - 1550 ;))))) thought they will burn, leaves went curly during day and I had to spray them with BioHeaven really often ..
Night photo shows all good so , I will give bacterial feed next watering and will do one more feed bomb. Will target my favourite 1200, but you never know ... ;)))
Hopefully tomorrow I will dump last Northern Lights and will rearrange all tent. Second wave of FB needs bigger pots too ...
It's amazing what they did under that little light, but I think WeedSeedExpress grow proved - all Mars Hydro SP light line - pure joy for grower !!! SP150 will go to grow wonderful plants in Wooster very soon ... One more grower will be born ! ;)))
Busy busy busy ;)))
Day 40. Two girls got supercrop, they stretched too much. Both got bottom clearing too, other girls still left for a week, till any training will be done .
After 6 hours girls are looking up already and all is good , just overcrowded ;))))
Happy Growing !!!
Likes
4
Share


@DmbTexasRanger
Follow
Outdoor harvest smells and looks better than indoor. AN bloom boosters (full lineup) made a huge duffe


Likes
49
Share

@AsNoriu
Follow
Day 85. Girls are packing up , still flowering like nothing.
I have other diary with moved Kushes running and explained there a bit more why i think i have that leaves discoloration. Still lost what happened, but measures were taken, girls got EcoThrive Microbe Tea, Epsom salt , now its only to finish them. 3 plants from 8 got some deficiency and the only variation was new brand of molasses for me. Let's see will it stop the spread or i have to find real problem ....
I was always using Cal-Mag not by Biobizz, this grow i tried to use theirs, but simple epsom salt works better and faster... Drifting away from organics a bit ;)))
Skunks looks like a faster strain, Cheeses just packs flowers, no brown pistils at all.
In my mini hopes they are 5 weeks away from harvest.
Happy Growing and Merry Christmas !!!

Likes
39
Share


@valiotoro
Follow
Hello everyone 😎
A wonderful genetic thank you Dutch ❤️🔥🤩
The trim was super easy the buds are FAT & FROSTY full of resin 🤤
I’m very happy with the harvest 134g !!
For the light i’ve used the Mars Hydro FC-E6500💡

Likes
2
Share


@GreenLeafMinds
Follow
Sorry playing catch up again but everything's rolling along smoothly so far. Slowly adjusting pk forward and watching for negative side effects and deficiencies. The girls are starting to smell delicious .. ecsuse me miss ur terps are showin' XD Microbes are real my friends lol

Likes
9
Share
@Chrisandweed
Follow
De momento van engordando y confirmando las sospechas aunque hasta que no corté no lo sabré del todo jajaja pero lo dicho, tiene pinta que va a ser de floración larga pero espero que buenas cabezas xD
Likes
17
Share


@4chuk
Follow
When I began the contest I had only grown Magic Melon once before (last winter), it grew in an 18 litre pot, became around 4 feet tall, and completely filled a 3'x3' tent. A friend of mine successfully grew a seed I gave them this summer in a container about 4 litres and the plant was considerably smaller. The fact that it can be successfully grown in less than 250mL is astonishing, I have buds from the one grown last winter that are bigger than the can I grew this one in.
Harvested 91 days from sprout.

Likes
3
Share


@Koku_green
Follow
Every thing is looking good healthy plants buds are getting in shape👌 I'm very happy with this strain i wasn't expecting this much flowers 💯🤞 thanks again Green house seeds.co

Likes
28
Share


@Grow_N_Smoke
Follow
I went ahead a flipped into flower and the girls have responded really well!
I had some issues last week but I think adjusting the PH down to 5.9 helped and diluting my nutrient solution to bring down my EC levels helped as well

Likes
7
Share
@MetropGrower
Follow
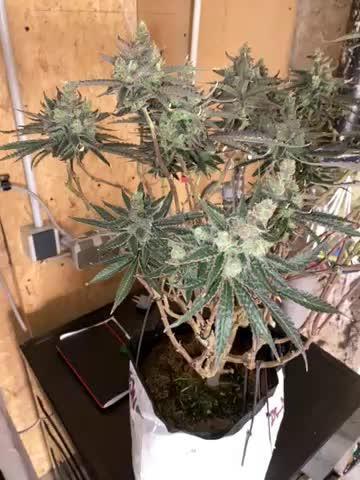
Trichomes are about 45% amber
Now we cut this lady off
It whas not a fun grow
Had much problems
She don’t like training and topping definitely
Not stable in my eyes sr
Likes
7
Share


@Adam22
Follow
Day 6 in flower the back left one has extremely outgrown the other 3. The front right has shown pistils and the other 2 are short and bushy so hoping I have 3 girls. Going to keep an eye on the tall one till it shows sex. Didn't get a chance to prune at all due to being in tiny pots for veg 6 weeks and causing stress and didn't want to over do it with transplanting them soo late I will wait untill week 3 of flower before I prune and keep bending the fan leaves under the lower canopy untill then. The smell is lovely