


Processing
Likes
Comments
Share


@Jelemond
Follow
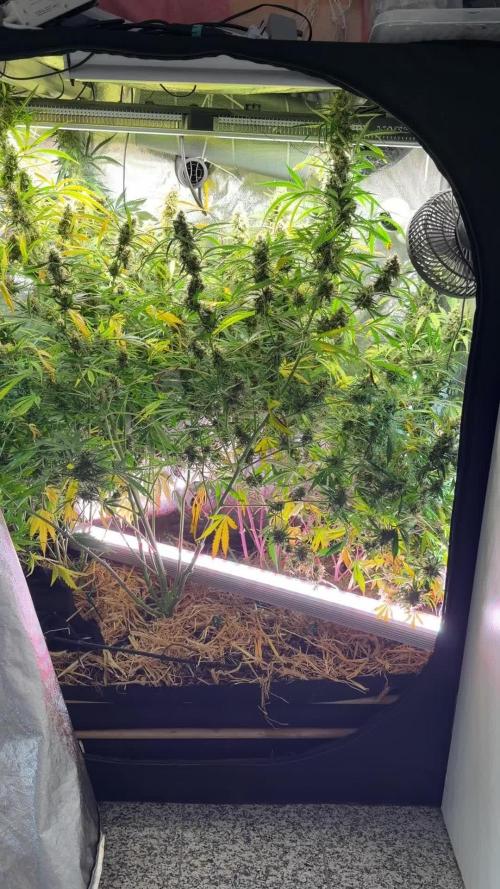
Hello names John this is my first grow.I’m not using any bottled nutes for this grow. Instead using nature’s living auto flower concentrate.

Likes
5
Share

@Organic_G
Follow
Wachsen und reifen ganz gut, überlege bereits eine zu cutten aber denke warte noch ne Woche oder so
Good Things Take time ;)
Ansonsten Terps sind jut

Likes
44
Share


@ILoVeThiSpLaNt
Follow
Giorno 58
Purtroppo ho ancora problemi coi fertilizzanti(ogni volta non mi scende acqua da sotto al vaso e spesso si creano accumuli).
Prossimo giro farò ancora 6 piante coi fertilizzanti e 3 con super soil Dogma!!!
Ricordati sempre di pensare prima di tutto al seme che metterai in terra. Cerca la banca semi che ha i cloni ufficiali in casa della genetica a cui sei interessato e non fare la prima cosa che trovi al negozietto sotto casa!!!
A settimana prossima. Grazie dei commenti e like ❤️👊


Likes
92
Share


@DogDoctorOfficial
Follow
🌸 Week 4 Flower Report: Growth, Challenges & Big Changes! 🌸
Hey, Grow Diaries Fam! ✨
We’re here at Week 4 of Flower, and what a week it’s been—packed with challenges, adjustments, and exciting progress! Before diving into the details, let’s start with a note on my flowering timeline. While this is Week 4, I don’t start counting flower days the moment I flip to 12/12. Instead, I wait for the plants to show true signs of bloom. It’s a small but significant distinction that keeps things accurate and aligned with the plants’ development. 🌱
Defoliation: Timing is Everything!
Defoliation is a critical part of the flowering stage, and I typically wait until Day 21. However, this week, I tackled it earlier on Day 17 because:
1️⃣ The room was simply too full.
2️⃣ And most importantly—the Papaya Zoap had other plans!
She’s a fighter—determined, defiant, and constantly reaching for the moon. Despite intense training like super cropping, she’s still pushing upward, nearly outpacing the LED lights. Challenges like this remind us of a simple truth: gardening mirrors life. It’s about resilience, adaptation, and unwavering determination. 💪
This week, I added a second SCROG layer. While this net will support the flowering colas, it’s also there to strategically manage the Papaya Zoap. Why? Because experience has taught me that if she grows out of the LED’s range, she won’t finish properly—and that could disrupt the balance for every other plant in the tent. It’s all about teamwork, even in the garden. 🌟
Defoliation was intense, removing nearly all the leaves with stems to clear space and boost airflow. The tent now looks dramatically different! For the full before-and-after transformation, be sure to check out my YouTube channel—trust me, you’ll want to see this process up close! 🎥✨
Switching to Aptus Holland Minerals
A major milestone this week: I’ve transitioned entirely to Aptus Holland Minerals. 🌊 From now on, it’s just minerals—no more organic inputs. This marks the start of a new chapter, and I’m incredibly curious to see how the plants react to these changes. Here’s the current nutrient mix:
• System Clean: 0.5 ml/L
• Regulator: 0.15 ml/L
• RO Water Conditioner: 0.8 ml/L
• All-in-One Liquid: 2.1 ml/L
I’m keeping the pH at 6.1 and TDS at 556 ppm, and so far, the plants are thriving. This week also included a thorough system clean, ensuring everything runs smoothly as we enter the final flowering stages. 🌿
Bud Development: Pure Magic!
The bud formation across all the genetics is nothing short of incredible. Every plant is thriving, and the canopy is lush, vibrant, and full of potential. I’ve raised the PPFD to 750 for this stage, with temps steady at 25°C and RH at 63%—keeping the VPD dialed in at 1.11. The TrolMaster ecosystem, paired with the AutoPots, makes managing these precise conditions seamless. With more time to focus on the plants, I can give them the daily care they deserve. 💚
Shoutouts & Gratitude
A huge thank you to my sponsors and supporters: TrolMaster, Aptus Holland, Pro-Mix, Cannakan, and the amazing seed banks. Your incredible products and technology make this journey possible. 🌟
To the Grow Diaries community and all my followers—thank you for your energy, love, and even the challenges from the haters. It all fuels this incredible process, and I apprecilove every bit of it.
Special shoutout to Brother Daggadna—check him out on Instagram and show some love! 💚
The plants are heading into the next phase of bloom, and I can’t wait to share how this story unfolds. 🌸✨
As always, stay tuned, stay positive, and let’s keep growing strong together! 🙌
Growers’ love to all 💚
#TrolMaster #AptusHolland #GrowLife #CannabisCommunity #FlowerWeek4 #NeverGiveUp #GrowWithLove #IndoorHorticulture #Defoliation #PPFD #ControlledEnvironment #SCROGNet #DogDoctorOfficial
Discount Codes so you can save big on your next check out 💚💚💚
Kannabia - DOGDOCTOR 30% off
SeedsmanSeeds - DOGDOCTOR 10% off
CannaKan- DOGDOCTOR 15% off
terpyz.eu - DOCTOR 15% off
The Neutralizer - PORKIT5-DOG 15% off
As always thank you all for stopping by, for the love and for it all , this journey of mine wold just not be the same without you guys, the love and support is very much appreciated and i fell honored and so joyful with you all in my life 🙏
With true love comes happiness 💚🙏 Always believe in your self and always do things expecting nothing and with an open heart , be a giver and the universe will give back to you in ways you could not even imagine so 💚
Friendly reminder all you see here is pure research and for educational purposes only
Growers Love to you all 💚💚💚
P.S. – A Deep Dive into the ICL-300: Revolutionizing Under-Canopy Lighting
The ICL-300 isn’t just another LED—it’s a game-changer for under-canopy lighting. Unlike traditional LED systems that project light in a single direction, the ICL-300’s 300-degree design ensures even light distribution beneath the canopy. 🌟 This unique feature means that no part of your plant is left in shadow, creating a balanced environment for lower buds to thrive.
Key Tech Specs & Benefits:
• 300-Degree Light Distribution: This design fills the under-canopy space with optimal light, enhancing photosynthesis where it often gets neglected. 🌱
• Full Spectrum Output: Tailored to meet the specific needs of plants at every stage, ensuring quality growth from base to apex.
• Energy Efficiency: Advanced LED technology delivers maximum output with minimal energy usage, keeping costs down and sustainability up. 💡
• Durability & Heat Management: Built with high-quality materials, the ICL-300 stays cool and reliable, even in intense growing environments.
Why It Matters:
Under-canopy lighting is a game-changer for growers aiming to maximize yield and quality. Typically, lower buds receive less light, resulting in larfy or underdeveloped flowers. The ICL-300 changes that dynamic entirely by turning shadows into opportunity. 🌟 With light evenly dispersed across the entire plant, you’re not just growing; you’re sculpting a masterpiece.
For me, the ICL-300 is more than a tool—it’s a partner in innovation. It ensures that every plant in my grow room has equal opportunity to shine, from the top colas to the smallest buds at the base. When paired with a carefully managed ecosystem, like the one powered by TrolMaster, the potential for consistent, top-quality harvests reaches new heights.
This isn’t just about adding light—it’s about adding value, efficiency, and balance to the grow process. I’m beyond excited to see how the ICL-300 transforms the game in my tent, and I can’t wait to share the results with you all! 💚


Likes
38
Share


@PolishFarmer
Follow
Hi:) it’s day 72 today. 2 days ago I feed them with nutrients for last time. I will flush every single girl with 15l water plus canna flush And then water with terpinator only for another 12 days and happy harvest :) can not wait. I also welcome to see my new project baby’s from fast buds :) nice strains are coming! Bless guys, see you soon !
Likes
19
Share


@Sergio_721
Follow
So far it seems to be fine even if the high humidity worries me even if the temperatures are still high then they have stopped growing and will finally focus on the flowers and slowly we recover these small deficiencies
Likes
17
Share


@blasterw32
Follow
Harvested 2 branches of each girl because the weed from the last grow is over :( hahah
Full harvest in 1 seek :)

Processing
Likes
12
Share


@2Stones1Bird
Follow
Checkout my Instagram @smallbudz to see the Small budget grow setup for indoor use, low watt, low heat, low noise, step by step.
27/12/2019 - Fed her 1.5l of 6.4PH water with 0,5ml of each: Grow, Bloom and Max, and 1ml of each: Heaven, Alga-mic and Vera, I use about 1/3 of the nutrient dosage on the chart, to achieve about 200/300PPM (500 scale).
01/01/2020 - Fed her 1.5l of 6.4PH water with 0,25ml of Grow, 0,75ml Bloom and 0.5ml Max, and 2ml of each: Heaven, Alga-mic and Vera, mesured about 280PPM (500 scale).


Likes
19
Share


@RDWCGrowing
Follow
7/27/2023- Prep
Tent and system are cleaned and ready to go from my last grow. I have submitted my Journa for the Diary of the Month Competition here is to hopeing for good resutls.
7/28/2023- Germination Day 0- Seed initiation
Well lets get this new Grow started.. So My Dad Sent me a custom Landrace Strain that he wanted me to grow out and Breed for him. The Strain is Called Black African Magic:
Black African Magic, Alson known as BAM, is a Sativa pure land race strain, It's classified under the Cannabis Sative species and its genetics come from Africa-the Ituri Forest in the Dmocratic Repoublic of Congo. The Effects are said to be Very Psychedelic, used for Stress managment and for better sleep and rest. This is my frist Land Race so we, will see how this goes together..
RO Water Used
Added Hydrogen Peroxided
8/1/2023- Germination Achieved G-Day1
Popped her head above the root riot today to say hello.. Woot first challenge when dealing with an unknown seed and a new Strain is getting the seed to pop and the lady to show life.
8/2/2023- Germination Day 2
Took the root riot out today and it was soaked not good plant drowing again. I am still having a hard time finding the right blance for where the water should be to keep the root riot moist and not soaked. I had to drain some of the water out of the root riot plug to help give a little oxygen. I also removed some of the water.
8/3/2023- Germination Day 3
Looking good stretching her leaves out to let in the lights
8/4/2023- Germination Day 4
Looking good a few days until I put them into the RDWC System and get this thing rocking and rolling.
8/5/2023- Germinaiton Day 5
Looking good will probably plant tomorrow if the roots are still looking good.
8/6/2023- Plant Day- Germination Day 6
Planted into the RDWC System today. Joy when they go into the system as long as we dial that in right this will now be a great grow.. Survived the hard part..
8/7/2023- Germination Day 7
Everything looks like it is going good, she is showing some damage on the lower leaves from the over watering in the cloning machine but right now I don't see any new damage.
8/8/2023- Germination Day 8
Added the first Nutes today, to help support root growth and to help give there first jump to growth.
TPS SILICA GOLD-.5mil/Gal
Root Drip- 1mil/Gal
GH FLoraMicro-1mil/Gal
GH FlroaGro-1mil/Gal
GH FLroaBloom-1Mil/Gal
ORCA-.5mil/Gal
8/9/2023 - Germination Day 9
Everything is looking good new growth looks like it is praying and they are looking happy. I will take off the damage leaves probably tomorrow.
8/10/2023- Germination Day 10
She looks like she is on track the roots are starting to come out of the basket very small but starting.
8/11/2023- Germination Day 11
Cleaned up the dead leaves... Day 1 VEG tomorrow.. Water Change Day and first real meal...
Likes
8
Share


@Listening2thestatic
Follow
Welcome to week 5,
Herbies just been chillin' as always, keeping the other plants company as they finish their last couple weeks. I've started watering twice a day, as the plant is now consuming more water.
Plant has not stretched much, definitely due to the auto's restricted root growth. Hopefully we keep her happy and grow a nice big nug!

Likes
23
Share

@GrowerMario
Follow
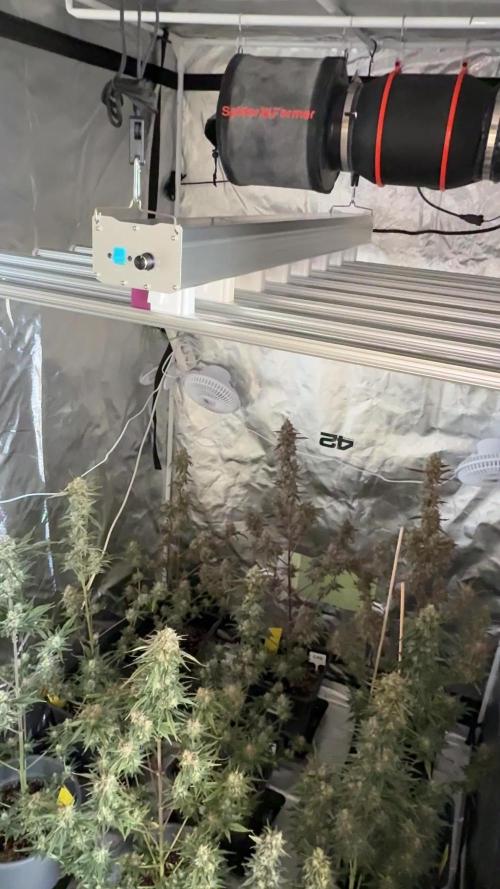
Rastliny sú po dôkladnej defoliacii a už dostali prvú zalievku overdrive namiesto bigbud . Pomaly ale isto sa blížime do finále . Rastliny sú neskutočne zacukrované , extrémne lepkavé a smradľavé . Toto vypada na naozaj krásnu úrodu a za ňu , som vďačný hlavne svetlam od @MedicGrow a semenám od @Fast_Buds a samozrejme vynikajúce živiny od @AdvancedNutrientsLtd . V tomto týždni som vymenil dve 240w svetla za jedno 640w . Je to obrovský krok vpred a dúfam , že to bude vyditelne aj na výsledkoch . Aktuálne používam svetlo @MedicGrow ez8 640w led bars .
Likes
22
Share


@donovanliam
Follow
The smell is pretty pungent and skunky. With a citrus smell if you squeeze the stem. Started the flush this week pretty excited for the harvesting. I'm at the 9th week of flowering. And I think 10 should be enough. I wanna thank @TheBudWhisperer for helping me with all my questions

Likes
10
Share


@StickyFingah420
Follow
Ganadora del primer lugar en la categoría autofloreciente de la copa Litoral de Los Poetas en Chile.🏆🥇
Definitivamente en mi top 5 de preferencias ⭐️⭐️⭐️⭐️⭐️
Una genética muy estable, ya que es segunda vez que germino de estas semillas y se expresa exactamente el mismo fenotipo; tonalidades hermosas y caractericas, frutos muy apretados y macizos cubiertos de una capa de tricomas lo que le da una visual espectacular.
El aroma en frasco es una mezcla de frutilla ácida y tierra con un fondo dulce 🤤 es realmente exquisito. En la fumada se repiten gran parte de los aromas pero menos dulce y más cremoso y especioso, detodas formas es un humo genial que querrás fumar todo el día..
Likes
26
Share


@KingSalomonsWeed
Follow
Notfallprotokolle treten in Kraft.
Grund?
Gelato 41fast
UNKONTROLLIERTE GEWALT.
Obwohl ich sie einige male sehr zärtlich dazu überredet habe (ok, es knackte einige male) in andere wuchs richtung zu wachsen, nimmt sie ¾ des grow room an platz ein. Und, das ist keine Beschwerde. Sieht von oben fast aus wie ein sea of green (zufall).
Und überall, diese watte Bällchen.
Ich bin entzückt!
Update. Es wird wasser mit Wasser gegossen, welches ich aus einiger Entfernung per Hand aus einem wasserlauf hole.. 😛
Die Phylaxien der Gelato 41 fast sind anders.
Heftig. Sind superdick lang und schnell wieder braun.
Bud Körper bilden sich und sind hart.
Und das überall. Ok tiefer gleich kleiner.
Am 001.009.021 wird sie 71 tage alt.
35 in Blüte.
And, what the phylaxien!
I mean they re unnormal.
Never seen phylaxien growing so massive (i mean pls look at one phylaxie., i think theyre big,) and then as FAST they go brown.
Boah difficult to explain.
I checked the soil. Wet enough.
Looking my Gelato 41 FAST. She is everywhere healthy.
I read this is a monster genetic
But to see, how it grows!
This strain is (so far) different from all the others i made with before.
First its a photo. (accidently because I'm a idiot)
Than 2 weeks untrained growing.
Than not vey lovefull i showed her her new grow direction.
And the smell. Of Gelato 41 fast is..
The smell of Gelato, 41 fast.
Heavy smell on your fingers from everywhere. Steam, sheet,,, buds are becoming sticky.
I mean i smell vanilla schololade.
My Next noise means she smells like an gelateria.
And YES! SHE IS! FAST!
GREAT! WORK(till now).👍🏻 👊
I tried to make some defoliation... You wont see on the photos. Just 3 leaves and 8 little buds somewhere i found.
O8. Oo9. I cut off 2 side branches.
I knewed it before that they will take only energy from the GELATO 41 FAST.
But holy mother earth, she got enough of this.POWER!
And its me a little ankward, because im the only one till now, who got an growdiary of this FABULOS HEAVY SWEET SMELLING STRAIN!
And., the BREEDER SEEDSTOCKER, himself is watching this GROWDIARIE!!!
And holy mother earth... Im so a noob.
First I thought it was business, advertising.
The contact, i mean.
Than, after i joined the original website of SEEDSTOCKERS, and i read what i really bought!
THE PENNY FALLS..
Its the FLAGSHIP.! (
.
So im the advertising?
Oh je oh je. I do my best, but remember, please,
(and because of some little mistakes i did)
.
.
.
OK OK ok ok, big mistakes!
It is not the yield another grower can go for it, what i expect i will harvest.
But HiGHEST Quality!
This is what i expect.
And dont get me wrong,
I build an joint of some fast dried micro buds.
Brought to a friend.
After the third time Jonny goes out(because after one or two breathes he forgotten jolly Rogers). He Realized it. "Hey i hold the joint now all the time (15 min). Why don't you say a word?"
"I knewed it. But i just smiled. Looking about how long it takes till you notice it!"
He thought a few seconds "Longer"…
Both began to laugh.
So the quality i try will be heaven!
DID YOU REMEMBER THE SEED
WHEN I FELL IN LOVE?
SMARAGDGREEN.
10.09
Everday you can see the buds go with more flesh.
And sticky as nothing i had before.
Smelly? Yes. It is!
It seems that i had an Sativa dominant phenotype
Like the leaves form. (and from some fresh harvested i smoked, with 75 % milky trychomes, and the rest clear... 😛 Heavy uplifting, motivated you start to do something! As you start to moving you discover that you re really stoned).
And my 0.36 m² tent is from the GELATO 41 FASTer as i never seen any Cannabis so quick blooming, sticky everywhere.
ABNORMAL! in a great way.
And i think, soo small arent they. Or?

Likes
14
Share


@GoldenWeedGrower
Follow
D43/V39 - 13/05/23 - Changed water , added nutes until EC=0.9
D44/V40 - 14/05/23 - Defolation - Added water EC= 1.1 pH 6.5
D45/F01 - 15/05/23 - Start flowering. Monitoring water from maximum to above, for the week out
D46/F02 - 16/05/23 - Continuing LST. Flowering stage is now clear
D47/F03 - 17/05/23 - EC= 0.9, Added nutes until EC 1.1. pH 6.4 (added some drops of pH-)
D48/F04 - 18/05/23 - Added water and nutes EC=1.1, pH 6.5
D49/F05 - 19/05/23 - Nothing to report


Likes
12
Share


@valiotoro
Follow
Hello everyone week 5 of flower has passed for this LSD-25 auto 🎢
For the feeding schedule i stopped feeding Power Roots and Pure Zym and started feeding Green Sensation 0,5/l
Mars hydro FC-E6500 75%
have a great day and wish you all happy growing 😎👨🌾🏻
Likes
3
Share


@sunshinegroww
Follow
Got to love some 🍧
Here we are somewhere in week 3 and she look banging very healthy very happy for sure ,stayed rather short compared to her friends but i rather have them short than tall anyway ,starting to put on flowers so last night ive cleaned her a little bit so top flowers can get all the energy,been feeding every other watering so far so good 😊 💚

Processing
Likes
20
Share


@Hawkbo
Follow
Couple got a little burn I think maybe a little too much soil in there with the coco on top of the light feed? I got all the final pots filled up today they will go in 3 gal bags either today or tmm. It's a Greentree pro ultra coco/perlite mixed with some roots organic soil about 70/30.