


Processing
Likes
21
Share


@dubkream
Follow
day 8 - i think i might have a small issue. i think the ph level of the coco is a bit high, my runoff water is about 6.8, i really want to get the run off down to under 6.5 ... the coco might be a little bit too salty because its new
the kush plant is yellowing, which im assuming is from overwatering. im going to not water my plants today and see how they take it. i watered heavily last night to try and flush out some more of the salts / lower the ph of the coco.
i ordered a new light last night, the HLG320 4000k. i am tired of having to adjust the hlg65 and hlg135 seperately, so i figured might as well go with a light thats the full length of my tent. eventually, ill throw in an hlg320 3000k, have both turned way down, so during flower the coverage is very even.
also, im debating getting my light turned down on the seedlings right now. now its around 30-35k lux, but i might have it turned down into 25k lux range for the day. i
day 10 - a little bit of tacoing on charlottes #1 and cheese #2, turned down the light intensity by about 10%


Likes
5
Share


@Msweedster
Follow
This past week I was out of town. However, I set up an auto watering system for two girls and one lived off the auto pot.
Seedling 1 - Largest in clear container
Seedling 2 - Autopot
Seedling 3 - The “Late Arriver”
I monitored the process and tent while away and was not let down. Came home to the nutrients finally being delivered, so the girls received fresh water with a first dose of “minerals and food.”
I’m just stoked they survived in my absence!
Processing
Likes
8
Share


@NOLOGIK
Follow
I cut the main top to have a structure with 4 main tops. all the rebirths
change Hours 12/12
the name already says a lot, I cut the main top and put it on the vase, making it look more homogeneous to receive the light, I changed the light cycle in 12/12 for the flowering,
it is a super strong plant thinking about what it has undergone for the first 3 months ...

Likes
9
Share

@Mimi420
Follow
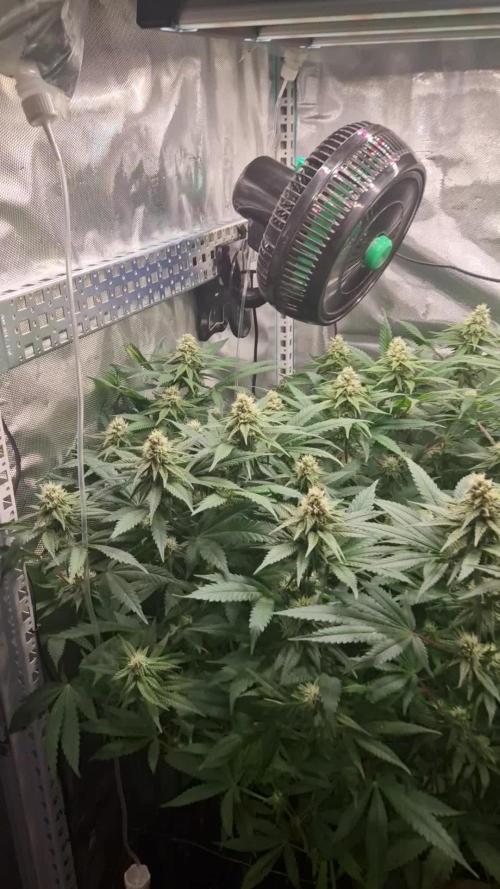
Week 4 of Flowering – Post-Vacation Update & The Auto-Drip Setup
What’s up, grow family!
Just touched down from my trip and I’m buzzing to see the girls looking absolutely fire! Leaving them for a few days is always a bit stressful, but I had a solid plan in place.
The Irrigation Setup:
To keep them happy while I was away, I put together a custom drip system using irrigation bags from Amazon. I used two drip emitters per plant, each dialed in to a flow rate of approximately 25ml/h. To prep, the night before I left, I gave each lady a heavy 4-liter feed with my full nutrient mix (Bio Grow, Bio Heaven, Bio Bloom, Top Max, and Green Sensation). This was the perfect "insurance policy"—it ensured they had enough hydration and nutrients to stay happy and thriving the entire time I was gone.
The Ladies:
The stretch is officially over, and the girls are now entering full-blown "fattening" mode.
Nebula 1: She’s the leader of the pack—the tallest in the tent. She’s really pushing for the light and has some serious, heavy colas starting to form. The vigor on this one is insane.
Nebula 2: On the shorter side, but she’s a dense little monster! She’s packing on mass with super tight, rock-solid flower clusters. She might be the shortest, but she’s making up for it in density.
Caramba: Looking just as healthy and vibrant as the others! She’s settling in nicely with the rest of the crew and responding great to the feeding schedule. She’s got a beautiful structure and is definitely ready to pack on weight.
Did some light maintenance today—trimmed off some of the lower, older fan leaves to improve airflow and direct all that energy into the main tops. The tent is smelling absolute gas, and the structure is looking exactly how I want it for the second half of flowering.
Everything is dialed in, and the Spider Farmer gear is doing its thing. Time to watch these flowers swell up!
Stay growing, fam! 🌴🔥

Likes
4
Share


@Erich2025
Follow
The plants are healthy and growing and stretching great. Dei are literally exploding in my tent. I changed light cycle to 12/12 now. And gave them the feeding they need to go into flower.
Sorry for the bad quality of the pictures but as you may noticed since the new Iphone came out pictures are blurry on snapchat.
After feeding you could sit down an watch them grow. 😎💪🌴🍪

Likes
50
Share


@BUZIMAN
Follow
Runtz N Roses 🌹
An amazing strain with solid genetics! The buds are absolutely covered in trichomes and have that classic Runtz shape. The aroma is incredibly strong, with beautiful rose notes coming through. Absolutely incredible! Really can’t wait to taste this one! 🔥🌹


Likes
6
Share


Likes
5
Share


@Deli_Weed
Follow
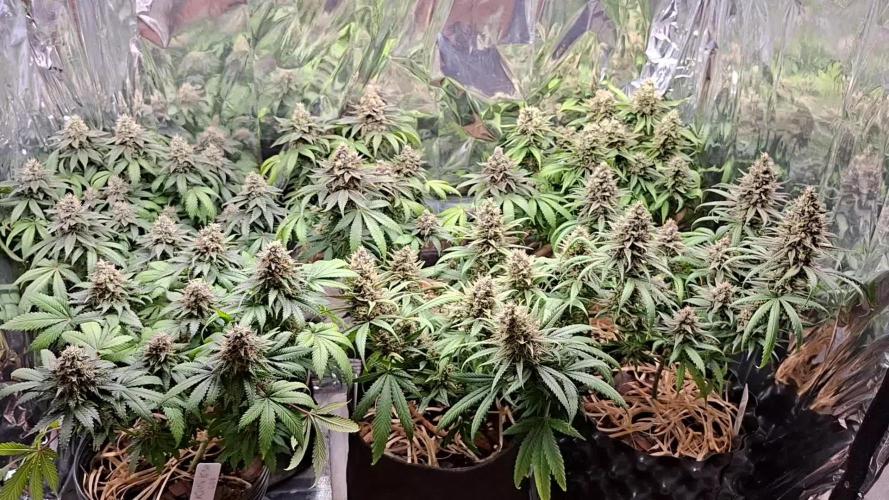
Esta semana fue solamente de flush 🚿 en esta ocasión decidí usar florakleen para ver con cual obtengo mejor resultado si con este o con flawless finish, lo hice así, primero hice un lavado con pura agua con ph de 6.2 lo hice desde el ultimo día de la semana anterior, fue lavado doble, uno en cuanto se encendio la luz y otro justo antes de apagarse, luego empezando esta semana regué dos dias usando el florakleen y ph de 6.2, el tercer día no regué y al final de ese día le di corte ✂️ y la colgué, actualmente ya la tengo curando, la tuve 10 días secándose con una humedad de entre 50 y 60% para un secado lento.


Likes
24
Share


@Canadian
Follow
Day 71 from seed the plant seems to be coming along nicely and flowering stretch has come to a end . I cut some of the lower branches that were carrying some flower because there was no way they were going to develop on time with the higher branches because of lack of light penetration at that lower level and since nothing well happened to those lower branches she can start concentrating her effort and energy on to the higher buds.
Interesting note with this girl has been that she has stretch constantly up to this point therefore not putting a lot of effort on building up those flowers that makes me hope that when she starts putting Wight in those flowers they are going to be beautiful.
Thank you for reading I will continue to update have a happy grow.

Processing
Likes
142
Share


@MadeInGermany
Follow
Hey everyone :-).
There is not much to tell this week :) A few came to the flowering tent, 2 are still in the vegi phase for 2 days and then come last to the flowering tent :-)
The Blue Cheese and the Kosher Tangie Kush smell very good and how they should 😍👍
It will be difficult to choose 2 mums :-).
I wish everyone a nice week 👌 Let it grow


Likes
6
Share


@PurpleBeen
Follow
/Semaine 6 flowering /
Look really beautiful and smell too💜💛, i would start rinsing when trichomes 75 % white to 1,5-2 week only water !⚠️little burning in critical so i will reduce and maybe start it first
Temperature little hot 28,5 in peak so i set to 75% dimer
2,5l per plant 1/medium ppm 700 2/hight ppm 900 3/micro flush humic+bubblezyme

Likes
13
Share


@Rob691
Follow
D-29 : I made a mistake. I think the second top I did today was too soon. Only 4 days after the first one. What is done, is done. Now, let see what happend but, I'll wait more for the last top. I think I'll wait untill the new mains have at least 3 new real nodes.
On top of that, 2/4 of the plants have brocken branches because of too tough HST.
D-30 : Every thing is ok except that the new mains are really really really small.... It should be better in a couple of days.
D-33 : The one that have been broken during topping, still alive and looks pretty good, but she grow slower than the others. And more, the branch that have broken grows slower than the other one. That means that she's not symetrical anymore, and then, it's not good for the main-lining... I let her grow anyway. We'll decide later what we'll do with her. The others are getting back to a normal pace.
Likes
26
Share


@Bread_n_Buds
Follow
Our Zamnesia photoperiod plants have also started their journey into the magical flowering period, this is the first week.
---- The general environmental conditions are good, the heat has increased a bit again but for the first weeks of flowering it is not a big problem, let's remember to never exceed 27 degrees centigrade in the last 4 weeks to avoid jeopardizing the quality of the flowers. If necessary, open the growbox but never let it exceed 27-30 degrees
where 30 is already a lot. The good thing is that as soon as the lights are turned off the change is already visible a bit and as autumn progresses we will also improve. The humidity is fluctuating but we try to control it with two dehumidifiers when necessary, pushing both possibly not into the growbox but directly into the room. (I dehumidify the room and the air in the growbox should be dehumidified too)
- Our two Cosmic Noodles are in great shape, they have started the flowering process revealing the sex with small hairs near the internodes and now we are dancing. One plant is growing straight in Christmas tree style with just a little cleaning. The other one has received a topping and is opening up like a bush.
--- Technique chosen as I mentioned one of the two plants was left to grow straight the other one worked with the topping only once. Quick solution that allows you to go into flowering together with the straight plants.
--- Feeding Program - The fertilizers are always Plagron and I am following the table that I generated on the site depending on the substrate chosen. Create your card and follow it, never be presumptuous my friend as I have been in the past, follow the card and look at the plants, not all need the same amount of fertilizer. We have arrived at the moment to give a good dose of ferrò in the first weeks of flowering, already of race life not sprayed but mixed with fertilizers.
---- https://plagron.com/en
- Power Roots - 1ml/l
- Alga Bloom - 4 ml/l
- Pure Zym - 1 ml/l
- Sugar Royal - 1ml/l
- Vita Race - 5 ml/l
--- Dehumidifier is now running between 50% - 55 %
--- The 100% Organic pack by Plagron can be found on Zamnesia at the link: https://www.zamnesia.io/it/11457-plagron-easy-pack-natural.html
--- We have removed the deumi dehumidifier and now the values range from 45 to 60% we will put the dehumidifiers into operation at the 3/4 week of bloom
// Strain Description //cross of Alien OG and Rollercoaster Haze, Cosmic Noodles offers excellent yields and extraordinary aromas. This variety is very powerful, contains 25% THC and produces intense and long-lasting effects. Stimulating and relaxing at the same time, Cosmic Noodles causes an energizing cerebral effect that fades over time becoming soothing at a physical level.
- Get a seed of this fantastic strain --- https://www.zamnesia.io/it/10777-zamnesia-seeds-cosmic-noodles.html
- Soil and Fertilizers entirely organic --- https://plagron.com/en buy on www.zamnesia.io
- Growbox and air system --- https://www.secretjardin.com/
- Light - P2000 Viparspectra https://www.viparspectra.com/
- Music and sound --- I made my girls listen to 432hz frequencies and music from www.radionula.com
- Z --- You can find these seeds, much more from the world of cannabis, mushrooms and an incredible series of accessories and gadgets on the reference site not only mine but of many growers
—— https://www.zamnesia.io
Likes
27
Share


@RDWCGrowing
Follow
1/20/2023- So much to do pre grow and over the next 16 days, absolute first order of business is that I have to take down my current Grow---TIMBER-- Then I have a list of things I have to get done in order to be ready to start this grow 1 Feb.
With that said
T - 2 days until start 48 hour Flush
T - 2 days until Start 48 hours of Light
T - 4 days until TIMBER!!!
Items that need to be done before 1 Feb 2023
1. I need to clean the tent out
2. I need to clean the equipment- Proper Sanitization between grows in Hydro is a must!!!
3. I need to get the hole in the ceiling above my tent repaired- For my last grow I had a deep sink installed in my grow room, to make Hydroponics a little bit easier and have a water source in the same room. The seals on the pipes they were installing broke and leaked through the ceiling causing some damage all the way across my grow room, I was already weeks into my grow and couldn't risk them working above my tent and it would have been very awkward positon for them to be working in as well, so have to get this done quickly between chop and germination.
4. I have to install my new light- I was using a Vivosun 4000 and for this grow I am switching up to a Spider-farmer SF 7000.
1/20/23- For this upcoming grow I am working with M/F photo seeds so I ordered 4 Sex determination kits. I recieved my my 4 Sex determination testing kits from Rimrock Analytics today. I will be using these to test my plants at week 2 of Veg so that when/if I take clones I know I am taking them off females. As well as I don't want to accidently pollinate my tent during this grow I am looking for big beautiful buds not seeded buds. :-)
1/24/2023- Harvest of current grow- Started at 2:00pm and finshed wet trim and firt batch into the freeze dryer.
1/25/2023- Next batch into the freeze dryer and cleaning all my equipment for this Grow.
T-1 Day until the workers are supposed to be here to fix the hole in the Grow Room.
T-3 days until I instll my new Gorilla Grow Tent and my New Light Spider Farmer SE-7000 for this grow.
T-7 Days until Start of Germination
1/26/2023- Harvest is done ran through the Freeze dryer and dry tim completed.
1/27/2023- Grow Room repairs completed. Hole is gone Letting the paint dry before I install the new tent.
T-2 days until Install the New Gorilla Grow tent and the new Light
T-3 days until I put the hydro equipment in the new tent
T-5 days until Germination
1/29/2023- Day 0- Final Pre Germination activities
Germination Start T-3 days
The paint on the ceiling was dry and it was time to finish prepping for Germination. I got the following items knocked off my list.
New 4X4 Gorilla Grow Tent is up and ready
New Spider Farmer SE-7000 Light is installed- Thanks Moony Grows for the suggestion and for the Code that got me some money off and free shipping (Moonygrows)!! I turned the lights all the way up to max and set the timer to 18/6 0600-0000. I will keep an eye on the temperature and humidity without my plants and see how hot it gets with the new light.
I put my Hydro system back together and put in 40 gallons of water into it, time to monitor for leaks the next few days.
I Setup my cloning machine for Germination Days 3-11
1/30/2023
let me break down the situation, ROOM in the TENT.. Enough said.. No really I tried putting my exhaust system up in the new tent with my new light, The light is so big corner to corner that it really didn't give me enough room for the lights be be raised, with the exahust hanging the buckets my plants are Starting in are 2 and 1/2 feet off the ground, great for plenty of room for roots but not so great for upwards space for the plant to grow. In a 6' 11 tent with the exauhst in side and hanging that only gave me a little over 4 feet of grow room to play with. My last grow if you saw my diary, anyone could tell I was struggling to keep the buds off the lights. No good, Since space was such an issue I was running my carbon filter inside on the ground but It really needed to be up sucking the heat out not shooting the cool out. With that setup I was sucking air through the filter and pushing it out the tent at a bottom exhaust hole cold out. Wasn't doing me any good for my heat. I was hitting temps of up to 85 degrees. I bought a portable AC unit and have been running it in the grow room to try and keep temps below 85 and I have had to lower the power on my lights during grow also not ideal.. With that said a friend of mine MoonyGrows (Check out his diary) took the time to look at my issue send me a picture of my grow tent setup with detailed instructions on how to suck the air out from the top but putting my filter and fan on top of my tent so no room issue and I am sucking the air out from the top where the heat is instead of pushing the air out from the bottom where the cool is... THANK YOU MoonyGrows For taking the time to help me get this straightened out.. Now I have room and I have the exhausts working right and now my temps with everything at 100% are topping out at 80 this dropped the temp by 5 + degrees at 100% max.
T-2 days until Start of Germination
Prepped my seed tray with humidity dome
Prepped my Rapid Rooter plugs. I Used RO water, and I added a few drops of Hydrogen peroxide to Oxygenate the water. I then PH balanced between 5.7-6.0 the same that they will be getting in the Cloning Machine and when they get to thier final grow pod. I perfere the 5.8x range and I hit 5.84 for these rapid rooters. If you want to see a complete video on the process HowWeedGrow has an amzing video that shows step by step how to do it and explains it better than I ever could including how to plant the seeds. Which I will cover when I get to that step on Wed. https://www.howweedgrow.com/how-germinate-weed-seeds-cannabis-rapid-rooters/
1/31/2023
T-1 day until Germination Start
All set and ready have my Rapid Rooter plugs ready to go have my seeds out.. Have my seed tray warming up tonight. Tomorrow morning right into the Rapid Rooter then strait into the tray. I will spray the dome to start the humidity in there.
2/1/2023
Germination Day!!
Let the games begin!
0600am Put the seeds into the Root Riots. And then put the seeded Root Riots into their first home the Seed tray. I have them under the light 24/7. Sprayed the dome
7:30pm Sprayed the Dome to keep humidity going on the dome.
2/2/2023
Day 1 of Germination
Sprayed the Dome in the morning
Sprayed the Dome in the evening
2/3/2023
Day 2 of Germination
Roots are starting to come out the bottom of the root riot plugs and the heads are slowly popping out of Number 4 just below the surface.
Afternoon- Number 4 has popped up
Evening- Number 3 has popped up as well. Happy Dance!!
2/4/2023
Day 3 - Germination
Surprise Surprise Surprise- all 4 have now poked their heads up.. Happy day!! 100% Germination succeeded.
Now major milestone to track is how many are female and how many are male.
I will take look at the roots this afternoon/evening and see if they have enough root to go into the cloning machine for the next 7 days before they go into their Hydro Pods.
Day 3 - Germination - Evening..
Roots looked good and they were tall enough to make it into the cloning machine.
Now that they are all in the cloning machine I have switched the lighting to veg state 18 on 6 off.
2/5/2023
Day 4 - Germination - Morning
All the Ladies (fingers crossed) looking great stretching nicely and look nice and green, Photo synthesis underway....
UPDATE!! After a very interesting POD cast on FSTS by Dr. Bruce Bugsbee from Utah University, I have shifted my lighting to 24 hours on through seedling and then I am going to shift to 20 hours on the rest of Veg.
2/6/2023
Day 5 - Germination
While Checking on my conditions inside the new tent last night, I found that the Humidity was down to 39 Percent. I added an AquaOasis Cool Mist Humidifier, the reason I selected this humidifier is that I needed one that could be turned on and off utilizing my Inkbird Humidity Controller IHC200 that I have my Pro Breeze Dehumidifier currently running with.
Root structures are starting to get there about 1/4 of an inch.
2/7/2023
Day 6 - Germination
Everything seems on track more roots poking out of each today. They are each getting a little taller as well.
Checked in the evening and number 3 was drooping the Root riot plug on the bottome was dry and the roots were not in the water yet. I raised the water just enough that the longest root that was sticking out is now hitting the water.
2/8/2023
Day 7 - Germination
Everything looked good while checking in on them this morning number 3 is now full up and no droop again.
2/9/2023
Day 8 - Germination
T-2 days until Plant into Forever Pods and we start week 1 of Veg .. :-)
Surprising thing to me is that number 1 and 2 were later in popping then 3 and 4 but the roots are growing longer in 1 and 2.
2/10/2023
Day 9 - Germination
Number 1 and Number 2 are definitely ready for transplant today.. Based on how they were yesterday and where they are today I am hoping by tomorrow 3 and 4 are ready. Today they look to me where 1 and 2 did yesterday.. I really hope 3 and 4 catch up by tomorrow since..
T-1 day until transplant to new/ final home for grow.
Need the roots long enough to have some clay down in the basket to keep the root riot out of the water and only roots in the water..
2/11/2023
Day 10 - Germination
Today they got placed in thier forever Home, 7 days from Sprout and 7 days until Week 1 Start.
PPM- 180 this is water out of the Tap
Temp Water: 70.7
Temp Tent: 77
Humidity: 40% I have a humidifier going 24/7 to try and bring this up.. I also have Humidity Domes on each plant.
2/12/2023
Day 11 - Germination
Sprayed the domes, all are looking good.. Nothing much to do at this phase but Keep monitoring the PH level in the system and making sure they have a comfortable home.
T-6 days until Week 1 start
2/13/2023
Day 12 - Germination
Sprayed the domes, They were looking a little yellow today so I moved the light down to assist. Nothing much to do at this phase but Keep monitoring the PH level in the system and making sure they have a comfortable home.
T-5 days until Week 1 start
2/14/2023
Day 13 - Germination
Sprayed the domes, They were looking a little Florissant yellow today, with what looks like slight burn on the tips, I talked with a fellow grower and we agreed that It was probably that I was drowning them, Yes you can drown you plants even in Hydro, but only early on.. :-) It usually happens with the water being too high, which soaks not only the roots but the medium (root Riot plug in this case). I lowered the water from touching the bottom of the pot to about 1" away. This will probably take 3-4 days to resolve. I will continue my daily monitoring.
T-4 days until Week 1 start
2/15/2023
Day 14 - Germination
Sprayed the domes, continue my daily monitoring they look a little darker green instead of lime green now that I lowered the water levels in the system, so I think that I might have resolved the issue but it will take a few days for recovery to happen.
T-3 days until Week 1 start
2/16/2023
Day 15 - Germination
I looked in on them this morning, 3 and 4 look like they are doing well and recovering nicely. Number 1 not so much it has brown spots on the leaves, this very well can still be a side effect of the overwatering but I decide to go ahead and add Nutes earlier than I was planning just incase. I was going to wait until Saturday but I think intervention is necessary now especially after drowning them early on.
I added 1/2 what I am planning on adding for week 1 start. I also think I am going to adjust my chart to add 1/2 2 days after plant from now on. I don't think it would hurt it to have some Nutes to pull from.
.25ml/Gal Calmag = 12.5ml
1ml/gal GH FloraMicro= 50ml
1ml/gal GH FloraGro = 50ml
1ml/gal GH FloraBloom = 50ml
T-2 days until Week 1 start = I will drain the system and start it over on Saturday with Week 1 Nutes.
2/17/2023
Day 16- Germination
I didn't even want to post today after looking in on them this morning, 3 of the 4 are now showing signs of dronwing.. Brown spots on the leaves, the water levels were still too high.. I drained about another inch out of the tanks.. Will see how quick they recover.. I start week 1 tomorrow and will have to ensure my water levels are at least 1" away from the basket on this round.

Likes
42
Share


@Natrona
Follow
Week 15 days 99-105 . I'm am flushing all plants with 1 gallon of filtered water each. I've reduced the light cycle from 18 to 14 hours to reduce heat stress. It may reduce yield as well based on comments I've read in other growers diaries. An oz per plant would be nice. Of course more would be better but an oz makes a pound of cannabutter. Reducing the light hours is reducing the purpleness in the stems of og kush and gorilla glue but Purple chill still has purple stems
The Natrona sisters spend their nights in the garage where the temps are 10-15 degrees cooler than in the day temps in the tent. Night temps ranged this week between 63-66 with rh 51-76%. The high rhythm comes after a rain.
During the day, I'm keeping the tent open while circulating 2 fans. Day Temps can reach 80 so it gets hot in there.
flooded each plant with 1 gal of water. From here forward I will be flushing all plants with filtered water at 1 gal for each plant every other day.
Monday, flushed with 1 gal of water. Starting this flush, I added ice to the top of the soil before watering. See photo.
This is a stress technique used to force plant phenotype colors. I don't think it will work for mine as I over fed. While I have 3 different strains, they look the same with blue green dominance.
Thursday, flushed with 1 gal of water. Starting this flush, I added ice to the top of the soil before watering. See photo
Saturday, flushed with 1 gal of water. Starting this flush, I added ice to the top of the soil before watering. See photo
Sunday photos
I'm not seeing any change in leaf or bud colorations from flushing out the fertilizers nor from the ice treatment.
General comments"
After putting the plants in the garage during the night, morning soil temperatures are within a degree of the night air temperature. This has been about 15 degrees cooler (50s) than the tent temperatures (75+). This week our weather has been unseasonably warm so the night temperatures have been 63-71 with Rh 51-70%
Tent temps in the day 75-80 and RH 47-59%.
Special thanks to @DreamIT for showing me how to add music to video. Check out my Gigi video above for a short clip.
Likes
27
Share


@BoytzzBudzz
Follow
Thanks for checking in Guys!
Absolutely loved growing and admiring this Zkittlez plant for the past 4 months. She’s a beauty. Grows super well, and was happy to be topped and trained with LST and defoliated quite heavily. She loved a feed, and show no signs of nute lockout or any deficiencies.
My only one downsize is that the nugs produced, especially the lowers aren’t super dense and you lose a lot of wet weight.
Other than that an incredible plant to grow and super super tasty on the smoke 🙌🏼❤️
Likes
20
Share


@Stickybudz420
Follow
Okay so it’s finally time to take this girl down this weekend it’s been 86 days from harvest now and she’s smelling lovely an looking frosty, hopefully she taste good to, been flushing her for a little over two weeks just to make sure! Will update after she’s dried an trimmed!! Happy growing peoples 👊 🌳

Likes
13
Share


@J_diaz420
Follow
Genética muy estable, floración rápida, hermoso color y bastante generosa 💚❤️