


Likes
9
Share


@JamaweedOPO
Follow
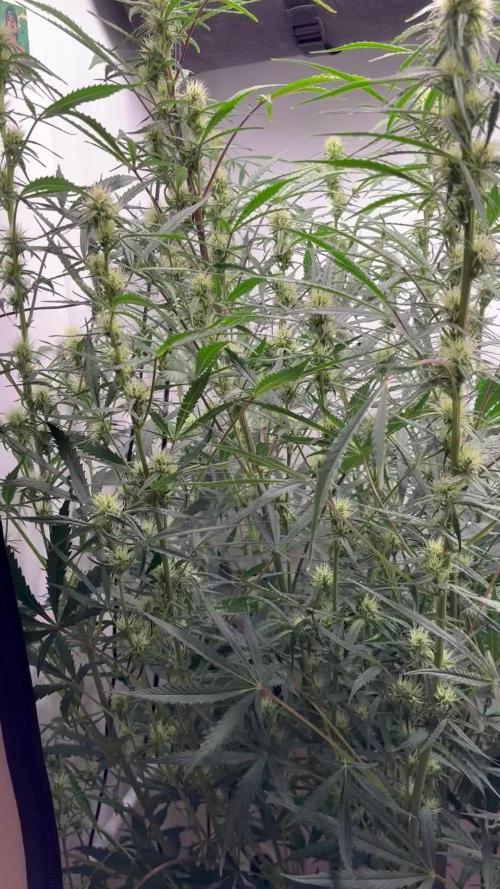
A planta segue forte, saudável e explosiva. Na última semana, a evolução dela a cada 24h foi algo impressionante. Segurei um pouco na nutrição para prevenir um overfert. Fiz uma leve defoliação e também tirei alguns brotos menos promissores. Seguimos aí para mais uma semana. Colaborem com meu cultivo e me ajudem com dicas!
⛓️💪🏽

Processing
Likes
84
Share


@Beans
Follow
Added heating mat and moved to recently vacated 2x4 veg tent.
Nutrients are guessed I used a couple drops per quart and used 6.5 h20 every other time


Likes
20
Share


@420DeepGrow
Follow
Gracias al equipo de Fast Buds, Marshydro y XpertNutrients sin ellos esto no seria posible.
💐🍁🍋🍊 Lemon Mandarin:
Esta variedad es para los amantes de todo lo grande. La Lemon Mandarin es el resultado de nuestro trabajo de cruce de dos deliciosas cepas cítricas: nuestra matriz Lemonade cut y la Tangie (selección de Crockett's Family Farms). Nos aseguramos de que se combinaran los mejores atributos de sus padres, como un efecto eufórico y vigorizante, una producción de tricomas demencial y un perfil de terpenos cítricos agridulces. La Lemon Mandarin es ideal para los amantes de los árboles enormes y los rendimientos XXL: puede alcanzar alturas de hasta 200 cm, mostrando una resistencia extrema y muchas ramas laterales. Su aroma es una mezcla perfecta de la Tangie, cáscara de limón y la dulzura calmante de la mandarina madura, que envuelve los sentidos en una fragancia profundamente picante de mandarina-limón que perdura mucho tiempo después de fumarla. Se comporta perfectamente tanto en interior como en exterior, y su impresionante crecimiento y encanto aromático la hacen ideal para los cultivadores que buscan una cepa realmente excepcional con una compleja fragancia cítrica. Basándonos en nuestra experiencia, aconsejamos realizar el Scrogging o cualquier otro tipo de sujeción, ya que las ramas podrían no ser capaces de soportar el peso de los cogollos. En interior, para conseguir el máximo rendimiento por planta, no coloques más de 2-3 por metro cuadrado, ya que esta variedad se vuelve muy tupida. También podría beneficiarse de una defoliación más frecuente, ya que produce muchas hojas grandes y anchas en abanico, y podría necesitar ayuda con la aireación más adelante en la fase de floración.
🚀 Consigue aqui tus semillas:
https://2fast4buds.com/es/seeds/lemon-mandarin
💡FC6500: Eficiencia líder en el mercado: la lámpara de cultivo LED FC-E6500, que ostenta un estatus líder en el mercado, es una solución rentable con un PPE de 2,8 µmol/J y un rendimiento máximo de 2,5 g/vatio. Ofrece un PPF alto de 2026 umol/S y es adecuada para una cobertura de vegetación de 1,50 m x 1,50 m y una cobertura de flores de 1,20 m x 1,20 m.
Iluminación versátil y uniforme.
https://marshydro.eu/products/mars-hydro-fc-e-6500-730w-commercial-led-grow-light/?gad_source=1&gclid=Cj0KCQjw1qO0BhDwARIsANfnkv9IIrYSbmJqz8PqpJOIyWwJfp5bc3SGJgUV68USLQ4tjmXDYwoBuAsaAue3EALw_wcB
🚥 MarsHydro ADLITE UV/IR/RED:
Para lograr un crecimiento óptimo de las plantas y maximizar los rendimientos es un arte simple que depende en gran medida de las condiciones ambientales adecuadas. Reconociendo las limitaciones de la iluminación natural y las soluciones de iluminación tradicionales para satisfacer estas necesidades únicas, lanzamos ADLITE. Estas luces especiales UV, IR y roja están diseñadas para llenar áreas del espectro, proporcionando las altas longitudes de onda que las plantas necesitan para un crecimiento y desarrollo óptimos.
🚀 Consigue aqui tu Adlite:
https://marshydro.eu/collections/adlite-supplemental-lights/
🏠 : Marshydro 1.50 x 1.50 x 1.80, carpa 100% estanca con ventanas laterales para llegar a todos los lugares durante el grow
https://marshydro.eu/products/diy-150x150x200cm-grow-tent-kit
🌬️💨 Marshydro 6inch + filtro carbon para evitar olores indeseables.
https://marshydro.eu/products/ifresh-smart-6inch-filter-kits/
📆 Semana 12:
Última semana aplicando nutrientes, creo que todavía pueden engordar un poco mas, finalmente estoy contento con los resultados

Likes
20
Share


@Boomdrawfyah
Follow
Dia 134 y semana 6 de floración,ultimo dia de vida de las plantas.
Este año ha sido un poco raro las plantas han crecido como monstruos tuvieron un crecimiento espectacular un tallo muy grande y junto con sus ramas flexibles y muy resistentes. Pero al llegar el engorde de floración no se porque les falto el empujon final para hinchar el cogollo, tiene muy buena pinta , mucha resina y muy fuerte buen olor pero me esperaba mas en la fase final. Cortamos ya que tambien habian orugas y no terminaba de eliminarlas por completo, la semana que viene era entera de lluvias así que decidi cortar un poco mas temprano para poder prevenir cualquier mal mayor, hay mucha gente que le gusta cortar antes de tiempo ya que el efecto es muy diferente, este año probaremos que tal.
Likes
6
Share


@IamCy
Follow
Week 6...........
Getting frosty
Edit: on day 41,I already have amber but it's still packing on weight. I don't know what to do at this point.
Processing
Likes
2
Share


@KrudBuddysExotics
Follow
Sup tho you guys there’s a lot going on at 48219 Krud Buddys Grow House and I’m starting to get better with keeping track of everything
Today is April 11, 2020 and I’m excited because I took some cuttings on the 3-4th and today all of them are showing roots out of the Rockwell I only mist them once a day and sat the dom on top of a heating pad on low and their doing they thang
April 4th : I took down my 4x4x8 diy tent Moved to a different room in my grow area n turned it to an 2x4x8 and put my Gorilla Cookies and Peanutbutter Breath under an diy scrog net with my Fsgtek 600w LED hanging 18in above plants. this is the end of week one of being in the room under the scrog net on April 25th I’m going to flip them to flower and start the count down
I also order some diamond film and glued it on the walls in my other room in my grow area and using it as an veg room with my 1200w Aglex LED and 250w Grow Bulb hanging from the ceiling
I have a variety of strains in the veg room I have Sherbetlato, Wedding/Birthday Cake, Grape Pie, & Girl Scouts Cookies are clones I got from a grower I know here in Michigan I also have some seeds I ordered herbieheadsshop 2 Blue Berry Pie, 1 TurtlePie, 1 FruitPunchAlien and I have my clone cuttings that showing roots which is 2 wedding cake 2 sherbetlato 3 Peanutbutter Breath 3 gorilla cookies which are getting put into solo cups today
Well that’s about it for what’s going on this week I will be keeping you guys updated as I grow and learn Subscribe to my YouTube channel AintThatFlame or search #48219KrudBudds

Likes
39
Share


@BubbleWeedMasterKush
Follow
Ce fut une bonne semaine dans l'ensemble. J'ai augmenté la dose de l'engrais de base à 4,5ml/l. Les feuilles du bas ont commencé à jaunir sur un plant. Les autres sont encore verts foncés pour certains, quelques feuilles sont tombées aussi. J'ai coupé certaines branches du bas pour améliorer la qualité de celles supérieures mais pas sur tous les plants. Quand j'ai arrosé avec les engrais, un ppm de 650 et un pH de 5,75. J'ai attendu quatre jours puis j'ai arrosé à l'eau Mont roucous ( pH 6 indiqué mais des fois plus faible, et ppm constamment à 14) à raison de 1 litre par pot. La température le weekend fut gérée bien, entre 24 et 26 degrés, au niveau de la canopée, sinon la semaine, c'est entre 29 et 33 degrés ( pendant la journée) portes fermées

Likes
12
Share


@Kirsten
Follow
9.2.25:
The plants had a good watering, they're all still drinking a lot. Which is great, as that means growth, which, at this stage, we desperately need!
I went ahead and gave all the plants a thorough watering each with:
2ltrs of dechlorinated water, PH'd to 6.5 with:-
♡ 4ml of Xpert Nutrients Bloom Booster
♡ 4ml of Xpert Nutrients Cal-Mag amino acids
♡ 4ml Seaweed extract liquid
I don't know how this scrog net is going to work out.
I think the squares are too big. It's elasticated, which I like. However, I'm extremely cautious with watering and moving the net. It's only a matter of time before I break more branches. It's such a hassle with it in there, honestly. I can't get in the tent properly to even check the weight of pots, as it's all weaved through, and again, I will snap branches.
I did have a free net with the tent, which I think was smaller squares. I think I will use some other training next run.
It's really not my kind of setup. I'm too interested in moving things and inspecting the plants constantly.
The net is driving me up the wall. 😣 I'm considering removing it and trying something else, but it's also a bit too late for oldest plants.9.2.25:
Gave the plants another good soak.
I used 2ltrs of dechlorinated water PH'd to 6.4. It contained the following nutrients;
♡ 4ml of Xpert Nutrients Bloom Booster
♡ 4ml of Xpert Nutrients Cal-Mag amino acids
♡ 4ml Seaweed extract liquid
♡ 0.5g of Ecothrive Biosys.
The plants are undergoing explosive growth at this stage, which I'm thrilled by!
Purple Lemonade is turning purplish hues.
Pink Mist has so many bud sites and is looking very healthy.
Do-sì-dos is growing vigorously and looking promising, especially considering all my unfortunate mishaps! 😅
Watermelon also has considerable growth. However, my training has made a mess out of the structure. Which I consider another valuable take away.
Bubble
Likes
35
Share


@StonedandSteady
Follow
Happy Growing Everyone!!! It's been a few days since I gave the Ladies thier 1st Feed of #HumboldtCountysOwn Nutrients and some Loved it a little Better than others but that's Alright! We'll definitely Grow back to everything here soon! I can't Wait for May 1st to Flip to Flower and to Celebrate my Wonderful and Beautiful Wife's Birthday!
10th w/ Veg Update #Pre-Sexed🚺 #SuperCropped
Good Day and Happy Growing Everyone! These Ladies are Growing into thier 11th Week of Veg and Looking Totally Tight and Phenomenally *Femed* from the Right!
#Pre-Sexed 4/9/21 #Opium/#PabloEscobar *Fems* breed by Team #DivineSeeds #DivineSeedsSquad #DivineSeedsBreedingCompany and #SuperCropping continued! I'm Very Excited and Extremely Gracious!!!
Heck Yeah Growmies and Growmets!!! Check Out these Confirmed Females with thier Wild Pistol Hairs popping and I'm still Training and Widening them Out with #SuperCropping Everything looks Expanded and Growing Great!
After #SuperCropping the plant will Grow Bushier, Produce More Buds, and possibly even Produce More THC! This is how the plant naturally responses to danger and protects itself! Growers take advantage of this technique to get Bigger Yields and More Potent Buds than would be produced otherwise!
Getting Trained out into thier 9th Week of Veg and Looking Mighty Fine!!! Thier getting Humongous and Hearty in thier 10 gallon Grow Bag from Broski #www.as420.ca These Cannabis plants are Camping out in the Closet for a week or so! Lol
This is my 2nd run using the Osree.Light QB1000w and Everything is Mesmerizing!!!
My #Opium and #PabloEscobar *Fems* from #DivineSeeds Regs: SalamiLegF3's×2 and FireAlienRomulan look$ Outstandingly Awesome and Growing Up Phenomenally Fine into thier 11th week of Veg in our 2- 10 gallon The Grow Bags from Broski #www.as420.ca and also 2- 5 gallons as Well! Our others are Super and Breed by #thehumancannabiniod #AlienBloodGenetix #TNBNaturals #Foop
Yo!!! Thanks Again for All the Love and Support my fellow Growmies and Growmets!!! These Magnificent and Magical Ladies were Growing in our 48×24×60 ViparSpectra Official Club 🌿 ®️ Grow Tent and under our #Osree QB1000w and #GrowStarStore Kokokala QB1000w and our Lavender×3, Sunflowers×5 and The 6 Brand New and Fresh Starts are Wonderful with a Huge Hint of Fantastical Fire is my #SalamiLegF3×2 by Broski #thehumancannabiniod #DankFlowGenetics #EastCoastSeedBank #FireAlienRomulan by Broski #AlienBloodGenetix my #PabloEscobar and #Opium by Team #DivineSeeds #DivineSeedsBreedingCompany We Grow with #Growatt 600w with #FoopOrangicBioSciences and #TNBNaturals The Enhancer Co2 Despersal canister and ph'd them w/ Declorinated watering w/ TNB ph Up and Down! Totally Top Quality Topz all Around! Thanks Again #GallowGlas420 #HarleyGrower #thehumancannabiniod #AlienBloodGenetix #TNBNATURALS #FoopOrangicBioSciences #www.as420.ca #divineseeds #divineseedssquad #divineseedsbreedingcompany #BioFlux Family's and Teams!!! Your Genetics are Merry Magnificent, Mega Marvelous and Mighty Medical! Love um!!! I really Can't stress enough how Thankful and Grateful I am of All of you and what you've Shared with Us! Means the World!!! It's definitely a Pleasure being able to Grow with these Phenomenal Grow Lights! Please Enjoy! BudBrothers4-Life! Cheers Famz!!! Much Props and Much Topz!💯🔥 #Osree #GrowStarStore #Growatt #TNBNaturals #TNBTeam #FoopOrangics #GrowYourOwn #Bliss
HumboldtCounty'sOwn:
Email: [email protected]
Phone: (707) 725-4119
Toll free: (866) 872-9434
Humboldt Bottling
Po Box 429 · Fortuna, CA 95540
HumboldtCounty'sOwn Website Link: https://humboldtcountysown.com/
HumboldtCounty'sOwn Instagram Link: https://instagram.com/humboldtcountysown?igshid=1qj809qkkwych
https://instagram.com/divine.seeds?igshid=1r90iwe9xiwz8
https://instagram.com/thehumancannabinoid?igshid=17k159pumklkq
https://www.instagram.com/alienblood_genetix_official/
https://instagram.com/as420.ca?igshid=1f116alw054wp
The Grow Bags: https://www.as420

Likes
9
Share


@DeepRootsGrowTrees
Follow
KICKASS AUTO by KANNABIA
Week #9 May 28th- June 4th
Week #3 Flower
This week she is doing great no issues being outside she has a nice short center balance that has helped her be a strong 💪 young lady outside!! Trichomes coverage looking good and buds looking 👍!! Stay Growing!!

Likes
Comments
Share


Likes
5
Share


@wheedtobeus420
Follow
Day 75. She’s huge and in the dark ice flushing. She smells amazing. I can not wait! 🎂🎂🎂🎂 we also added another meet Mortimer

Likes
14
Share


@MWHomegrow
Follow
Vegetationswoche 6
Tag 50: Heute wurden unten die ersten Triebe rausgenommen , welche es nicht über die Lichtgrenze kommen und insgesamt eine etwas größere Entlaubung, um noch mal schön Licht an die kleineren Triebe zu lassen.
Dann noch je 2l ph 6.1 Wasser in die Bewässerungsbasen pro Pflanze.
Tag 51: heute in Vorbereitung auf einen Kurzurlaub je 3l Wasser mit ph 6.2 ins Reservoir 😊
Tag 52: Urlaub
Tag 53: Urlaub
Tag 54 Rückkehr vom Urlaub,Ladys extrem gewachsen(65cm) Alle 3l Wasser mit ph 6.3 und 0,5ml/l Calmag gegossen und Wechsel in die Blüte 😊
Ende der Vegetation
Likes
36
Share


@TaterheadJohnson
Follow
7/14: Watered her today. Just plain water. Filled up half gallon jug of water. Filled reservoir back first line.
7/16: Bumped light intensity to 45%. Topped off reservoir at night.
7/18: Watered her today with the the leftovers of some treated water with Rapid Start from her half gallon jug. Prepping for new nutrient schedule next week.
I am happy to say it seems like the WCC is responding well to the environment and feeding schedule. So Far So Good!!! 😁
Thinking of possibly starting LST next week.
Please Comment if anybody sees anything wrong in the pics!?!?!? 👍 Also any tips on how-to/when to start LST would be greatly appreciated!
***** For this Grow******
“Day Air Temperature” will be the max temp of tent for the week.
“Substrate Temperature” will be the average temp of tent for the week.
“Night Air Temperature” will be the lowest temp of the tent for the week.
Likes
39
Share


@Bread_n_Buds
Follow
Disclaimer: if you want to have a big flash like a big trip focus on the trichomes, really crazy colors.
I still have to recover from the beauty of the Purple Urkle harvested last week that must amaze me again:
even this time we are embarrassed by the beauty of the colors of this plant, this time it is a plant with shades of purple that if you go to see then in micro are fantastic very light trichomes on lilac and all shades of purple.
We have nice big buds this time, of that type with a large calyx but really beautiful and elegant.
** Remember that for all the varieties we have at least two plants, one left to grow straight and one worked with the techniques (come back during the week to see). Today we talk about the harvest of the phenotype with shades of purple.
Technique used // In this case we did topping repeatedly x16 and cleaned the sparse branches.
Better with the techniques or normal? This time we have two very different phenotypes, one plant with medium internodal distance for beauty and color better than the other, this one beautiful flowers and beautiful quantity.
Flower quality // From one to 10 stars 10. The plant has resinated very well on all sides, it is super mature, very mature pistils, mature trichomes, the flowers are very purple and of a very good general quality. There is also a fair quantity this time. We washed the flowers according to the procedure suggested by zamnesia.
Check the article in your language // https://www.zamnesia.io/it/guida-growing-cannabis/333-lavaggio-delle-ceme
Fertilizers// I am very happy with how I managed to unload the plant that at a certain point before going to flush was fed for a few days only with additives and then went to flush and we are very very well discolored, I predict a very tasty flower, grown organic and flushed successfully, the flavor and taste will be epic.
All the fertilizers and additives of Plagron in the green / 100% organic version have fully satisfied me. Choose your soil based on your style and calculate the sheet on the website www.plagron.com -
Bro if you are stubborn use additives listen every now and then....and then come and tell me.
The fertilizers instead are found in convenient all-inclusive packages on the Zamnesia website.
Purple dl CALI flavour ...
---- https://www.zamnesia.io/en/11168-zamnesia-seeds-purple-urkle.html
Zamnesia Description // A direct descendant of a Mendocino Purps phenotype, Purple Urkle is a high-performance cultivar from Zamnesia Seeds. This feminized, indica-dominant strain is sure to win over any cannabis grower. With a THC content of 20%, Purple Urkle has a lot to offer from seed to harvest and beyond. Suitable for growing indoors, outdoors or in a greenhouse, Purple Urkle is a very resilient strain. Growers will be impressed by how easy this cultivar is to manage. Purple Urkle can reach 120cm indoors and 160cm outdoors, but if you want more control over the height, LST can be used. Purple Urkle has fantastic flavours and aromas that intensify during the flowering phase. Regardless of the method of consumption, Purple Urkle offers pungent and fruity flavors that lean toward notes of grapes, berries and plums. The effects of this strain are soothing and relaxing, with uplifting sensations that make the experience suitable for any occasion, both social and solitary.
Music and frequencies // For about 4/6 hours a day my plants listen to 432 Hz frequencies created specifically for their well-being and sometimes a bit of black music to give them those vibrations that only music can give. www.radionula.com
All the best that mother nature has to offer is at —— www.zamnesia.com

Likes
27
Share


@BoytzzBudzz
Follow
Yoooo!
Welcome back 🙌🏼
Just a quick update for week 7 of flower. Plants looking incredible. Zkittlez is really packing on the frost now and starting to develop some lovely colours. The Runtz seems to be continually packing on size and developing - most of the trichs are still clear but I’m seeing cloudy and a few amber ones here and there, so I’m looking to get the flush going in a few days time.
Thanks for stopping by!
Cheers 🤟🏻
Likes
39
Share


@King_Green21
Follow
Everything looking good this week happy with the vegetative stage with the th Seeds original Bubblegum. Says they are an ibl strain so the genetics should be stable, which is less chance of 10 different phenos ( update me If I’m wrong here, still learning )
Day 54 - today I did the last defoliation and lst 2 days before swith to 12/12. Middle growth was insane so spread them out abit by screwing small screws in to the pot and using the as a tie down
Day 55 - all plants seemed to have bounced back the day after and look exactly how I planned so far so good
Day 56 - final day of vegetative growth all seems good, all females showing white hairs , have raised the lights and turned Intake to full to maintain humidity levels and switched lights to 12 / 12.

Likes
14
Share

@GermGrowFox
Follow
8. Dezember
Ich hab einige Hitzespots im Zelt, melden mir zumindestens manche Spitzen zurück.
Das Blattwerk meldet mir an vereinzelten Stellen zurück, dass Green Sensation vermutlich etwas Zuviel war 😬 ich spüle jetzt mal leicht die nächsten Tage
Die linke und größte Pflanze fand es nicht so geil so eng unter der Lampe zu stehen. Hab sie leicht zur Seite gebogen. Nicht ideal aber besser als davor.
Die mittlere Pflanze staubt extrem. Blüten allerdings noch recht klein.
Die rechte Pflanze wirkt am vitalsten und hat ein sehr schnelles Blütwachstum.
Im großen und Ganzen bin ich weiterhin zufrieden, nur die überdüngungserscheinung gibt mir zu denken. Eigentlich auch ne dumme Idee mit Green Sensation wenn die Basis living Soil ist 🙄 ich liebe meine Ideen die ich manchmal habe 😂
Likes
54
Share


@MrJones
Follow
MrJones Cream Mandeiran Auto XL - ViparSpectra XS2000 240W Infrared Full Spectrum LED Grow Light
´🍪⊱╮🍪╰⊰🍪 WEEKLY GOALS 🍪╰⊰´🍪⊱╮🍪
🏡Indoor - 3"x4"x8" Custom Built Grow Closet
🌞Environment - 80F and 60%Humidity - using Humidfyer as needed.
🌾LST and Defoliation - this strain likes to stretch!
🗓️Week 6 Flower
⚱️5-Gallon 📊5.8/6.2 PH
💧 Feeding / Using Dr. Earth Dry Organic Amendments - Home Grown & Bud / Bloom Booster
🌞ViparSpectra XS2000 240W x2 Infrared Full Spectrum LED Grow Light
🕷️ IPM - Will be using Green Cleaner" 1 OZ per Gallon, and CannControl from Mammoth alternating between products each month for Integrated Pest Management.
´🍪⊱╮🍪╰⊰🍪 PLANT UPDATES 🍪╰⊰´🍪⊱╮🍪
📝 Notes - Week 9 is here, the buds are just getting PHAT, should be the last week before harvest, so let's say we are looking at Next Saturday, the ViparStrectra XS-2000 lights are just blowing up on these ladies, just amazing!
╰⊰🍪╰⊰´🍪⊱╮🍪╰⊰🍪╰⊰🍪╰⊰´🍪⊱╮🍪╰⊰🍪╰⊰🍪╰⊰🍪⊱╮
🔶Sunday 08.08.21/ Just watering with H20 PH to 5.8/6.2
🔶Monday 08.09.21/ Just watering with H20 PH to 5.8/6.2, taking a few of the fan leaves, keeping the buds lean, they are fat, wet, and sticky and have a hell of an aroma!
🔶Tuesday 08.10.21/ Just watering with H20 PH to 5.8/6.2
🔶Wednesday 08.11.21/ Just watering with H20 PH to 5.8/6.2
🔶Thursday 08.12.21/ Just watering with H20 PH to 5.8/6.2
🔶Friday 08.13.21/ These ladies are looking great, just watering with H20 PH to 5.8/6.2, looking to harvest tomorrow or sundsay.
🔶Saturday 08.14.21/
╰⊰🍪╰⊰´🍪⊱╮🍪╰⊰🍪╰⊰🍪╰⊰´🍪⊱╮🍪╰⊰🍪╰⊰🍪╰⊰🍪⊱╮
Cream Mandarine XL Auto®️ Information
Tall-stemmed auto-flowering strain. This high-yielding 4th generation auto-flowering strain is the resulting hybrid from the cross between selected specimens of our Cream Mandarine Auto®️ (SWS29)) and a Super Tai’98 elite clone.
The genetic coming from the Super Tai’98 elite clone contributes with interesting Sativa characteristics to this hybrid, such as bigger size, but also subtle aromatic and spicy tones with hints of wood and nuts. The so much appreciated Cream Mandarine Auto®️ genetic contributes with traits from the Indica side, such as high flower and resin production, but also sweet and fresh aromas with tones of citric fruits of the mandarin orange type.
DATA SHEET
Variety SWS55
Indica: 35% / Sativa: 63,4% / Ruderalis: 1,6%
THC: 18-23% · CBD: 0,6%
Indoor Yield: 450-650 g/m2
Outdoor Yield: 50-300 g/plant
Indoor/Outdoor Harvest: 9 weeks from germination
Height: 110-150 cm
