
Likes
3
Share


@Organic473
Follow
Moved the girls to a make shift greenhouse. The smells are coming in…so are the stink bugs lol
Likes
5
Share


@M3_Growing
Follow
A little confusing but i put my other to pineapple and the Hulkberry in this tent and send it into flower 2 days ago (14.3.2023)
I believe the plants might have a nitrogen deficency but we are on it. All in all lookin good
Now we have 2x TSL 2000 (300W) = 600W/120cm*90cm
Plants:
2x Big Hulkberry (one topped early, one topped late)
2x Critical Kush (second largest plants)
2x SuperSilverHaze ( pretty small both plants)
2x Pineapple Kush (Had it rough)
1x Pinapple Kush (very small plant, 2l fabric pot..)


Likes
19
Share


@FrostyTips92
Follow
Everything seems well. I made a mistake and the yellow leafs are my fault during foliage spray for bugs.
Seen others growing and had alot of insights on this strain. I had the same problem and wanted to stay short. But the fat leaves I can see the cultivars coming out. Thanks for looking!


Likes
4
Share


@CheeRz
Follow
The time had come for Lady Candy. About 20% of the trichomes had turned amber, so I decided to harvest it. I estimate that I will get about 30 g of dry buds, but we'll see in a few weeks.

Likes
18
Share

@DutchBarnacle
Follow
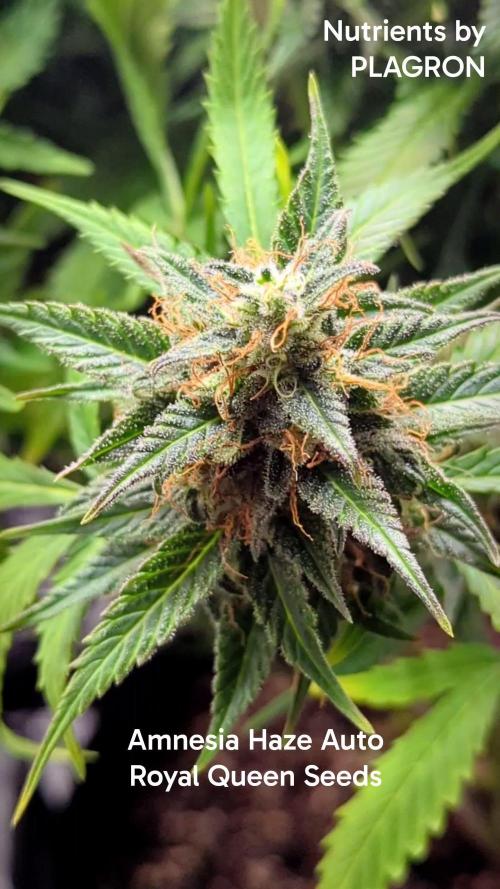
Week 12!
Earlier diary entry than usual, but here's a tribute to this amazing strain by Royal Queen Seeds and the nutrients by PLAGRON - as well as a few additional pictures from Tuesday. We're nearing harvest, we've dialed back the growlight to about 25% to slightly reduce the temperature and prevent her from crisping up too fast. From now on, we'll just have to be patient. The past few days she's began to drive out more and more foxtails. Perhaps from the heat, perhaps genetics - most likely the heat. Irregardless, we don't mind foxtails in this form.
(In week 13)
We aimed to stop watering her in week 12, but since her trichomes still haven't turned amber we picked up one final watering to get her through week 13. We're picking off more and more leaves as she goes.
Likes
31
Share


@TheHighentist
Follow
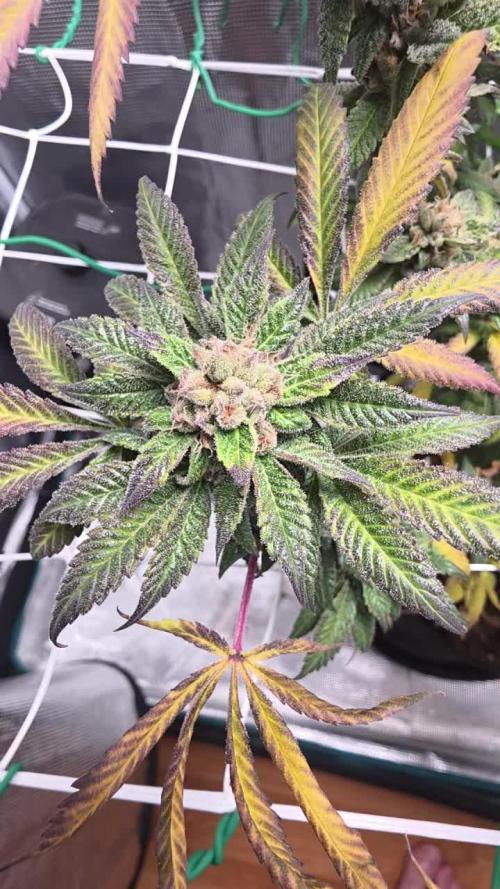
They looking good, but temp is a little too high. It is what it is
One of the plants (In front to the left) is more frosty, with less amber pistils.
But overall the trichomes are starting to go from crystal to cloudy. Which is my timing for start flush.
24/7
-Temp 23-26day/21-24night
-47%RH (2+-)
25/7 Water day* start of flush
Gave them till run through with plain ph balanced water, and topped it off with some light nutrients-mixed water.
-Temp 23-26day/21-24night
-49%RH (2+-)
26/7
-Temp 23-27day/21-24night
-47%RH (2+-)
27/7
-Temp 23-26day/21-24night
-47%RH (2+-)
28/7* Water day / flush
-Temp 23-27day/22-24night
-47%RH (2+-)
29/7
-Temp 24-27day/22-24night
-47%RH (2+-)


Likes
67
Share


@AsNoriu
Follow
Day 22. Last 3 girls got final house. 20 liters pots for those late runners. They look sad, but maybe big house and other girls will encourage them to kick in.
I took last NL away and now humidity and lightning are a lot better. Will drop lights down in few days, but not a lot ... 16 girls again in one room ;))))
I changed names of diaries, because I will try to finish them indoors ...
Happy Growing !!!


Likes
4
Share


@Tazard
Follow
She is clawing so I cut the base nutrients in half. I removed the lower fans to open up her branches.

Likes
47
Share


@PEAKYPLANTERS
Follow
Hello, gardener brothers
Welcome back with us again in the gardens smelling of weed
My girls have just announced that they feel like flowering considering the opening of their buds ....aaaa... how much I love these bitches😎
Obviously we tried to spread his legs with a little lst🤗
Likes
13
Share

@Dottgreenthumb
Follow
Oggi si taglia, i tricomi sono diventati quasi tutti ambrati 😅 la pianta ha 69 giorni di fioritura

Likes
26
Share


@LKABudMan
Follow
Plants have grown well this week with only minimal interference. The temperature and humidity are holding at a good place (around 70-72 degrees and 65% humidity). Pretty sure that Demeter was just light burn. We moved the lights back a bit, and new growth is coming in good.
Kini has taken the lead and is really taking off. Demeter is recovering, and Alice & Lorraine are 6 days behind but catching up quickly. They are starting to eat/drink more, and it will be time for the first res change this week for everyone. We noticed a few bugs in the basement this week, and may have gone overboard on the diatomaceous earth (the white powder all over everything). Also added another 4-port air pump this weekend, and another 4x2 stone in each bucket.

Likes
35
Share


@ISCA_Abi_In_Da_HOoD
Follow
Im Come back .
Je suis de retour comme Gandalf .
Fillere selam .
Sweet Seed
Mandarine Zikittlez Fast
Strawbery Cola Sherbet Fast
Non game no pain


Likes
97
Share


@OrganicNature420
Follow
JungleBoys
Gelato33 x ZkittlezCake (clone)
THC: 30+%
Terp: 45%
Nutrients • GreenBuzzNutrients
(DISCOUNT CODE • (GD42025) %25 off
I use the whole product range and this stuff is a game changer. I've not had one bad grow with this company and it hasn't let me down once. Terps and taste are through the roof. No need for run off in coco only during flush week (i use a 0ppm distilled water) Hands down the best nutrients on the market
GREEN BUZZ OUR NOW GIVING YOU GUYS A SUPER DISCOUNT OF %25 WHEN USING THE NEW CODE ABOVE. JUMP ON BOARD THE GREEN BUZZ TRAIN AND GIVE YOUR PLANTS WHAT THEY DESERVE 💚🌱
LIGHT/TENT • Mars Hydro FC-E6500 5x5 tent
Buds are rock solid and massive. Going to be a huge yielder. Going to guess 8 ozs as long as cure goes to plan. Absolute beast of a plant 💚
Likes
44
Share


@RakonGrow
Follow
Note: jegliches Equipment findet ihr in der Germinations Woche .
Day 22:
PPFD 410 * 20h = DLI 29.52
Day 23:
Day 24:
+ Dünger
+ + 0.5 Flaschenwasser
+ + + Rhizotonic
+ + + Terra Vega
+ + 0.6 Leitungswasser
+ final PH 6.5
Day 25:
Day 26:
Day 27:
+ Flaschenwasser 2.5 L (PH 7.2 EC 0.26)
+ + CanaCym
+ Final PH 6.1
= Drain : EC 1.325
Sieht bissel danach aus als hab ich etwas zuviel Urgesteinsmehr in die Erde eingearbeitet :)) Muss ich halt bissel spaarsamer mit der Düngung umgehen .
Day 28:
Das Wetter und die liebe Luftfeuchtigkeit :(( Manchmal denk ich das ich Outdoor growe :))
Im Video sieht man schön wie der kleine Zwerk sich selber mit seinen riesen Blättern SCROG mäßig den Wuchs in die Breite erzwingt :)) Die Blütentriebe müssen halt den Weg zum Licht mit aller Anstrengung erreichen .


Likes
17
Share


@Hempface86
Follow
So as you can see, she is building bud pretty quickly which I am happy about.. this plant has been very easy to grow and by looking at it, I don't even think i'm gonna need scissors to trim it lol ... this is gonna be a nice change of pace as far as that goes... My guess is she's probably in her third week of flower by the looks of it... Time to start bulking.. God bless and happy growing 🙏
