


Likes
12
Share


@m0use
Follow
Will have more info posted when the plants are dried and weighed. Can start the cure process and smoke report, Will use my friends to see if they kept the CBD attributes that the parents had. More to come.


Likes
Comments
Share


@Old_school_grower_dude
Follow
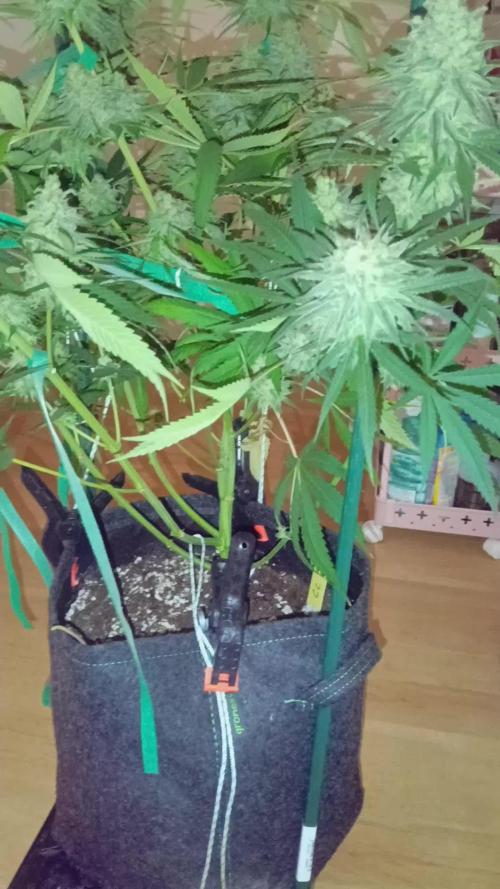
My Purple Star Killer girl looks great. I am doing a lot of LST to try to keep her spread out and not get too tall. She's drinking 5 gallons a day now and I think I'll have move that up to 10 gallons soon.


Likes
97
Share


@CANNASIM
Follow
GENERAL COMMENT.
So the RQS STRESS KILLER AUTO is down. Now we have the NL to manoeuvre and try to keep her alive for the final flush.
RQS NORTHERN LIGHTS AUTO COMMENT.
Many but slim colas emerged, showing extreme spotting and deficiencies, but gained weight since last week and started turning purple, first time that happens.
So now the final flush started and hope, afraid taste could be off, because of the problems i ran in with her, probably a good strain to considere light feeding, the smell is very gentle, a good strain to do stealth.
10-14 day to go! Yield could be amazing but will be common because of the locks, nothing out of the curve in my opinion, something to retry and correct to deal with this strain. Not turned on or off by her just feeling neutral and glad she made it.
Trichomes wise she is just ready, mostly cloudy, she will finish with some amber will do a nice sleeping aid.
Trim job will be a pain on this one because i will clean all the small affected spotted leaves.
Likes
14
Share


@Fullmeltalchemist
Follow
Welcome to my Seedsman grow. This is my first real attempt at growing from purchased seeds. I didn't know too much about genetics when I bought these but hopeful they turn out dope. The idea was to have the tent filled with drastically different colored buds 😅I like symmetry
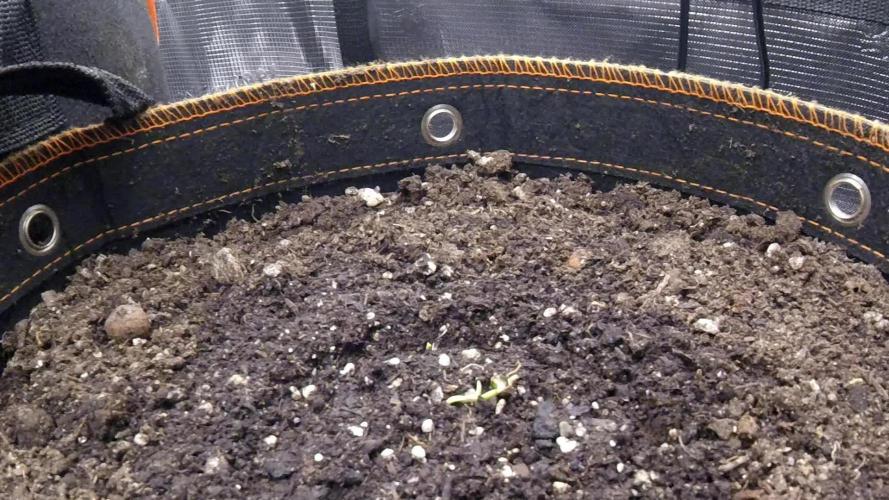
D1 - 9.13 - 3 fem White Widow Fast and 3 fem Black Sugar (Soaked/toweled) were dropped in to solo cups with bottom 1/3 NLS super soil and top 2/3 Fox Farms.
D4 - 9.16 - We got sprouts 100%
D6 - 9.18 - Third set of leaves making their move. Seedling station light is Phlizon 600W LED. I have it at 18in with full spectrum on.
D7 - 9.19 - Growin

Likes
11
Share

@HazeLiebhaber
Follow
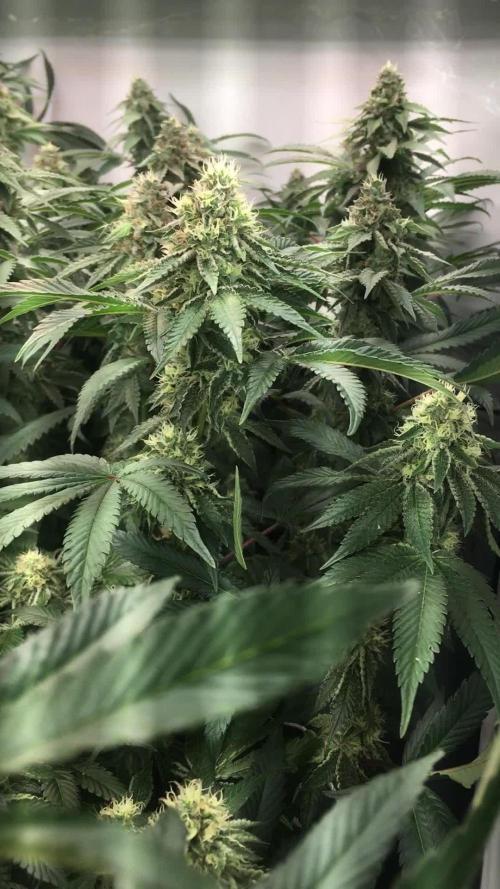
🍒 Ernte der Critical Cherry an Blütetag 64.
Die Trichome sind zu etwa 20% bernsteinfarben.
Die Pflanze verströmt einen süßen Geruch, der mich an das alte bubblegum erinnert. Riecht auf jeden Fall sehr lecker.
Die Erntemenge ist definitiv überdurchschnittlich. Aufgrund der wirklich sehr fetten Blüten hatte ich erst Angst vor Schimmel, aber ich konnte beim ernten zum Glück keinen entdecken.
Werde diesen Breeder auf jeden Fall im Hinterkopf behalten und habe auch noch Samen ihrer Mimosa x Kush Mints hier, die bei einem der kommenden Grows zum Einsatz kommen werden, wenn sie auch beim Konsum Qualität zeigt.


Likes
51
Share


@Bread_n_Buds
Follow
And we have arrived at the magic moment for our autoflowering plants, the Zamnesia elves are working their magic and the buds are composing and freezing in the night. A scent of paradise invades my house now.
--- Our Black Orchids are beautiful and different from each other. I imagined they were similar until a few days ago but then one started flowering more quickly and kept the main cola quite aligned with the lateral buds; the other instead started a mega central brunch and stands up to 130 cm tall. What we like most is that it seems to be bringing out dark buds. I don't want to bring bad luck but here we are waiting for a Black with fingers crossed, touching wood and everything necessary. Beautiful, tall and powerful, she will still be a champion. The bigger drink 2 litres x day and i found her dry in the morning.
---- Fertilization schedule - As for the fertilization schedule, we have two plants, one further forward and one further back. To the advanced one we are giving the green sensation and all the late flowering program while to this one in the photo that is monstrously big, it seems dark and a little further back we are still giving the early flowering program with a lot of bloom, still power zym and grenn sensation.
---- https://plagron.com/it
- Alga Bloom - 2 ml/l
- Sugar Royal - 1 ml/l
- Power Buds - 1 ml/l
- Green Sensation - 1 ml/l
--- The dehumidifier now works between 50% and 55%
--- The 100% Organic Plagron pack can be found on Zamnesia at the link: https://www.zamnesia.io/it/11457-pla gron-easypack-natural.html
// Strain Description // It is said that the orchid symbolizes love, refinement and beauty. Well, we can confirm that the Black Orchid Automatic contains all these attributes and many more. This autoflowering variety has a lot to offer: a particular but very pleasant aromatic profile, and a relaxing and carefree high. Furthermore, this plant is very productive when grown in optimal conditions.
- Get a seed of this fantastic strain --- https://www.zamnesia.io/it/9493-zamnesia-seeds-black-orchid-automatic.html
- Fully organic soil and fertilizers
--- https://plagron.com
buy on www.zamnesia.io
- Growbox and ventilation system --- https://www.secretjardin.com/
- Light — P2000 - https://www.viparspectra.com
- Music and sound --- I made my girls listen to 432hz frequencies and black music from www.radionula.com
- Z --- You can find these seeds, much more from the world of cannabis, mushrooms and an incredible series of accessories and gadgets on the reference site not only mine but of many growers
---- https://www.zamnesia.com

Likes
2
Share


@Mytrichomedgarden
Follow
cortar o no cortar estas dos ! la parte alta ya casi estan en un 5% los tricomas ambar


Likes
2
Share


@Ninjabuds
Follow
My Skunk Apple Run plant is still a bit young, but I can see those buds starting to form. It's a bit of a slow starter, with buds popping up all over the place instead of a nice even line. We'll see if adjusting the light cycle or its food might help it along. I'll keep you posted on any changes.
The past few weeks have been so beautiful, watching the plants grow and change. It's amazing how something so small and fragile can turn into something so strong and vibrant. Now that they're getting ready to bloom, it feels a little bittersweet. I'm so excited to see the finished product, but I'll definitely miss having them around while they're growing.
Likes
17
Share


@Hoodoo
Follow
2020-08-24 Chop chop chop. I DID NOT FLUSH! I read a lot of guides and some scientific data and I wanted to see if I could detect an issue with non-flushed cannabis. We'll find out!
After seeing that the trichomes were not going to turn amber (all milky for many days) I did a bit of research and found that some people say WW doesn't produce amber trichomes until week 13-14. I have been monitoring to decide when to cut the plant. I noticed that there was some foxtails developing. The grow was messed up because the plant stretched so much. This created different lighting strength areas so some parts developed faster than others. Everything right under the light was definitely ready for harvest.
I have done a bit of a wet trim and hung everything up at 74F and 55% relative humidity.
Took a pic of the 8 main colas that I setup from the beginning with my mainlining technique from Nebula.
Definitely way messier than I intended (need to lollipop way higher in the future) but those buds are pretty giganticccccccccccccccc
2020-08-26 It is now smelling fairly grassy as the chlorophyll breaks down. Everything going as expected. I was kind of worried by the smell because it was very earthy, now very grassy. The air coming out of the tent smells like fresh cut grass but if you actually touch/squeeze the buds with your hands, it EXPLODES with citrus smells, far more so than when it was still alive. No signs of mould or mildew. I bleached the tent right before hanging so hopefully no infections. I will post the harvest report later on!

Likes
6
Share


@russrahl
Follow
Plants are really blowing up! Forgot what day I flipped these girls exactly but I’m guessing there just under 2 weeks into flower now. Cheers 💨
Likes
12
Share


@BlackForestGrower
Follow
We’re approaching the finish line — the top buds are already nearly perfect. I’m just giving the lower ones a few more days before putting her into a 48-hour dark phase.


Likes
3
Share


Likes
17
Share


@Rooflower
Follow
Week 2
Both plants looking great so far , good growth rate 📈 and looking healthy so far.
Boosting a bit nutrients to see how much they can take to maximize their potential starting later this week.
Roots have been already all over the bottom of the pots while looking thick and healthy 💥
D4
Applied some foliar feed this morning while turning off the lights for an hour till they dried /sucked up all the juice from their leaves. mixture was basically water with 1ml/lt boost accelerator.
Both look really nice and healthy in other news 🍀😅
