
Likes
Comments
Share


@Ganjagrandaddy
Follow
Day 14 flower: Hinall . hope we are still green and mean.
This week has been an interesting one for both girls.
Mimosa Lemon has stretch really well so far and inthinknhas slowed up now so I needed to work on her bushy appearance for light penetration and airflow. When digging into her, I found so much growth to decide onbi was shocked. The side branching was so productive and had tips everywhere. I took the small lower growth out to give her more energy for the mains to use and did notice the wide node lengths like a sativa grows. I will keep pulling her down so she doesn't get too tall and when I grow one in the future , I will train her very early and scrub up during that time.
Glueberry has been a learning curve on watering. for the past week or so I have been assuming her ill health was over watering so held off a few feeds. seeing her worsen was a mystery but when I moved the pots around following harvesting one plant and felt how light she was. her position meant I had not been able to feel her weight before. After a drench watering and a few days , she is recovering great now thankfully. I am having a minor fungus gnat issue which I am in process of dealing with. it is shocking the amount on the sticky cards already yet I didnt notice more than a few flying around. horrible little beasts.
Not a bad week now the issue is dealt with hopefully. Until next time growmies
be safe and well


Likes
22
Share


@Robbaus
Follow
Ho smesso coi fertilizzanti base per la crescita della pianta, sono ancora un po' troppo verdi per essere alla dodicesima settimana. Tranne una Tropicanna Banana che è sempre stata una settimana avanti alle altre. Spero che nel mese che manca i fiori si gonfino come si deve, ho sempre un po' di paranoie soprattutto visti gli ultimi due giri che non ho avuto il risultato sperato. Però stavolta la situazione promette meglio, tra due settimane dovrebbero esplodere definitivamente. Sicuramente in questa settimana è aumentato a dismisura l'odore che emanano, si sente distintamente in tutta casa. E che profumo 😊🤤🍀


Likes
4
Share


@hazemaze
Follow
Today the time had come, the amnesia and auto ultimate were flushed.
They look very tasty don't they look? 😍


Likes
74
Share

@HinduGod
Follow
WOW LOOK AT DAT!! DAT PLANT IS NOW HARVESTED!!! IT HANDLED THE OUTDOORS VERY VERY GOOD!!!! I WOULD LIKE TO THANK DA THOUSANDS OF PEOPLE WHO STOPPED IN AND VIEWED DA GROW!!!!! A SPECIAL THANKS TO THE ONES WHO LEFT COMMENTS YOU ARE VERY VERY KIND!!!!! I WILL HAVE A SMOKE REPORT AFTER DA DRY AND CURE!!!!!😎
PLEASE COME AGAIN!!!!!

Likes
269
Share


@JohnnyBlaz3
Follow
Hey guys,
Great week! Nothing too much to report here. Things seem to be going great........the stretch is coming along nicely, about 8 inches since flip. The signs of buds forming is there and I can spot some tiny crystals forming near the center 😁 Started using the flower nutes this week as well. Today I will start using the co2 and terpinator. Also I was recommended to try a 2nd net as well for some support which from what I've read these buds can get quite big.
The clones I cut a couple weeks ago are ready for friends. I learned from quickly from some rookie mistakes and greened them right up along with lots of new growth, they are nice and healthy as well. go spread the happiness to others!!!
I did do another quite big defoliation that really cleaned up all weak branches and leaves. only the strong survived. no wasted energy.
This is where the fun really begins as I can now get to watch the buds grow!! 😲😎
Thanks again for following along, this has been a very exciting journey so far and now it really begins!!
Likes
1
Share


@braxat420
Follow
For ten days or so, this zebra Stripe was stuffed in the corner of a 3x3 dominated by a 30 gallon pot filled to the brim with Apple Glitter, but now she's free! The environment is unstable and not ideal most of the time, but it's starting to fill out now that I've defoliated and it's not so crammed.

Likes
1
Share

@AkatsukiVirtue
Follow
- Purchased an AC Infintity Cloudforge Humidifier
- Switched to flower nutes
- Installed Trellis
Note:
- No more apparent deficiencies
- Surprisingly there is very little stretch

Likes
114
Share


@GMSgrows
Follow
Girls had a good week of mostly sun and rain for the end of the week.
Upped the girls feed yesterday to 1400 ppm 2.8 ec, Almost to the max for outdoors, in the ground, grows.
Girls are a nice green with big beautiful leaves. No clawing or burnt tips and the stems of the leaves are all green like they should be.the Breakup Cake and the Silver Widow in this garden are a lot smaller than the gelato, but that is fine. I will have a week of steady trimming as it is now.
Thanks for your interest and thanks to Kannabia for supplying some awesome genetics

Likes
12
Share


@Just_Weed
Follow
Seems Strawberry will stretch a bit and C-Vibez ) started producing budsites.
Trying to lighty defoliate this week and focus on reducing nutrients cause ppm runoff is 1000.
I realized this week as I am using RO water I need to supplement more calcium/ magnesium and as all plants were transplanted from BioBizz Lightmix to BioBizz Allmix they all have lot of nutrients in soil.
I will just sprinkle a little bit of epsom salt , add low amount of calmag to water with very low amount of REMO nutrients, pH to 6.2 and that is it.
Usually I used much lower REMO or BioBizz dosages based on my feeling but then my last diary ( 4 Dutch passion) I had very bad grow. Those 4 plants were transplanted to soil from previous grow ( BioBizz Lightmix + Allmix) to big pots as seedlings so it was hard to measure runoff and ppm of soil spec earlier in the veg. So for this grow my mindset was to follow the charts as much as possible so after 4 weeks of seedling phase in BioBizz Lightmix I transplanted into 18 L AllMix and also started feeding remo in lower dosage but proceeded to increase dosage to remo schedule dosage in a month of veg. I will try to water till runoff and measure to not make same stupid mistakes.
Also soon I will be trying Dogma Organic SuperSoil and I will try to compare same genetics in soil with nutrients, dwc and supersoil.
My understanding is that using straight RO water in living soil can be problematic so I will keep in mind that factor. My RO filter on the tap has mineralization it comes out 50 ppm.
Clones will soon be ready for transplant, I am planning to keep only few alive as I will not have space for all of them, both tents will be available for flower of these clones in around 2 months so plan is to veg few of them in soil and two of them in my DWC setup until Flower tents are ready.
HEIGHT
Strawberry Cough (80 cm after SCROG)
C-Vibez (55 cm after SCROG
#2 Strawberry Cough (50 cm after SCROG)
First watering 2. day of the week:
C-Vibez 6 L 600 pm 6.2 ph RUNOFF: 6.5 ph 1000 ppm
Strawberry Cough 5 L 470 ppm 6.4 ph RUNOFF: 6.6 ph 1000 ppm
Strawberry Cough #2 in 40L pot is still heavy and I will just water around the plant a little with very light dose of nutrients and sprinkled little epsom salts
Second watering 5. day of the week:
C-Vibez 6 L 400 pm 6 ph RUNOFF: 6.5 ph 1000 ppm measured runoff only in this one
Strawberry Cough 5 L 400 ppm 6.2 ph
Strawberry Cough #2 mixed 7 L 330 ppm 6.5 ph that i will likely water till end of the week.


Likes
5
Share


@Rock_n_Roll_Randy
Follow
This was a nice taller plant that filled in nice and is extremely delicious. It has a slight orange flavor and smell mixed with a very strong sherbert taste and smell and very dank kushy skunk exhale but I still taste the orange sherbet too and it is mouthwatering and potent. I smoke it at night because it is very strong stuff. Highly recommended strain because it is very strong and very delicious
Likes
43
Share


@GrowerGaz
Follow
Day 26 of 12/12 today , So in day 22 I made a biotabs PK compost tea with Mollases in place of Orgatrex. Yet two days later they still look hungry, so I turned the autopots off yesterday and gave them a little Canna Flores Organic. I really underestimated how much Biobloom I should have added to the soil. Next time I would use 5g per litre of soil. The jacks Toe Jam that's decided it wanted to flower in its own terms is almost ready so that did not get any feed , just water. Apart from that just general maintenance , defoliation , tying the branches down a little tighter , keeping the autopot tank full.


Likes
7
Share


@420Medicine_Man
Follow
Happy with the end product really strong high and it’s a nice high relaxed and hungry, get defiantly an evening smoke


Processing
Likes
4
Share


@grown29
Follow
The smell has really picked up! The buds don't seem to be getting any longer/more connected, but they are def getting denser... I'm guessing another couple weeks before harvest.


Likes
39
Share


@Belverde
Follow
Hi guys..
Here we are again with our two beloved Peyote Critical ...
I will not dwell much today ... it is just now missing to reach an optimal flowering ... I believe that at most, in ten days, they are ready ...
If one if you wish you could easily cut it now ... all milk-colored trichomes .
Usually I always prefer to start the second phase (drying and treatment) when there they are 15% of amber trichomes ... The timing of the harvest sometimes varies based on various factors and / or above all on personal pleasures ...you know..
The plants are really beautiful and super resinous ... The perfume it is much more on the Kush side, quite even sweet with other "notes" that I do not recognize but tending to the "honey" side ..... Of the critical it has more than anything the structure and also the shape of the peaks .... however it is ... at the end of the week last time I gave them once again a bit of banana macerate, more or less always a 0.5 in a 1.5l bottle of water ... a few days later a little bit of Topmax .. now just water, like I practically did it throughout the cycle, since the nutrients were already present in the soil ... we hope for good ...
let me know if you liked it ...
Criticism, advice and comments are welcome😉 ...
Thanks to have read 🙏..
Good cultivation ...
See you in seven days ....
Bye ✌️


Likes
15
Share


@Messypies
Follow
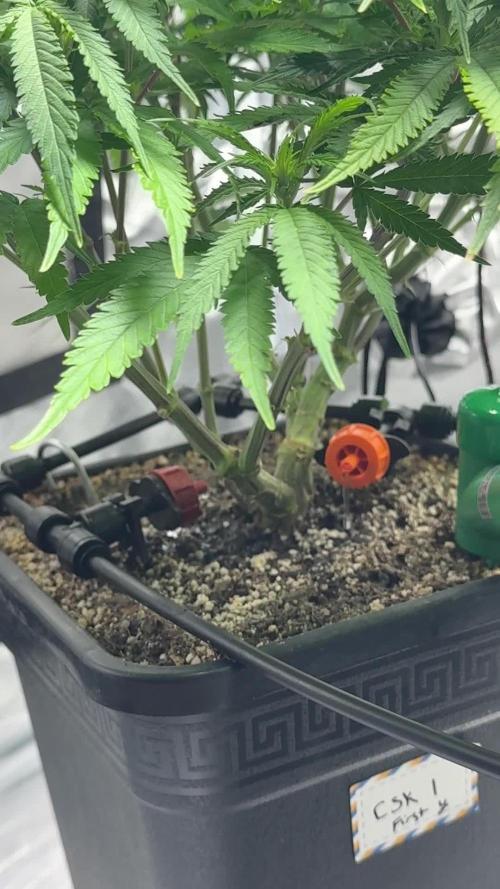
Auto cinderella jack - Amazing week of growth. There are new nodes exploding from everywhere and its not showing signs of slowing down. They are currently loving the organic nutes and have started showing signs of flowering.
Auto critical cheese - this plant has shot up recently. It was planted a week later that the ACJ but is growing some seriously fat fan leaves. Should be a nice yeilder.
Peanut butter cookies - this girl is looking pretty sorry for herself. I am intentionally trying to keep her as small as possible so that I can get the autos out before flipping into flower but she is gonna be a beast. Will transplant into a final pot in the next day or so.
