


Likes
2
Share


@eldruida_lamota
Follow
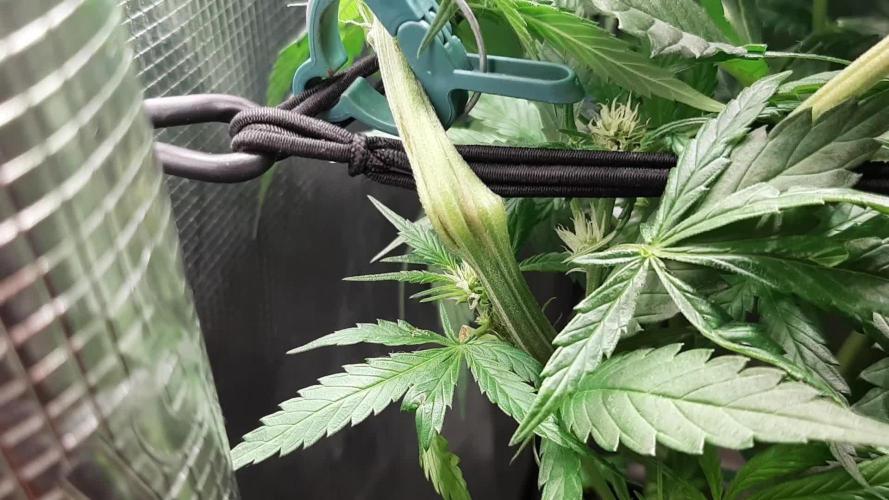
Que pasa familia, vamos con la cosecha de estas Orange Sherbet Fast Flowering, de FastBuds.
Por dónde empezar, las flores son poco compactas pero van repletas de resina y unos aromas bastante dulces y citricos
Es muy sencilla de cultivar, es de ciclo corto aunque también si le dais una semana más no pasa nada agradecer se agradece al final.
Mars hydro:
Code discount: EL420
https://www.mars-hydro.com/
Agrobeta:
https://www.agrobeta.com/agrobetatiendaonline/36-abonos-canamo
Hasta aquí todo, Buenos humos 💨💨💨

Likes
50
Share


@Roberts
Follow
This was my first time using plagron. I dropped the ball on it. I had lots of issues with getting the right amount of nutrition with the level of irrigation I use. The yield will be low but it should still have some kick. Thank you Plagron, Zamnesia, and Medic Grow. 🤜🏻🤛🏻🌱🌱🌱
Thank you grow diaries community for the 👇likes👇, follows, comments, and subscriptions on my YouTube channel👇.
❄️🌱🍻 Happy Growing 🌱🌱🌱
https://youtube.com/channel/UCAhN7yRzWLpcaRHhMIQ7X4g.

Likes
1
Share


@My_Orbital_Temple
Follow
11/13 Was the last night I kept the dome in the tent, started getting too crowded!
But here on 11/15....lol i got bored and wanted to give it some more nutes! 😏
So I made a gallon up of some warm tap water PH'd down to 6.1, 8ml of FoxFarms Big Bloom, 5ml Boomerang, 5ml Wholly Mackerel, and 2ml of Power Si followed up with a very low dosed foliar spray of Xtreme Gardening's CalCarb before it was lights out.
11/17 I did some topping including the main stem.
In the video (its off my Instagram story @SoilBGood) there's one that I'm not too happy about, the taller one with the stretched out spacing. But I don't doubt that its gonna give me some dank buds 👊
11/20 The plants are looking sharp....I foliar fed them with some Calmag / Power Si and they blew up over night lol
B: Is a shot of the node growth
NOTE: I ALWAYS DEFOLIATE EVEN IF I FORGET TO MENTION IT.
NOTE NOTE: I swear I smell them already :D
Likes
12
Share


@AllieO
Follow
2/9: pH balanced water given today. Flowering sites are starting to explode a bit. Top leaves appear to have light burn. I've got my light at max height so I can't move it up any higher..trying to push the light over to the side as best I can
2/11: light defoliation and feeding... Coming along nicely!
Likes
14
Share

@eldruida_lamota
Follow
Vamos familia segunda semana de floración de estás Punch Pie de RoyalQueenSeeds .
Que ganas tengo de ver el progreso de esta variedad, las plantas están sanas, se ven con buen color.
La cantidad de agua cada 48h entre riegos, nutrientes de la gama Agrobeta.
Esperaremos que no me suba mucho la temperatura , por el momento se mantiene entre 25-26 así que lujo.
Estas próximas semanas veremos cómo avanzan.
Mars hydro:
Code discount: EL420
https://www.mars-hydro.com/
Agrobeta:
https://www.agrobeta.com/agrobetatiendaonline/36-abonos-canamo
Hasta aquí todo, Buenos humos 💨💨.

Processing
Likes
Comments
Share


Likes
4
Share


@Skinnytalls420
Follow
Day 32-26/08/22 the force is with this one will start giving bloom next watering !!

Likes
13
Share


@Prozak
Follow
to mutch cold here 2 week with low temps at night cicle betwen 12 &16 graus in europe.
maybe this is the reason of that purple orange colors (:
Likes
8
Share
@HashishOculus
Follow
Flower - Week 4 (Days 22-28)
Day 22 (Jan 22)
I did a reservoir change at 00:30. Fresh numbers: pH 5.81, EC 1588. It felt like a clean reset after all the EC creep and the general “why are the numbers doing this?” vibe. Plant looked strong. No drama in the canopy. Buds forming, everything looked like it was on track. I was honestly feeling pretty good about it.
Day 23 (Jan 23)
At 01:15 I topped off with about 2½ L pH’d water and landed at EC 1566, pH 5.79. Same session: I did a lot of work - heavy LST in the trellis, supercropped one branch, and pulled a few big fan leaves to open light to lower bud sites. The plant took it like it was nothing. That’s been the story: I mess with her, she just keeps growing and throwing bud sites. Great… but it also means I’m still running out of vertical space.
Day 24 (Jan 24)
At 01:00 I measured EC 1668, pH 6.0 and did massive LST work again. Also took a picture of the root ball and it looked amazing - clean white, crisp, and huge. That was a relief, because when the canopy is getting dense and the tent is getting tight, it’s nice to know the foundation is bulletproof. I also had to move the oscillating fan because there’s basically no room above canopy anymore. I ended up hanging it upside down under the canopy (not ideal), and I even saw a tiny bit of condensation forming between leaves higher up. That made my stomach drop a bit, because I can’t really “create more air” out of thin air in a packed tent.
Day 25 (Jan 25)
Around 01:00 I got an EC reading 2000+ that didn’t make sense to me. Plant still looked fine, so I didn’t want to panic-correct based on a single number. But mentally it was annoying: I can handle a plant problem, but I hate “do I even trust the data?” problems. I was still doing LST, but I stopped supercropping because I don’t want to stack stress and end up stunting her - especially with my harvest timeline in the back of my head. It finally seems to have ended the stretch. Good!
Day 26 (Jan 26)
At lights on (around 00:15) I finally saw it: discoloration on upper fan leaves (right side). It reminded me of the early grow issues. My working theory was that I’d been pouring concentrated low-pH top-off water on the same side, basically creating a micro-zone and stressing one part of the root system. Later I also had that “oh fuck” moment where I noticed the airline to the air stone had disconnected - no idea how long, but likely when I stirred. Luckily roots still looked fine and the plant didn’t look like it had crashed, so I think I dodged a real disaster there. Still… not the kind of surprise you want in DWC.
Day 27 (Jan 27)
At lights on (00:30) it was a total mess. The upper canopy looked wrecked fast - most top leaves damaged, necrotic spotting, and the tent smelled like wet hay. That’s the kind of smell that instantly makes your brain go to worst-case scenarios. I drained the reservoir and the numbers were completely wack: EC ~3000, pH 6.8. That explained everything. I did a full res change immediately and replaced it with a sane mix: EC 1622, pH 5.63.
And honestly, I don’t know if this happened because I switched to a new brand of pH down and screwed up somewhere, or if it’s just the combination of high uptake + my top-off method + small res volume catching up with me. But the timing feels… suspicious.
Day 28 (Jan 28)
At lights on (around 00:15) the damage hadn’t spread further. The canopy still looks ugly - lots of necrotic patches on leaves - but the plant itself doesn’t look like it’s dying. Buds look largely unaffected, which is a huge relief. I removed the worst leaves, but I’m trying not to go crazy stripping her. The vibe right now is: she took a hard hit, I corrected it as fast as I could, and now the only smart move is stability. No more hero moves. Just let her recover and keep building flowers.

Likes
100
Share


@AsNoriu
Follow
Day 111. First is ready, second week behind, third maybe even 3 weeks behind ....
Plus they are LEAFY ,!!!!
Trim jail ...
Wet trim for all of them - no doubts !!!
Day 115. Still hanging, slowly drying and result should be decent at the end ... A week more I guess, very humid in UK ...
Day 118. First trimmed - 175 g. Other is chopped ! One still grows ...
Day 136. Chop day for the last one !!! Long run ....
Happy Growing !!!

Likes
22
Share


@CenturionGrower
Follow
26/07/20 (Sunday)
Plants were starting to exhibit signs of light burn so I switched back to the 75W bulb. SVG never seemed to recover from having it's cotyledon damaged so I decided to take a risk and fed all of the seedlings 20-20-20 nutrients except the D.R. which I thought would've suffered shock, so I just watered it.
27/07/20
Decided to mist the plants with a homemade pesticide mix today because they're readying to be introduced as full time outdoor plants in a week or two so their sun basks are getting longer.
28/07/20
Noticed what looks like new growth from the first true leaves of the SVG, fingers crossed it's making progress.
29/07/20
The new growth from the SVG has split into two on both sides leading me to theorize that it's abandoned it's main stem (for now at least) and started two new stems. All other plants are working on new nodes and are showing a steady growth of .5cm a day. I've decided to revert to the 100W bulb because I believe I've misdiagnosed the light burn.
30/07/20
Today I left them outside for their longest sunbask to this point; 7 of their 18 total hours was provided by sunlight. The SVG now has two new 3-leaf true leaves on each new stem confirming my theory. Also starting to see signs of a minor mite problem on one of the leaves of my TT plant (Though it's new growth that wasn't sprayed with my homemade concoction.)
31/07/20
New growth has already begun sprouting from between the new true leaves of the SVG with no visible progress on the 'abandoned' main stem. Also had a power outage for 2 of the plants 18 hours.
01/08/20
Today the plants again stayed out in the sun for longer than previously making 8 hours in direct sunlight. I've decided to keep them in the grow tent for a further week because when I went to retrieve them the Jam was blown down flat by winds and had started to grow bent towards the light, so I doubt it's stem is ready for that daily beating. I raised the soil level and massaged it back into shape and it seems to be back on track. The D.R. is slowly beginning to bounce back from being stunted in the seedling tray and from it's third node (from the bottom up) of 3 leaf true leaves has turned into 5 leaf leaves. The SVG has made a major recovery and seems to be on it's way to even surpassing the others by the end of the week. The TT is officially the sturdiest of the younger seedlings and it's growing right behind the Jam in terms of node development. All in all this week was an overall success growth wise and I'm looking forward even more to week 3.
Likes
8
Share


@Style_weed
Follow
È stato bello far crescere questa pianta e vedere tra le 8 piante tutte le sue sfumature, 2 di queste hanno sviluppato i pistilli rosa!!! Il profumo è buonissimo e uguale il sapore. Non sono un amante del cbd ma fumare queste cime ci si gode di più il suo gusto favoloso.

Likes
39
Share


@GrowWiththeBro
Follow
10 days dry and bagged for curing. Sampled a little, the high is very heavy. Definitely growing again


Likes
3
Share


@Earthsower
Follow
She looks much better than a few weeks ago as she suffered too much of a drought but she is steady recovering. The double kush cake continues to grow with short nodal spacing. She is receiving around 500 ml of water every other day, stands at 25cm from the soi

Likes
20
Share


@FlavoursUk
Follow
Day 74 (28/05/18) - 2 of the Girl scout cookies are looking very close to being finished and seeing all cloudy trichomes with a couple amber. I look for 80/20% ratio of cloudy/milky to amber trichomes for harvest as this gives the best medicinal effects from my experiences. Flushing the GSC and will be waiting for her to use up the remainder of her nutrients in the leaves before I chop, hopefully get a nice fade. One of the Stardawg girls isn't so far behind but being more sativa dominant, I expected that. May upload one picture of her and how she is getting on. The smell coming from the GSC is so potent and sweet. Hoping the smoke quality lives up to the smell. Not long to go now.


Likes
4
Share

@SamDo
Follow
🇺🇸 Grow Journal – Week 13
Week thirteen.
The plant seems in good shape overall, even though it’s starting to show some light discoloration on a few leaves.
I don’t really know what’s causing it.
Maybe it’s because the plant is growing and needs more nutrients now.
Or maybe there’s some kind of nutrient blockage starting to appear.
The substrate has been running for thirteen weeks, so it could be getting a bit loaded.
I’m thinking a flush might help — just to give the root system a reset before moving forward.
This week I also worked on defoliation and topping.
We’re now at sixteen apexes, and I think that’s enough.
It’s probably the last topping, because if I wait much longer, the plant is going to get too big and it’ll be harder to manage once she stretches.
Aside from that, everything looks fine.
However, I did notice a big drop in pH in the reservoir, which is strange.
I added Athena Balance, just like always, but the pH keeps going down.
I don’t really understand why it’s dropping so much.
Other than that, everything’s okay — nothing special to report.
The plant looks stable, and we’re getting close to the flowering stage.
Processing
Likes
10
Share


