
Likes
Comments
Share


@Batista
Follow
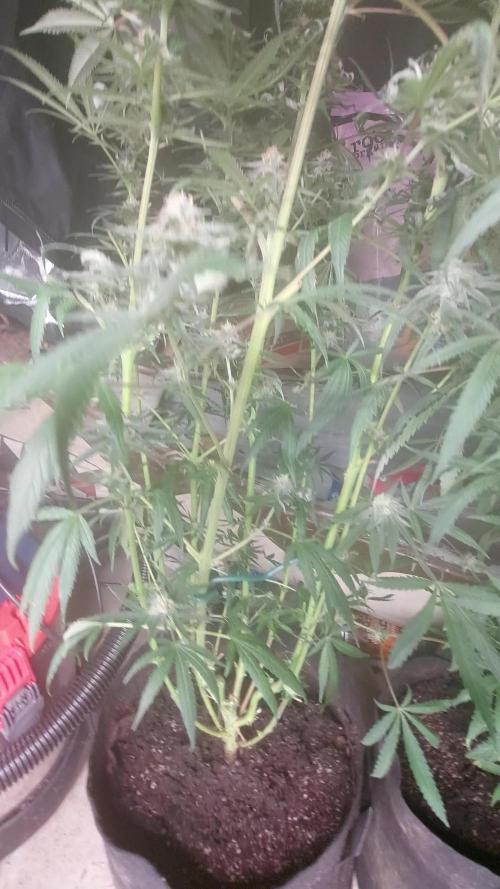
This week we increased the quantity of fertilizers and transplanted it into a 5 liter container.
Next week we will start LST.
The total height decreases due to the transplant.
We use mycorrhizal fungi (Mykos) in the transplant.


Likes
39
Share

@AestheticGenetics
Follow
4/9/25
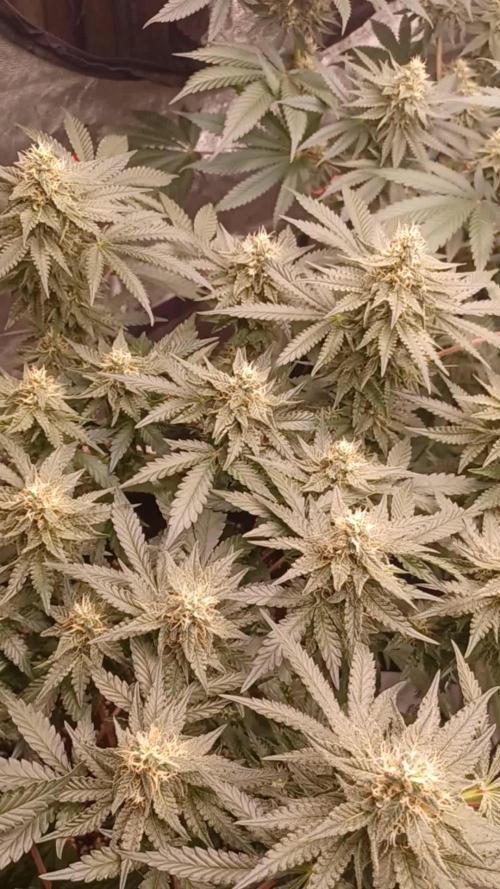
Welcome to another week. Week 5 since the flip of 12/12 just ended. So today is day 36 since 12/12. The begining of week 6.
About halfway done with flowering. Time to start packing on weight.
also its important to note that it took a week or so after 12/12 to have pistils show up. So its closer to 28 -30 days of Flowering.
I have a foxtailing pheno thats mostly green with thin buds.
I have a super chonker green pheno with ridiculously chunked up golfball sized nugs everywhere.(R3)
I have a sativa style but thicker buds with nice long connected colas (R2)
another smaller pheno with traits of some of the others and also green.
and then a singlular pheno that looks gelato dominant and its purple pretty much everywhere to the point that i didnt notice its coloring until it was next to all of its sisters that are straight green.
Very beautiful plants and a nice display of phenotypical expressions
Top dressed
2tsp bloom
2tsp microbe charge
1tsp bloom booster
A Special thank you to Zamnesia and


Likes
26
Share

@Cooky_420L
Follow
5 ' semaine de floraison Pfffff elles ont chaud . Ici nous avons une période de canicule a 37° pars jours depuis une dizaine de jours.
Dans leur tente ⛺️ j'arrive à ne pas dépasser 31° mais c'est quand même encore élevé , elles consomment par jours la quantité que je donne pour 3 jours. Pour garder le control des nutriments je vérifie l'E.C de sorti de pots.
Apart ça elles ce portent très biens aucun soucis de santé. Les bourgeons commencent a grossir et pour la première fois je vais utiliser du PK 13/14 , je vais voir ce que ça donne. Les réglages culture sont inchangé à la semaine dernière
Merci aux Growmies qui me suivent ✌️, bonne semaine de croissance à vous les p'tites ✋️ vertes 🌱🌞🌱

Likes
5
Share


@Ninjabuds
Follow
The pound cake auto is really taking off. I’m happy I didn’t top the plant and just let it do its thing. It’s gonna have big long bugs all over the whole plant is just gonna be nugs. Not sure what I did with this plant but I got the roots perfect this time and it’s showing it the growth of the plant

Likes
13
Share


@WeedM8
Follow
Hello m8 welcome to this journey with me in this diary will have very interesting strains hope u find something useful
Persi
- [ ] 1st week Veg: germinated in substrate lighting very close so it jets medium high humidity after the 3rd day they started sprouting
- [ ] 2nd week Veg: this week my ventilator broke down and as the temperature stayed very warm nothing developed much
- [ ] 3rd week Veg:fortunately this week i had fixed the ventilation and the temperature has go down a bit allowing the little plants to develop and reinforce
- [ ] 4th week:very good developments in this week I already started feeding a bit two times but i didn’t have to…once was enough
- [ ] 5th week Veg:this week they were very strong green i only had to water them good and keep the ventilators going no stop .They have good hight already ,but as i have to strains together. I want to transplant them when the hight of the other one have stretched… I’m thinking to transplant next week if not the next one
- [ ] 6th week Veg: this week it went great fortunatly i dont have pests that eat my buds i’ve givven a fed once the substrate is very rich already the plants streached very well i will transplant today so be ready m8 i cant wait to show you the progress
- [ ] 1st week Fl:they started stretching and looking very healthy just transplanted
- [ ] 2nd week Fl this week I’ve been away i had a friend taking care of them they stretching very well i hope that she starts putting energy into the flo
- [ ] 3rd week Fl:they are streaching very well ..getting the light very well
- [ ] 4th week Fl:there we aree guys the good stage is heree good high hope dosent effect de prod
- [ ] 5th week Fl:pumping very good this week a lot of changes started already being frosty
- [ ] 6th week Fl:this diaries its not daily updated this week its going’s so great we are close to harvest between next week and the other one . Ill harvest them at diffrent time just because they are not all at the same point of flowi
- [ ] 7th week Fl: im so satisfied from the way that this is going they didnt had any particular stress just that its 29 degrees during light and its going good so farr I haven’t constantly fed like on the peach g and pcr i hope for better taste at the end

Likes
36
Share


@Growgirl1114
Follow
I’m getting so jazzed about this Bruce Banner Auto, upside down grow. Week 8 and she’s getting thicker everyday. I wasn’t sure if she would really amount to a nice grow but it has surpassed my expectations and is turning into a beautiful plant, no real issues to speak of, I do put her under cover every night and pay extra attention to this one but over all what a great experiment #peace ✌️🌱✌️

Likes
5
Share


@Willy_Balls
Follow
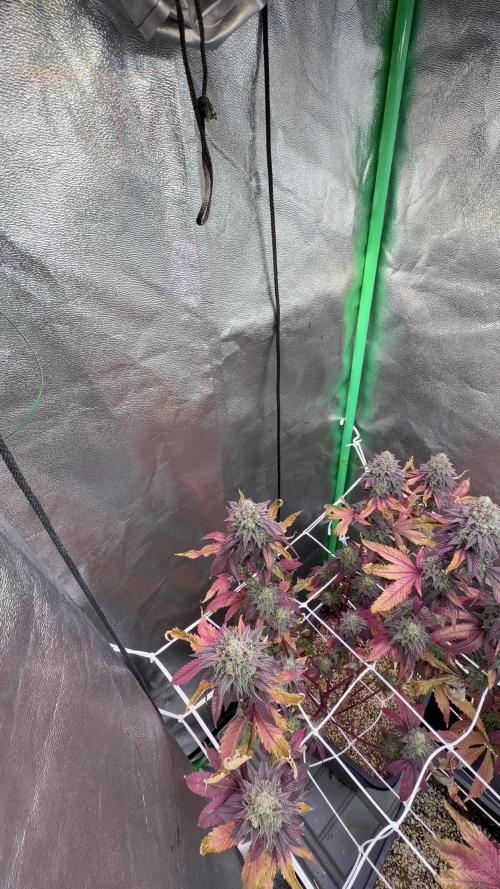
Beautiful spot on finish.
Fade is going on beautifully
This Mokum’s Tulip specimen I managed to save in reveg project is a true gem.
Gelato x sherbert go in tandem to create a creamy thin mint taste with hint of lemon zest. It’s astonishing.


Likes
9
Share


@iHateSativa
Follow
This is obviously not week one.
I had this Power Africa clone in the corner of my mother tent under some weak CFL lights, i transplanted it A week or two ago.
I have no definite plans for this plant but I decided to HST her today, i'll see what happens over the next couple weeks.
I do intend to turn the harvest into hash, so 100 grams would do fine.


Likes
6
Share


@GoldenWeedGrower
Follow
Legend
Timestamp: 📅
EC - pH: ⚗️
Temp - Hum: 🌡️
Water: 🌊
Food: 🍗
pH Correction: 💧
Actions: 💼
Thoughts: 🧠
Events: 🚀
Media: 🎬
D: DAY, G: GERMINATION, V: VEGETATIVE, B: BLOOMING, R: RIPENING, D: DRYING, C: CURING
______________
📅 D71/B34 - 25/06/24
⚗️ EC: 1.2 pH: 6.6
🌡️ T: 26°C H: 70%
🌊 10L
🍗 Calmag - Bloom A-B
💧pH-
💼 CO2 Dispenser added
🧠
🚀
🎬 4 nice pics and 1 TL video
______________
📅 D72/B35 - 26/06/24
⚗️ EC: 1.2 pH: 5.7
🌡️ T: 26°C H: 70%
🌊
🍗
💧
💼
🧠
🚀
🎬 1 TL video
______________
📅 D73/R01 - 27/06/24
⚗️ EC: 1.2 pH: 5.7
🌡️ T: 26°C H: 70%
🌊 12L
🍗 CalMag - Bloom A-B - B52 - Bud Candy - Overdrive
💧
💼
🧠
🚀
🎬 1 TL video trunked
______________
📅 D74/R02- 28/06/24
⚗️ EC: 1.2 pH: 6.0
🌡️ T: 26°C H: 70%
🌊
🍗
💧
💼
🧠 Last Timelapse videos are pretty useless. I'm thinking to don't them anymore..
🚀
🎬 1 TL video
______________
📅 D75/R03 - 29/06/24
⚗️ EC: 1.3 pH: 5.4
🌡️ T: 26°C H: 70%
🌊
🍗
💧
💼
🧠
🚀
🎬 1 TL video
______________
📅 D76/R04 - 30/06/24
⚗️ EC: 1.3 pH: 5.4
🌡️ T: 26°C H: 70%
🌊
🍗
💧
💼
🧠
🚀
🎬 1 TL video
______________
📅 D77/R05 - 01/07/24
⚗️ EC: 1.3 pH: 5.0
🌡️ T: 26°C H: 70%
🌊
🍗
💧
💼
🧠
🚀
🎬

Likes
35
Share


@Santica_Garden
Follow
This is how things are looking at the end of Week 3 of Flower. Really happy with the way the ladies are looking, only complaint is the growth. Don't think I have done a good job at transplanting this time around.


Likes
57
Share


@GreenISR
Follow
First of all the plant is so strong after I have LST her all the way and tops and main line like wtf 🤪🤪
My trim of the buds gose fan leafs in the side and sweet leafs in the side and cut a litel for secend trim ( took me some time around 3 - 4 hours .
P
So I had some issue in the beging becuse I try to grow it in 24 h cycle light in the start it have made the plant dense but it slow down the growing for 2 - 3 weeks .
In the end the results are amazing with the flux method ( I hope I did it right ) .
Grate seed bank !
That color in the end just wow and even the lower buds get a pink color .
Wet wight around 1.2 - 1.5 ( Human scale Lol ..) will update soon with more pic's .
Roots are full its amazing ! And I 0did a good job .
After the dry out ill do so aging .
So came out with 200 grams in the end I have learn that the size is dosent metter 🤣
Becuse of 3 liter pot I made 180 but still it weird becuse in 10 liter I came out 300 .
So the flux project went intresting and my last time im doing this grow flux..

Processing
Likes
13
Share


@Cheesefarmer420
Follow
This plant has a solid stench of pure ripe lemons. So much aroma and color in every bud, purples, to dark green, to lime green, to solid frost. This one definitely a fun strain to watch grow and tend too for the last few months. She’s definitely a hungry girl, seemed to be the only strain out of the three that accepted and thrived with full feed nutrients. Would definitely recommend this Strain to someone For a nice uplifting day smoke, also seems to do me good for some pain and stress relief.
Likes
11
Share


Likes
9
Share


@Krautbauern
Follow
After 35 days of vegetation we send them into Flower. They get 2 hours less light every day until we reached the day/night-cycle 12/12 hours.
we have noticed that they have already started their stretch. they grow 5-10 cm every day.
We water them with bio grow for the first time.

Likes
92
Share


@DogDoctorOfficial
Follow
🌱 Week 2 Report: The Journey Evolves 🌱
Grow Fam, the adventure is in full swing! 🌟 The Gorilla Melon from Fast Buds is out and shining its light, and the Papaya Zoap has made its debut in the Cannakan, bringing with it a story that adds even more depth to this incredible run.
When the universe speaks, we listen. 🍈✨ I didn’t plan on popping Papaya Zoap from Sweet Seeds just yet, but sometimes things just have a way of aligning. After a few other seeds didn’t germinate, I felt an inner pull toward this special strain. As it turns out, the universe had something beautiful in mind! Just days later, my brother @daggadna also began germinating the same genetics—gifted to us during Spannabis. Was it a coincidence? I don’t think so. 🌱 This is more than just a grow now—it’s a journey with purpose, guided by synchronicity and connection. I can already feel the magic building up with this one, and I can’t wait to see where this road takes us!
Now, onto the Papaya Zoap… something tells me this plant is going to take us on a ride we didn’t expect but absolutely needed. 💚 Let’s make something incredible, Brother Dagga—this one’s going to be legendary.
Gear Updates: All Systems Go 🚀
This week, everything’s dialed in perfectly with the TrolMaster system. Shout out to the incredible DSH-2U Humidity Station! 🌬️ This tool is giving me precision control over the RH (relative humidity) ranges in the room, keeping the environment just right for my babies. Having that accurate readout and control allows me to maintain optimal levels for each stage of growth. It’s like magic—you plug it in, set the desired ranges, and let it do its thing! 🌡️
By monitoring and adjusting humidity levels on-the-fly through the TrolMaster app, I can ensure the environment remains stable, and that means happier plants and healthier growth! No more guessing games. From anywhere—whether I’m working in the garden or chilling out—I can track and tweak it all. Heck, I could be on the toilet and still have complete control over my room! 😂
The AMP-3 Precision Meter has been running 24/7 in my water solution, giving me real-time updates so I can make any corrections when needed, right from my phone. This tech has taken my grow to another level. ✨
Nutrition Update: Keeping It Balanced 🍃
As for feeding, we’re sticking with the basics to give the plants what they need, without overloading. Right now, I’m running:
• Regulator: 0.15ml/l
• Startbooster: 0.25ml/l
For now, I feel like this is the sweet spot—just enough to encourage root development and early growth without overloading them. I’ll be adjusting the feed as we go deeper into the grow, keeping an eye on how they respond. You know me, always tweaking and improving along the way!
Shoutouts & Gratitude 🙌💚
Huge love to everyone following along—whether you’re here on Grow Diaries, over on YouTube, or on IG. Your support keeps this journey alive, and I am so grateful for every comment, like, and message! Special shoutout to my sponsors for fueling this project:
• Nutrition: @aptusholland @aptus_world @aptus_es @aptusbrasil @aptus_thailand @aptus_portugal @aptususa_official @aptusplanttechnz @aptusplanttechaus
• Controls: @trolmaster.eu @trolmaster.eu.support @trolmaster.support @trolmaster.agro
• Soil: @promix_growers_eur @promix_cannabis @promixmitch
More to come soon, and you won’t want to miss it! 📺 I’m also documenting everything on my YouTube channel, and I’ll be sharing behind-the-scenes content on IG, so hit that subscribe button and follow along. Let’s grow together, fam!
Growers Love to All 💚
The love and support from the grow community is something I never take for granted. This journey wouldn’t be the same without all of you! I’m so honored to be part of this amazing community, and I can’t wait to share more updates and insights along the way. Remember, this isn’t just about growing plants—it’s about growing together. 🌱
Until next time, stay positive, stay inspired, and keep pushing forward!
This week’s shoutout is dedicated to the synchronicity of life, my growing community, and of course, Papaya Zoap and Gorilla Melon. Let’s see what magic we can create together!
#HighFrequency #PositiveVibesOnly #PapayaZoap #GorillaMelon #TrolMaster #InBalanceWithNature #GrowLife #AptusTruePlantScience #GrowersLove


Likes
3
Share

@IndigoMist8
Follow
Temps have been on the cooler side lately, with a few days close to 80° .


Likes
10
Share


@CHILLING_RACOONS
Follow
Hi Dear Friends, 👨🌾 👩🌾
Plants showed some deficiencies, but we are recovering it. I prefer to have deficiencies instead excesses..
Maybe It was better if I started a week ago to give Top Veg.
It is the biggest of the cycle and it is really fast.
I notice a HUGE difference compared to other plants growed under the 480w quantum board.
The Kush mintz Fast is under the the XS2000 by ViparSpectra and it is bigger and stronger compared to other plants. Small distance between internodes and stems hard like rocks.
This lamp is really a beast, can't wait to try the new models!!
✅ VEGETATIVE week #7 (LAST WEEK)
30/12 SWITCH 12/12H
📅this week goes from 26/12 to 01/01.📅
💡💡💡Viparspectra XS2000 is working at 50% power.
💉🔍Fertilization schedule:🔍💉
26/12 3ml/lt TOP VEG
30/12 TOP MASS 0.2ml/L + 2.2 ml/L TOP VEG
31/12 SENSI CAL MAG EXTRA 2ml/L foliar spray
WE ARE BACK!!!
We are back after a little pause.
We take a break because we were too busy to post high quality diaries. In the last diaries we tried to post as good as possible and we have to publish about 6 or 8 diaries (in addition to these that we will publish shortly). We opened also an educational Instagram page, we growed a lot in a short amount of time BUT, Instagram suspended our account and we lost all our posts, I was so sad and disappointed... a lot of work lost in a night....
In this diary you will see our journey with Kush Mintz Fast by Original Sensible 🤩, sit down and enjoy the show!
We are growing in a 15L Smart Pot with Light Mix soil by BioBizz under the AWESOME XS2000 by Viparspectra 🤩
DATA SHEET:
Bubba Kush , Animal Mints, Secret Hybrid
Genetics: mostly Indica
Yield: 650g/m² indoor
flowering time: 50/55 days
THC: 25%
Aroma: cookie mint
Effect: happy relaxed
💸💸💸💸💸 Here you can buy seeds of this top shelf strain: https://originalsensible.com/original-sensible-seeds-kush-mintz-fast~21711
_______________________________________________________________________
🔧💡OUR SET UP💡🔧
✔️ 💲💲💲VIPARSPECTRA 🚀🚀🚀🌕🌕
ViparSpectra®️ XS2000 240W Infrared Full Spectrum LED Grow Light:
Excellent ratio between wattage and ppfd, excellent light penetraton, perfect light spectrum (it also has IR 🤩) and it has the best build quality on the market. Until now, built quality is really awesome. You can touch that quality. Materials are really strong, excellent driver and the best leds on the market. Heat dissipation is perfect, the lamp is never too hot and it has a passive dissipator so you will have zero noise. It also has IP65 certification. I like that this lamp is bigger than others, so the 240w of power are well distribuited on the space. Viparspectra has an awesome customer service, and shipping was creazy fast!
This awesome brand also offers 3 years warranty.
This lamp has no rivals.
A special thanks to Emily of Viparspectra ❤️❤️❤️❤️
HERE YOU CAN BUY THIS PROFESSIONAL LIGHT: https://www.viparspectra.com/products/xs-series-xs2000 or https://amzn.to/3dyUoJl
and here you can buy other awesome stuff: https://www.viparspectra.com
✔️ 💲💲💲MARSHYDRO 🚀🚀🚀🌕🌕
📦120X120 GROW TENT: an awesome box, easy and fast to assembly. Made by strong materials, solid zips and it is totally lightproof. The position of holes is optimal and the two lateral windows will make easier the work inside the box. There is also a double end, so you are 100% sure that dirt or liquids will not spill out. You can find it here: https://www.mars-hydro.com/grow-tent/buy-mars-hydro-grow-tent-48x48x80-1680d-4-x-4-size-keeps-all-light-in-top-quality-1680d-canvas-is-tear-proof-and-double-stitched-light-blocking-fast-installation-for-sale
💡TS 600 FULL SPECTRUM 100W LED GROW LIGHT : with this light you will achieve excellent buds, you will not need anything more. This lamp replace a 150w HPS lamp, but, with this Led Light you will smoke bigger, harder and tastier buds because Led have a complete spectrum and a powerful light penetration, so your plants will work as much as possible to make you happy. Psssssss it it extremely cheap and it is only 100w, your bills will never be too high, YOU HAVE NO EXCUSES!! Here if you want this little beast: https://www.mars-hydro.com/led-grow-light/mars-ts-series-led-grow-light/mars-tsw-600-led-full-spectrum-hydroponic-led-grow-light
Thank you Eleen of Marshydro❤️❤️❤️❤️
💣Quantum board - 480w - 4x120w Boards by Zhoangshan Koray Opto-Electronic Ltd.
Samsung LM301B 288 led/board 3000K 0dB noise
+24led/board led Osram 660nm
Efficiency 2.6 umol/J 220 lm/w
Driver: Meanwell HLG-480H-36B
💣Quantum board - 240w - 2x120w Boards by Shenzen Yuanhui Led Ltd.
Samsung LM301H 504 led 3500K 0dB noise
+24led/board led Osram 660nm
Efficiency 2.7 umol/J 220 lm/w
Driver: Meanwell HLG-240H-48B
-ESTRACTION FAN:
Blauberg 125 Turbo Pro Series
Maximum air flow: 430-560 m³ / h 50W 32-44 dBA
-FANS:
A)OSCILLATING FAN D.15cm 2 speeds 20w
B) COMPUTER FAN Sunon DP200A – 230V 20w (Strong, reliable and quiet)
C)Cornawall Electronics Multifan Turbo, three speeds, can be used both on support surfaces and mounted on the wall. High capacity, about 740 m3 / h. High silence and reliability.
💊💉💊FEEDINGS:
We used BioBizz light Mix
TOP CROP:
-DEEPER UNDERGROUND: to stimulate roots system
-TOP VEG: for a excellent growth in the vegetative phase
-GREEN EXPLOSION: to promote creation of bud sites and to allow a faster growth
-MICRO VITA: bacterias for equilibrate the soil and to make the plant healty
-BIG ONE: to stimulate bud sites and to stimulate resin production
-TOP BLOOM: to achieve excellent big and hard buds
-TOP CANDY: to feed the buds with molasses for a tastier smoke and to gain weight
-TOP BUD: to enlarge buds and to gain weight
PLAGRON: PK 13-14 to have big and hard buds and to feed plants with lower effort
ADVANCED NUTRIENTS: Sensi Cal-Mag Extra-> for cal mag deficiency
GROTEK: CAL MAG for cal mag deficiency
HESI: PowerZyme to clean and balance the soil. It feeds the plant cleaning the soil.
GHE: - Final Part (ex Ripen) accelerate the final flowering phase, dissolves minerals in excess
- Flash Clean to flush the plant and to be sure that all excesses are out from plant and pot
These two products improve A LOT the smoke of our babies
-PURPINATOR to stimulate flavonoids and to have a better taste and smell.
____________________________________________________________________________________________
🙏❤️ THANK YOU FOR BEING HERE ❤️🙏
Please leave a comment with your opinions, it is very important to us to have a comparison.
If you like our job, tap the weed button and follow us. It will be really appreciated.🙏
We want to thank again everyone that help us in our project. You support us to support our dream. ❤️
SPREAD THE LOVE OF THIS PLANT ALL AROUND THE WORLD
🌿Thank you again🌿
❤️Sweet hugs❤️
👨🌾CHILLING_RACOONS👩🌾
