


Likes
7
Share


@Damonkey
Follow
I think it was just one of those things with this plant. It maybe could have benefited with a different positioning below the light. The smell is good very strong blueberry/floral hum. I’m guessing the taste is quite similar, I’ll come back to this when it’s been tried.😬
The hash is a great smoke, a good flavour smell and a very heavy stone.
I was suffering from quite a bad toothache after smoking this sleeping wasn’t a problem, the pain was controlled very well by it.✌️


Likes
7
Share


@Hightable420
Follow
Bloombastic putting in that work! Stinks like crazy now. Super strong sweet Lemon terps
Stopped Bloombastic & DualPart feed. Switched to Ripen for few feeds before starting flush.
Likes
32
Share


@Only4passion
Follow
All right these fastbuds auto are getting huge man I’m really impressed by those strains 💪💪🤩✌️
Likes
11
Share

@BushDoctor740
Follow
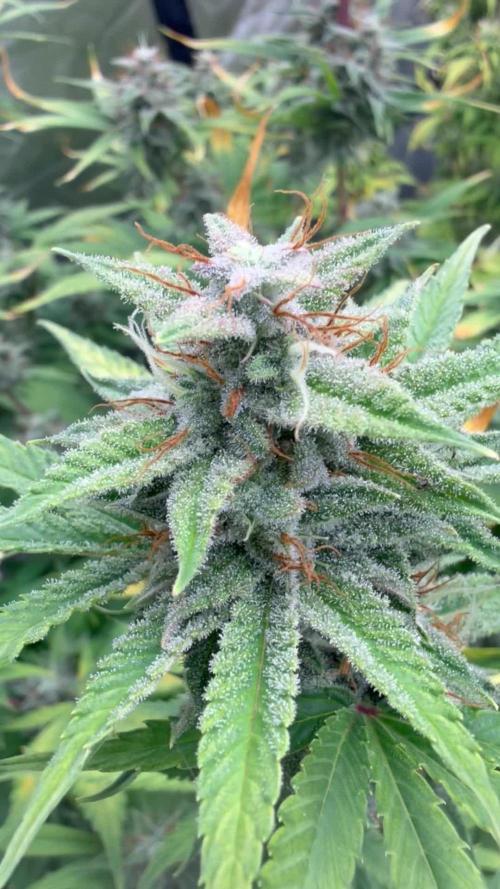
The trichomes are heavy and she is really pretty at this point.She still has some clear trichomes as some are cloudy.Ill let her go a lil longer and keep pounding her with 80 percent light intensity and maybe one more feeding of Plagron and some bud candy.

Likes
12
Share


@w33dhawk
Follow
Tag 9 in der 2ten Woche und die wurzeln sprießen aus den jiffies. Hab die Mädchen direkt in die endtöpfe gesetzt (15 liter) Mills light mix, bin bis jetzt zufrieden mit allem


Likes
Comments
Share


Likes
57
Share


@Roberts
Follow
Pablo Escobar has grow a lot in the last week. I did top her a few days ago, and removed the first node branches. I left the 2nd, 3rd, 4th node branches. She did experience a ph fluctuation, which lead to a few spots. It gas been corrected, but she is likely due for new solution. As the whole grow room is due soon. She has gotten a lot stronger since the over stretch in the beginning. Nothing more to report. Thank you Spider Farmer, and Divine Seeds. 🤜🏻🤛🏻🌱🌱🌱
Thank you grow diaries community for the 👇likes👇, follows, comments, and subscriptions on my YouTube channel👇.
❄️🌱🍻 Happy Growing 🌱🌱🌱
https://youtube.com/channel/UCAhN7yRzWLpcaRHhMIQ7X4g

Likes
6
Share


@XanHalen
Follow
Nov 29:
They seem to be accelerating in veg growth but I see a small portion of the leaf on the smaller plant either grew in mutated or somthing cut it, I haven’t seen a single bug in the box so I don’t think it’s that but you never know, and the bigger plant has some issues near the base of its stem, I noticed it before I did the LST and now I’m wondering if I should have addressed that issue before starting the LST. Let me know what you guys think!
Dec 2:
Walked into the room and noticed a faint smell, wasn’t any smell last night when I started the LST on the slower girl. Further inspection showed some white pistols on the bigger girl, I believe she is the culprit for the smell as the other seems about a week behind. They are both now LST‘d and leaf tucked. Enjoy the pics and vid’s!
Dec 6:
I have tied down some of the longer chutes on the bigger plant (will see in week 5 update) to create more airflow and light penetration as I didn’t even realize how bushy the stem and node sections had gotten. I have also cut the chutes coming off the first true leaf. I don’t think I will make any cuts to the smaller one as it’s already a slower growing pheno. Going on a trip starting the end of week secede to late week 8, so I have a automatic feeder coming from Amazon, and I will continue using it through flower to reduce open tent time.

Likes
25
Share

@German_GrowLab
Follow
Einen wunderschönen guten Tag, liebe Grow-Community, und herzlich willkommen zur 14. Woche meines kleinen Outdoorprojekts!
Diese letzte Woche ging es den Damen an den Kragen …
Da die Kleinen in letzter Zeit doch ordentlich an Pflanzenmasse zugelegt hatten und das Wetter in Kombination mit zu dichtem Blattwerk ein erhöhtes Pilzrisiko birgt, habe ich mir die Schere geschnappt und die Pflänzchen ordentlich ausgedünnt. Ich bin hierbei relativ radikal vorgegangen (nach dem Prinzip „Viel hilft viel“). Das hat mehrere Gründe: Einerseits bin ich kein Fan von diesen ganzen Popcornnug-Geschichten (sowohl qualitativ als auch vom Trimaufwand her). Ich stelle die Qualität immer über die Quantität und so gewährleiste ich, dass die Haupttriebe die gesamte Energie erhalten und optimal performen können. Des Weiteren gewährte ich so eine deutlich bessere Luftzirkulation und vermeide ein unnötiges Überlappen der Blätter, welche wiederum Kondenswasser einfangen und somit ein optimales Klima für Pathogene bilden. Und last but not least darf ich ja eh nur meine 50 g/Person ernten.😇
Beim sogenannten „Lollipopping“ verwende ich eine frisch sterilisierte Schere, welche ich nach jeder Pflanze neu reinige, um eine mögliche Kreuzkontaminierung zu vermeiden.
Vor diesem Eingriff habe ich den Pflanzen noch eine Stärkung verabreicht, um sie auf den kommenden abiotischen Stress (nicht durch Lebewesen erzeugter Stress) vorzubereiten. Hier kam wieder mein noch nicht so altbewährter Biostimulator ins Spiel. Dieses Mal allerdings in Kombination mit einem Komposttee. Dieser hat den Vorteil, dass er den Gasaustausch der Pflanze fördert (,,ein lebenswichtiger Prozess, bei dem Sauerstoff (O₂), Kohlenstoffdioxid (CO₂) und Wasserdampf mit der Umgebung ausgetauscht werden“), indem sich die Mikroorganismen um die Spaltöffnung (Stomata) ansiedeln und diese sich schneller öffnet und schließt.
Wichtig ist hierbei noch zu erwähnen, dass sich die meisten Stomata auf der Blattunterseite befinden, diese also ebenfalls besprüht werden sollte. Und da wir Bakterien ausbringen, ist es von Bedeutung, mit großen Tropfen und wenig Druck zu arbeiten und die Pflanze möglichst nass zu machen.
Jetzt hoffe ich nur noch, dass das Wetter wieder mitspielt und wir gesund und vital in die Blüte übergehen können.
Und zum Schluss noch das altgewohnte Gequengel: Grow Diaries hat mir aus irgendwelchen Gründen meine Views gedrittelt (vielleicht wegen der Kritik im letzten Bericht)😁. Bisschen ärgerlich, aber ich mache es ja nicht für den Fame.😂
Das war’s für diese Woche. Euch noch einen schönen Restsonntag.
Peace


Likes
21
Share


@DeepWaterGrower
Follow
🗓️ WEEK 7 (flo)
💧 As is my usual practice during the penultimate week of flowering, I prefer to completely cut out nitrogen from the DWC reservoir. Instead, the focus shifts entirely to phosphorus, potassium, and flowering stimulators. This time, the process is quite straightforward: I'm using Green Sensation, but at a decidedly higher concentration than usual. This approach offers the benefit of working with fewer products overall and helps in reducing the potential accumulation of salts around the root zone.
🌱 Starting this week, I began closely inspecting the buds to gauge their maturity. Currently, about 20% of the pistils have browned. As for the trichomes, my assessment is approximately 15% clear, 80% milky/cloudy and 5% amber.
Likes
86
Share


@Tropicannibis_Todd
Follow
ALRIGHTY THEN
REMINDER I DO 2 UPDATES PER WEEK 👉WEEKLYROUNDUP👈👉MIDWEEKLY UPDATE👈
At this very moment , hint of Grape Crush Soda smells 😛 Which is awsome
We just hit week 8 and all is well , for the most part , had some Cal/Mag issue early week 5 but hopfully with some adjustments ive made I got it under control 😃 .......
Her little sister was also showing Cal/Mag problem but like her big sister I have made adjustments and hope that works 😲 They are so quick 👈 Baby Sister Plant #2 Is 6 weeks 42 days from seed
rain water to be used entire growth👍
Lights being readjusted and chart updated .........👍
I GOT MULTIPLE DIARIES ON THE GO 😱 please check them out 😎
👉IF ANYONE IS LOOKING FOR A PLACE TO HANGOUT VIA GROWDIARIES AND TALK GROWING AND JUST CHILL AND WHATEVER .....👈
👉I CREATED GROWDIARIES DISCORD SERVER !!!!!!!!!!!👈
LINK IS 👉
https://discord.gg/zQmTHkbejs
AND SEE HOW IT PLAYS OUT !!!!!!!
Likes
12
Share


@B4niTa
Follow
Very easy to grow, this is my second Gorilla Zkittlez and both grew without problems
Likes
5
Share


@nastygenetics
Follow
this week was uneventful. buds have been getting bigger. im feeding more and defoliated again a bit.
theres now a sweet smell in the garden
Likes
15
Share


@GrapevineGrower2
Follow
As the Ganja Farmer Seed's TKO is ripening and getting closer to harvest, I'm continuing to lower ppm levels while managing bucket water levels and ph. We're exactly at day 56 of flower (5/5/23) on Cinco de Mayo. The TKO reflects a flowering time of 60-65 days, so no more nutrients at this point. I'll continue to monitor Trichomes through next week (i.e., week 9 of flower). Once I see more amber (approximately 20-25%), I will begin a 2-3 day flush with straight RO water. At that point, she is ready to come down.
The last bucket change end of week 7 strictly following GH's recommended dosage. That bucket change out brought an end to the ph swings she was beginning to experience. After the change out, the balance between water consumption, nutrient uptake, and ph is spot on. Specifically, while plant is up taking water, ph and ppm have maintained stability.
She's looking and smelling incredible. There is a learning curve with DWC - no lie - but I've enjoyed the experience. She is an aggressive grower and challenging for maintenance.
All in all, great genetics. Gratitude and thanks to Ganja Farmer Seeds! Peace.
Likes
10
Share


@Reaper
Follow
day 15: flowers start to appear
day 16-17: temps go 24 celcius, i throw ice bottles in the res
day 25: insane stretch stops flowers fatten up, even crystals around the young budz.
Likes
32
Share


@GreenHouseLab
Follow
This girls is extremely bushy, absolutely lost cause lol I have no doubts in flower she will start stretching. Increased watering at 1.8L every 24hrs.
Processing
Likes
11
Share


@Sctanley007
Follow
9/30/18. She still looks great. No burn and no deficiencies so far. I fed her a liter and a half . The pot is now heavy but not totally soaked. I did not water to runoff but the lower portion of the pot is wet. I don't like soaking the pots because the bottoms take ay too long to totally dry and I have had issues watering schedules.
10/5/18 Still doing perfect with minimal attention. Bumped up the amount of Grow Big last feeding with no ill effect.
Looking ahead and having weeks before the auto is done I didn't know how to face the upcoming issue of vertical space. Shes too big to LST and I did not want to top her because shes doing incredibly well and want to see what she will produce. I rigged up a scrog contained within the bucket. I did a mod years ago to a smoker which gave me the idea in the middle of the night. I might change out the screen itself since it was just what I had on hand but will see how it works.. The openings are 2.5" so it should suit my needs. I have it set at 8 inches above soil but it is fully adjustable up and down by the nuts on the threaded rod.
I plan on keeping the main stem under the screen to induce the plant to keep producing shoots and fill the area. Im pretty excited about trying this and Stay Tuned.


