The Grow Awards 2026 🏆 


Likes
Comments
Share
@Bluedreaming
Follow
Hope I can hold out for a couple of more weeks, should have had a second trellis to support the gorilla girls as I as I wasn't expecting the lower flowers to get so big. Thing are leaning everywhere. I am grateful that its quite dry where I am and don't have to worry about mold too much. I do have a bit of wind burn as you can see in some of the pics but very hardy plants overall.

Processing
Likes
4
Share
@Tastecraft
Follow
Outside in 7 gal fabric pots, they’re stretching out and over 3 feet tall now. Tons of bud sites, probably another couple of weeks before the preflowers start to show sex.
Gone out of town for a few days, so I rigged up a hose timer to flood the kiddie pool once a day and just let the plants soak it up from the bottom.


Likes
5
Share
@SugarK8
Follow
Week 2 had a few challenges. The seedlings were getting little leggy so I got them outdoors in the breeze to strengthen the stem. The wind caused one to snap but it didnt fully break so it is in scotch tape traction right now 🤣. It is still hanging tough after day two fingers crossed. I am preparing the pots for the seedlings to be transplanted into this weekend. I plan to use FishSh!t to easy the stress of transplanting. I am using the leds on overcast days to supplement till they get bigger. Happy growing and any suggestions are welcome just be sweet. 😘 -Kate

Likes
9
Share
@AlienScrOG
Follow
Dutch put want big pot ... some cal mag add ... i use rain water 25ppm ... and go down to 700ppm ... this fruit joy is strong
..in precedent pot all root
developer in the botto of pot .. only 1 liter of root
but blant is strong
Likes
4
Share

Likes
4
Share
@Pechu420
Follow
Ak4 is growing a lot, with lots of vibrant colors, and gaining a lot of weight.
Ak3 is the slowest of them all, the smallest, but it's gaining weight at its own pace and resining well.
12/12 from seedWatering with filtered tap water every 2/3 days, when the pot is lighter
Soil:
peat, coconut powder, perlite, carbonized rice husk, sheep manure and worm humus. essential mineral mix, vegetable flours, vegetable cakes, biochar, bokashi EM1 and other organic inputs, Algae ascophyllum nodosum
small pots 3,7liters // 1gallon
light: lm301h-evo
120watts with other plants

Likes
13
Share
@cookingwithninja
Follow
Week 9 day 1 video pheno.
Gonna chop this week
Week 9 day 7 well chop this weekend so on week 10 Day 1-2. Just waiting on a light to reveg one.
Everything is magic
Likes
2
Share
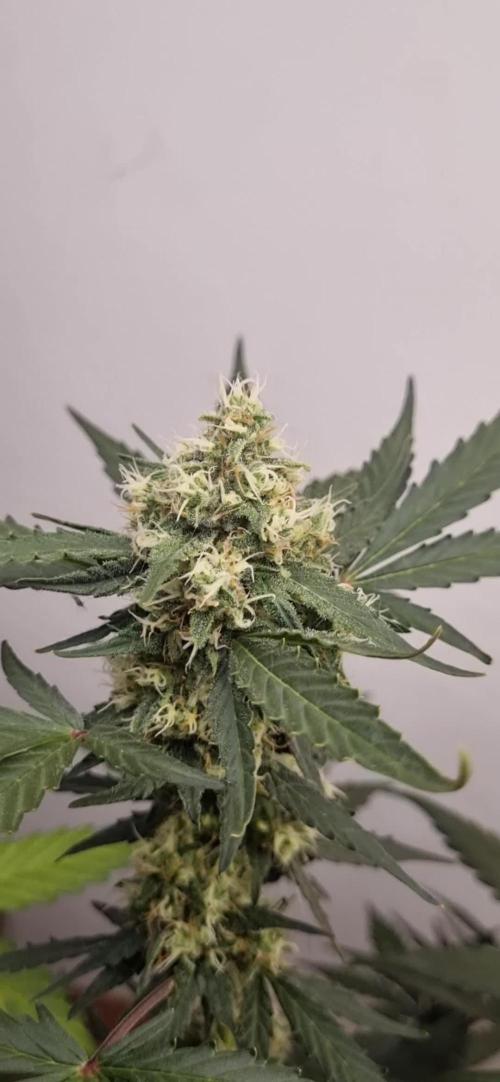
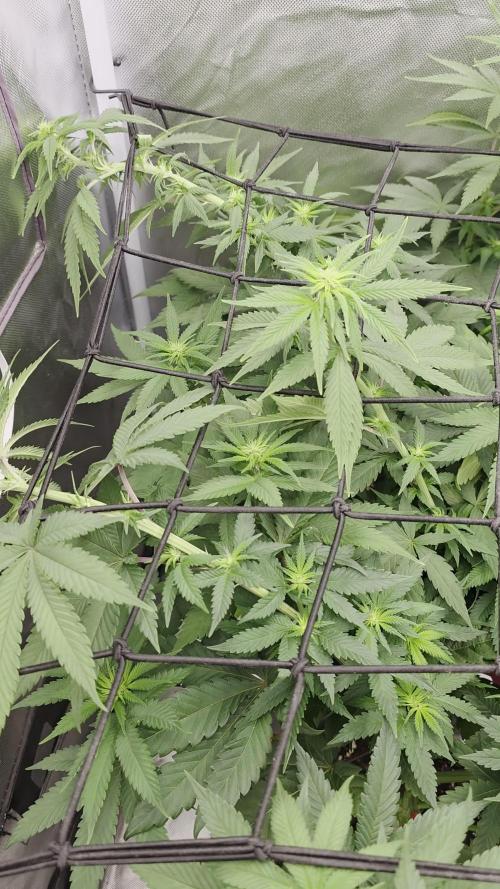
@CheeRz
Follow
It is week three of flowering, and the net has been installed. Both ladies have also been defoliated. I am very happy with how things are going so far. Let's hope for buds as big as lemons!
Likes
34
Share
@PrairieFrostGrow
Follow
**** Week 3 Veg - December 26/20 to Jan 1/21 *****
That is two weeks in solo cups and this will be transplant to 1 gal pots week. The girls are doing fine and not always perked up but I think a new home will help change that. They have been happy and noticed that when they were given a stronger feed at the end of last week they responded very well the next day and looked very healthy. Add that I am starting to see some purpling on the stem and I think they are ready for full on veg cycle to kick in.
Not a lot of excitement her either Growmies😀 just to early with nothing go on other than making sure they are alive each day 😂😂 So for this week we will give the roots a new home, step up the ppm on veg feeding. Add in microbes to help the root development and keep the environment in the same 82 degrees and humidity in the mid 60's.......I am not supplementing with CO2 so keeping everything a little lower with feed, light, and humidity. They are growing veg well with the blue light and are very happy with the current 28" distance. Will maintain and let them grow into the light more until I see negative signs and then start raising the light with them as they grow.
That's what I have to add at the start of the week.......see how the days unfold😀
Little more detail........
Dec 26/20, Day 15 Veg
- Dry out day
- Let the microbes in the media do their thing and start pushing root growth harder than what has been happening.
Dec 27/20, Day 16 Veg
- Gave the girls a little splash of the left over nutes from 1 gal girls two days ago to add a little oxygen and they can take the extra microbes and bacteria right now😀
- 100ml with Microbial Mass and Piranha @ 2ml/L = 650ppm and 5.7pH
Dec 28/20, Day 17 Veg
- 100ml each girl with the full line for this week. No other additives, just the IPP line = 700ppm and 5.7pH
- This was also from the big girls.....I am thinking that they are ready for transplant so will give them a little high feed today.
Dec 29/20, Day 18 Veg
- It is transplant day.......we need to keep this party moving along. She may not have the root mass I am after but I am moving forward.
- Prepared 1 gal pots with Mycorrhiza added to the holes.
- Gave each girl 500ml watering with full strength IPP line for week 1 veg = 700ppm and 5.8pH
- Root mass on these girls was very poor......there were roots.......keep stepping up the microbes with all of the girls!!!!!!
Dec 30/20, Day 19 Veg
- they were just watered heavier yesterday........dry out day today
- think it is a CalMag only feeding tomorrow for all the ETS girls.
Dec 31/20, Day 20 Veg
- feed day today since it has been a couple of days.
- 500ml with CalMag @ 2ml, Gold Storm @ 7ml, Sea Storm @ 5ml, Blackstorm @ 2ml, Vitamin B @ 0.5ml = 525ppm and 5.7pH
- keeping the humic and fluvic acids going in, plus Kelp and CalMag👍
- the girls are happy and seeing forward movement everyday, looking for more aggressive though from the girls.
Jan 1/21, Day 21 Veg
- doing very well......like really well💪
- didn’t push them today and left them alone for watering, pots of course still had some weight and I didn’t expect them to need today.
- Optic Folier Overgrow given today. Folier spray to give them just an extra boost since everything is otherwise dialed in👍
Finishing off the week very strong!!!!!! They have been looking very healthy and perky everyday. The roots are a concern and will be taking it easy on the nutrients for another week yet and keep up the microbes and beneficials. Will get them in line......my hope is too keep their time in the 1 gals down to two weeks max......maybe 10 days??
Looking very nice ETS.......you find yourself just staring at them and realize you just waisted 5 minutes😂😂😂

Likes
9
Share
@Ninjabuds
Follow
I 100% believe this plant only turned out so great was because I added big bud from advanced nutrients this run. I love the stuff I will probably start tring out there other products when I need to replace nutrients as I run out of what I have
What a week. It’s been hotter here than in Miami Florida what’s going on with the world it’s broken. Well it’s ok drying buds when the ac blasting is always perfcet
Likes
12
Share
@DrGHemp
Follow
2/6 - Reservoir EC 1061, PH 6.1 at 5:30pm.
2/7 - Reservoir EC 1061, PH 6.2 at 11:00am. - Today I did an inspection of the girls and Sweet Baby James is a confirmed hermie and the damage has been done! She has opened pollen sac's in a few different spots and released her pollen, some directly onto my fans 😐 Looks like I'm in for a seedy harvest, oh well. Long Shanks is still stretching like crazy! She is now 64" tall (5' 6"). She has at least tripled in size since the flip. She is also now starting to form some nice flowers too.
2/8 - Reservoir EC 1061, PH 6.2 at 9:00am
2/9 - Reservoir EC 1057, PH 6.1 at 10:30am
2/10 - Reservoir EC 1125, PH 6.1 at 11:00am. - Surprisingly no sign of pistils fading/shrivelling. All pistils are still white and sticking straight up. I'm praying that Sweet Baby James is shooting blanks 😉 haha. Will keep a close eye out for signs of pollination. Sweet Baby James is still growing like crazy! She's nearly at 6 feet. Over twice the size of her "sister".
2/11 - Reservoir EC 1085, PH 6.0 at 6:00am
2/12- Reservoir EC 1087, PH 6.1 at 10:30am - Pistils are still showing no signs of pollination. Now I am starting to get my hopes up that Sweet Baby James is an infertile hermie. I really hope I'm right. Long Shanks is still stretching!! She is turning into a tree and quickly running out of space in her new, much larger home. Hopefully she's about done with her insane growth spurt. I would say she has quadrupled in size since the flip, maybe more!
2/13 - Reservoir EC 1104, PH 6.1 at 6:00am

Likes
10
Share
@brunoazazel
Follow
4/11
Día 35 de vida, entramos en la sexta semana
primer trasplante de maceta de 500ml a otra de 7 litros.
las dejare a la sombra un par de dias para que se recuperen con facilidad.


Processing
Likes
14
Share
@DonPato
Follow
Fin de la semana siete y soló veo un proceso hermoso, lleno de gratificación, sin hojas quemadas ni exceso de nutrientes, todo se ha dado en las dosis justas de cada componente, los nutrientes orgánicos funcionan de maravilla. Creó que las palabras están demás después del registro gráfico.
Saludos a todos!
Don Pato.
___________________________________________
End of week seven and alone I see a beautiful process, full of gratification, without burnt leaves or excess nutrients, everything has been given in the right doses of each component, organic nutrients work great. He thought the words are there after the graphic record.
Big Hugs !
Don Pato.

Likes
27
Share
@Chubbs
Follow
What up family. These girls are super close with some being done and will get pulled out to get harvested in the next day or so. I flowers are super dense covered in trichs. The smell is pungent & sweet. Over all a fast strain to grow producing beautiful flowers.
Likes
12
Share
@Kakui
Follow
Nuevo cultivo, volví a plantar Jamaican Dream, está vez solo se hará LST y defoliación, nada de apical(Main Lining).
Se ha aprendido de errores y atrasos del cultivo anterior, esperando no cometerlos en este cultivo.
Para este cultivo de usarán los nutrientes de la línea Grotek(mega pack), además de micorrizas great white.
Las semillas germinaron al tercer día de plantadas en el sustrato, al igual que el cultivo anterior. Esperaré a que crezcan hasta unos 3 nodos para hacer transplante a maceteros definitivos de 18 litros.
Germ2, han estirado suficiente para remover el plástico, se regaron con agua de osmosis con CalMag a 0.6 EC y pH 6.5, se espolvoreó great white en el sustrato. Se instalo un humidificador en el indoor y se bajó a un 70-80% la potencia del LED.
Germ3, se mantienen en 80% de humedad a 23 grados, se humedece el sustrato.
Germ6, están creciendo al ritmo esperado, se humedeció el sustrato, los parámetros están correctos.
Germ8, primer riego con Vitamax Pro y SoloTek Grow de Grotek, 0.8 EC, y un poco de great white en polvo al sustrato. Creciendo bien.

Likes
19
Share
@adam_pawloski87
Follow
Let’s go day 72 from seed!!! Another great week it’s been , 2 Ogreberrys an brucy b been flushing for a week, an the 3 others will continue to get there normal feed of nutrients, they are just not quite ready so they will start getting flushed around next week!! Sweet sweet smell of Grapes And gooey frosty nugs is all I can really say, photos do no justice, some of the craziest fruitiest smelling buds I’ve ever had, Real High quality meds !! Hope you all enjoy an have an amazing productive day as well as a great week!! Peace love an positive vibes to all y’all Cheers 😶🌫️💨💨💨💨💨🤙🏻If there’s any questions, please ask!! 💚🙏🏻💯
