
Likes
Comments
Share


@Creatorknbsland
Follow
Crescendo tudo por aqui!tive que fazer uma super crop para caber aqui!!semana que vem tem mais!

Processing
Likes
7
Share


@Vegetoo420
Follow
Hi!
Here’s my 300W led session for tropicanna banana and dos si dos 33 to compare with my 315CMH box !
They are at day 28 and everything is ok!
I had a little nitrogen deficiency on two plants but It’s ok now !

Likes
15
Share


@MotherNaturesSon
Follow
Plants got a surge of growth over the week, lookin forward to a decent canopy come flower. Switched to 12, keeping MH bulb going until i see flowers. Slowly beginning to wean off the calcium nitrate as well. Also have begun to do some light defoliation and pruning where necessary - best to nip it in the bud as they say - before the energy investment grows. Gotta be careful with your girls though, don’t get clipper happy. Cheers
Late week update: Actually probably keeping calcium nitrate steady since it'll need more for the stretch, after which I'll quickly decrease and change my nute schedule.


Likes
18
Share


@JeyGanesha
Follow
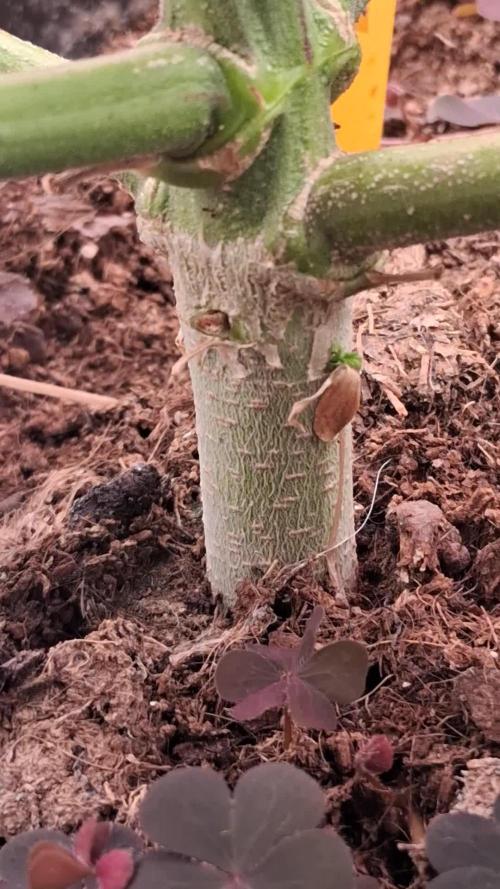
Ok!!! adesso è partita bene...questa strawberry 🍓gorilla 🐵, è nata con un cotiledone che se guardate bene sembra morsicata da non so cosa😂🙈..le prime 2 foglioline sono uscite normali, la 3 foglia è uscita con una malformazione. ...adesso dal 3 nodo in su dovrebbe crescere più che bene💪💪🍓🐵

Likes
89
Share


@Zurban_Poison
Follow
Hi people!
Hard lst continues) we form the horns! which in bloom will take on a reddish tint and the composition will become fantastic!))
overall growth and distribution are going well .. flowering begins!
Likes
60
Share


@SooSan
Follow
12/12 + 61 jours
Vu qu’il y a 16 plantes mais que sur growdiaries on ne peut mettre que 8 variétés j'ai divisé en 2 diaries pour le bas de la tente
1️⃣
🏠 90x60x90
☀️ FC-E 4800 => puissance a 80%
🍁
1x Black Bomb / Philosopher Seed
2x Amnesia Lemon / PEV Seeds
1x Blueberry / PEV Seeds
1x Blueberry / 00 Seeds
1x Wappa / Paradise Seed
1x Dark Phoenix / Green House Seed
1x Quick Sherbet / Exotic Seeds
1x Mango Cream / Exotic Seeds
1x Banana Frosting / Sensi Seed
1x Hindu Kush / Sensi Seed
3x Fast Mix / Sweet Seed
📎 https://growdiaries.com/diaries/122084-grow-journal-by-soosan
📎https://growdiaries.com/diaries/124052-grow-journal-by-soosan
2️⃣
🏠 30x60x50
☀️TS1000 => puissance a 100%
🍁 4x Quick Sherbet - Exotic Seed
📎 https://growdiaries.com/diaries/122080-grow-journal-by-soosan


Likes
59
Share


@dataTwiiix
Follow
10/21: dernière semaine de cro. Enfin je l'espère sur les trois plantes une est restée bloquée une bonne semaine elle a l'air de reprendre du poil de la bête car elle montre des signe de pre-flo. Ce que les deux autres qui sont bien grande n'ont pas encore fait. #36
10/22: cocoa+B augmenté à 3ml sauf pour la plante qui a du mal à suivre gg0. Les deux autres aimes bien leurs petites routines mais il est temp de passer en Flo. Mes chéries ! #37
10/23: j'apperçois de minuscule pistils apparraitre de ci de là. pour gg0 je vais tester le régime sec quelques ou alors elles est malade, j'attend les retours par rapport a ma question ouvetre
La plante gg2 à reçu une bonne soupe bien complète on verra dans les jours à venir la coco est buffered en plus.... #38
10/24: j'ai quand même sortie mon ph metre digital et verifié les RO de chaque plante et le probleme de la 3eme GG c'est un ph trop ellevé, 7.4 les autre flirte autour 6.4/6.6, malgrés tout cela je vais tenter de récuperer la gg qui a un ph trop haut et on dirait bien que les deux autres passent en pré-flo AMEN! #39
10/27: dernière journée de cro. On est bien passé en pré floraison. Mon RO de contrôle à tjrs un ph au dessus de 6.5 , j'ai utilisé des briques ugro de 11L que j'ai mal tamponé j'espère avoir de la chance et un joli harvest. #42

Likes
15
Share

@BlaKX
Follow
Aloah Growmies am Tag 49,
es liegt wahrlich ein einzigartiger Terpene Geruch in der Luft! Sauer Süßer Erdiger Geruch mit Kush Nadelholz note.
Sobald man nur ein Zuckerblatt oder Blüte leicht berührt klebt sofort alles vom Harz.
Sie hat einzigartige schwarze Blätter und mit dem Harz sieht sie mittlerweile wie gezuckert aus ❤️
Hat auch sichtbar an Volumen zugelegt. *update *
Habe die Trichomen gecheckt und seht selbst wie weit sie ist;)


Likes
18
Share


@RadDad
Follow
Ahhrrrrrggggghhhh PH imbalances!
Don't panic. We got this.
After a few theories and a bunch of research what I originally thought was light stress then a Cal Mag deficiency. Then I saw leaf damage and thought of Thrips. Wrong wrong and wronger.
Turns out the soil PH is all out if wack. By which I mean waaaaaay too high. Like almost 8. That's what I get for not thinking PH was nOT tHaT BiG a dEaL. Now equipped with my PH and TDS meters and a little PH up and PH Down from Standard Hydroponics we can get thing back into balance.
Lots of leaf growth this week. Looks like flowering is right around the corner. This will probably be the last week I'll feed her Grow Girls Grow from DSN and switch to Bloom Baby Bloom next week.
I've also done some defoliation this week to get light to some of the bud sites. Again I had no idea LST was this powerful, she's gonna have such pretty flowers
Looking forward to Bloom 🌹🚀🌻😎

Likes
6
Share


@Genussmittel420
Follow
day 1 - flower week 6 has now started and i want to H²O stress her in the next 2-3 weeks in hope to get her metabolism to work faster. it works by fakeing that the plant has a dry year and might not have enought water to stay alive till she can reproduce. so she starts to work faster and goes turbo (bro science explainaition). thats what i want to try here so dont expect it to work out perfectly. i watered her every day before this week and i will reduce by about 40%. i will still spray the soil every day a little bit when the light turns on but only every other day she will get her usual water dosage (about 600-700ml)
Likes
6
Share


@HowtoBubatz
Follow
The Lemon Haze Auto is continuing to grow healthy and strong!💚
I don't see any major issues so far, everything looks very good.
The only thing I’ve noticed is that the main stem is developing a lot faster compared to the side branches. 🌱

Processing
Likes
5
Share


@PETEROG
Follow
Can anyone help my lower leaves are turning yellow and drying up


Likes
1
Share


@Cultiv8or
Follow
Lower leaves started turning light green / yellow .
I flushed with 4-5l of water, the runoff was dark LOL maybe nutrient lockout started. Good thing I caught on early
Day 5 since the flush, the soil is soaked, but there’s no new yellow foliage!

Likes
8
Share


@MrAutogrow
Follow
Got an ounce from her. Not too much as far as yield but the dense bud structure and purple hues made it all worth while. Pressing it for rosin and it is perfect.

Likes
Comments
Share


@LokalGrenz
Follow
The bottom watering worked for the week I think as away happy with results think I might just bottom water regularly and feed the tea from top every other changing
2/8
I did a good clean up and some pining Monday 2/10 I will filp to flower I also added power bloom today 2/8


Likes
2
Share

@PapaTerps
Follow
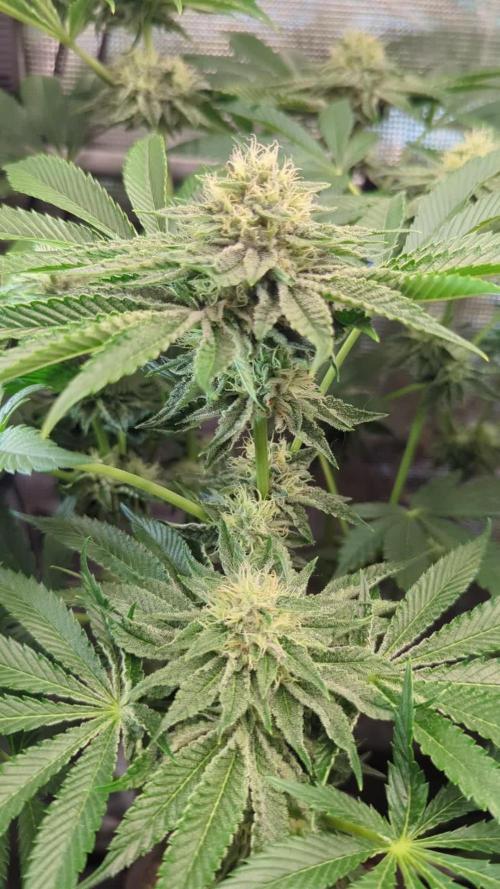
Wizard Fuel - Wizard Trees
Day 77 - Watered with 3L of RO tap water with nutrients mixed individually, in order and then pH'd to 6.3 💪🏻 Great week, she is bulking like crazy and requires feeding every second day, her buds are getting so big🤘🏻 I removed a couple of the lower hanging fan leaves and that's pretty much it, she has been a super easy grow so far!!
