Likes
38
Share


@MrLahey
Follow
Been busy so I’ve been slow to update. Thinking 3 weeks until I can chop. Gonna be a much smaller harvest than I’d like (thinking/hoping for at least 2-3 ounces) but from what I’ve seen just getting to your harvest on your first grow can be considered a success. Just gotta keep them alive for 3 weeks then I can focus on the scary task of drying.
I would imagine small yield is due to beginner lighting equipment, shorter veg time (coulda gone like 3 more weeks to really pump up the roots which I’d imagine would equal bigger buds), mistakes I’ve made and uncorrected nutrient deficiency. Really hoping that they put on some more size in the final week when they ripen.
I dialed back the nutrients by half for their last feeding. I think I mistook the normal senescence for nutrient burn and I got worried. EC last night when I made my nutrient mix was 1250 I think.
Regardless the quality is there, just not yield. Reallly looking forward to when these are fully dried and cured to test them out. Lots of trichomes starting and the smell is great!

Likes
34
Share


@BelSun_420
Follow
I would like to express my gratitude to Plagron and Zamnesia for organizing this incredible contest, providing the community with the opportunity to participate, showcase their skills, and learn from one another for free.
Initiatives like this strengthen the spirit of the community and highlight the talent of so many unknow dedicated growers.
I am BelSun, a 34-year-old guy who started planting in 2018, mainly focusing on autoflowers,indoor setups and organic grow .
Hope you enjoy my Journey on Eternity Grow Cup 2025 🏆💚
The main setup and a simple recipe on this journey as a thank you to Plagron and Zamnesia 👨🏻🌾
Runtz Automatic Zamnesia (3 seeds)
Fabric Pot 3x15L
RoyalRoom Classic C100
Electric Sky 180w v2
Plagron - Seeding & Cutting Soil
Plagron - BatMix Soil
Plagron - Perlite
Plagron - MegaWorm
Lurpe - Earth Vibes Super Soil
Lurpe - Volcanic Ash
Cultivers - Basalt Powder
THC - Epson Salt
THC - Delomite
Vithal - Bokashi
Mycoterra - Alfalfa Meal
Canna-BioRHIZOTONIC
Agrobactérias - Bactomatik Rex
Plagron - Alga Bloom
Plagron - GreenSensation
*Plagron Schedule 100% Natural
*Topdress amendments along the way if needed.
*Light Schedule: 20h
*Watering System: Manualy
*Paper Towel MethodI
I'm going to start in the middle of January, for now I still have some plants finishing flowering in the tent.
Good luck for all!
💚
-------------------------------------------------------------------
#10/01/2025
I’ve prepared my Super Soil mix, and it’s now cooking until I start germination, which will be in about 3 weeks.
-------------------------------------------------------------------
#03/02/2025
For germination, I leave the seeds in a bottle of water for 12 hours, then transfer them to a paper towel until they sprout a root. This method has worked well for me!
-------------------------------------------------------------------
04/02/2025
I’ve transferred the seeds to the paper towel method!
Now it's time to Pot preparation!
For my pots, I use a three-layer method, filling each layer while shaping them with different-sized pots:
- First layer: Super Soil
- Second layer: Regular fertilized soil (BatMix by Plagron in this case)
- Third layer: A light soil with mycorrhizae (Seeding Soil by Plagron)
-------------------------------------------------------------------
#05/02/2025
I’ve planted the seeds!
I'm using a cheap LED light from Amazon just to kickstart germination and gain a few extra days to finish flowering the plants in my tent. As soon as they sprout, I'll transfer them to the tent, where my old but fantastic Electric Sky 180W is waiting for them!
-------------------------------------------------------------------
#08/02/2025
Two of them have already germinated, but one still hasn’t. I’m struggling with low temperatures, as it's been only 12°C during the day and between 3°C and 7°C at night.
Unfortunately, I had a bit of bad luck—my lamp fell onto the pot, disturbing the soil and seeds of two plants. One of them is the one that hasn’t germinated yet.
Just in case, I’ve put two more seeds in the paper towel method as backups. If I don’t need them, I’ll give them to a friend!
🙂
-------------------------------------------------------------------
#10/02/2025
I placed them in the tent on the 10th. Two of them germinated on the 8th, while the other was affected by the lamp falling.
I’ll probably replace it with one of my backup seeds and offer #R03 to a friend, but it all depends on how things go in the next few days.
-------------------------------------------------------------------
#12/02/25
I replaced the seed that went into shock with one of my backups. So, from now on, #R03 will be the backup seed, and it will be about a week behind the others.
---------------------------------------------------------------------
#13/02/2025
The backup seed has sprouted! 🌱
---------------------------------------------------------------------

Likes
7
Share


@420keef
Follow
Just cut up the lemon shining silver haze yesterday, first pics are from after i cut the wonder pie (from another diary) and i put one of my plants from outside there instead. Going to post more updates when i can actually smoke it!


Likes
9
Share


@ManikShamanik
Follow
Went to harvest them in the midst of night with a friend. Not as much mold as I was expecting considering how dense the vegetation was surrounding the spot. Lost less that 5% to mold which is good.

Processing
Likes
9
Share


@STAYINGONMYMAINCBATORUNTWO
Follow
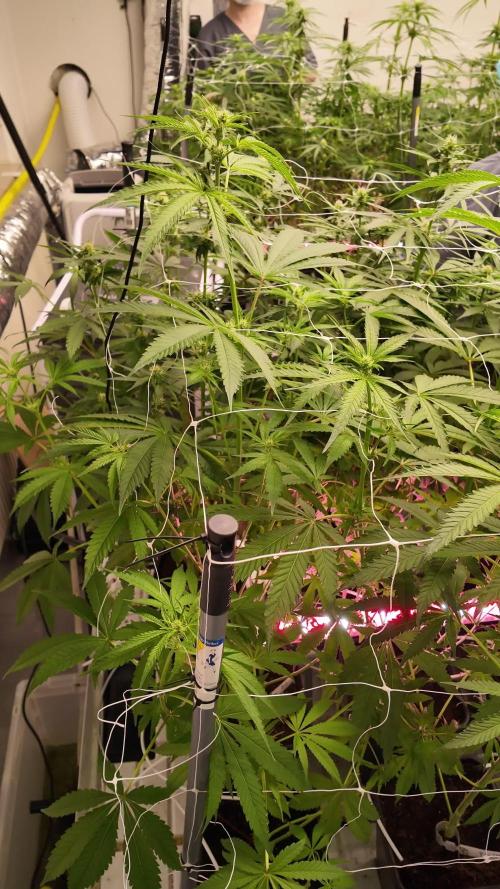
All ready for the switch! Will transition on Friday to 12-12 Both these babies have grown so much and had to train the whole tent to acquire every space! Now I think I’ll have a lovely sea of green during transition! Luckily I’m prepared!
Processing
Likes
20
Share


One of the dark devils is extremely stunted.... it's almost comical how small it is.... but she went through a lot .......it's a wonder she still alive .....some other people might have just thrown her away and started with some other seeds...... but it's kind of an experiment .....to see the extreme they're able to go through

Likes
8
Share

@greenkeepers
Follow
Week 4 – Flowering (Day 22–28) 🌸🌱
At the end of Week 3 (Day 21) we carried out a deeper round of defoliation and some lollipopping. By now the stretch is coming to an end, with the plants settling close to their final height.
We’ve also stopped foliar feeding, since every single plant is now covered in developing buds. To keep everything protected, we refreshed the beneficial insects, better be safe than sorry, how we say in German, sicher ist sicher.
Already in this early stage of flowering, we can clearly spot differences in structure, bud formation and even the first aromas. Some phenos are showing exceptional promise — those will be the ones we’ll highlight more in the coming updates.
🔎 Pheno notes so far:
ZR 43 – very nice structure, already showing early bud size.
ZR 68 – robust side branching, healthy development.
ZR 70 – compact flowers, stacking well.
ZR 82 – tall, vigorous growth, strong flower initiation.
ZR 30 - Fasciation, looks very interesting, I'm quite interested on how it ends up looking, having mutations like these in the grow room are not necessarily what one is looking for commercially speaking but for me is quite special, like a Zoap Rosé special edition! 😝
Zoap Rose phenos bring floral aromas with acrid undertones, giving them a distinctive edge already at this stage.


Likes
4
Share


@GERGrowDesigns
Follow
Welcome to Flower Week 1of Sweet Seeds Sweet Mandarine Skittlez F1
I'm excited to share my grow journey with you from my
Sweet Seeds Project . It's going to be an incredible ride, full of learning, growing, and connecting with fellow growers from all around the world!
For this Project , I’ve chosen the Feminized Photo strain Sweet Mandarine Skittlez F1 :
Here’s what I’m working with:
• 🌱 Tent: 120x60x80
• 🧑🌾 Breeder Company: Sweet Seeds
• 💧 Humidity Range: 50
• ⏳ Flowering Time: 7weeks
• Strain Info: 19-24%THC
• 🌡️ Temperature: 26
• 🍵 Pot Size: 16
• Nutrient Brand: Narcos
• ⚡ Lights : 600W x 2
A huge thank you to Sweet Seeds for allowing me to try my Best with this amazing collection from Photo Strains they managed to Sponsore . Big thanks for supporting the grower community worldwide! Your genetics and passion speak for themselves!
I would truly appreciate every bit of feedback, help, questions, or discussions – and of course, your likes and interactions mean the world to me as I try to stand out in this exciting competition!
Let’s grow together – and don’t forget to stop by again to see the latest updates!
Happy growing!
Stay lifted and stay curious!
Peace & Buds!


Likes
10
Share


@Andres
Follow
I was traveling ... to give information ... the temperature has dropped ... I think she will be even slower outdoor ...


Likes
10
Share


@SkunkyDog420
Follow
Hallo zusammen 🤙.
Sie wächst sehr schön und macht keine Probleme
Rabattcode für den BIOTABS-Webshop https://biotabs.nl/en/shop/ GDBT420, damit erhalten Sie 15 Prozent
Likes
8
Share


@Kindbudz
Follow
Forgot to water these ladies for a couple of days but after a heavy watering and a good feeding they perked right back up. I have 2 flower tents running with sunset sherbet right now. Regardless of wether I think they are ready or not I will be switching them to flower in 3 more weeks. Can’t wait to see how these ladies flower!

Likes
11
Share


@frenchincaliweed
Follow
I can't remember exactly when I started this seed but I believe we're around week 7/8 of veg. I didn't really take good care of this plant until now (as well as the Red Dragon in another diary). But today is transplanting day and from now on I will dedicate more time and care to those two little ones.
The thing is that the greenhouse is busy right now with plants flowering and a blackout cover 12h a day, so I have to take this NLX and the Red Dragon out of the greenhouse every night so that they get more than 12h per day.
In about a month they will have the greenhouse for themselves.
Anyways, for now: transplanting! I posted a video and more details on my medium mix on my Red Dragon diary.
I will post pictures here when the plant has been transplanted from a 2 gallon plastic pot to a 15 gallon cloth pot.
Cheers!


Likes
8
Share


@Bread_n_Buds
Follow
Our Gush Mintz Automatic from Zamnesia has given us great satisfaction, this one is a nice big plant that will give us about 80-100 gr.
** We remind all users that we grow two plants per strain, one worked with specific techniques and the other left to grow freely and beautifully or worked with uncut techniques to preserve speed. In this case the first was worked with LST but after a mistake with the main lining that had led to the breakage of a brunch and this one with a single topping.
Description // This plant was worked with a single topping but leaving under the topping two "levels" or rather two internodes of branches that gave us a nice bushy plant. The flowers have joined in beautiful long Tower Buds and not so tapered, the plant is quite full and the flowering is sufficiently dense.
Trichomes and maturation // We did a thorough microscopic analysis 10x (and 10x x 1.6) and noticed a good percentage of milky/lumpy trichomes; The percentage of amber trichomes was not so much but good for me with still a bit transparent too. That's fine for us as we're not crazy about THC oxidation and hyper indica effects around here.
No a Evaporation, strong trichomes thanks to a great VPD management you can reach good results even in hot period. Ideal condition remain Bible but...you can.
Fertilizers and soil // We used the Plagron organic fertilizer range, all the recommended additives and Pro Mix soil, both unfertilized and organic. Calculate the dosage according to your needs on the website
------ https://plagron.com/
The nutrients are available in convenient packs on the Zamnesia website
--------- https://www.zamnesia.io/en/11457-plagron-easy-pack-natural.html
Try this strain, it is one of the best in recent years, with a very high THC level ---- https://www.zamnesia.io/en/11234-zamnesia-gush-mintz-automatic-semi.html
Zamnesia Brief Description // Gush Mintz Auto is a relaxing hybrid strain derived from the original Gush Mintz and a high-performance ruderalis specimen. This cross has produced a plant with 70% indica and 30% sativa genetics. Her parents have given her some interesting characteristics, including mint and candy aromas and a high THC content of 20%. Smoking these buds provides creative vibes, a feeling of euphoria and a pleasant high that lasts from head to toe. In addition to its enticing flavors and powerful effects, Gush Mintz Auto produces large yields of compact buds in just 9-10 weeks from germination.
Gush Mintz Auto is extremely easy to grow, with plants reaching an average height of 70cm indoors and 120cm outdoors, making her ideal for discreet grows or limited space, both indoors and outdoors. This strain is suitable for LST (Low Stress Training) and performs best when grown in the ScrOG technique (a technique that optimizes light exposure to maximize yields).
Intense aromas and deeply relaxing effects
As Gush Mintz Auto grows, her aroma intensifies, releasing sweet and minty notes. This refreshing flavor profile is perfect for smoking, offering an inviting combination of minty freshness and sweetness. The effects are deeply relaxing, enveloping the body in a pleasant sensation of well-being without being overly sedative. Gush Mintz Auto is perfect for those seeking creative inspiration, making writing, painting or music sessions smoother and more inspiring.
The whole world of growing and much more is at Zamnesia, just visit the website to find "the best that nature has to offer" in various shapes and colours.
-- // www.zamnesia.com
Likes
38
Share


@Oyziphar
Follow
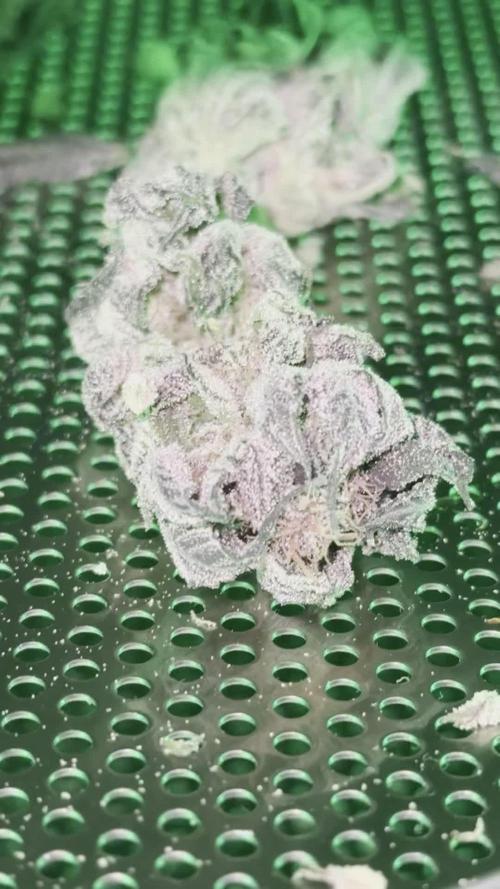
DAY63 WEEK9 = Impatiently waiting till harvest time 😘 Beautiful to enjoy the plants ripening and finishing 😍😍😍
Congrats to BIOTABS, because their tablest are really superb 🙏 I'm super satisfied 😁😁😁
Wedding Gelato, Triple G, and Cookies Gelato are completely ripe.👍😃 All their buds are rockhard 💪😖
👉 Cookies Gelato have become completely purple with beautiful piled buds and orange pistils, and looks delicious. Smells of berries and 😵
👉 Wedding Gelato has round buds (easy to trim) with mixed colors : gold, brass, brown, yellow, red and green colors with orange pistils 😊 Fine and accessible smell, pleasant and no overbearing 😄 🙏
👉 Triple G will be the hardest to trim, because of her quirky shaped buds. She has big internodes and big buds scattered across her tall sturdy stalks. Beautiful buds, a pleasure for the eyes. Her smell is pungent, sometimes narcotic even. She will get you stoned in no time 😋
👉 Liberty Haze could have another week. But she lacks some nitrogen; watch her leaves turn yellow, and make her taste sooo soft 👻 She hasn't any purple or red colors, only green and yellow. Her buds are leafy, not that firm, but volumineus. She's soo sweet, with hints of lime. 😘
I defoliated the plants in week 3 because I had to treat the plants against spider mites. Because of this, the plants had fewer leaves, the light could penetrate much deeper and now the lower buds are ripen as well 🙏. I will continue to apply this technique in the future. 👍👍👍
These will be the last pictures before harvesting 😍