
Likes
Comments
Share


@TheBudWhisperer
Follow
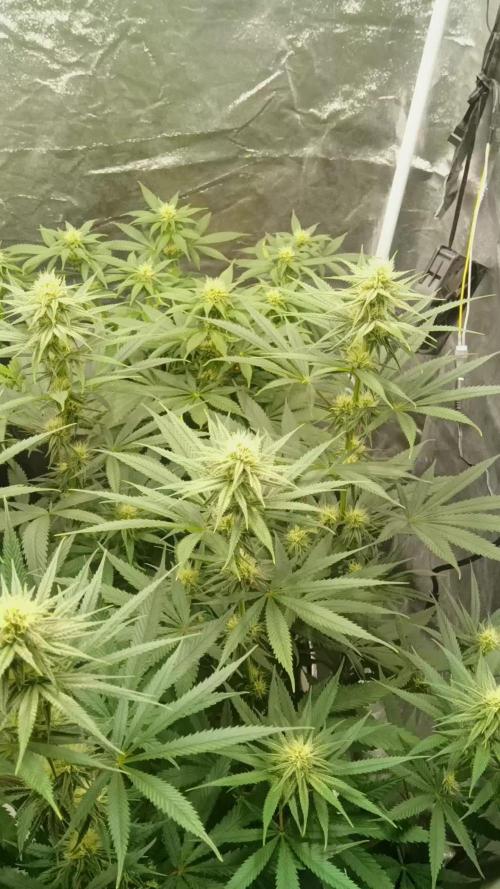
Week 8 of flower is in the books and this show is quickly coming to an end. I said last week we had about 7-10 days and I was spot on at the 10 day mark. I was only wrong about the order. The cheese is ready to chop before the rest and the gorilla cookies, cherry Bomb and lemon haze will follow in due course. The cheese is a beast and it’ll take a little time to get it all run through the bowl trimmer. At least the big one goes first. Her tallest colas have foxtailed like mar, despite the late supercrop. You can tell where the sweet spot for the light is at about 10” distance from the canopy. Any closer than that and the tails begin to show prominently. It’s a good example of just how close you can get to these fixtures with a little bit of prior experience. It’s been noted for the next run😎👍😎. The res. is on an h2o2 only flush for the remainder until the rest are ready to come down. Not a moment too soon either - the pollen chucking project has stalled out waiting for these girls to finish and now that we’ll have a little extra room, we can start running our cuts in the aerocloner🤟. Not long at all now folks. Thanks for tagging along through all this. Learned a bunch about this system and we’re back to hardware mode to make some serious improvements for the next run🤙😎. I love hardware mode😉.
Background/Repetitive Nonsense
The strain line up on this grow is look’n quite saucy 😈. We’ve got 2 FB strains this time around - Gorilla Cookies (seems we always have some GSC cross in the works). Mainly because the colours look stellar and remind me of a sugar breathe we did last year that was 🔥. The other FB is their original Cheese strain... because we already smoked all our cheese... and we really like our cheese...😉. Emerald triangle was kind enough to include a freebie of Lemon Haze. Wasn’t really big on the list but we haven’t done a haze strain to write home about yet so worth a go👍. The last is a Cherry auto from Bomb seeds that we’ve been trying to get to for months. Let’s just hope that she’s not a dud like the last bean.
The new digs for this run are courtesy MarsHydro👊. Their 2x4 single grow tent, paired with a shiny new 240w QB courtesy ViparSpectra.
These folks were kind enough to discuss a collaboration and as a result, here we are to test out the gear with an inaugural run of autos. Each week, we’ll try to expand on some of the benefits of each, as well as any limiting factors or considerations that need attention when pondering purchase.
Already I can say that both are high quality products in terms of overall craftsmanship.
MarsHydro 2x4 Grow Tent:
Excellent construction in terms of durability. Reinforced stitching on the zippers and corners ensures zero tearing. Conveniently placed screen vents and intake/exhaust ports. The ceiling exhaust port only exists on the right side. Perfect for me but not great if you’re running exhaust from the top on the left side (left side wall port makes up for this however). The aluminum frame is rigid enough to support the weight of the lights and accessories. Once you have some weight in the tent, she’s go’n nowhere and you can assemble and break it down in record time if moving or stashing the grow op.
Only limiting factors I’ve noticed is that temp. Control will be an issue for a tent. It just doesn’t have the same insulating ability as a wood cabinet or other permanent enclosed space. No worries, this is offset by a small desktop heater and keeps the environment exactly where desired. The other issue was a production problem - the ceiling vent was accidentally stitched into the corner seams on the assembly line. Again, no real issue - just pulled it out with no damage or fraying to the tent or port👍.
Website link here:
https://www.mars-hydro.com/grow-tent/buy-mars-hydro-grow-tent-24x48x70-2-x-4-cabinet-closet-grow-box-upgraded-diamond-1680d-mylar-for-sale
ViparSpectra 240w Quantum Board:
This thing is sleek and slick in terms of design. Closest comparable to it that I’ve seen would be spiderfarmers line of qbs. They feature the same top-o-the-line components and roughly similar spectrums. Where VS takes the advantage is in the convenience of the dimmer nob which is easily accessible and works great at 50% with no strobing👍. The heat sink is also larger which contributes to lower temps. That’s not a good thing in my case but beneficial for most folks.
I can already say that this will be a great fixture through all stages of growth. Where I know this light will excel will be in the veg. Stage for sure. Dimming function gives seedlings a much better chance of success with the ability to use lower lighting levels early on and the coverage area on a 240w is great. The average grower will find this panel suitable and fitting to their needs in a 2x4 grow space although I’d suggest 2 units if going any larger than that. The total output in this space equates to about 30w/sq.ft. Which is a decent amount of coverage based on power vs. Growprint. Ideal for veg. Certainly but, in flower - I tend to run closer to 50-60w/sq.ft to achieve higher yields. Again, similar fixtures have performed admirably in the past and while this wouldn’t be considered an “entry-level” fixture, I’d recommend that any grower new to the game not skimp on lighting and start with one of these. The price points are a great value for quality LED tech. These days, so there’s little reason to even consider a lesser fixture👍.
I have no detail on limiting factors for this light as yet but have heard that stock branded fixtures don’t necessarily incorporate enough red diodes. I’ve seen no issue myself but confess - I’m no lighting guru.
Website link:
https://www.viparspectra.com/collections/xs-series/products/xs-series-xs2000
***8% discount when using code: “ItBudWhisper”***
Happy to have you along for the ride if you made it this far through my opening rant!!😎🤟😎🤟😎


Likes
26
Share


@Earthy_Greens
Follow
🌸✨ Hey friends! Week 12 is here, and everything’s going great! 🎉🌿 Our plants are absolutely thriving 💎🍀 and are almost ready to bloom! 🌸🔥
I’m on a mission 🚀💪 to prove that the perfect growing environment for cannabis is simply well-prepared soil 🌱🌍 and top-notch nutrients like Advanced Nutrients 💧. No shortcuts, just pure organic magic!
Keep an eye 👀 on our blogs 📔 because we’re about to drop some mind-blowing updates! 🤯🔥 Once we finish drying and testing, we’ll be taking a THC test 🌿 to confirm that all our years of experience and dedication have paid off! 🌟💪
If you’re in New York 🗽 and know a great place to get a THC test done, please let me know! 🙏💚 Thanks a bunch for all the support—big things are coming! 👊✨🚀

Likes
7
Share


@Ambz_1990
Follow
Just approaches week 7, I don't know when to initiate the dragon force, kill feed and then flush, iv gotta buy a camera lens this week to check trichomes but I'm nearing the end


Likes
57
Share


@DogDoctorOfficial
Follow
behold the epic conclusion of my Medusa F1 odyssey! Week 11 brings us face to face with an absolute masterpiece – our mighty Medusa in all her glory. She has blossomed into a cannabis goddess, and I can't help but feel a mix of pride and hilarity.
So, picture this: with scissors in hand and a grin on my face, I bravely took the plunge and performed the cosmic haircut of the century. I snipped the entire girl, leaving her looking like a botanical version of a cool, upside-down pineapple cake! It was a sight to behold, and I couldn't help but laugh at the quirky transformation.
With our Medusa delicately suspended upside down, she's now getting ready for her final act of drying. It's like she's doing an acrobatic performance, waving her buds at us from above. Who knew cannabis cultivation could be so entertaining!
In all seriousness, though, our Medusa's buds are absolutely mesmerizing. They've reached their peak density and glisten with an abundance of trichomes. The colors are a true botanical wonder, like a vibrant firework display against a night sky.
Speaking of trichomes, I continue my daily trichome investigation with the precision of a detective. Each day, I observe those tiny resinous diamonds, searching for the magical moment when they're just right – cloudy with a hint of amber.
And the aroma, oh the aroma! Terpenes fill the air with an intoxicating fragrance that makes my nose dance with joy. If only we could bottle this cosmic perfume!
Before I conclude, I must extend my heartfelt gratitude once again to Royal Queen Seeds. Their Medusa F1 genetics have granted us this cannabis goddess, and I can't thank them enough for this delightful journey.
As we prepare for the final chapter, drying and curing our Medusa to perfection, I invite you all to join me in celebrating the whimsy and wonder of cannabis cultivation. Let's cherish this upside-down adventure, savor the captivating colors, and delight in the celestial magic of our Medusa F1.
As always thank you all for stopping by and for supporting me on this journey, i am super passion about growing and fell blessed to have you all with me on this new journey <3 <3 <3
Genetics - RQS MEDUSA F1
Ligth - LUMATEK ZEUS 465 COMPACT PRO
Food - APTUS HOLLAND
All info and full product details can be find in can find @
https://www.royalqueenseeds.com
https://aptus-holland.com/
https://autopot.co.uk/
https://lumatek-lighting.com/
With true love comes happiness <3<3<3 Always believe in your self and always do things expecting nothing and with an open heart , be a giver and the universe will give back to you in ways you could not even imagine so <3<3<3
<3 <3 <3 Growers love to you all <3 <3 <3
Medusa F1
Medusa is a true F1 hybrid created from pure, inbred cannabis lines. She boasts uniform grow traits, mouthwatering aromas and flavours, and plenty of potency. If you're looking to bring stable, elongated plants into your room, tent, or garden, look no further. Mouthwatering Aromas, High Potency, and Mid-Size Plants
Though she won't turn you to stone like the mythical goddess after which she's named, Medusa F1 is bound to get you plenty stoned in her own special way. Combining genetics from inbred lines deriving from Sugar Magnolia, a thick and sweet indica, and American Beauty, a fast, fruity hybrid loved for its well-balanced, positive high, the result is an autoflowering F1 variety that produces fresh flavours, a unique cannabinoid profile, and large yields.
A very aromatic cultivar with a vibrant concentration of terpenes bearing notes of fresh mint alongside an upfront peppery kick, backed up by hints of fresh fruit, berries, and tangy fuel. Her thick, frosty flowers consistently produce high levels of THC and CBG, as well as high concentrations of myrcene, ocimene, farnesene, and caryophyllene. As a result, Medusa F1 has strong effects that relax and stone the body from head to toe (brought on by particularly high concentrations of myrcene and farnesene) while motivating the mind with an uplifting, creative, and motivating kick (thanks to high concentrations of ocimene).
Medusa F1 seeds produce elongated autoflowering plants with long, strong branches and well-spaced internodes. Plants regularly grow up to 80–85cm tall and boast a fast flowering time of just 42–45 days (72 days from germination to harvest). Thanks to her genetics, Medusa F1 produces plenty of thick flowers with big, swollen calyxes that make for very easy trimming. Medusa F1 is very stable, handling stress and unfavourable growing conditions with ease, though she is somewhat susceptible to Botrytis, so make sure to keep tabs on the humidity in your grow room/garden
Likes
53
Share


@BudBoutique
Follow
! this is my current status, gonna upload my last veg weeks within the next week - got a bit busy around Spannabis - thank you for your understanding! 💚
Welcome to Bud Boutique Grow Diary - really appreciate all your love and support :)
Dont forget to check out my other current grows!
🗓️ This Week:
- Day 24: attaching once a week APTUS Foliar with Regulator & Nutrispray with the amazing CannaFogger by Petra Grow
- Day 28: bud development is super beautiful on each pheno #1 and #2
Thank you for still staying with me 💚
___________________________________________
--- 🌱 Strain (Sponsor) ---
🏷️ P.C.R. by Art Genetix
https://www.artgenetix.world/product-page/p-c-r
--- 🥗 Nutrients and Feeding (sponsored by APTUS: APTUS Ambassador) ---
🍸 APTUS: full nutrient schedule extreme
-- Regulator, N-Boost, P-Boost, CaMg-Boost, K-Boost, Allin1 Liquid, Startbooster, Topbooster, Enzym+ every feeding
-- Fulvic-Blast, NutriSpray as Foliar each once a week
🔗 https://aptus-holland.com/
--- ♻️ Grow Control (Sponsor) ---
TROLMASTER: TENT-X + LM14 Light Adapter to dim/sunrise/sunset lights + Temp & rH Sensor all remote on App
🔗 https://www.trolmaster.eu/
--- 🚿 PetraGrow (Sponsor) ---
CannaFogger Foliar Spray
🔗 https://www.petratools.com/product/petragrow-cannafogger-atomizer-new-mini-fogger
--- 🏭 Grow Setup ---
💡LUMATEK Zeus Pro 600
* 🏠🌿 Indoor: Homebox 120x120x200cm (4x4)
* 📐🌀 PrimaKlima exhausting Fan 1180m3/h (running on 60-80%)
* 🌀 Can Light Filter 800m3/h & 1x Fanbox 1x Dyson fan for Air circulation
🔗 https://lumatek-lighting.com/zeus-600w-pro-29/
🔗 https://primaklima.com/de/shop/ventilatoren-de/ec-ventilatoren/pk160ec-tc/
🔗 https://canfilters.com/products/filters/
All Likes and comments are highly appreciated!!!
👨🌾 don't forget to check out my Instagram for daily educational content: budboutiquee
- Bud Boutique


Likes
12
Share


@ciansta
Follow
Germinated for 24 hours in a glass of water, 48 hours in a paper towel and then I planted them into biodegradable seedling pots. Northern Lights looking a bit ahead of the Dosidos seeds but that was expected I’ve grown Northern Lights before and they sprout real quick. One of the Dosidos’ first true leaves is looking a bit wonky but we’ll see how it goes I suppose.
Likes
9
Share


Likes
13
Share

@masterofsmeagol
Follow
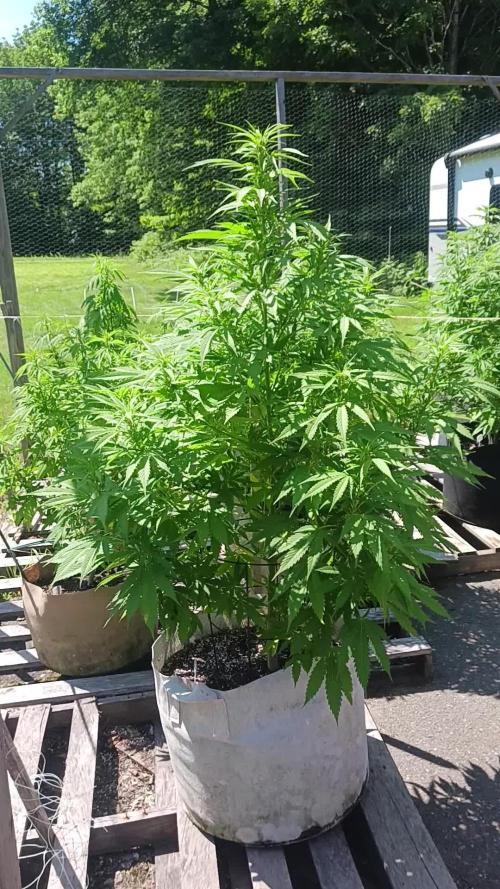
7/20 Went over this morning to plants soaking wet and heavy rain. Went back around 4pm and plants actually look really good. The rain has stopped for a bit and the girls looked great. Apart from some septoria leaves I needed to defoliate on the first plant I treated. I also noticed a few others on other plants so it's spreading albeit slowly. I treated the three in the middle with their second dose of Plant Doctor at 3tsp/1gal. One gallon administered to each plant via root drench. I think I may treat the other plant showing signs with a diy Dr. Zymes using citric acid as the active ingredient. That way I Gould start treatment right away without having to rely fully on plant doctor. Plus it would kill any pests. Ive seen damage but the birds do a number on them. I dont want to spray my plants with a bunch of chemicals if I don't have too. I shouldve replaced the pallets and cleaned the cage better. I think I did a good job sanitizing as I have no wpm. Just this septoria I probably got when the lady mowing the lawn cut all tjis fucking grass and blew it in my pen, throwing bird seed and I'm sure tons of disease into my grow bags. I literally had to harvest a bunch if fucking sunflowers. It looked like my plants had been mulched. Just with small disease carrying shrubs. At some point some of this stuff has to be on purpose. You CAN'T be that stupid. A couple kushes in the back look hungry. I think I may need to up my feed. I've written to much. I'll keep this updated. Thanks if you made it this far.
7/21 I guess it rained last night. Oh well. It was blue skies for hours before dark. It must've rained late/early morning. I'm sure the app of plant doctor will be fine. Like I said I'm considering using citric acid as a foliar spray to help with the septoria and clean up any pests. I don't have enough pests to warrant spraying. I just don't want to put all my eggs in the plant doctor basket. Today is overcast and windy. The wind has really assisted in spreading this virus. I remove anything I see infected immediately and since these plants are reveges they have plenty of leaves. Plants are really stretching. I know I talk about the septoria a lot but realistically if someone looked through my garden they'd have a hard time spotting it. I don't want to exaggerate the problem but I don't like dealing with ANY fungus or molds.
7/22 It was 55° this morning when I went over. I defoliated some septoria leaves and a few that were fading or damaged. I saw almost a whole leaf eaten so it's probably a good idea to move forward with citric acid. I can add that to the plants I've already treated with plant doctor. This is the first year it's been so noticeable. It's the reveg 10th planet that started this off. Oh well. I've dealt with MUCH worse. Plants LOOK good (other than septoria leaves (on bottom of plant). Today is water day for me but it's been raining and it's a lot cooler today. Bags still had weight to them. I want them to have a proper wet dry cycle. Temps top out at 75° so I'll monitor during the day and if something NEEDS WATER I'll give it to it. I'm suprised I have ZERO WPM. The septoria is much more identifiable but pm is usual present in these conditions bur I don't have a spot of it. I may do some defoliation today. I also need to add supports for flowering but one thing at a time.
EDIT: Went over around noon. 70°. Bags seem to be holding weight (it was easier to tell as ONE plant was substantially lighter than the rest) so I decided to hold off on watering. At least until tonight. There are three plants (at least that are going to NEED water). They look phenomenal now though and we've had lots of rain. Plan is to go over later and get the light ones and mix the water for the others so I can administer it in the morning quickly. I have an early doctor's appointment but I don't to overwater or water unnecessarily just because. But when you grow alone sometimes you need to do things when your able. I have people there that would help if I asked. And I have before but its late . I'm very grateful. I defoliated quite a few septoria leaves. They were all from the bottom of the plant. A couole wete bottom interior. I know there are worse things to contend with but still a pain.
EDIT #2 WENT BACK AT FOUR AND PLANTS LOOKED FANTASTIC AND STILL HELD WEIGHT. THE REVEG MK ULTRA IN EARLY FLOWER "MAY" HAVE STARTED TO DROOP AND "SEEMED" LIGHT. THE LARGE SPECIAL KUSH FUETHEST IN FLOWER BY THE DOOR WAS ALSO EXRRENELY LIGHT. I HAVE AN EARLY DOCTORS APPOINTMENT BUT DONT WANT TO OVER WATER MY PLANTS JUST BECAUSE IM IN A HURRY. ITS COOLER THIS WEEK. 70 TODAY AND HIGH OF 80 TOMORROW BUT DAD SAID THATS NOT UNTIL THE AFTERNOON. I MIXED UP ENOUGH WATER TO WATER EVERYTHING IN THE MORNING IF IT NEEDS IT. I HAVE AN IMPORTANT DOCTORS APPOINTMENT EARLY THAT WILL TAKE ME AWAY AND IM FEELING A LITTLE ILL SO I WANTED TO GET DONE WHAT I COULD TODAY. WATERED THE TWO THAT NEEDED IT WITH TWO GALLONS A PIECE (30GAL REVEG MK ULTRA AND THE BIG SPECIAL KUSH IN FRONT I DIDNT TOP THATS FLOWERING THE FASTEST. EVERYTHING ELSE CAN WAIT.
7/24 Surprisingly the plants still held weight this morning! The looked pretty good too! However its going to be highs in the 80's for the next 7 days. Since the plants still had some heft to them I watered everything just a gallon. I gave the 10s a half gallon and skipped the 50gal container plant. I think this is a good happy medium. I'm still seeing random septoria leaves but still no WPM. I defoliate daily sometimes a couple times. I need to get a minute to myself and add a foliar spray. I'll start with a dih Dr. Zymes while I'm looking into other products like bicilus (i have bt but its a different bicilus) or trichodermia. I need to feed sometime this week too.


Likes
8
Share


@Hiroots420
Follow
26/05/2021 (Day 71)
Se realizo un nuevo cambio de nutrientes y las plantas vienen mas felices que nunca, no se observa ni una carencia en las hojas y los parámetros se encuentran muy controlados.
29/05/2021 (Day 74)
Se agregó 20L de solución, las plantas vienen muy bien comenzándo el engorde de una manera muy optima.
El espacio de cultivo está repleto 100% en conjunto con los 600W en 8 chips de Citizen que logran llegar a todos los puntos de la carpa.

Likes
89
Share


@nonick123
Follow
Esta semana nuestro TrolMaster me ha ayudado mucho con las altas temperaturas que tenemos en mi zona (algo inusual para esta época del año)
La VPD está fuera del rango optimo y he tenido algunos momentos de pico con temperaturas por encima de 28 ºC
Gracias a tener al TrolMaster he podido reaccionar y dar una entrada de aire más fresco a la sala donde se encuentra mi armario, haciendo que las temperaturas bajen 2 grados centigrados durante los momentos más criticos, incluso dejando toda la noche la ventana abierta para aprovechar el aire fresco de la noche
Es genial tener el TrolMaster en mi armario!
_________________________________________________
Día 83 (08/04) Riego 1,25 Litro H20 + Wholly Base 2,5 ml/l + Solid Green 1,5 ml/l + Big Bloom 1 ml/l de Gen1:11
TDS 1000 PPMs - pH 6,2
Día 84 (09/04) Velocidad de crucero ON... Las plantas se acercan a su fecha de cosecha teórica (49 días en floración = 13/04/2024)
Muestran ligeros signos de senescencia, pero siguen creciendo las flores, el consumo de agua no baja... 😍💥
Día 85 (10/04) Riego 0,5 Litro H20 sin nutrientes. TDS 225 PPMs - pH 6,6
Día 86 (11/04) Riego 1,25 Litro H20 + Wholly Base 2,5 ml/l + Solid Green 1,5 ml/l + Big Bloom 1 ml/l de Gen1:11
TDS 1000 PPMs - pH 6,2
Día 87 (12/04) Empezamos a revisar el color de los tricomas y se encuentran en su mayoría trasparentes con alguno turbio. Va a necesitar unos días más para madurar
Wedding Cheesecake FF empieza a no soportar el peso de los cogollos doblando sus ramas 🚀 Lo cierto es que tiene unos cogollos duros como rocas 💪😍
Día 88 (13/04) Riego 0,5 Litro H20 sin nutrientes. TDS 225 PPMs - pH 6,6
Se abre la ventana de la cosecha! 😍 Justo hoy cumplen 7 semanas (49 días) en floración
Día 89 (14/04) Riego 1,25 Litro H20 + Wholly Base 2,5 ml/l + Solid Green 1,5 ml/l + Big Bloom 1 ml/l de Gen1:11
TDS 1000 PPMs - pH 6,2
💦Nutrients by Gen1:11 - www.genoneeleven.com
🌱Substrate PRO-MIX HP BACILLUS + MYCORRHIZAE - www.pthorticulture.com/en/products/pro-mix-hp-biostimulant-plus-mycorrhizae
🎚️Controlled by TrolMaster TCS-1 Tent-X System Main Controller - https://www.trolmaster.com/Products/Details/TCS-1
Likes
7
Share


@Dsif90
Follow
It was a great week for her she has started budding in full force. I have been battling with humidity issues because of trying to make more space inside the tent and moving the humidifier around but I think I got it straightened out now
Likes
15
Share


@Waveform
Follow
Not much to say about this real first grow week’s start. Everything looks ok, steady growth at 40% light.
I had to restart the control app a few times, therefore the broken graphs.
At night times, the control software tries to attain optimum humidity rather than optimum VPD. That’s why VPD is dropping when the lights are out. CO2 is back to baseline – really wonder what the reliable values are …
I found I have to silence the blowers when a timelapse photo is being taken. The shaking you see at the beginning of the grow video should not appear, or to a much less degree, in the future.
Day 13 (July 30th) shows good, steady growth. Leaves are a bit spotty, although less then the processed images show. Something to be worried about? I would not currently …
All are developing their 3rd nodes now.
The controlling Raspberry Pi crashed last night when I tried to access it remotely … ;( – looks like the Connect software is in need of an update.
The leaf temperature sensor is now really aimed at lady-to-be nr. 1’s leaves.
Nothing to change that I see. I won’t cut the top yet, just watered the outer circle of the big pots slightly to encourage root growth.
Day 14: Nice growth. First plant is now at 11 cm, and at 12 cm on day 15. Nothing special to report so far, except for I had to move the internal camera a bit upwards to keep little lady #1 in focus.
Day 16 and last day of this week (Aug 2nd): The young ladies are now at about 14 cm tall. Growth looks very compact though. I think the two inside girls will lose their heads next week; I’d still prefer to have one or two more nodes available. Pictures of this day are taken at the end of the plants’ day. Notice their leaves are pointing upwards, which should be a sign that they want more light. I turned the lights up by another 20% for a total of 60 W now. Weather was pretty hot the last days so it wasn’t possible to stay in optimum VPD range but as long as growth is this satisfying I don’t mind.
I will water them slightly at their next day start. Outside plant’s soil humidity might still be at around 58% officially, but drying starts at around 40% with this measurement and the sensors are placed quite closely to the stems so outer soil is dryer. I am preparing the plant water with some additions and a frequency imprint suing some Solfeggio and Schumann frequencies.

Likes
10
Share

@HazeLiebhaber
Follow
📝 Blüte Tag 28
🚿 Seit heute gebe ich Phosphor und Boost zum Wasser dazu. Sonst alles wie in der Vorwoche.
🌡️ Temperatur 26-27°C
⛈️ RLF 55%


Likes
9
Share


@Daan_Buds
Follow
Welcome to week 10 and week 4 of the flowering period of my Zambeza White Widow XL grow😁
Last changes seems to have a possitive effect an the plants. 2 liters a plant a feeding seems to be a little to much considdering that my RH is getting a little to high over 50% now it raises to 60 when the light are off and going to 45 with lights on. Considdering to defoliate some more but not sure. Keep ya posted😁💚💯
Day 27😁😁
Every thing is going better by the day. RH is now between 42 en 47. She likes the nutes but i gave her a little to much so i lowered it a bit. Now it's time for bud fattening😍 she already started a bit and i am seeing differce day by day. So tomorrow is gona be the last day of week 4😁 Keep ya posted😁💚💯
Stay medicated and grow big buds😁💚💯

Likes
13
Share


@YOUNGSTERBR
Follow
Estava sem celular, perdi várias mídias da semana passada e dessa semana
Likes
2
Share


@TBADarkness
Follow
Plants have now been somewhat defoliated, sex of the plants can now also be determined.
Fertilized according to Bio-Bizz Shema
It was watered every 2 days.
___
Pflanzen wurden nun etwas entlaubt, Geschlecht der Pflanzen lässt sich nun auch schon bestimmen.
Gedüngt wurde nach Bio-Bizz Shema
Gegossen wurde alle 2 Tage.
Likes
2
Share


@Ieiogrow94
Follow
Eccoci di nuovo qui!!!
Super eccitato per questa nuova collab con Sweet Seeds, team davvero al top, che mi ha dato l’opportunità di testare questa nuova genetica e di condividere i progressi con tutti voi!!!
Come sempre partiamo nei bicchieri per poi travasare.. Questa volta verrà svolto tutto sotto la Lumatek Zeus 465 ProC, mi aspetto molto da questo ciclo!!
Abbiamo una cima su una foglia ed è davvero molto grande!!!
Non vedo l'ora di assaggiare questa piccola!!!
Grazie a tutti per il supporto ❤️🍀🔥
Likes
4
Share


@SherbGrows
Follow
Ganja Farmer Seeds
Mandarine Auto
Day 48
Light viparspectra XS2000 dialed in at 75% intensity
watering every other day to every two days
I am very happy thus far with the mandarine auto by ganja farmer. She has taken to LST very well and the buds are forming nicely. I am hoping this will be a good yielder
See you all next week! Happy Growing!
