


Likes
Comments
Share


@traxxx
Follow
this week 20 gallons of ro water armor si
50ml
cal-mag
60ml
hydrogaurd 40ml
flora micro 100ml
flora gro
100ml
flora bloom 100ml
transition week
low stress training


Likes
9
Share


@BodyByVio
Follow
This week I LST , lollipop, defoliate and move them to 4x4. Now they are Ready for flower!

Likes
19
Share

@DogDoctorOfficial
Follow
Skywalker OG — Harvest / Trim / Cure
Part 1 — The Giants Begin
First of all, we want to apologize once again for dividing this harvest series into multiple parts.
But honestly… there was simply no other way to do this properly.
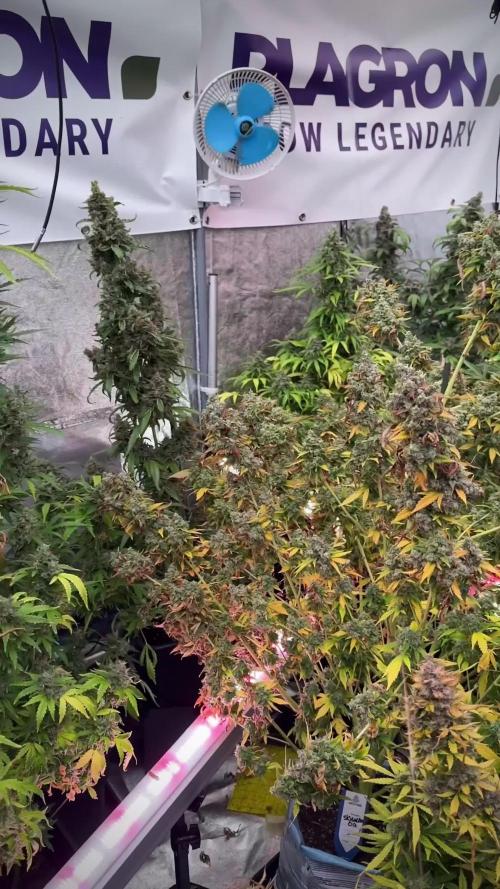
This Skywalker OG run became massive.
Not just in terms of plant size and harvest weight, but also in documentation, photos, observations, and the amount of details we wanted to properly share with everybody following this journey.
So instead of rushing everything into one overloaded update, we decided to divide the:
* harvest
* trimming
* drying
* curing
* and smoke review
into three, maybe even four different reports.
Mainly because we are dealing with:
three huge plants
all with slightly different expressions, structures, and personalities.
And honestly?
These girls deserve proper attention.
⸻
Quick Recap — 12/12 From Seed
This entire run was done:
12/12 from seed
with almost no training at all.
No topping.
No aggressive manipulation.
No heavy canopy control.
Mostly:
* gentle leaf bending
* small adjustments
* minor defoliation
* and simply opening light paths where needed
The rest?
We allowed the plants themselves to decide.
To grow naturally.
To express themselves freely.
To shape their own structure.
And what they became honestly surprised us.
⸻
Legends Of The 12/12 Galaxy
These plants did not become extremely tall.
Instead…
they became monsters horizontally and structurally.
Massive production.
Heavy flowers everywhere.
Dense stacking all across the branches.
Everywhere you looked:
* colas
* side branches
* swollen flowers
* branches collapsing under their own weight
Support or no support…
it honestly barely mattered.
These girls were simply too heavy.
The branches kept bunching, leaning, and dropping from pure flower mass alone.
Exactly the kind of “problem” growers love having.
⸻
The Fade
One thing we absolutely loved during the final weeks was watching the senescence develop naturally.
Toward the end, these plants received mostly:
* water
* enzymes
* patience
And they faded beautifully.
The yellows.
The pale greens.
The autumn-like transitions.
The dying fan leaves surrounding swollen flowers.
It gave the room this incredible “end of season” energy.
The plants truly looked finished.
Not forced.
Not rushed.
Just naturally reaching the end of their cycle.
And visually?
Beautiful.
⸻
The Flowers
Honestly…
these flowers are ridiculous.
Huge colas all over the plant.
Top colas. Side colas. Lower colas. Everywhere.
And dense.
Very dense.
The kind of flowers where even holding them lightly leaves resin on your fingers instantly.
You can see it in the photos too:
our hands next to the flowers almost look small beside some of these colas.
And we don’t exactly have tiny hands.
The stacking came out incredibly effective too.
No wasted structure.
No airy towers.
Just thick, compact, greasy flowers from top to bottom.
Exactly the type of structure we hoped Skywalker OG would give us.
⸻
Harvest Day
So finally…
week 14 from seed arrived.
And it was time.
We harvested the first giant.
And honestly, carrying this girl into the studio already felt surreal.
Huge branches.
Massive colas.
Beautiful fading colors.
Trichomes absolutely covering the flowers.
Most of the trichomes sat exactly where we personally like them:
* mostly cloudy
* a touch of amber
* and still a few clears remaining
Because honestly?
It is impossible to have every single trichome perfectly identical at once.
And this specific harvest window gives us the balance we personally enjoy most:
* potency
* terpene expression
* complexity
* and overall effect balance
Not too early.
Not too late.
Right in that beautiful middle ground.
⸻
Charas & Resin
One thing that immediately stood out during harvest was how absurdly sticky these plants were.
Simply removing fan leaves and touching flowers started building resin layers onto the gloves almost instantly.
And naturally…
we started collecting charas.
For people unfamiliar:
charas
is a traditional hand-rubbed cannabis resin made directly from fresh living or freshly harvested plants.
Unlike dry sift or ice water hash, charas comes purely from physically collecting the resin through contact and friction.
And honestly?
We absolutely love this type of medicine.
There’s something incredibly old-school and ritualistic about it.
Sticky.
Greasy.
Dark.
Aromatic.
Almost alive in texture.
Very different from the finger hash we’ll later collect during dry trimming sessions.
Fresh charas feels softer, oilier, richer, and incredibly expressive terpene-wise.
This Skywalker OG produced beautiful charas too.
Easy to collect.
Very greasy.
Very resin-heavy.
Exactly the kind of resin that instantly tells you:
“This plant is loaded.”
⸻
Full Plant Drying
After harvest, we decided once again to dry the plants whole.
Entire plant hanging.
All of them.
We personally love this method because it slows the drying process slightly and helps preserve:
* terpenes
* moisture balance
* aroma complexity
* and overall flower quality
This first plant will now dry roughly:
7–10 days
under:
* 18–20°C
* ~60% RH
Although during the first couple of days we intentionally lower humidity closer to:
~45% RH
mainly because these plants are extremely large and dense.
And with flowers this thick, we prefer removing the initial excess surface moisture a bit faster to reduce risks of unwanted issues like:
* trapped moisture
* stagnant humidity pockets
* or bud rot
After that initial phase, conditions stabilize again for slower drying and proper curing preparation.
⸻
What Comes Next
The next reports will continue covering:
* the remaining Skywalker OG plants
* their individual structures
* harvest observations
* drying progress
* trimming sessions
* cure
* and eventually full smoke reviews
All while still staying within this same harvest week timeline.
Because honestly?
Each plant deserves its own spotlight.
And each one brought something special to the room.
⸻
Thank You
Huge thanks once again to everybody following this journey.
To the growers.
To the silent viewers.
To the curious minds.
To the old followers.
To the new followers.
To the skeptics.
To the lovers.
To the people stopping by for just a few seconds.
To the breeders at Zamnesia behind these genetics.
To Plagron for the nutrients.
To Future Of Grow and Lumiflora for the LEDs helping drive this jungle.
To everybody creating the gear, tools, and spaces that allow growers like us to keep learning and sharing openly.
And especially to the growing community itself.
Because without growers sharing knowledge with growers…
none of this culture survives.
From grower to growers.
Skywalker OG harvest series officially begins.
📡 DELETED @ 1K Please stay tuned.we never quit https://www.youtube.com/@TheDogDoctorOfficial NEW 🙏 Thank you for your patience and continued support.
FOR DISCOUNT CODES AND MORE JUST FOLLOW THE LINK https://website.beacons.ai/dogdoctorofficial
📲 Don’t forget to Subscribe and follow me on Instagram and YouTube @DogDoctorOfficial for exclusive content, real-time updates, and behind-the-scenes magic. We’ve got so much more coming, including transplanting and all the amazing techniques that go along with it. You won’t want to miss it.
GrowDiaries Journal: https://growdiaries.com/grower/dogdoctorofficial
Instagram: https://www.instagram.com/dogdoctorofficial/
YouTube: https://www.youtube.com/@dogdoctorofficial Deleted by Youtube - https://www.youtube.com/@TheDogDoctorOfficial NEW
Vimeo : https://vimeo.com/dogdoctorofficial Under construction stay tuned ⸻
Explore the Gear that Powers My Grow
If you’re curious about the tech I’m using, check out these links:
🔆 Lighting & Environmental Control
• Future of Grow — Advanced LED lighting technology
https://www.futureofgrow.com/
DISCOUNT CODE: DOG20
• Lumiflora — Under-canopy LED lighting
https://lumiflorade.com/
• TrollMaster — Environmental controllers and automation gear (past collaboration)
⸻
Genetics
• Zamnesia Seeds — Genetics used in this project
https://www.zamnesia.com/
⸻
🌱 Soil, Substrates, Boosters & Root Support
• Plagron — Substrates, bio mixes, and supportive products
https://plagron.com/en/
⸻
🎒 Storage, Curing & Preservation
• Grove Bags — Curing and storage solutions
https://grovebags.com/
⸻
📸 Photography Equipment & Tools
(Not sponsors, but part of my creative toolkit)
• Sony A6700
• Sony full-frame macro lens + few more
• Stacking photography workflow - learning
• iPhone (for behind-the-scenes shots)
We’ve got much more coming as we move through the grow cycles. Trust me, you won’t want to miss the next steps, let’s push the boundaries of indoor horticulture together!
As always, this is shared for educational purposes, aiming to spread understanding and appreciation for this plant. Let’s celebrate it responsibly and continue to learn and grow together.
With true love comes happiness. Always believe in yourself, and always do things expecting nothing and with an open heart. Be a giver, and the universe will give back in ways you could never imagine.
💚 Growers love to all 💚
📸 P.S. – The Eye Behind the Lens
All photos in this diary (for now — except for the ones showing the camera, which I took with an iPhone) are taken with a Sony A6700 paired with a Sony full-frame macro lens and a few more.
Photography is part of the story — it’s how we share the fine textures, the glow, and the quiet details that words can’t always capture.
I’ve also started experimenting with photo stacking — a technique where multiple images, each taken at a slightly different focus point, are layered together to create one perfectly sharp image from front to back.
It’s not digital enhancement or AI; it’s pure photography — a way to reveal the plant’s beauty in microscopic depth, from trichome to petal.
You’ll even see a few shots of "ghost me" capturing the shots — camera, lens, setup — because every grow deserves not just to be cultivated, but documented like art.
FOR DISCOUNT CODES AND MORE JUST FOLLOW THE LINK https://website.beacons.ai/dogdoctorofficial
NEW DISCORD - Official Server Invite Link : https://discord.gg/ksjAkA5T74

Likes
62
Share


@nonick123
Follow
Día 43 (02/12) CBD Auto 20:1 #1 no para con el stretch! 🚀😍 Le elimino algunas hojas de abanico que tapan la luz a los cogollos inferiores
Está empezando a pedir más agua cada día, pero no me extraña con lo grande que es!
CBD Auto 20:1 #2 está empezando a engordar y engordar los cogollos 💥😁
OG Kush Auto tiene unos erizos preciosos!
Día 44 (03/12) CBD Auto 20:1 #1 sigue imparable. Elimino algunas hojas de abanico
OG Kush Auto se empieza a mostrar más sedienta en la formación de cogollos!
Día 45 (04/12) CBD Auto 20:1 #1 sigue imparable. Elimino algunas hojas de abanico más!
OG Kush Auto también le elimino algunas hojas de abanico
Día 46 (05/12) CBD Auto 20:1 #1 Schwazzing / defoliación intensiva
OG Kush Auto Defoliación!
Día 47 (06/12) CBD Auto 20:1 #1 repetimos Schwazzing / defoliación intensiva debido a que la planta no para!
Es increíble lo que crece esta planta!
Día 48 (07/12) OG Kush Auto ha empezado a aumentar el consumo de H2O, y se muestra sedienta en esta fase. Mañana aumentaré el volumen de riego de 750 ml a 1.000 ml
Debido a que se acerca una ola de frio, hago una mejora sustancial en la tienda
Coloco un radiador de aceite + un termostato digital Wifi (controlador de temperatura) para poder controlar el radiador
Me encanta porque desde la App puedo programar eventos en función de cualquier parámetro, de modo que puedo controlar la histéresis del radiador 😁
Tras un par de días de pruebas, consigo una temperatura estable de 22 - 24 ºC con luces ON! 😁
Día 49 (08/12) CBD Auto 20:1 #1 ha crecido increiblemente esta semana comparandola con la semana anterior! Un monster pheno!
CBD Auto 20:1 #2 hago riego con 750 ml H2O RO + BIO PK 5-8 10 ml/l. ¡Un empujón para la recta final de floración!
Tiene unos colores preciosos en los cogollos! Con tonos rosas y morados en los apices! 😍
LSD-25 Auto hago riego con 750 ml H2O RO + BIO PK 5-8 10 ml/l. ¡Un empujón para la recta final de floración!
Está preciosa con ese morado casi negro que presenta en cogollos y hojas, unido a los pistilos de color naranja fuego conforme van madurando
OG Kush Auto tiene una formación de cogollos impresionante, y ha empezado a cubrir de tricomas todas las hojas que salen de los cogollos 😍
Lo unico preocupante es que ha empezado a mostrar algunas manchas marrones en las hojas de los cogollos...
Riego con 1 litro de H2O RO + 1 g/L de BACTREX para ver si le ayuda con la gestión de este exceso / deficiencia
💦Nutrients by Bio Tabs - www.biotabs.nl/en/
🌱Substrate PRO-MIX HP BACILLUS + MYCORRHIZAE - www.pthorticulture.com/en-us/products/pro-mix-hp-biofungicide-plus-mycorrhizae
"GDBT420" 15% DISCOUNT code for the BIOTABS Webshop https://biotabs.nl/en/shop/
Likes
8
Share


@Gabroxxx
Follow
Settimana di crescita per le piante, aspetto che le ultime due abbiano abbastanza apparato radicale per stare al passo di quelle già messe in precedenza, vedo che stanno crescendo bene tutte, ho ancora dei problemi con gli insetti, non so se le coccinelle abbiano aiutato o no, a breve credo di utilizzare un prodotto per cercare di eliminarli completamente perché piano piano stanno formando dei puntini nelle foglie.
Del resto tutto bene, sto aggiungendo i soliti prodotti in più che ho citato nelle altre settimane, dimmer della luce alzato un po più del 50% per avere più luce e anche innalzare leggermente il calore all’interno del box.
Ho aggiunto delle piante grasse e 2 animali giocattolo per fare compagnia alle piante😂


Likes
10
Share

@sellem
Follow
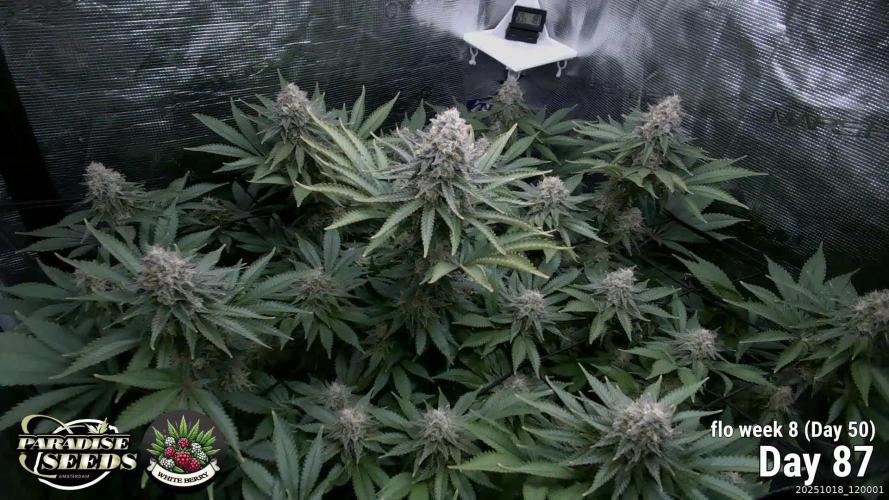
My how she smells and fades 😋😍👌
Getting some really nice coloration on her in her last stage 👏👏.
Trichomes look good, ill let her rip for another week or so to have the middle and bottom buds catch up a bit, and probably harvest during my vacation. Looks im gonna be busy for a while with her.😵
Watering still stays 6L at ~6PH 5ml/L Bloom, 5ml/L Green Sens.
Did some final and thorough defoliaton this week because i did not like that the RH was creeping towards 60%.
Next run already decided for a 1:1 Plant, also from Paradise Seeds. Photoperiods it is for now 👻
Harvest is approaching 💀

Likes
4
Share


@ZweetZkittlez
Follow
Crece a una velocidad increíble, ya tuve que agregarle agua 😊
Estoy cambiando el agua del balde cada 15 días aprox

Likes
5
Share

@ChitownCannaChica
Follow
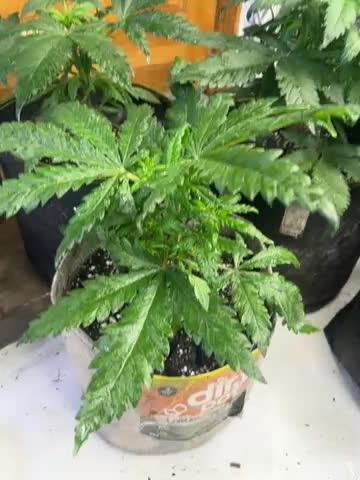
Did a little clean up of the lowers. Will let these go for 2-3 more weeks as I have no room in the flower tent and they are healthy— but short and bushy still. No feeing yet. They look good. Very indica with the huge fan leaves
Likes
57
Share


@Secretflower
Follow
Hello my friend,
...June 14, 2022..Day N°84...
...Flowering day N°38...
My Feminized Tatanka Pure CBD is beautiful and fine. The flowers developing very good.
I gave her water with a tablet of Easy Bloom Booster from RQS Organics Nutrients.
She's under a Mars-Hydro Tsw 3000 at 70% of power and at 25cm of the canopy.
www.royalqueenseeds.com
www.mars-hydro.com
That's all for now my friends, thx for passing through here.
Wish you the best with your green projects.
See you soon..💨💨💨

Likes
12
Share


@GREENPHOENIX6262
Follow
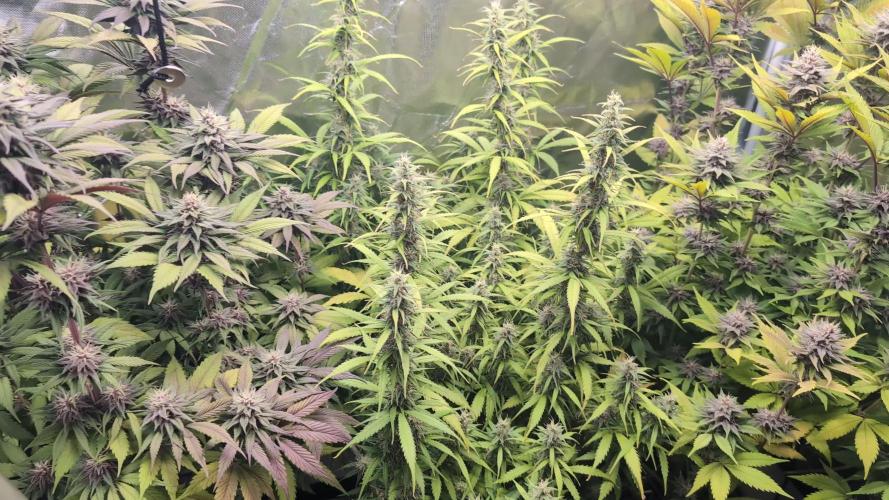
* Week 6 Flower Mimosa (1 -2) - 10/8*
Both Mimosa's are near harvest about a week left, Lotus CarboFlush will begin this week.
Mimosa (1) - 38 Inches - Mimosa (2) - 28 Inches.
Trichomes have set in - Pulled off trellis net this week
* Pre-Harvest set-up - 10/15*
Both plants have been cut down and are drying out accordingly (Day -1)
Dry time will be 9-14 days - Dry temps are 60% Humidity - 62 degrees F.




Likes
9
Share


@UnkleSkunk
Follow
Siamo alla fine i tricomi diventano ambrati ancora qualche giorno val taglio

Likes
16
Share


@THC123
Follow
Day 71 (September 5th) She’s holding on strong. Brought her in a couple times when we were having really bad storms. She doesn’t seemed stressed though.
Day 76: we’ve had a beautiful weekend. These ladies are loving it!

Likes
1
Share


@Olduffybastard88
Follow
Nice and frosty next to no effort was put into tbis plnt just let her do her thing and she turned out a beauty really easy to grow and no problems so far
Likes
2
Share


@Earthsower
Follow
100 ml of phd water this week she is still progressing slowly but she may take to the leds so I will hold her the and see if she settles. She has short nodal spacing with five finger leaves. I will wait until the end of the month before I pinch her. She stands at about 15 cm from the soil!

Likes
28
Share


@SensiHank
Follow
Brachiale Buds, Intensiver Geruch, Vorfreude auf den geschmack ! so kann man die Woche in kürze beschreribe. DIe Buds werden immer dicker und die Ladys reifen immer mehr vor sich hin : bald muss ich wieder das Microscope raus suchen um die Trichome zu checken :slight_smile: ich bin wirklich gespannt ob die Ladys noch ihre Dunkle farbe bekommen oder ich es nächstes mal etwas kälter machen muss wärend der nachtphasen :slight_smile: mal schauen

Likes
2
Share


@AlexanderVu77
Follow
I uesd Advanced Nutrients Voodoo Juice 7 day on the 7th day of the seedling
Likes
10
Share


@Myrcene_Dream
Follow
-Bulking up very nice and looking pretty frosty.
-Trichomes are mostly clear still so should be another week or so until harvest
-Watering every 3 days with 1 gallon of filtered water
-Reeking like a bouquet of garlic and herbs

Likes
5
Share


@Organic_LarF
Follow
Hello
This lady is getting nicer curves by the day.
Next week coming ill continue downsize the nutrients, certainly no N no more.
Last 2 days she didnt get no N too.
Still 3 weeks to go.
Keep on growing 🍀🍀🍀🍀