


Likes
Comments
Share


@Ginger_gnome
Follow
Everything is looking done. Been checking when lights turn on and just before you go out and the trenchomes are looking full and starting to turn amber. So first thing tomorrow there all going to get chopped down.
Well that's all for this week
Happy growing everyone.

Likes
115
Share


@DogDoctorOfficial
Follow
Week 5 Marvels: Cherry Cola Auto's Grand Green Symphony, guys get ready for some exiting report, what a week , what a week <3 <3 <3
We've hit Week 5 of the Cherry Cola Auto adventure, and I'm buzzing with excitement to share the latest chapter in this extraordinary journey. Our green queen continues to defy expectations, growing at a pace that hints at the making of a true horticultural legend.
Surprisingly, our Cherry Cola Auto remains in her vegetative stage, and I must say, she's growing into what can only be described as a potential green monster. The anticipation for the flowering stage is building, and the sheer size she's reaching makes me think we're in for a botanical spectacle of epic proportions.
The ballet of bending continues, with a touch of finesse and a dash of strategy. Every branch is a brushstroke in this green painting, carefully orchestrated to maximize light exposure and encourage lateral growth. The benefits of bending are becoming increasingly evident – a wider canopy means more bud sites, and more bud sites translate to a potentially bountiful harvest.
In my quest to create the optimal light environment, I've been selectively plucking away those shading leaves, allowing the lower branches to thrive. It's like pruning the excess to unveil the hidden gems, ensuring every part of the plant receives its fair share of the spotlight. The result is a vibrant, evenly lit canopy that promises abundant photosynthesis.
The nutrient elixir from Aptus Holland remains the backbone of this green symphony. The familiar blend of Regulator, caMg-boost, Start Booster, and Enzym+ is like a well-practiced melody, ensuring the plant's nutritional needs are met with precision. And for an extra touch of indulgence, a refreshing shower of Aptus Holland NutriSpray was on the menu. Not that our Cherry Cola needed it, but a little extra love never hurt.
Why all these techniques, you might ask? Each bend, each leaf pluck, and each nutrient application serves a purpose. Bending creates a balanced, open structure for optimal light penetration, leaf maintenance ensures efficient energy distribution, and the nutrient elixir acts as the lifeblood, fueling this green powerhouse. It's not just about growing a plant; it's about crafting a masterpiece.
As we wrap up Week 5, the Cherry Cola Auto stands as a testament to the boundless possibilities of cultivation. The anticipation for the flowering stage is palpable, and the journey thus far has been nothing short of an epic green saga. Stay tuned, fellow green enthusiasts, for the next thrilling installment in the Cherry Cola Chronicles!
Genetics Cherry Cola Auto @Fast_Buds @fastbuds_genetics_official @fastbuds_official @fastbuds_espana
Nutrition: @aptusholland @aptus_world @aptus_
Love, Care, and Attention: @dogdoctorofficial
As always, thank you all for joining me on this journey, for your love, and for it all. My horticultural odyssey would never be the same without you. Your love and support are cherished, and I feel both honored and blessed to have you in my life <3 <3 <3
#aptus #aptusplanttech #aptusgang #aptusfamily #aptustrueplantscience #inbalancewithnature #trueplantscience #dogdoctorofficial #growerslove #fastbuds #specialplants #homegrown #fastbuds #cherrycola #CultivatingBeauty #NatureArtistry #HomegrownMagic #GreenPassion #JourneyWithPlants
With true love comes happiness. Always believe in yourself and always do things expecting nothing in return, with an open heart. Be a giver, and the universe will respond in ways you can't even dream off.
Friendly reminder: all you see here is pure research and for educational purposes only.
Growers Love to you all <3 <3 <3
P.S - A glitch snick in to the future with a cherry cola 420 Christmas Love <3 <3 <3 Merry Christmas guys and blessed holidays to you all <3 <3 <3

Likes
14
Share


@Terpyboyz
Follow
Alright growmies 🍁🕺 week 6 of veg - girls are starting to get there Colour back into them now 🙌🏻2 girls have a bit off a potassium def but same strain so could be a sign(worst part about running multiple strains) that will clear up with the next few days. Little update on this weeks progress. Start cloning next, and repot will be on cards 👏🏻 light work 💪🏻


Likes
11
Share


@ZombieKushAddicted
Follow
to view this lamp or any other marshydro product go to: https://instagram.com/marshydro_aliexpress?igshid=YmMyMTA2M2Y=

Processing
Likes
13
Share


@RandomNoob
Follow
Day 17. - The ghetto CO2 generator did it's thing! They all exploded yesterday.
I fed this morning @ full strength (1mL/L) Green Buzz Organig Grow Liquid, with about 1.5tsp molasses, and 1mL of Bokashi EM Juice (not bokashi tea, but the EM inoculant).
After feeding I tied up and down. Ponytails for the top fan leaves, to expose the bottom nodes. And stakes to get the bottom nodes a bit more horizontal.
Tangie is probably the prettiest out of the bunch. Before our first training, she was the most symmetrical and had shown the most growth in girth. The fan leaves were definitely shading the nodes underneath though, so I'm expecting some nice growth out of those tomorrow morning, after today's CO2 session.
I bumped up the smell in my diary to 'strong'. It's not flower smell yet, but the veg smell is reeking. A friend noticed it as soon as I opened my vent-room door. But the good news is that she said she couldn't smell anything before then. When I open the tent, it's so strong that it's dank already. Again, not a flower smell...but I've never smelled a stronger veg-oder than these.
Nobody could ever convince me that yeast is futile or too much work. The growth from day 16-->17 was simply mind-blowing. I'm expecting more tomorrow, after the heavy feeding today.
Day 20. So...some news. Yesterday I got the new fan. Freaking sweet- screw that clip on fan nonsense.
And today, I've been busy.
Non-tent related...
I put together a worm farm. So I'm hoping for castings in a few months. Fed the bokashi bucket. I've had a problem with fungus flies (look like gnats, but live in soil). Elsewhere, notice that this falls under 'Non-tent related' :D. So I removed the top inch of soil in that houseplant, sprayed a soapy water mixture and covered with 1.5 inches of sand. I'm including this here, because I was terrified that those dudes would somehow find their way to my tent (on the other side of the house). But I think I've seen the last of them.
Tent related...
I watered with a nice castings tea that brewed for about 24 hours. I hope I didn't f*ck up. I hit GG and Strawberry Cheesecake with it before I pH'ed it down. So they got dosed at around 7.6. I went back to them and hit them with a cup of pH'ed tea (6.5). Then the light cut off, and it was their bedtime. I had to wait for LST until after their nap. But while they were on black out, I got a package. Some dope-AF smartplugs. I can now control my LED, my exhaust, and my air mover from my phone. There's a built in digital timer where I can schedule on/off's. And it *measures* my usage! :D How cool is that?! Welcome to the space age. I also got a USB microscope, which is also badass. So look for pics from that in the coming weeks... Later when the light went back on (courtesy of my new smartplug!) I went back and did LST and pics for today.
Day 21. New dehum. It's loud AF and uses a boatload of electricity. But let's see if they look a little better, once the humidity sinks. It's been at 85-90%. It's like a jungle sometimes it makes me wonder how I keep from going under...
Processing
Likes
13
Share


@Cheesefarmer420
Follow
Just finished week 11, and the time has come! Two of the three ladies were harvested on Monday of this week, the last one is still holding on. Posted some pictures of my homemade odor controlled dry box, the thing works great! Hardly any odors escape when the box is closed up, running a humidifier and drying in the basement has given me a solid 55-65% RH and a comfortable 64-70 degrees fahrenheit for a beautiful slow dry. Once the last one is harvested I will Get her hung up and have updated posts And pictures on harvesting/drying and a final end product. Stay tuned!
Likes
15
Share


@Ronin716
Follow
So at the start of week 3 I began to LST CM#3 to just experiment basically and topped CM#2 I believe. Again, just to experiment. This is my first grow and I was stunned with the reactions to both! The new growth after topping was about 1/4” in about 12hrs.. Crazy to me and the lst is proving to expose these bud sites and encourage amazing growth QUICK!! I’ll continue to train daily. One of the videos show the topped CM just yesterday. In 4 days, it’s grown soo much! Also, a video mentions the gender reveal but since then, all 4 have officially revealed themselves as female at the 22 day mark.

Likes
7
Share


@Adkguerrilla44
Follow
I lost all my pictures of my candy kush harvest but the bud was pretty uninspiring, not much for terps or smell and just makes me sleepy so been using it when I get home from my 12 hour shifts at 7am so I can get to sleep quick as possible, will be the last plants EVER from royal queen seeds ,defended them for the last year but since growing real breeders seeds I see that rqs is most definitely a white label seed company that sells us all fake genetics that are not what they say they are,I gave them every chance but when I grow 5 different strains and they all end up looking,smelling and tasting exactly the same theres something fishy going on ,sucks too because now I don't want to give those strains a chance because rqs's version left such a bad taste in my mouth(literally and figuratively)

Likes
19
Share


@Tommy716
Follow
This week has gone great. My lovely lady's are thirsty and taking there nutrients wonderfully. I have increased there water and nutrients intake and they are responding well. They continue to grow rapidly I am moving there light almost daily. I'm running out of vertical room.. All the hard work is paying off, they are starting to show there reward of amazing bud sites developing everywhere. A few more weeks and they will get added micronutrients. I'm pumped to see there development coming soon
Likes
8
Share


@Kirsten
Follow
26.4.25:
The plants were watered with 3 ltrs of dechlorinated water PH'd to 6.3, containing the following nutrients:-
♡ 1/2 Tsp Sea K(elp) by Greenleaf nutrients
♡ 1/4 Tsp Ecothrive Biosys.
27.4.25:
I LST'd again by adjusting the tie downs.
For FastBuds Mystery seed auto #1 and RQS Northern Lights autoflower, this will probably be the last time I adjust the fabric ties, as they're now well in to flower.
Hulkberry was LST'd again today, She is looking absolutely beautiful 😍
Retied some branches down and added a couple of clips.
Keeping the canopy as even as possible.
29.4.25:
HulkBerry is looking great. Nice green colour, without being too dark.
The plant has taken well to the LST training.
It doesn't need adjusting much at the moment as the growth hasn't become crazy, just now.
I think next week we will be in to flower, she has 1 pistil on the lower branch. 😅
Nb: I have added this week a couple days earlier, as last week was a couple days late, trying to get back on schedule 😅
Thanks for checking my diary and hanging out 💚✌️🍃😊🌱
Likes
53
Share


@Oyziphar
Follow
DAY 25 I took these pictures before 2nd time topping. Final numbering of the plants
Likes
10
Share


@Alpengrower
Follow
showing great colors during the last 3 weeks of flowering, great strain. i absolutelly recommend it!

Likes
2
Share

@RatmanJR
Follow
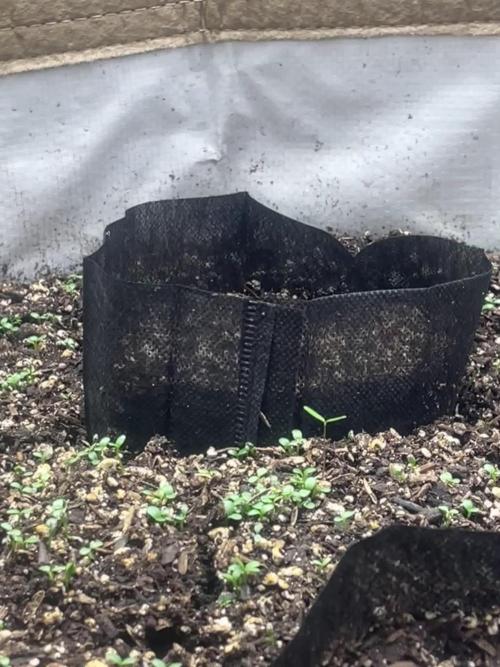
Hello and welcome to my newest grow! Going to be doing a small pheno hunt for a keeper cut of purple marmalade by Solfire.
Speaking of Solfire, want to shout these guys out. Just purchased from these guys the first time and the seeds I received look perfect. They also sent me 3 free seeds which I’m looking forward to growing next.
Purple Marmalade is something special too me as I actually smoked this strain in Rochester New York around 2021, I would always pick up 3 new strains a week when I stayed here. For me and my girlfriend at the time it was one of our favorites we have ever had. Super spacey and melted away all stress.
Going to be doing a proper hunt where I will keep the rooted seeds as parents and will be taking clones of these for the actual hunt. The clones will be planted in my newest 30 gallon no till bed where they will be flipped semi early to allow all 3 plants to fill the 2x3.
The 30 gallon pot is the same soil I have been no tilling in a 15 gallon for the last year and a half. It had gotten compacted in the 15 so I dumped it out, reammended with 3.0, craft blend, and gnarly barley. Also added a gallon of perlite to help prevent compaction again. Poured it into the 30 and topped it off with about 8 gallons of fresh Elite Soil.
My thought process is the plants will start off in the new top soil as the bottom cooks, so by the time the roots hit the older soil it is ready to go. I also took a soil sample of the old soil and sent it to my local university to see if the amendments I added will be enough or if I should top dress more early on. Today August 23rd I sprinkle a ton of white clover seeds on top of this pot so by the time I transplant the clones in two weeks I will have a cover crop
I also planted the seeds today on August 23rd. I filled my small nursery pots with some new Elite Living soil. I soaked the soil heavily to ensure it was wet and tamped. Poked a small one inch hole into each pot. Sprinkled recharge into each hole, dropped the seeds in and covered lightly. I then transferred these to my small parent tent where they will hopefully pop and veg until I am able to take my clones for the main tent.
Germination success is set to 0/3 until they start too pop.
Really looking forward to this grow with you guys! God bless!
Update Day 4, August 28th:
Cover crop growing in well and first seed popped. Good looks for solfire, first time using them. My seeds planted directly in soil almost always consistently pop on day 5. Day early and healthy looking, no helmet head, and can already see true leaves coming in.
Update Day 5, August 30th
Number 2 sprouted
Update Day 6, August 31st
Transplanted both sprouted clones to large container

Likes
2
Share


@aquaMan
Follow
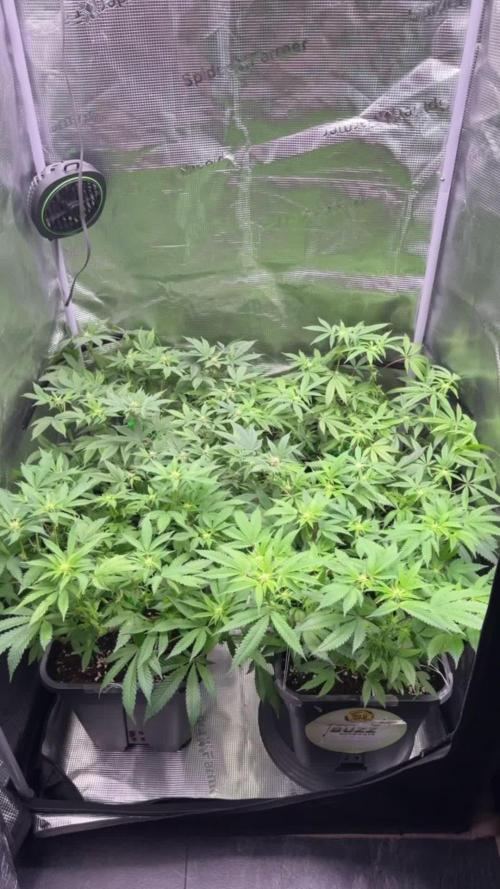
Week 8 and still now flowering on the Amnesia Zkittlez, changed it up to 12/12.
EC is up to ~4.5 Plants seem to like it!
Tried to get some pictures of the Trichomes with a jewelers Loupe.
Smell is amazing!



Likes
20
Share


@DeepRootsGrowTrees
Follow
NORTHERN THUNDERFUCK AUTO / RQS
WEEK #8 OVERALL
WEEK #3 FLOWER
This week she's doing good no issues to report she's looking good buds are looking good and are starting to get thricomes on them!! Stay Growing!!
Thank you for stopping by and taking a look!!
Thank you ROYAL QUEEN SEEDS!!
NORTHERN THUNDERFUCK AUTO/ RQS
Likes
13
Share


@FadedTotoro
Follow
The plant is a beast. Having a lot of light burn issues and I dimmed the LED but it still continued. I’m out of vertical space in the tent. Trying to keep her happy until harvest.


Likes
5
Share


@majklsoft
Follow
- introduced 7W far red light bulb to boost stretching (girls are VERY bushy)
- slowly drying soil (so I drilled more holes on side of the pot like a cheap dyi airpot)
- preflower
Keyra (the bigger one) is what I would say a stretching phase and Margot (smaller) evidently falls behind but not stretching yet, I hope she catches her atleast little bit..

Likes
2
Share


@pareto
Follow
Everything went well appart from the afids in the end. She looks very pretty and smells awesome!
Yield could be a litle higher... Still shooting for less than 1€/g. I think I will stop topping my plants.
Maybe next time.
--------------------------------------------------------------------------------------------------------------------------------------------------------------------------------
Set up cost (fixed costs)
-Lamp: 40€
-Timer: 3,5€
-Pot: 4€
-Total fixed costs: 47,5€
Given 5 years (or 15 grows) usage time translates to around 3,17€ per grow in materials.
Variable costs:
-Seed: 10€
-Soil: 6€
-Fertilizer: 3,50€
-Power (68 days 20h/day): 19,58€
-Total variable costs: 39,08€
-Total costs per grow: 42,25€
-Cost per Gram: 1,63€
