
Likes
Comments
Share


@Jupiter401
Follow
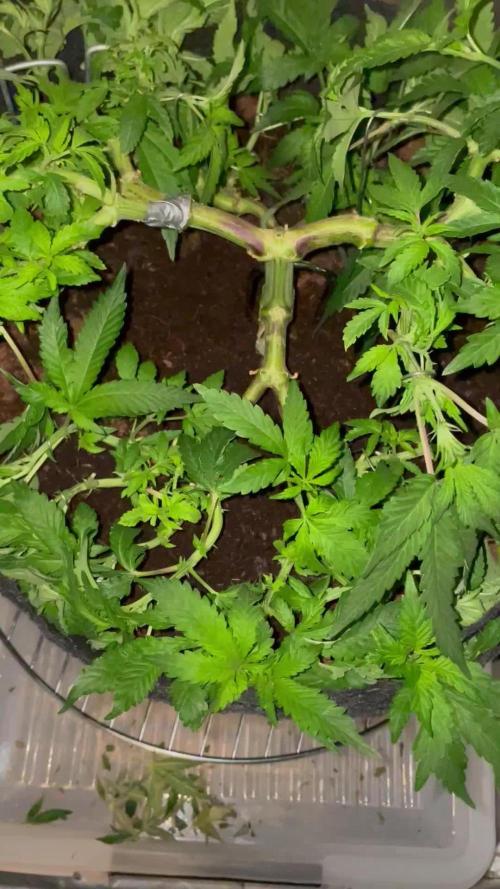
Just got the girls in the coco with the floraflex drip shields. I have on girl in regular roots organic soil and some m3 super soil mixed in. They are under my DIY citizen cob led. Consists of 4-citizens clu048 -1818 90cri cobs running at 1050ma. Later in bloom I'll probably bring in my other DIY that consists of 2-citizens clu058-1825 90cri cobs running at 2.4 amps. Im hoping to really push these girls but this is only my second run with coco and advanced. We shall see!

Likes
23
Share


@frogDUDE
Follow
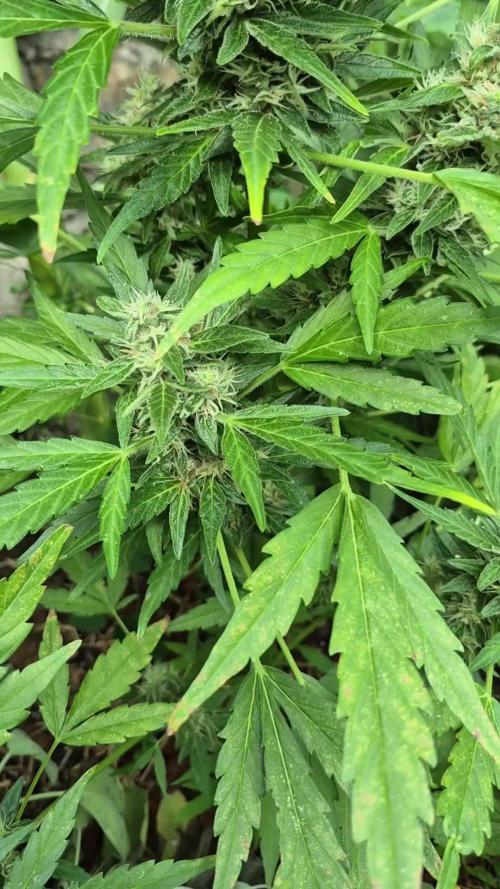
Terps are coming alive as she is taking on a delicious fruity smell. Still going very light on defoliation as I feel like the big fan leaves are still doing their job to boost photosynthesis and feed the buds.
She is starting to turn purple already!!!
I’m going to allow night temps to continue to drop below 10 degrees C at night, hoping for an amazing color show at harvest!


Likes
3
Share


@Taskot_Joe
Follow
Weeks 6 & 7 💚
Lack of photos were taken so I have decided to consolidate these two weeks together,
The 8th - 15th as well the following week of 16th - 23rd of March

Likes
55
Share


@BodyByVio
Follow
Just got done with trimming the 4x4 @greenhouseseedco Super Silver Haze / @blimburnseeds Silver Surfer Haze tent.
The final yield is exactly 1000g plus some (kind of a lot)that I smoke in the last 2 weeks 😃
Also got 6, gallon size ziploc bags filled with good quality trim for concentrate.
To be honest I was expecting a little more but keeping in mind that this grow I did not supplemented with bottled CO2 I think I’m good with the results.
Definitely I enjoyed a lot this grow and I’ve learned even more.
Likes
2
Share


@Herbsmanington
Follow
Week 7. Just watering now while the plant matures. Buds are getting heavy and needed support so I ran a few twines to hold them up.


Likes
9
Share


@Bullbulator420
Follow
Week 5
Day 28 to 35
Faster and faster they happily grow!
Only the black berry showed me coupe of spots on some couple of leafs but nothing serious.


Likes
101
Share


@Mrs_Larimar
Follow
Saturday, Feb.20th
After final training, and recovering,
Girls went into a larger Growspace called "big Floweringtent"
its a 4x4 Growtent, and soon some Companions will be added.
Girls are sitting into final Pots ( 11l), filled with My Soilmix
amended with "Living Organics" and EASY BOOST ORGANIC NUTRITION
waterings with Benefical stuff from Green Buzz Liquids
So we had a busy Day Yesterday in setting up the Tent
that means lots of cleaning transplanting and so on
Thank you A.R. for Setting up the Tent 😘

Likes
33
Share


@Darksoul
Follow
Week 5 - Same nutes from previous week. 2 more weeks of vega i think.
Look ate the shape of the plant and the wires to hold she down.
I have toped my plants 2 times over the past 2 weeks, and now all of their have the "H" shape in the base
Likes
38
Share


@GODSGIFT_2005_JM
Follow
For LIQUIDS & NUTES ******GREEN BUZZ NUTRIENTS***** organic.
Also i’m using their LIVING SOIL CULTURE in powder form!
MARSHYDRO ⛺️ has large openings on the sides which is useful for mid section groom room work. 🤩
☀️ MARSHYDRO FC 3000 LED 300W
💨MARSHYDRO 6” in-line EXTRACTOR with speed-variation knob, comes complete with ducting and carbon filter.
Likes
38
Share


@CANNASIM
Follow
—SETUP—
.BOSSLED LED 1800W full spectrum, real power consumption is +-250W.
.Grow space 60X100X200(a simple shower box.
.AN nutes and other simple additives.
.Grow medium is 60% peat, 30% perlite, 10% organic correction(worm castings), 5 gallon fabric pots(18l).
—BRIEF—
Hi there, I have tried already done this genetic outdoors, in poor lighting and a general purpose nute from Neudorff, yielded 25g dry, in 3gallon pots same medium.
So this is a good experiment, lets see indoors how she will compare.
—GERMINATION—
My germination process always start by scarifying the seeds, i created a little tool for that. I just a little container with sandpaper walls. Shake gently for about 60 secs+, this allows for the water to penetrate better in the seed shell, once you soak. Then i soak overnight from 12 to 20 hours max.
From there i either plant straight or use the paper towel method to see the tap root before. If you are a bit on the impatient side seen the tap root is advisable so you see some movement before planting. Lol!
—ROYAL QUEEN SEEDS . QUICK ONE . INFO —
Chose this strain because is basic and I have to travel for a month soon, and someone else is going to take care for this time. :)
Most of our autoflowering feminized strains are easy to grow. This one, however, is so easy to grow that we had to call it Easy Bud. Easy Bud is very similar to the autoflowering strain White Dwarf.
THC: 12%
CBD: Low
Yield Indoor : 275 - 325 gr/m2
Yield Outdoor: 30 - 80 gr/plant
Height Indoor: 50 - 60 cm
Height Outdoor: 60 - 110 cm
Flowering: 5 - 7 weeks
Harvest month: 8-9 weeks after sprouting
Genetic Background: White Indica x Ruderalis
Type: Sa 15% In 55% Ru 30%
Effect: Physical
Climate: Mild
—RQS EASY BUD GERMINATION UPDATE—
My mood said to me to plant straight, so scarify > soak 18 hours +- > plant straight.
Seedlings look a bit odd, this one with a purple center, let's give her some days in and see what happens next.
Likes
24
Share


@Alpha_Green
Follow
And this is how we successfully open week 9 -
After fermenting a dose of PK compost tea at the end of last week, I poured it extensively. As always, he did them very well. They also need significantly more water again. I have now also increased the humidity a bit, because there is currently drier indoor air in the room of the cultivation area.
Let's see how long I leave my Sweet Seeds ladies. I'll decide that at short notice.
Sour Jealousy will then be able to enjoy all the space to bloom at her disposal.
Both Sweet Seeds now only get purified and aerated water and only enriched with enzymes.
It is now time to signal to both to use up their reserves. After all, their genetically pre-programmed life cycle is significantly shorter than that of sativa-dominant strains - for example, Sour Jealousy from Fast Buds.
She is only now really starting to flower, while the indica dominant strains are moving towards the glorious end.
I have also already been able to positively determine how practical and thought through to the end 2 Sanlight panels really make sense. I am not primarily concerned with more power through the lighting, but also and above all, I am concerned with the homogeneous illumination at 11 degrees inclined positioning of the solar panels. And to have the opportunity to meet the different growing conditions individually by adjusting the heights of both panels.
Of course, I will be able to strive for much higher performance in the large Homebox Ambient with CO 2 and both lamps, but area coverage is the be-all and end-all for me.
Lamps currently operate at 60% each. That's definitely enough. Because 2 x EVO 4 - 80 means to me:
Precision in the form of light - a tool that you learn to use. Everything before didn't convince and satisfy me nearly as impressively as Sanlight.
Also the advantage of being able to operate your lighting system from the outside, via Bluetooth, yes that is really very important, practical and innovative.
It makes things so much easier...
Sweet Seeds - brand new:
„Jealousy Z XL“
I can’t wait to give it a try next run…
Super noble presentation, in my opinion.
There are many reasons for an emotional attachment to a product. But one stands out in particular: the desire to design, personalize, individualize something or - in other words - the desire to own something unique and feel special as a result. Scientists have found that our buying behavior is shaped by emotions. A person does not buy a product, but an emotional feeling.
Many thanks to Sweet Seeds! 🙏
I also feel the feeling that Dark Devil gives me - as a noble high. I associate the turn with a noble, very effective and multifaceted indica dominant weed from Sweet Seeds. Creative work only works in the 1st part of the turn - haha, because then the coma phase begins with subsequent binge eating!
But even during sports I was in the vaporizer with Dark Devil and it supported me mightily during training. Maybe it depends on the activity at the time of consumption, haha
I find it very fruity in taste and smell. Very sweet terpene spectrum.
And not very top-heavy.
A wonderful body high.
Worries and fears - as if blown away…
Some here on growdiaries describe meticulously exactly how they give what, when and how much of it to the plant, etc.
I prefer to keep a diary for my passion in a different way. With passion and feeling. I feel my plants. And talk to them. They also listen to chilled music.
The Kobe beef in Japan is even massaged to classical music. ;-))
I think such information is only useful for a run to those who do it exactly the same way, under the same conditions with almost the same phenotype.
That is almost impossible. And not necessary either. I have to learn to read plants. Their signs are pointing. Become sensitive to it.
If I know why and how something happens, then I also know how to keep something like this alive. And what it takes.
And why.
So let's see what we have to do today. In any case, Lady Jealousy is being driven to the hairdresser today. Yes, we're doing beauty and wellness spa today, haha. She's so busy with branching, I'll give her a helping hand.
She has developed incredibly. And has an unusually long breath. Comparative:
She looks like a farm animal to me. In other words, what it was bred for. Very strong and healthy adult. Then bloom efficiently and productively. And that's the fascinating thing for me. The breeder creates all parameters here to perfection.
Even though I don't particularly like the marketing of Fast Buds anymore, I have to admit without envy:
"I've never experienced that before."
The phenotypes are absolute warriors, from another planet. Marketing is debatable. No problem.
But I can only marvel at these plants and their quality.
Unfortunately, too much turnover often spoils the core vision of a successful company.
…PK is on the way!
Addendum about the one, Lady Dark Devil 😈, which had to be harvested too early:
And yet:
Dark Devil gives me a deep inner satisfaction in my existence. Nothing upsets me. Nothing can disturb me, because I am one, with myself and my environment. I can only feel gratitude for that.
It gives me this broad, generous sense of inner peace.
For me, inner peace means balance, equanimity, even-mindedness, harmony, and stability.
And that's exactly what a noble special effect means to me. When a weed variety can develop medicinal qualities. When THC simply has a more complex effect on my organism, than just the usual power high.
And if, a plant that hasn't even had the opportunity to reach its full potential, can do that, it has passed all the requirements of a cannabis variation, with flying colors.
And on top of that, she seems incredibly graceful and elegantly feminine to me. It's just something very special:
She's a Sweet Seed!
Oh I see, I'm writing a real diary here... 😜
But I love that. I love grow diaries.
Look at the brave girl. She forgives me for topping, training, defoliating and in the end: that I have to kill her.
But I know then for sure, that she knows, that I really loved her.
And the fascinating homogeneity. Totally instructive.
It behaves like a photoperiod phenotype, unbelievable but true! on 14.09.2024 I moved her to the grow room with the others. So it's almost 9 weeks. I'm curious to see if she holds out. But I think so. It seems incredibly energetic and relatively relaxed to me. I'm mentally very busy with her right now. Every morning I comb through her leaf picture. Make impressions of the smallest changes.
I currently have Pk boosters or tea with her every third day, alternating. And in between only purified water with enzymes. Dark Devil and Big Devil I let slowly starve and then die of thirst. They consumed the last booster 4 days ago.
She (Sour Jealousy) currently swallows 2.5 liters per day. That's really a lot. And in the morning she wants to have something again. I think the lamps tickle out their full potential. I meticulously defoliated her and now she stands happily and despite all the exertions, like a star in the sky. My star. 🌟
Sour Jealousy is really crazy, I can say that.
And the coolest highlight will be:
Lady Jealousy will soon be able to enjoy the whole place in the sun for the "grande finale".
The smell of the two Sweet Seeds totally upsets me! I would like to bite into it.
Its killing me softly.
Very few leaves have a few dark small spots or dots at the tips of the leaves. (Sour Jealousy)
Many thanks to BerrySweetHighhat. I think the same. Will probably be calcium. She gets this from the Bio PK Booster. I keep calm and don’t panic, it’s organic. ;-))
Sour Jealousy:
Today I cleaned out small shoots again & defoliated them from below up. I think there were still too many young little shoots. Now everything should be distributed quite well. We'll see.
Tomorrow I will
probably harvest both Sweet Seeds.
Hello everybody!
Today it's Dark and Big Devil's attack. It's about time. Lady Jealousy will be allowed to use the full 0.64 sqm of cultivation area for herself from today.
Take care & bee 🐝 positive
🐝… to bee continued.


Likes
73
Share


@Andres
Follow
she is almost ready ... she has 141 days in the outdoor ... I think she will cut it at the end of the month when she has 100 days just of flowering ... she has already started 10% amber in her ... with a typical smell of .a indica ... mint ... to earthy wood ... under a little temperature and a little cloudy ... but patience.and there is little left ... if I would cultivate it again it is obvious that if .. She will be very generous in her buds ... and she continues to feed herself organically ... and these are her results ... I am happy

Likes
5
Share


@DaddyPrime2
Follow
5/25 this plant is starting to gain some vigor finally. Has some real nice healthy color and I'm happy with where she is and/or where she will go once flowering commences. I was worried that she wasn't going to grow into much of anything. This seedling has been fighting since day
5/26 top dressed. She's taking off
Also her very main top, keeps branching off weird, it's like 3 at a node almost. Its been having weird mutations like parts of leaves missing and odd shaping of
Likes
2
Share

@3rnest
Follow
Leider war es im Gewächshaus letzte Woche zu feucht und ich musste die Pflanze etwas früher als gewollt ernten.
Ein Teil der Blüten hatte angefangen Schimmel zu bilden und ich musste die Spitze entfernen.
Likes
64
Share


@Kitties_and_Colas
Follow
~_~_~_~_~_~_~_~_~_~_~_~_~_~_~_~_~_~_~_~_~_~_~_~_~_~_~_~_~_~_~_~_~_~_~_~_~_~_~_~_~_~_~_~_~_~_~_~_~_~_~_~_~_~_~_~_~_~_~_~_~_~_~_~_~_~_~_~_~_~_~_~_~_~_~_~_~_~_~_~_~_~_~_
ok..i'm an idiot 🐱🔫 ..they we're clearly overfed last week and without thinking i gave them our usual "full strength" bloom shot as we decided to flower her (no more space)..she's not too happy with us atm, her top leaves are curling very hard..We intend to give her PH water only until she comes around some...normally we wouldn't flower a plant in this condition, we'd wait for her to straighten out and then flip however, space is critical atm...we moved her to the 3x3 to flower with a couple tiny White OG plants...she's a big plant, we have some room for stretch but not a ton, this might interesting in another week or 2 lol...we setup a dedicated exhaust for this tent and temps have been great, lots of air movement...We'll upload in a few days if her condition changes, thank you as always for taking the time to read and happy harvests everyone!! ❤️💡🌱😽💨
~_~_~_~_~_~_~_~_~_~_~_~_~_~_~_~_~_~_~_~_~_~_~_~_~_~_~_~_~_~_~_~_~_~_~_~_~_~_~_~_~_~_~_~_~_~_~_~_~_~_~_~_~_~_~_~_~_~_~_~_~_~_~_~_~_~_~_~_~_~_~_~_~_~_~_~_~_~_~_~_~_~_~_

Likes
7
Share


@Zelfiris
Follow
Welcome to my next grow/experiment! Really excited to grow my first Mephisto Genetics! I have too many options so my girlfriend picked these seeds to grow first. I have plans to top once and hopefully be successful at making a clone to reverse. From there I’d like to maybe make some F1, and S1 seeds as well as breed it with the cultivar sharing the tent: Fastbuds Amnesia Zkittlez.
This freebie seed had a slower start but they all popped! Started off germinating on Saturday 2/3 by soaking the seeds in a cup of water for 24 hours before transferring to a wet paper towel. On Tuesday 2/6 tap roots were present (one was barely coming out) and they were moved to rapid rooter plugs and put into a humidity dome. On 2/11 they had sprouted up 1.5” and were transferred to the top fed RDWC system. Filled the reservoir following General Hydroponics 10 part chart at light strength and diluted by 50%.
SE7000 is ~30” above at 40% providing ~270ppfd.
Likes
7
Share


@Mr_nugs_lover_David
Follow
This lady has come up very very fast, I cannot wait to see this lady become a beautiful bush, I hope you guys enjoy my work with this strain, you can find the other 2 phenos here on my page as well! Let's see what we can do this year! ❤️💚💛👨🌾