


Likes
7
Share


@Fresco_Grower
Follow
Se riega con 0.25L dias lunes miercoles y viernes. Se realiza transplante a macetas definitivas en el caso de las que estaban en macetas de 1L. La altura promedio es de 10cm desde el tope de la maceta.
Likes
2
Share


@Ddddgbbb
Follow
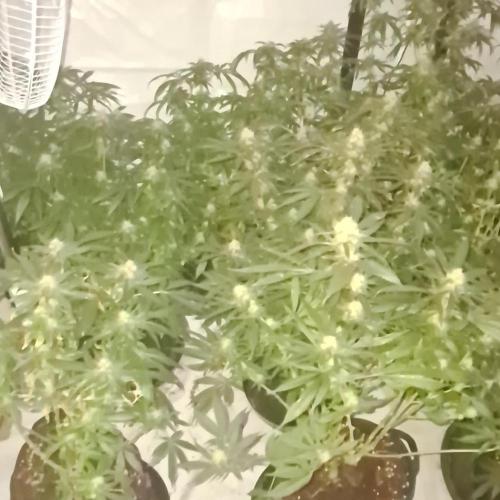
As u can see trichomes slowly turning milky even amber so starting to flush with ripenner then r/o some
Buds might catch alight foxtail i’m trying to maintain air circulation there as hard as i can to prevent rot cuz buds aregetting rly dance

Likes
22
Share


@Gram_Solo
Follow
HARVEST TIME!!! 👨🌾✂️
ALL 5 Banana purple have been chopped trimmed and now curing in grove bags! Drying took around 11 days so perfect. Dry Tent was around 19 - 21 degrees 60% humidity
🍌🍇🥊🔥🔥🔥🔥🔥
Dry Weight
Mainline banana purple - 47.82 gram
Thai stick looking one bpp - 54.03 gram
BIG MOMMA Purple - 49.96 gram
7gallon banana Purple - 50.55gram
Tall Banana purple - 61.05gram ( we have a winner 🏆 )
So happy with results.
If I hadn't done any mainlining or anything we might have pushed 60gram+ from them all.
I probably won't be doing the main line technique on banana purple again and will just let them go mad as it looks like a 7-10 gram difference in untrained and trained plants. Think I stressed them Bit too much on a couple of them maybe light or nutrients
Didn't know about foxtailing until this week when i read about , it hapend on both purples hopefully doesn't effect potency that much.
Got a big bag of trim after using spiderfarmer Bowl trimmer ✂️ will try make butter or something lol
Smell is! Literally blackcurrant fruit juice with a hint of foam sweets 😋 tried some that has cured for 4 weeks omg turns me into a potato instant couch lock straight to sleep 👌 can't wait to grow this again top notch!
See how long it lasts haha
💨💨💨💨
Likes
5
Share


@mobbly
Follow
After transplanting them into larger fabric pots (2x 7.5L), they were sad for 2-3 days, but this will improve next week. Until this week, I hadn't used a pH meter or organic nutrients, just tap water every 1-2 days."

Likes
96
Share


@gottagrowsometime
Follow
Welcome to my MilkyWay F1 Topped/Untopped Diary sponsored by RQS.
Topped/Untopped Phenos 1/2
Pre Flower Days 12-15, Flower Days 1-4 Days 57-64.
Plants are quick. Didn't put on much height during pre flower. 43 cm for the Topped (pheno 2), and 41 for untopped (pheno 1). The pistils surprisingly are 50/50 amber/white. They're in the fattening stage only a few days. I've added co2 for 12hrs and then they are going under my P1000 for 6hrs. Hoping to see some big buds. They are moving quickly. So, let's see. I've added a 13-14 PK booster from plagron with a few of their other products. With the 12hrs of extra heat and co2, they'll be needing a lot more nutrition.
Diet/Defoliation/Temperature
Was on a Full Plagron natural line and a few of their other products, and I've added a 13/14 PK booster, with fish force and a few others. I done a 10-15% defoliation removing many fan leafs, focusing on the middle to allow better airflow was done after pre flower. And more will be done coming into her next week "10" and light lollipoppoing at the end to clear any possible larf areas was done this wk. So, what's therenow will be brought to harvest, a lot is very far away, so I need to get a blue HID I think to control tight Inter nodes in veg, I'll do this as I gain more experience. 28-29c is maintained for the co2 addition and under the P1000 the temp is brought back down to 26c with no additional co2. And ppfd is lowered to 850 ppfd but its a deep penetrative led light I'll give it that. Actually it carries the highest ppfd into your canopy than any 100w out there, and this is the 2021 version. They've an upgrade. Much respect to Vipar, this light and the Spiderfarmer have been my veg lights the past Yr, and this yr I've used these both and they've produced some quality bud. The cbg is done fully under them and the plant is amazing.
Diet,
Shes on the Full Plagron Natural line, soil and all. "Pro mix" with mega worms to add later. With PK, green sensation, fish force, power roots, vita race, "dummies sent me 2x of these instead of Start" Silic Rock, Pure Zym Sugar Royal. And Terpinator. "Power Roots has been pult, its time recommended by plagron. The roots are plenty and they drink close to 1L of fluids a day. Normally I don't like given so much stuff. But all are different, (expect Terpinator and SR they've the same purpose but its only 1 feed of the Terpinator a wk, by itself 370ppm 6.1ph 15.5c temp..
Co2
Co2 is maintained at 1000-1300ppm for 12hrs. And then when they go back under my p1000 they get ambient co2 levels 675ppm. The co2 is been ate at 350ppm every hr. Mind you most of these girls aren't hitting a high ppfd that's needed to convert into sugars. I've shuffled my 3 fans. 2 fans 1 on the top left blowing above canopy and 1 on the other side. A small one is at the bottom that keeps the heavy co2 off the ground. And my moving my fans, the co2 went from 1000 to 1300 shows, right air-flow is paramount. Thankfully I've a sensor that reads every second and is so sensitive it allows you to move your fans and shows how much longer co2 lasts if kept at an level with the foliage..
WARNING: Co2, is no joke. You can die from inproper use. I fully advise if anything you get a top sensor at least to known your levels and then you can jerry rig whatever. If not using a full kit. I highly urge to have it only in use while you're there to monitor it. No way should it be left on. As co2 is heavy it'll flow down your stairs and your beloved pets will be the 1st to suffer. It doesn't take a lot of gas even from a 1L bottle to fill a 12x12M room to 500ppm.. mine does 3x1L bursts every hr at 0.00001L a burst.
Thanks to my rep James's for the seeds & merch. The rolling tray is constant use. My bird sings its praises. The grinder, possibly the best out for grinding. Goes through wet bud like dry. It grinds it that well. When I'm trying the get a small of her tetpine profile.
COUPONS
Spider-Farmer "ggst" EU (for now) 3%
Mars-Hydro "ggs" WW 3%
Zamneisa "GROWITGD" 20%
Likes
49
Share


@SolitudeCorners
Follow
This cross between Cherry Pie and Chemdawg and do-si-dos It smells vaguely like brain cake. However, chempie has a stronger aroma than brain cake. strong terpenes of linalool, and the smoke was quite harsh and powerful with each hit. The nicest form and most substantial buds in this crop

Likes
8
Share


@Australianbuds
Follow
In start week 4 flowering! Doing well! Starting to fatten out now! The 2 smaller ones are Bruce banner and are 2 weeks behind the rest in flower!

Likes
6
Share

@Phatlad187
Follow
Week 6 on flush now sticky wasbi as been growing good got a bit of nut burn but they are on flush now and the smell is stronge and nuggets feel dence and soild
@growerchoice
@SHOGUN dragon force 4ml/l for 1 week then pure water for 1 week


Processing
Likes
29
Share


Likes
25
Share


@DrGanj
Follow
This plant was a dream to grow, wish I'd taken cuts. Halfway through dry at 7 days. Drying at 55 - 60 % RH and 17 - 19 degrees C. I anticipate she'll be done between 10 - 14 days total dry time and I'll then trim and update weights on this Harvest.
133.75g total after trim. She's a nice smoke, very happy.
Likes
13
Share


@goeser
Follow
Day 50 since Germaniation. Genetics are really nice and strong. Even against high amounts of nutritions.
Rqs never disappoints but this genetics i like the most so far. Cant wait to see the result
Likes
85
Share


@Wicked_Stix
Follow
Been on 12/12 for a week and this girl is getting stretchy. Starting to look like preflower. Did some defoliation and spread her branches out a little. I moved her to the middle of the back row because I am trying to pair similar sized plants up for even light height.
Nutrients per gallon
.5 tsp maxigro
.25 tsp maxibloom
.25 tsp armor si
.5 tsp calimagic
.1 tsp 90/10 humic/fulvic acid
Ph to 6.0
Pumping nutrients 24 hours

Likes
5
Share


@DrGreenbutterThumb
Follow
Pistols, Pistols, Pistols, seen the flowers began to develop, she stretched lot last night, feb7-8 ir video uploaded. Took all the excess leaves off my girl
Likes
46
Share


@LittleBigTrees
Follow
Stretching a lot at the moment, strong smell for only 2 weeks in flower. Pistils are now visible. As buds start to form.
I moved the centre plant out as it was shorter than the others so looks a little more roomy now.

Likes
35
Share


@MadeInGermany
Follow
Info:
Unfortunately, I had to find out that my account is used for fake pages in social media.
I am only active here on growdiaries.
I am not on facebook instagram twitter etc All accounts except this one are fake.
Flowering day 15
since the time
change to 12/12 h.
Hey guys :-) .
The lady is developing beautifully, week after week :-).
The stretch has started.
This week I will clean everything down below so that the energy goes to the upper part.
This week it was poured 3 times with 1 l each time (for nutrients, see table above).
The entire tent was cleaned and everything checked for health.
Stay healthy 🙏🏻
You can buy this Nutrients at :
https://greenbuzzliquids.com/en/shop/
With the discount code: Made_in_Germany you get a discount of 15% on all products from an order value of 100 euros.
You can buy this Strain at :
https://greenhouseseeds.nl/
☝️🏼☝️🏼☝️🏼☝️🏼☝️🏼☝️🏼☝️🏼☝️🏼☝️🏼☝️🏼☝️🏼☝️🏼
Green House Seeds Company Cup Clone 🏆
Type:
Wonder Pie
☝️🏼
Genetics:
Wedding Cake x OG Kush
👍😍
Vega lamp: 2 x Todogrow Led
Quantum Board 100 W
💡
Flower Lamp : 2 x Todogrow Led
Cxb 3590 COB 3500 K 205 W
💡💡☝️🏼
Earth: Canna Coco Professional +
☝️🏼
Nutrients :
Green Buzz Liquids :
Organic Grow Liquid
Organic Bloom Liquid
Organic more PK
More Roots
Fast Buds
Humic Acid Plus
Growzyme Big Fruits
Clean Fruits
Cal / Mag
Organic Ph - Pulver
☝️🏼🌱
Water: Osmosis water mixed with normal water (24 hours stale that the chlorine evaporates) to 0.2 EC. Add Cal / Mag to 0.4 Ec Ph with Organic Ph - to 5.8
Likes
5
Share


@Fefa128
Follow
Sorry again for the poor media content. The project was coming to an end and I was starting with another one, my first hydro grow.
Pollen was kept fertile and used after with great results too.
Sadly I don't think I have the notes where I counted how many seeds came from this plant, but well see, I'll keep digging.


Likes
277
Share


@Ju_Bps
Follow
Hello growmies 👩🌾👨🌾🌲🌲,
👋 Buds keep coming more and more fat and frosty each day ❄️❄️❄️❄️💜
💪keep removing some leaves 🍃
💧 Give water each 2/3 day
1.5 l Water + Bloom + Green Sensation (5 + 1 ml/l)
1.5 l Water + Bloom + Green Sensation + Sugar Royal (5 + 1 + 1 ml/l)
1.5 l Water Bloom + Green Sensation (5 + 1 ml/l)
PH @6
💡Mars Hydro - FC 3000
50% 34 cm.
Mars Hydro Fan kit
Setting 8, start to smeel à bit out, so I've up.
Have a good week and see you next week 👋
Thanks community for follow, likes, comments, always a pleasure 👩🌾👨🌾❤️🌲
Mars Hydro - Smart FC3000 300W Samsung LM301B LED Grow Light💡💡
https://www.mars-hydro.com/fc-3000-samsung-lm301b-led-grow-light
Mars Hydro - 6 Inch Inline Fan And Carbon Filter Combo With Thermostat Controller 💨💨
https://www.mars-hydro.com/6-inch-inline-duct-fan-and-carbon-filter-combo-with-thermostat-controller
Anesia Seeds - Frozen Black Cherry Auto🌲🌲🍒🍒
https://anesiaseeds.com/product/frozen-black-cherry-auto/


