
Likes
Comments
Share


@Nedyah420
Follow
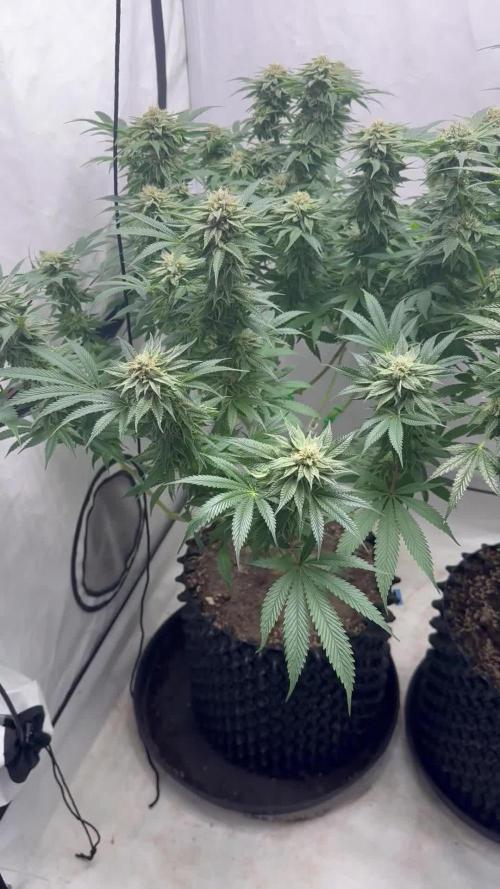
Starting to swell more each day...still very pleased with overall quality..


Likes
5
Share


@RFarm21
Follow
Another grow that has come to an end. I loved it, Simple and quick, i recommend it. It has started to dry. It will take between 10 and 14 data. Thanks!

Likes
19
Share


@HeavyHead
Follow
Great strain to run. I’ll be adding more pictures of dried products and possibly extraction videos in a couple weeks once it’s all ready ;)

Likes
13
Share

@StonedSteve
Follow
Today is day 62.
Start of the 4th week of flowering.
7 liters watering.


Likes
22
Share


@BiggestLittleGrower
Follow
Day 56f and week 8 and the girls are ripening up. Looking to harvest within the next 4 to 8 days. Just waiting for some more cloudy trichomes to show up. We've reduced our feeding to Canna Boost and Cannazyme only. For the last 4 days or so they will receive plain water. Really stoked how this girl has turned out so far and I can't wait to harvest her. Thank you everyone for likes and comments this far I so appreciate you guys. Growers love ✌️🏻-BLG
Video- https://youtu.be/NVoXwpqe9AQ
Processing
Likes
12
Share


@GanjaFarmerGrow
Follow
She is going verry nice...
Big Seedbank can be proud they got some nice seeds...
dispite the bad quality of the air..
really fully flowering..
I have increaed the feed...
hope it all goes good...
fingers crossed 👍

Processing
Likes
12
Share


@Therbalist
Follow
Busy week indoors and outdoors apologies for the slow updates! Kalini Asia's are looking good can't wait to see them flower!

Likes
36
Share


@MadeInGermany
Follow
Hey everyone 😀.
On flowering day 59 both came into the darkroom and on flowering day 61 both were harvested :-).
Both were very easy to trim 👍.
Both of them already smell very tasty but more on the last update because this is only the short intermediate update :-).
The trimmed buds were laid out on nets so that they can now dry at 62% humidity for 8-14 days before fermenting with 62% boveda packs in the jars :-).
I wish you a lot with the interim update of the harvest and we'll see you at the end 👍😃.
Stay healthy and let it grow 😀
You can buy this Strain at :
https://sweetseeds.es/de/sweet-skunk-f1-fast-version/
Type:
Sweet Skunk F1 Fast Version
☝️🏼
Genetics:
Sweet Skunk Auto (SWS34)
X
Early Skunk
👍
Vega lamp:
2 x Todogrow Led
Quantum Board 100 W
💡
Bloom Lamp :
2 x Todogrow Led
Cxb 3590 COB 3500 K 205W
💡💡☝️🏼
Soil :
Canna Coco Professional +
☝️🏼
Fertilizer:
Green House Powder Feeding
☝️🏼🌱
Water:
Osmosis water mixed with normal water (24 hours stale that the chlorine evaporates) to 0.2 EC. Add Cal / Mag to 0.4 Ec Ph with Organic Ph - to 5.5 - 5.8 .

Likes
19
Share


@adam_pawloski87
Follow
What a fun run this was ! These Ogreberrys finished up from 81 days to 102 days with nice hints of gassy , sour purple , sweetness and glistening with frost! These ladies will cure up for a month an will be ready to test out ! So much fun , I highly recommend this strain if your looking for some oooy gooohy resiny grape smelling nugs !

Processing
Likes
5
Share


@Vega0284
Follow
Beginning of Week 5. Getting ready for transplant. We made our own potting mix and compost tea with the following ingredients.
Potting Mix :
10 Quarts Fox Farm Ocean Forest Soil (Base)
5 Quarts Earth Worm Casting
1 Cup Flower Girl
5 Quarts Pearlite
2.5 Tablespoons Happy Frog Japanese Maple Fertilizer (Mixed in)
2 Teaspoons Vigoro (Mixed into top 3" of Soil)
2 Teaspoons Happy Frog Japanese Maple Fertilizer (Mixed into top 3' of Soil)
Compost Tea:
2 Cups of Worm Casting (Steeped)
.25 Cups Flower Girl (Steeped)
1 Cup of Happy Frog Japanese Maple Fertilizer (Steeped)
I wasn't entirely sure how a Compost Tea would work with feeding, so the guy at the gardening center said it wouldn't hurt to use the compost as the base liquid to water for the week, and it would be safe to add the typical nutrients ( Grow big, Molasses, Liquid Seawee, Big Bloom and Nitrogen). Guess we'll find out and hopefully I wont destroy my plant.
When transplanting we form fitted the orignal pot into the new 5 gallon fabric pot. Filled the hole and covered the rootball with Mycorrhizae.


Likes
5
Share


@Deebow
Follow
Got pretty hot in the afternoons when ac crapped out finished outdoors for the last 2 weeks
Hang dryed for 7 days at 60°60% now bagged
Likes
1
Share

@Shefman93
Follow
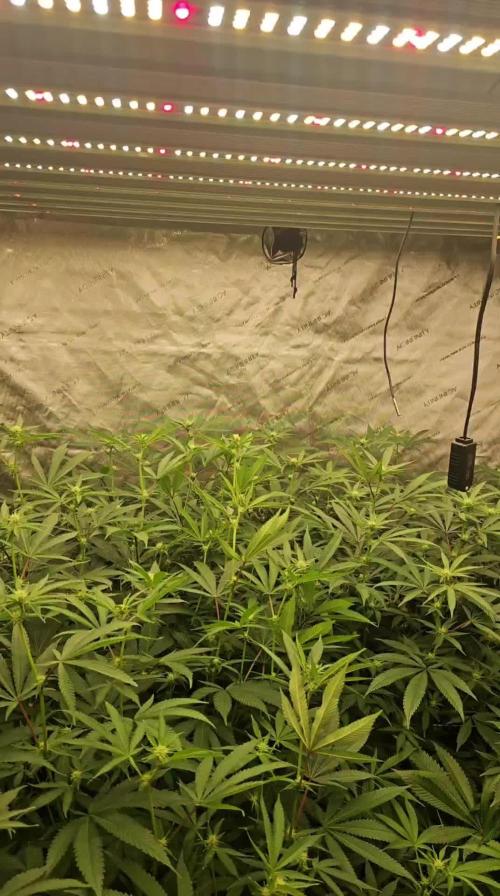
Forgot to take a video of the other tent at day 14, but my day 21 upload will have it. Tent 1 had a short stretch, while tent 2 stretch has been amazing.


Likes
45
Share


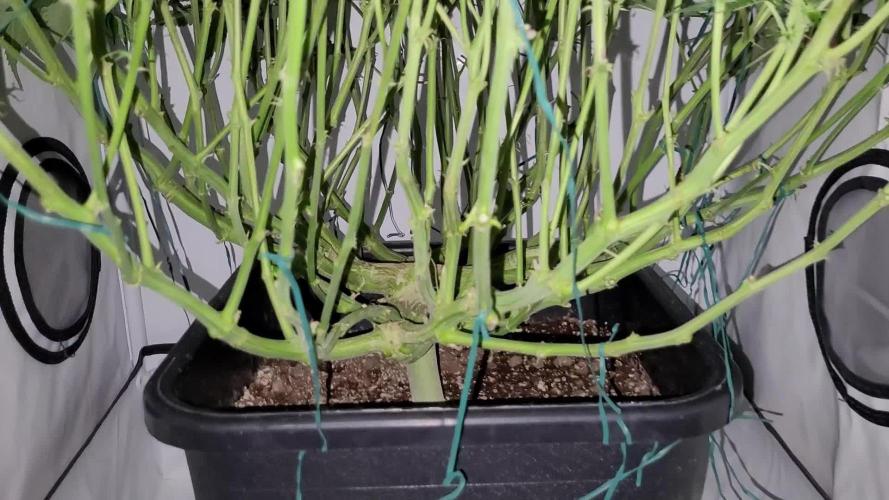
@Kitties_and_Colas
Follow
~_~_~_~_~_~_~_~_~_~_~_~_~_~_~_~_~_~_~_~_~_~_~_~_~_~_~_~_~_~_~_~_~_~_~_~_~_~_~_~_~_~_~_~_~_~_~_~_~_~_~_~_~_~_~_~_~_~_~_~_~_~_~_~_~_~_~_~_~_~_~_~_~_~_~_~_~_~_~_~_~_~_
❤️💡🌱😽💨
We're back from vacation!! These did great on autopilot, of the 6 plants, these 2 are definitely my favorite.. a simple 4way LST when all tops come in level makes me happy 😻. they're still a little too dark/overfed so we're going super light for a while.. We raised the Solux350 a few inches as well, they're stretching fast... all other plants were showing early signs of cal-mag def so we adjusted strengths for everyone..
We have the Solux350 at 75% power, we'll keep it here until their flowering stretch is over and finish out at 100%...I'm really curious to see if resin production using 2835pro/Osram combo is comparable to what 301b/Osram does.. We have another 300watt using these diodes and that tent is a frost factory lmao..not too much else to report, it was nice not returning home to dead plants lol..thanks as always for dropping by and happy harvests everyone!!
🤘😼❤️🌱
⚡Hortibloom/Solux 350⚡
Specifications ⚙️:
Diodes: Samsung LM281 Pro / Osram DR (1,440 total)💡
Driver: Inventronics 350 watt🔌
PPF: 1015 μmol/s ☢️
PPE: 2.9 µmol/j 〰️〰️
Lifespan: 50k+ hrs ⌛
Weight: 14.3lbs lbs (6.5kg)
Veg Coverage: 5 x 5 ft 🌱
Flowering Coverage: 4 x 4 ft 🌼
-Uses an aluminum heatsink (no fan), quiet while operating 👂⬇️
-IP65 waterproof ratings, tolerant to high humidity grow environments 💦
-May be daisy-chained via RJ14 and managed from a single controller 💡~💡~💡~💡~💡
🌎 https://hortibloom.com/products/solux-350-led-grow-light
~_~_~_~_~_~_~_~_~_~_~_~_~_~_~_~_~_~_~_~_~_~_~_~_~_~_~_~_~_~_~_~_~_~_~_~_~_~_~_~_~_~_~_~_~_~_~_~_~_~_~_~_~_~_~_~_~_~_~_~_~_~_~_~_~_~_~_~_~_~_~_~_~_~_~_~_~_~_~_~_~_~_

Likes
83
Share


@MrJones
Follow
These ladies were heavy yielding - just wish the PK booster did not stunt them, I feel they could have even been larger, the buds are sweet and sticky, they smell amazing, they are hard and resinous - they have a beautiful mix of dark and light shades of green with bright orange hairs, very pretty, my friends are already in love with this weed, hits you like a Sativa and as the high lingers mellows like an Indica, I can't, wait to grow this again! The is an urban legend that occasionally a purple strain emerges, and when it does the outcome is legendary, just another reason to try this strain!
Likes
10
Share


@HIAZ_urbanbudfarmer
Follow
Finished really fast! Not expecting a very big harvest, they needed a longer veg time, pretty small at start of flowering, didn't use massive bloom this run either
Going of the last run expecting good quality. Small buds.


