
Likes
Comments
Share


@BelgianBudtender
Follow
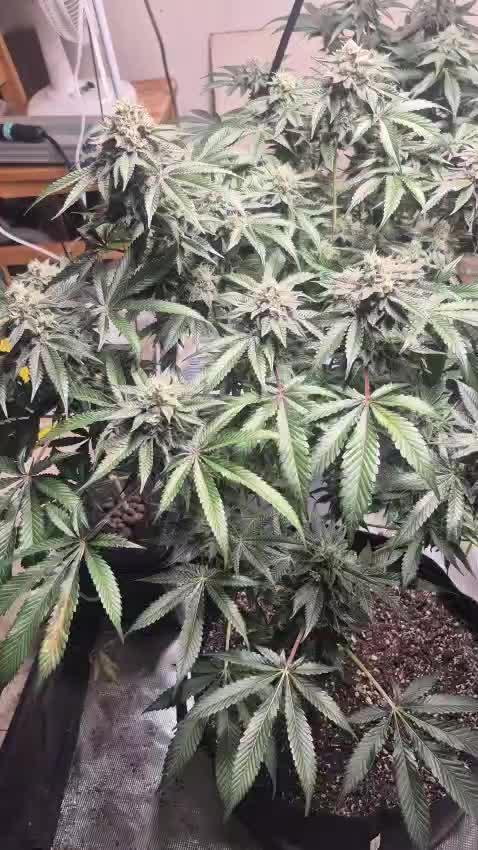
Heya Growmies, this week was pretty eventful
first off, the plant is in flowering in full force and doing really well despite a lot of user error throughout its life!
I mentioned last week I was going to do two things, the plants last major defoliation and turn my DWC into a 2 bucket RDWC.
I have managed to get around to both, I am always anxious when defoliating, scared of taking off too much but this time I really pushed my comfort zone, let me know what you think.
before, in my other grows, I have a lot of larfy buds, I dont want those, I want tight, dense small nuggies, I think one of my bigger problems back then was defoliation amount, I just left too many fan leaves.
RDWC.... Let me just say that I have proven to myself this week that I'm not destined to become a plumber, in my first iteration the drain line was too small, causing the pump to overpower it and overflow the plant bucket, I changed out the hose for some 50mm pvc tubing, which worked wonders, for the first few hours I sprung leaks and had to pull my plant out during her dark period to fix it; no bueno.
All is well right now though, no leaks and everything is circulating nicely at 500 liters an hour. I could probably get a bigger pump, but its fine, I'm going to stop tempting fate.
From here on out honestly, theres not much more for me to do other than go into the garden, pull a fan leave here or there, check flowers for nanners and balls and adjust the water. It's on cruise control now
Stay safe out there growmies, keep growing!


Likes
39
Share


@GERGrowDesigns
Follow
A Special Project from Germany and Welcome to Flower Week 3 of GoodTimesGenetix Blue Cream Haze
I'm excited to share my grow journey with you from my
GoodTimeGenetix Seeds .Im the First Person outside my Friends Company who got hands on this Strain .
He Managed over a long time to Cross these Strains:
-Blue Dream (Blueberry x Super Silver Haze - Female)
-Ice Cream Haze (Gelato x Wedding Cake x Crockets Haze - Male)
They Done a lot of Tests for a Nearly Perfect Stabilisation of this Genetic and Feminized them aswell .
This one is Professionell Created In Germany , Growed in Germany and presented To the World on Grow Diaries.
Here’s what I’m working with:
• 🌱 Tent: 120x60x80
• 🧑🌾 Breeder Company: GoodTimesGenetix
• 💧 Humidity Range: 60
• ⏳ Flowering Time: 8-9 Weeks
• Strain Info: 23%THC
• 🌡️ Temperature: 26
• 🍵 Pot Size: 20
• Nutrient Brand: Hy-Pro
• ⚡ Lights : 600W x 2
I would truly appreciate every bit of feedback, help, questions, or discussions – and of course, your likes and interactions mean the world to me as I try to stand out in this exciting competition!
Let’s grow together – and don’t forget to stop by again to see the latest updates!
Happy growing!
Stay lifted and stay curious!
Peace & Buds!


Likes
165
Share


@Tropicannibis_Todd
Follow
💩Holy Crap Growmies We Are Back💩
So what do you say we have some fun 👈 We got some EXOTIC SEEDS 👉 👻👻👻MONSTERMASH👻👻👻 😛
Well my friends we are just at the 49 day mark and as you can see shes doing great 👈
👉 So folks , she's been quite the little monster , and she's building some nice buds 👈 Shes the only one that hasn't had any issues 😎
Lights being readjusted and chart updated .........👍
👉I used NutriNPK for nutrients for my grows and welcome anyone to give them a try .👈
👉 www.nutrinpk.com 👈
NutriNPK Cal MAG 14-0-14
NutriNPK Grow 28-14-14
NutriNPK Bloom 8-20-30
NutriNPK Bloom Booster 0-52-34
I GOT MULTIPLE DIARIES ON THE GO 😱 please check them out 😎
👉THANKS FOR TAKING THE TIME TO GO OVER MY DIARIES 👈

Likes
8
Share

@Samsationalseeds
Follow
Because i'm away for two weeks the only thing I can do is upload screenshots off of the vivo time lapse camera.A half set in the room
Dad sent me a video of the plants. Uploaded both

Likes
7
Share


@BigUncGotGaz
Follow
Day 56 Veg from Seed
Crazy what a scrog method could do in just 1 week 🔥
Definitely going to preform this method again in my future grows.
Today was the last day of veg I prep my reservoir for flowering stage (nutrients mix with 5Gal spring water) and flip my lights to 12/12
Also collected a few clones from each plant giving me the opportunity for a mother plant or 2 then have a full run in the near future ⛽️

Likes
24
Share


@Jays_Not_Here_Man
Follow
Another week has flown by! The girls are doing great, cruise control this week as I have just been monitoring RH and temps. Trying to keep them as low as possible, I’ve been getting as low as 74 during the day and 68 at night.
I finally took a look a look at the trichomes with my jewellers loop, lots of cloudy, and a few amber around the leaves and top colas, but still lot’s of clear trichomes. I’ve ordered myself a wireless/usb digital microscope to assist with the process, and looks like it will be here just in time to determine harvest day. 😎🎄
I started by eliminating the nutrients at the beginning of the week. I typically allow for 3-4 pure water feeds before I harvest, and at the rate they have been drinking, this should be enough to get through the 7-12 days they have before harvest. I don’t flush, but rather “rinse” with normal water amounts, allowing the plant to use up the remaining nutrients in the soil. This also allows me to recover most of the soil from my grows and reuse ♻️ with other soil mix.
There has been great debate and a great deal of bro science out there for many years, but the recent studies suggest there is no difference in end result when it comes to flushing or using nutrients right until the end, if a proper dry and cure is performed. What do you think? What do you prefer to do? Thanks for reading this far, leave me a comment with your preferred method 👊🇨🇦❤️

Likes
9
Share


@Rizik86
Follow
Day 36 - Checked PPM 400. Plant is wide and bushy.
Day 37 - Plant is 28 inches tall and 10 inches from the light.
Day 38 - Plant is 29 inches tall. Root system is almost maxed out for 5 gallon bucket. Checked PPM 700. Built a new light stand/grow area. Now bigger then 4 by 4 foot area.
Day 39 - Started a new bucket of water and nutes. Added 20 mL of CalMag Micro Grow and Bloom. Added 10 mL of each additive. I didnt add the rooting additives Tarantula Piranha and Voodoo Juice. PPM is 1,600. Plant is 32 inches tall. Different looking growth forming.
Day 42 - Checked PPM 1,520. Added RO water. PPM is 640. Added 10 mL of CalMag Micro Grow and Bloom. Added 5 mL of each additive. PPM is 1,300. Plant is 34 inches tall. Noticeable bud development started.

Likes
27
Share


@w33dhawk
Follow
19.07.21 Moin liebe grower Gemeinde hab gestern (Sonntag 18.07.21) die ersten 3 Ladys wieder getoppt und endblättert danach habe ich alle 4 Äste, (bei jeder Lady) versucht auf eine hohe aus zu richten was ganz gut geklappt hat.mir is aufgefallen das alle Ladys gleichmäßige nodien produzieren bis auf purps OG Nr. 3 die hat an einem Ast tatsächlich 4 neue auf einem Haufen wie auf dem Bild zu sehen ist ich gehe Mal davon aus das
es durch den Stress verursacht wurde vom toppen,denke Mal das solche Anomalien normal sind und werde den Spass weiter beobachten hab wieder was zum lernen gefunden 😎😎😎😎😎 Mal sehen wie sich das ganze entwickelt denke Mal das ich Mittwoch oder Donnerstag Lady nr.4 in ihren endtopf setzen werde und dann auch gleich weiter Main Laining an den ersten 3 weiter führe. Ach ja zu den 3 Stecklingen in der Mitte habe vor sie die Tage nach draussen zu setzen ich weiss ist ziemlich spät dafür aber ich liebe Experimente, bis die Tage und euch, die alle bald ernten und auf dem Weg dorthin sind wünsch ich ne reichlich Fette Ernte mit glitzernden disco Kugeln🕺🕺🕺🕺🕺😁😁😁😁😁
22.07.21 habe gestern die ersten 3 Tomaten Ringe gebaut sind jeweils 5x35 cm Zaundraht die ich eingedreht habe (also sozusagen eine Öse), habe dann alles nochmal auf gleiche länge geschnitten und mir ein langes Stück Draht ca anderthalb Topfumrandungen lang. Stäbe am Topfrand verteilen wie sie ca stehen sollen und dann den Draht einfädeln und zum Schluss überstehendes mit Kabelbindern (Strapse) fest zurren ezzzz. jetzt stehen die Stäbe ca 14 cm über dem Topfrand. Drückt mir die Daumen das alles so klappt wie ich mir das vorstelle is das erste Mal das ich mit dem Tomaten Ring arbeite. Zu purps OG Nr. 4 die ist heute in ihren endtopf um gezogen, werde Sonntag dort dann auch auf 8 Äste toppen und danach den Tomaten Ring einbauen euch allen noch ne Ernte reiche Woche


Likes
5
Share

@jdean88
Follow
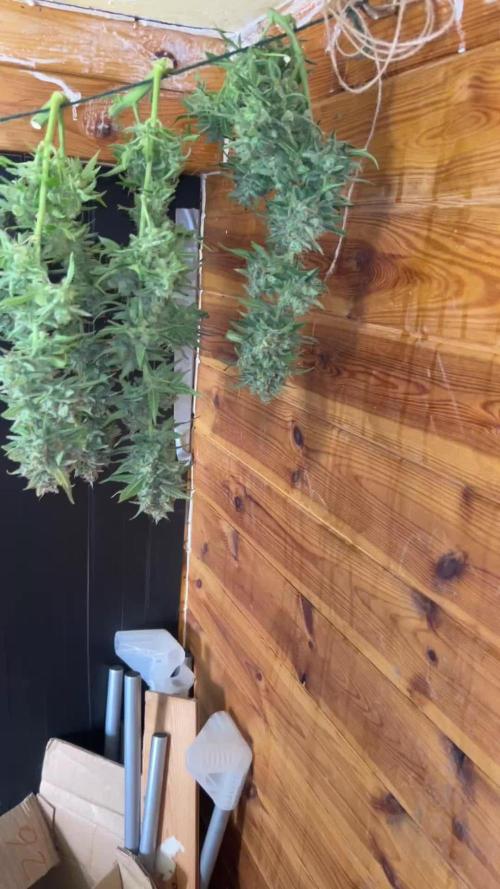
all chopped now and currently drying they all smell amazing and frown age I see over 100g on all
Plants but will update once dry with official harvest post
Likes
1
Share


@Dubl_Jointed
Follow
Chopped and done been drying for a total of 14 days ! (Feb 11th) and now just waiting to do some trimming! pics and yeild soon after cure !

Likes
9
Share


Likes
9
Share


@Yiyis_Grow
Follow
Buenos humos a todos!
En mi humilde opinión, esta semana este experimento ha tenido un hermoso y gran avance.
Para ellos es suficiente los sobros del riego de las otras plantas. Se ven felices y saludables.
Proyecta que van a ser cuatro hermosas colas gordas y pesadas.
Perro + Chile + Steel Pulse + Buenos humos 🤙🌊

Likes
17
Share


@BushDoctor740
Follow
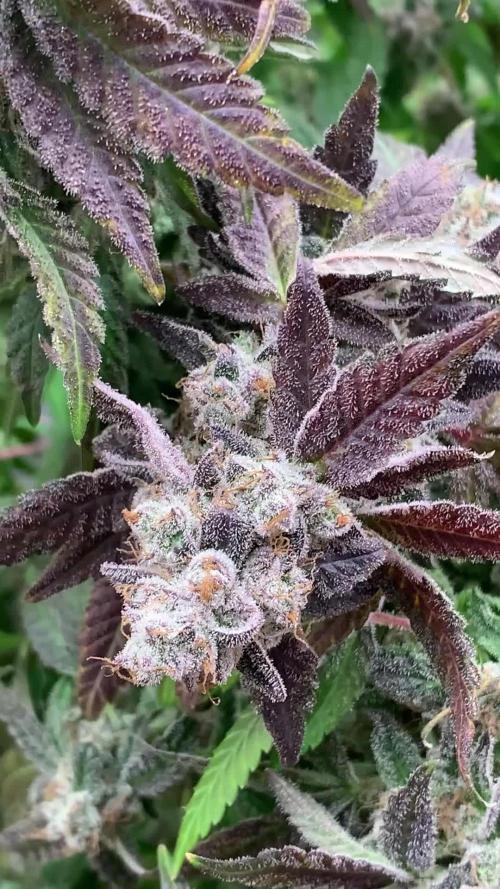
Frostbangers are doing really well as the buds are thickening up she smells so good.They are starting to produce some heavy trichomes.I have begun to add 2ml Plagron green sensation every feeding now.The light intensity is set at 70 percent on the Se7000 which they are taking well.
Likes
18
Share


@EaRtH
Follow
21.11. - Entering new week, still recovering from the deficiencies ❤️
24.11. - Watered
27.11. - It's been a calm week. Plants have recovered from the deficiencies, but not completely. I've learned that I should have used also Bio Grow in the mix with the Bio Bloom. Next week I'm planning to add some of the grow to the mix and then flush another week. However the buds are looking nice, fat and really smelly 🍋🍊
21.11. - 27.11.2023