


Likes
Comments
Share


@cuervo420
Follow
Segunda semana de 🌹, las bebas se siguen estirando. La red ya ni se ve y acomodamos la barra UV26 de GS que a fin de semana entran en acción.
Especificaciones
🌱 Genética: Muse de @rkiemseeds (central), Portela de Rkiem(las dos del fondo y abajo derecha) y Hulkberry (RQS abajo izquierda)
🚀Maceta: Mad Rocket 16 litros
Fertilizante: Mad Grow Flora, Engorde, Algas, Elicitor y Fungus de @mad_line_oficial
🌎Sustrato: Mad Earth
💡Luz: Mx150 de @gsiluminaciones


Likes
3
Share


@Chuckwaggon420
Follow
This week has been awesome with these ladies! Have moved them to the flowering tent and letting them get acclimated in here. Will prolly do 1 more week then switch to flower for this tent! Have got all 6 ladies all stacked in here all tight together. They are already demanding alot of water so I can see how a drip system might be nice but idk if would work for coco
Still doing same 5.6- 5.7 ph declorinated water with a heavy feed. Still doing some training as these girls grow so have more tops as they streach. I maintain about a 60%RH for this room for now and give them ladies about 1400ml every 2 or 3 days.
Will do a pre-flower check again in the next couple days should be showing havnt looked much! Fingers crossed!!
Much

Likes
11
Share


@Inceptionist
Follow
First week was running quite well. VPD could be more on point but it's alright.
The lights are now at 25% (~66W).
I'm just not quite sure if I should just let them grow or if I should LST them. Allegedly King's Juice has a nice natural structure.
Oh boy I just had to put an early update in. King's Juice #3 is exploding while #1 is continuing to be the drama queen
Likes
16
Share


@Chubbs
Follow
420FASTBUDS
FBT2107 WEEK 6
These two beautiful ladies are growing great. Staying on the shorter side but very bushy and healthy from the looks of it. It's been super cold so they have hung in there when temps have dropped lower than I would've liked. Fixed the issue by adding an oil heater in the tent so far so good. Only have snow in the forcast for the next week or so then it should warm back up a little. Kept the same feeding they've responded well to it. All in all Happy Growing

Likes
8
Share

@Tropicalsalt
Follow
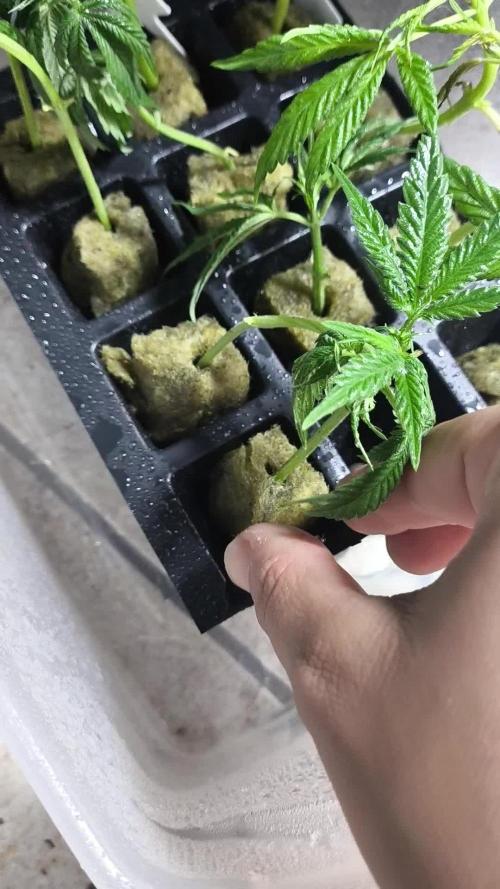
First week of flower gone! They are streching nicely, I'm stacking up the EC to give a generative stimulus. Having trouble with the temperature, there's a heat wave going on and I dont have A/C...at least it's not mold! They are holding up nicely, I'm getting a humidifier to help out. Clones are stating to show roots and callus.
Processing
Likes
Comments
Share


Likes
24
Share


@TerpTurtle
Follow
Flipped tent to flower
Strawberry truffle is so sticky, just defoliating veg growth and your hands are extremely tacky,
Healthy plants, All leaves are fat and genetics proving themselves to be strong+vigorous
Likes
10
Share


@KushManF
Follow
Some of the leaves are yellow/ brown. Did a bit of research, looks like soil might be dry (especially due to high temps during this time of year) and possibly leaves being burnt by sun.
Watering with a little bit more volumes of water, based on extra heat. Will track and see how week goes. The 2 bad fan leaves which looked really bad, I cut them off. Increase in volume of water for plants really helped due to really hot temperatures.
Week 10 no nutrients (only used on 1st day and 2nd day of week 10) , just straight water.
Likes
20
Share


@Ieiogrow94
Follow
Eccoci qui...
Che splendore questa genetica, NON SEBRA MARIJUANA!!!
Questa settimana posso solo dire che sembrano fatte di marmo.
STRAIN 1 super compatta chissà come sarà alla fine del raccolto!!!!
Si inizia a vedere il viola nelle foglie FINALMENTE!!!!!!
Grazie a @Khalifa_Genetics per la collab e a tutti per il supporto🔥🌲❤️

Processing
Likes
12
Share


@2Stones1Bird
Follow
Checkout my Instagram @smallbudz to see the Small budget grow setup for indoor use, low watt, low heat, low noise, step by step.
17/11/2019 - Pot feels light and the is bottom dry to the touch time to water, gave her 1,5l of water PH 6.2 with 0.5ml Grow, 1ml, Bloom and 0.5ml Max Biobizz reduced the dosage from last time, watered util some runoff appeared.
18/11/2019 - Mixed another batch of Alg-a-Mic 2ml per liter to spray on lights off PH 6.2

Likes
Comments
Share


@Uneasy
Follow
one of the plants could not stand the heat any longer. I cut almost all of its branches, I will cut it completely. Others struggle with the heat, but there's nothing I can do.


Likes
69
Share


@MrHightimes
Follow
Chop Chop! Glad to have finished up this dope little plant! Looking forward to growing this strain in full size pots!


Likes
17
Share


@grow_rva
Follow
GP #1 required another week of heavy defoliation. Light defoliation on GP#2. Shes sticky to the touch and starting to show orange hairs.
Smell is starting to really come out in the room even before I open the tent.
GP#1 is at 43 inches and GP#2 is at 40 and a half.
I added a video where she knuckled up after being supercropped a couple of weeks ago. I thought I needed to brace her to handle the bud weight but she’s going to be just fine.
Til next week!
Likes
10
Share


Processing
Likes
14
Share


@Silverback_Guerilla
Follow
TUESDAY 7/23:
The FIM'ing seems to have only doubled her main, but that's okay. She's going from Hawaii conditions to Arizona conditions every day...8-10 hour of 72f/70+%RH to 12-14 hours of 96f/35%RH and taking it like a champ. I foliar fed her after taking her outside today and started training her a little bit. Gonna try to get those tiny lower branches to think they have a shot at "primary cola" status. I had no wire with me, so I just used a pliable length of dead-ish vine that was lying on the ground. I'll use some wire and binder clips when I can find it..
Evening...same day: She broke the vine I was using to hold her down, so I dug around and found some clips and wire.
WEDNESDAY:
She was just about 4 inches beneath 120w of LED last night with tons of blue spectra, 69f temperature and 80% RH. Those lower branches gained another half inch each and the top colas have turned to face the sun. I foliar fed her and gave her a little douche of Bactrex this morning when I took her outside. Had a cool front come through today, so the high will just be 87f and it's dropping to the mid to low 60's tonight..hooray! They're forecasting another day or two like this before the return to "oven-like" conditions.👍
I carried my pole saw down to the site at daybreak and removed a few smaller branches above them and to the West. I'll see if it is allowing some evening sun to reach her when I go down there to fetch her home to the LED's for the evening.
THURSDAY:
I was somewhat successful with getting a little bit more direct sunlight to her while outside during the day..about another 20-25 extra minutes. She got a sip of compost tea today with a little kelp me kelp you and big bloom.
I tweaked her indoor domain a bit..she's now got 2 x 12w Miracle LED veg bulbs (cool white with 475nm peak), 1 x 75w cool white/460nm 225LED panel, 1 x 40w Sansi daylight grow bulb, 1 x 50w 460nm/cool white flood, and 1 x 18w 18" pinkish grow light bar. None of the lights are more than 5 inches from her, so she's incredibly well lit. I'm estimating that it's about 5,000 micromoles an hour, but I'm keeping the temp at her canopy under 80f with 90+% RH. It's not direct sunlight, but I think she's happy.
I'm still undecided as to whether I'll keep her on a 24/0 schedule or if I'll cut it back to 20/4 when she starts flowering. Since I can provide her with a cool and humid environment for a third of the day, I'm leaning towards running 24/0 the whole grow.
FRIDAY:
I accidentally burnt her up a little bit today..one of the overhead LED's slipped and was about an inch from her top leaves...oops..I put her outside and misted her with some boom boom spray and kelp me kelp you..
SATURDAY:
She's got a few crispy leaves, but she perked up and is growing again...whew...😓
SUNDAY:
I tweaked her indoor environment today. She's now got a 120w quantum board (3500k) overhead, a 24w panel with 225 x 660nm red LEDs, the 40w Sansi light, one 9w 2' bar grow light, and one 12w Miracle LED blue.
Likes
13
Share


@masterofsmeagol
Follow
7/6 Plants looked great thos morning. I WATERED A GALLON to the 50 and split one between the two tens. Top of the bags are still moist amd they still have some heft. I'm hoping this will at least carry me 48hrs. These are BIG plants and the wind goes right through those bags and dries them out. I'd rather have that though than worry about overwatering. I noticed some minor deficiencies on a couple plants so it's time to start the nutes. Calcium I'd guess. Just a beginning stage but it's time. Next feeding they'll get some food too. I'll still monitor during the day to make sure they ront dry out. It's amazing how fast they come back after they dry out but it stresses them.
EDIT: I WENT OVER AROUND 2OM AND IT WAS OVERCAST AND 83°. ALL THE PLANTS LOOKED GREAT AND ALL OF THEM WERE STILL SLIGHTLY NOIST EXCEPT THE 10TH PLANET. THEY ALL HAD SOME HEFT TO THEM TOO. THE SUN IS OUT BRIGHTER NOW BUT IT MAY RAIN TONIGHT AND CONSIDERING HOW GOOD THE PLANTS LOOKED I THINK IVE FOUND MY CORRECT WATERING RATIO. IM NOT GOIMG TO 9VET WATER IN THESE GROW BAGS WITH ALL THIS WIND. I NOTICED SOME FOUR LINED PLANT BUG MARKS ON ONE OF THE LITTLE PLANTS AND REMOVED A FEW LEAVES FROM THAT THIRSTY 10TH PLANET THAT COULD BE SEPTORIA. IM GOING TO TREAT IT BUT I HAVENT DECIDED WITH WHAT YET. I MEAN I NEED TO MAKE SURE ITS NOT JUST PESTS OR WATER SPLASHES FIRST TOO. I'VE BEEN PRETTY SANITARY THIS YEAR. IF I HAD A PLANT THAT DIDNT RESPOND TO TREATMENT AND IT WAS INDEED LEAF SEPTORIA I THINK ID RATHER SACRIFICE THE PLANT THAN RISK SPREADING IT. IM PROBABLY JUMPING THE GUN BUT I NEED TO BE READY IN CASE THAT'S THE CASE. IF NOT FOR LOCAL LAWS I WOULD THE PLANT ISOLATED. BUT IM TALKING I PULLED MAYBE FOUR LEAVES OUT OF THE LEAFIEST BUNCH AND INSPECTED EVERYTHING.
7/7 We got thunder storms last in the afternoon and last night. For at least 45 mins it rained harder than I've EVER seen it. Pure sheet rain. It turned over to heavy rain before moving out. The plan was to water everything this morning and start feeding. As I said in the video the soul was still moist amd the bags still had some heft. Not like I just watered them though. I stopped by a local dispo on my way home and talked with the best grower I personally know (thanks Junior) and his advice was the same as what I was planning. I planned on going around noon to check them. He said I could probably wait until like six and then when I do water give them like a 1 1/2 gallons to make up for that monsoon we had earlier. I showed him the video and explained how I have been watering. My intuition feels good about this. I may go check on them earlier but I don't think it's necessary. As usual I'll update as I go.
EDIT: AS SUGGESTED (WELL I SPLIT THE DIFFERENCE) I WENT OVER TO FIND ALL NY PLANTS LOOKING GORGEOUS EXCEPT THE 10TH PLANET REVEG THAT WAS A "LITTLE" SAGGY. I LIFTED THEM AND FELT THE SOIL IN THE BAGS. I DECIDED ON WATERING AS PLANNED EVEN THOUGH IT MIGHT HAVE MADE IT UNTIL NORNING. THIS WAS MY WATERING DAY ANYWAY. HOWEVER I ONLY WATERED 1 GAL PER 20 1.5 FOR 30 AND .5 FOR 10. I THINK THAT WILL WORK OUT GREAT WITH THE UPCOMING COOLER TEMPS. IT WAS SO HOT. DIDNT HAVE TIME BUT SHIT IS LOOKING GOOD.
7/8 Finally that hot streak has broken. It's in the 70s and it rained a little last night. Had to use an iPhone and send it to me because my phone was dead. My plan worked out great and everything is looking fantastic. We may get some rain tonight but I'll be watching the forecast. I DO need to feed and may do that. I might wait until next week. I also need to figure out what to do about that four lined plant bug. The birds that perch on my cage do a good job getting pests. Knock on wood I haven't seen many. I killed one pillar and there's just that four lined plant bug. That's really the only damage. I'd Hate to spray my girls with a bunch of shit over ONE bug. We shall see and I'll keep this updated.
7/9 Phone was dead this morning. Went back over later and defoliated a little bit. On reveg ive found a few spots that look like it could be septoria. Could be splash up or a million other things too. The birds have been taking care of pillars. I've found two this season which were promptly killed. Everything looked good. We are in much cooler weather now. Still high 70s with at least 90%rh. Could have showers but I need to keep up with my watering. I kept with the increase and watered everything with 2 gallons. With the exception of the 50 and the two 10's the 50 I skipped and each 10 got 1 gallon. Now it's time for a shout out. I get my seeds from North atlantic seed company. They have a sister company @dirtybirdgenetics which produces amazing strains that flourish in Maine. N.A.S.C has always used me good but this will be my first dirty bird grow next year. None of this was necessary but it's greatly appreciated. The hand written note put a huge smile on my face.
7/10 Rained last night. Phone won't charge so I used an iPhone and uploaded some pictures and a video. Plants are looking good but I've noticed "a" leaf with pillar markings. It's time to start feeding. I'm not sure if I'll start tonight or next watering. I'm not really sure. Any deficiencies are minor. I need to check my supply and see what I'm going to use. I'm suprised I haven't seen any wpm (knock on wood) with rh so high and "rolling mists". Happy 7/10 to those that indulge in oil.


Likes
5
Share


@banditman1200
Follow
these two ladies I hope are not going to get any bigger, but now into bud.