
Likes
Comments
Share


@GrowerGaz
Follow
Just a lot of defoliation and a little lst this week. Hesi working great . Flipped today 1/9. Light is doing brilliantly so far


Likes
21
Share


@cadur
Follow
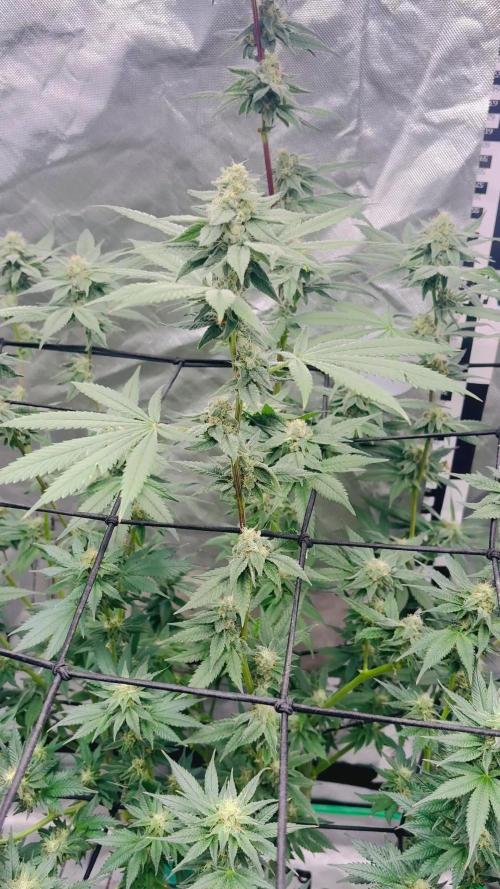
Growing well. It's now so tall I can't raise the light any further so I've had to pull the ever lengthting main branches over using some wire.
She's drinking like a fish too.
Some of the new leaves are patchy so uppped the nitrogen?!? Could be a mistake.
Some leaves are starting to get trichomes, yay!
Also pulled lots of the lower leaves as they were practically in darkness.


Likes
56
Share


@Island
Follow
After many weeks believing that I have mites in my cultivation, I start to believe that my real problem is my soil.
Apparently my soil still has decomposing material and it has affected the leaves.
Waiting the flowering goes and how will plant react of it.
I hope it not serious thing.
My leaves problem look like excess of nutrient in soil formulation.
On this week I turn lights on.
Now there will be 360W full power to flowering stage.


Likes
12
Share


@Jesperado
Follow
I made a video update for week 10.
Remember to turn on audio of you want to hear the scrambled voice of freedom.

Likes
26
Share


@Ageddd
Follow
Whats up GD !!!
------------- GROWTH-------------
She is getting weight and finishing, leaves turned purple, red, and all the amazing colours you see in photos, she is almost ready and it is so frosty,
Smells like red licorice, and fruits.
Flushing last 7 days.
------------- IRRIGATION-------------
1,5l, watering each 3 days .
1 of 2 irrigations with nutes, and the other with water.
------------- NUTRIENTS-------------
Top Bloom (3ml/l)
Top Candy (2ml/l)
---------------------------------------
Good vibes !!
_29/06/2018_


Likes
1
Share


@Ieiogrow94
Follow
Eccoci di nuovo qui!!!
Super eccitato per questa nuova collab con Divine Seeds, team davvero al top, che mi ha dato l’opportunità di testare questa nuova genetica e di condividere i progressi con tutti voi!!!
Come sempre partiamo nei bicchieri per poi travasare.. Questa volta verrà svolto tutto sotto la Lumatek Zeus 465 ProC, mi aspetto molto da questo ciclo!!
Settimana devastante sono in procinto di terminare la fioritura, non vedo l'ora di finire!!!!!!!
Grazie a tutti per il supporto ❤️🍀🔥

Likes
92
Share


@GERGrowDesigns
Follow
The Greenomatic doing Good
Getting bigger and the buds are devoloping.
Nothing Special Happend . Just doing my Narcos Organic Nutriets every water theye gaining .
Water : 2-4 Liter every 1-2 days
19hour light
200 watt light
20liter pot
28 day Temperature
55%Humidity

Likes
5
Share


@GREENPHOENIX6262
Follow
* Critical+2.0 Week 1 Veg - 10/08*
Thus far all is moving accordingly - Light nute feeds have begun - Moved into 4x4 tent with C02 Exhale bag.

Likes
9
Share


@masterofsmeagol
Follow
6/15 Everything was dry this morning but the bags STILL had some heft. Much lighter though so I decided to water. I didn't realize how cold the hose is so I'll have to usecthe water inside or premix it. I watered everything at least a half gallon. Things are going great. I'll update as I go.
UPDATE: IM GLAD I WATERED. ITS 73° OUT AND NICE AND SUNNY.
6/16 Foggy morning has turned into a sunny day! Plants are doing amazing. So glad I watered. I took a shit ton of pictures but they don't seem to be uploading. VERY FRUSTRATING TO TAKE THE TIME TO TAKE PICS AND VIDEO ONLY TO HAVE IT NOT UPLOAD.


Likes
3
Share

@Budoken
Follow
Harvest:
200g dry total
Two big jars full of trims and aery buds.
Final update: this is a bit overdue, I've been enjoying the fruits of labor too much perhaps 😎
Buds have been curing for a month in Grove bags, the big one has 100g and the rest are in smaller bags. Didn't need the mason jars, instead I put the trims there. I really like those Grove bags, so easy to use, initial drying and then just filled the bags. No need to burp, just set and forget.
Really happy with the outcome, now I have smoke for few years 😂 Many of the buds were a bit fluffy, maybe just because there were so so many bud sites. The main branches were dense and heavy. Also, the foxtailing made some of them look not so perfect but I don't mind really.
Smoke is pleasant, flavorful and good high. No anxiety, just relaxed and happy.
Still need to decarb and make oil from all the trims, it'll make a big load of cookies etc. which I really like. Gives a steady 2-3h high hopefully.
Now I will be having a break for some time, since the current location is not the best for growing. Hope to get back into it soon though, I didn't remember how much fun it is until doing this project again after a long time ✌️
Trouble in paradise, a week ago I noticed spots of mold in few branches farthest from the fan. So I cut them off and put to waste. I also decided to cut all the remaining big branches as a safety measure. Rest of the plant was harvested a week later and now the project is wrapped apart from drying and curing.
Overall, it's been fun despite of making some mistakes along the way. But I will take the learnings for the future projects. This was my first autoflower try and I've been positively surprised by it's qualities. Plant was resilient and didn't care that much about any issues it had. It grew bigger than I expected and was actually overcrowded. NFT system worked great, as did the nutrients.
The first batch of buds are almost ready to go to curing and the rest will take a week or so to follow. I will try curing in Grove bags and in mason jars. I will post a final update once I get to trim the rest and also try the fruits of labor 😎
Likes
3
Share

@centralflpheno
Follow
They are absolutely beautiful and have a berry/gas nose on it , they are starting to really bulk up. I feel like the big one stoke the light from the other so I’m going to grow #3 again to see if it’s a different Phenotype . Let’s go!!!
Likes
37
Share


@MrJones
Follow
Cream Mandarine XL-Auto #2 / FOOP Nutrients
======WEEKLY GOALS =======
🌞Environment - 80F and 50%Humidity - using Humidfyer as needed.
💧 Feeding - Feeding with FOOP Canna Organic Nutrient Line
🍃Training / Keeping Stems Stable and Strait
🕷️ IPM - Will be using Green Cleaner" 1 OZ per Gallon, and CannControl from Mammoth alternating between product each month for Integrated Pest Management.
🔅 Vegetation & Flower Kingbrite 240W QB288 v3 LM301H 4000k+ 660nm Red x2 - Maintianing 575 PPFD
========Plant Update===========
🌱 Plant - Week 6 started today, the plants are doing great very healthy, will need to do another IPM treatment in the mornting.
===========================
▶️Monday 03.29.21 / These girls are re well into flower, they are soundly in the 9/10 week glide path, they should start building up this week, may need to remove a few more leaves.
▶️Tuesday 03.30.21 / These look great every day, and have gotten too tall!! Feeding about 30 ounces per day.
▶️Wednesday 03.31.21/ Decided to cut the FOOP to 60%, feeding 30 ounces per day.
▶️Thursday 04.01.21 / Decided to cut the FOOP to 60%, feeding 30 ounces per day.
▶️Friday 04.02.21 / Decided to cut the FOOP to 60%, feeding 30 ounces per day.
▶️Saturday 04.03.21 / Decided to cut the FOOP to 60%, feeding 30 ounces per day.
▶️Sunday 04.04.21 / Decided to cut the FOOP to 60%, feeding 30 ounces per day.
Likes
9
Share


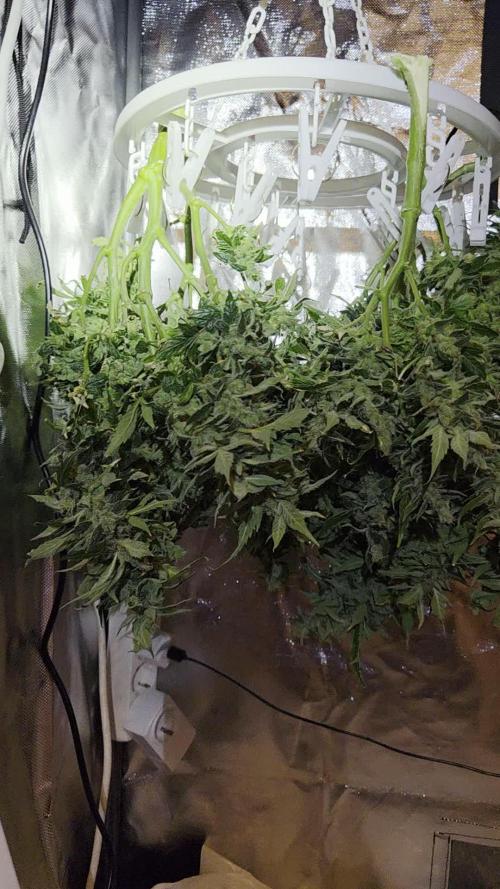
@Canadian
Follow
Looks like the plant is reaching its final weeks and has been doing great in my garden and is looking fantastic from now on pH water and calmag. looks Like it is within 1% of Amber so still a few days to go normally I will cut out all the fan leaf and a few Sugar Leaf then take down the entire plant and hanging upside down but because the place where I dry is the same tent but this time around I'm probably going to need to create a dry box cut them down into more manageable size because the other girls in my tent well take more than a few weeks I also can see how much of a difference does it make between hang them upside down and drying them like this thank you for reading I will continue to update have a happy grow

Likes
3
Share


@Ryno1990
Follow
Week 6 for this beautiful girl was flush week an she was ready to harvest she has some amazing plump nugs covered in trichromes this medic grow led is no joke as it helped produce some top of the line plants
Likes
11
Share


@LittleBigTrees
Follow
Transplanted to 4 litre pots , the growth has been explosive over the last 7 days