The Grow Awards 2026 🏆
Likes
Comments
Share
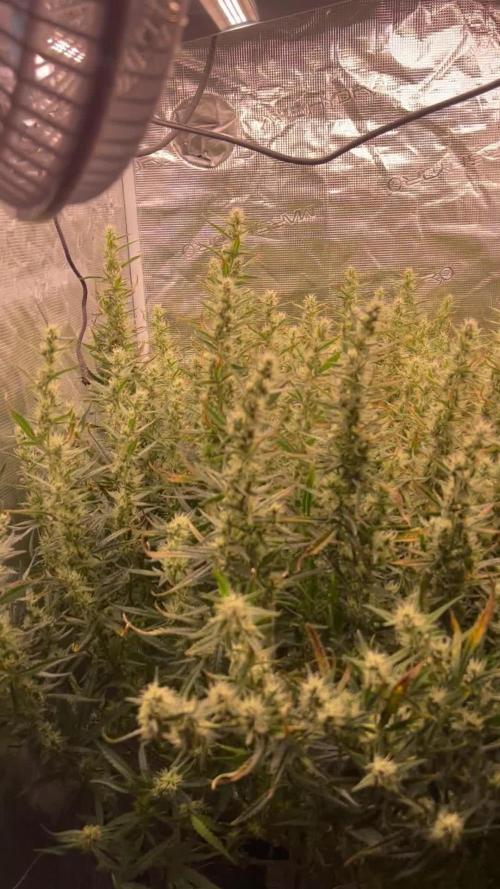
#AutoBlueberry Total Dry Yield, DIY Dry Box, Full Garden Update and Smoke Sesh: Super Cropped with Low stress Training for Big Bushes and Bulbous Budz! Big Girls getting Flipped to Flower on 9-24-21 AutoBlueberry 14th w/ 9th W/ Flower breed by #DivineSeeds #DivineSeedsSquad #DivineSeedsBreedingCompany No 6th feed of #NukeHeads Nutrients #PlutoniumBloom this week, I Flushed her out for the last 5 days of her life w/ 2 gallons a day w/ some Cold Declorinated Tap water and Checked her Tricks every few days till she was Ready for Steady! Lol These Lush Ladies and those Awesomely Purple Budz with Trippy Trichomes Growing on! I made and/or converted one of my Budz into a Polyploid (Bigger and More Bulbous Bud) This AB is Flowering out and her Smells are Super Strong of Gasy and Candied Blueberries! I recently Trained down her branches to expose more Bud sites and Removed the Biggest fan leaves to expose the Bud site's to this Glorious #BloomPlusBP1500w #GrowStarQB1000w #OsreeQB1000w Full Spectrum Grow Lights! I've also Super Cropped, Topped um, Defoliated, Leaf tucked, and Implement the 3D's method like my Broski #TigerfishOrganics to remove the Dead, Dying and Diseased leaves! Origin:Afghani/Thai Type:50% Indica/ 40% Sativa/ 10% Ruderalis Flowering:56 days THC:22% Harvest:400-550 g/m2 Height:110-150 cm They were Growing under the #Growatt600w and in my #TopoLite 24×24×48 Grow Tent but I've Upgraded and Updated it to my #OsreeQB100W I'm also using #TNBNaturals #TheEnhancer Co2 Despersal Canister and using thier Ph⬆️⬇️ for my Decolinated Tap Water! Green and Growing Up Great! She's Growing into her 9th week of Flower! She's Growing in my special blend of ProMix potting mix, a 1/2 bag of Earthworm castings and 2 light handfuls of Diatomaceous Earth mixed Up well for before transplanted! Diatomaceous Earth: Diatomaceous earth is made from the fossilized remains of tiny, aquatic organisms called diatoms. Their skeletons are made of a natural substance called silica. WHAT IS DIATOMACEOUS EARTH? In a nutshell, DE comes from the fossilised remains of small marine organisms called diatoms. Over a 30 million year period, these hard-shelled algae collected on the bottom of bodies of water, eventually forming into a type of sedimentary rock. Fast forwarding, it wasn’t until around 1836 that a German peasant Peter Kasten discovered the ivory-coloured, powdery substance while drilling a well in northern Germany. Ever since, the usefulness of DE for multiple purposes, including industrial and horticultural applications, has been well-reported. Just sprinkle some diatomaceous earth on top of your soil and watch mother nature's secret weapon work its magic.CONDITIONS THE SOIL When it comes to growing cannabis, everyone strives to provide the best soil to grow the best plants—but there’s always a way to make it even better. Making the soil a better medium is called soil conditioning, which is exactly what diatomaceous earth does. It works by improving the retention of moisture in your potting soil, holding a large amount of fluid and drying at a rate that’s much slower. This natural soil additive also helps to retain nutrients and allows for better oxygenation of the substrate. NATURALLY CONTROLS PESTS DE is an all-natural, safe-to-use substance that doesn’t harm the cannabis plant with toxic chemicals. The nature of diatomaceous earth makes it useful against most types of insect infestation you might be experiencing; and unlike chemical insecticides, insects can’t develop a resistance to the effects of DE. So once they’re gone, they’re gone for good. DE is an abrasive. and when used as an insecticide, it gradually scrapes away an insect’s exoskeleton, absorbs the fluids, and dehydrates insects and other critters to eventual death. IMPROVES PLANT STABILITY When using DE in your soil, it can be especially beneficial as it frees up nutrients so that they are made available to the plants as needed. This works via the silica content of DE being absorbed into the plant tissue, which helps improve the plant’s ability to respond and receive more nutrients as DE activates. This in turn results in greater yields and better stability under small pH fluctuations! https://divineseeds.net/ https://instagram.com/divine.seeds?igshid=osxe2v7en33v https://divineseeds.net/ Thanks Again to All my Friends, Family's, Teams, Sponsors, Followers and Subscribers!!! Your Genetics are Merry Magnificent, Mega Marvelous and Mighty Medical! Love um!!! I really Can't stress enough how Thankful and Grateful I am of All of you and what you've Shared with Us! Means the World!!! It's definitely a Pleasure being able to Grow with these Phenomenal Grow Lights! Please Enjoy! BudBrothers4-Life! Cheers Famz!!! Much Props and Much Topz!💯🔥 #BloomPlus #Osree #GrowStar #Growatt #TNBNaturals #TNBTeam #GrowYourOwn #Bliss https://instagram.com/bloom.plus?utm_medium=copy_link https://instagram.com/growstarstore?utm_medium=copy_link https://instagram.com/osree.light?utm_medium=copy_link https://instagram.com/as420.ca?igshid=1f116alw054wp The Grow Bags: https://www.as420 https://instagram.com/tigerfish_organics?utm_medium=copy_link TN Tonny Dual headed Clip on Fan Amazon Link: https://www.amazon.com/dp/B07PJH8CDT/ref=cm_sw_r_cp_awdb_imm_6E4BCKYN6HTAASNQDJSM?_encoding=UTF8&psc=1
Likes
7
Share
Day 14 🤩 vegi is starting Piccas from this morning 8.30 and 17.00 after LST So today was the first time I had Terra, Generator & Root Stimulator, only ¼ of the specified amount of everything and of course Hy Pro Fertilizers, my fertilizer barrel is finally ready, is being supplied with oxygen and the fertilizer is in motion, which means that as I am lazy I make 50l and leave it in the corner 😉 but always ready to use... Then today was the first light LST, I will leave it alone for 4 days and then see where and how I pull it out, it doesn't really matter because I want to put up a net and lay it flat underneath The Frosted Agave from Original Sensible Seeds has also seen the light of day This grow is sponsored by: Zamnesia Seeds Hy-Pro Fertilizers Mars Hydro LED Start 26.4.024 Germination date 30.4 024 Germination 6v6 From Zamnesia Do Si Dos f1 Auto.2x Green Crack f1 Auto 2x Pineapple Express f1 Auto 2x Growing method L.S.T with the help of a scrog net..🙈 Light led 1x fc 4800 from mars hydro Exhaust air, I replaced the heavy pk 150 with my Mars Hydro 6 inch fan Filter Rhino pro 900m³ Inlet air 305 m³ with filter 160mm Soil: Atami Light Mix & 5 mm pumice stone & 16 mm expanded clay on the floor In 15 l. Factory pot Temperature inside: 26.50°C 79 Fahrenheit Outside temperature 21°C R/H 64% Light: 19/5 dimmed to 75% distance 70cm Roots 21.00°C Ph medium 7.0 Ph water 6.3 1.5 liters today Ec 0.8 Nutes Hy-Pro Fertilizers Terra ml to 1l Terra Veg & Bloom 0.6ml Roots Stimulator 2.0 ml Spraymix 5 ml Generator 0.3 ml Epic Boost 0 ml Enhancer by Greenhouse 0 g 😉🤜🤛 #marshydroreview #HyProFertilizers #zamnesia #originalsensibleseeds
Likes
53
Share
Harvest Report: The Swift Journey of Blackberry Auto Greetings, fellow cultivators! The moment we've all been eagerly awaiting has arrived – the harvest of my Blackberry Auto. This beauty has moved through her life cycle with astonishing speed and grace. Let's take a moment to reflect on her incredible journey from seed to harvest and celebrate the fruits of our labor. Seed to Sprout: It feels like just yesterday when I planted the tiny seed of Blackberry Auto. Nestled in a Root Riot cube, she sprouted with vigor, her first delicate leaves reaching for the light. The conditions were perfect, with temperatures at a steady 28°C and relative humidity at 95%, creating an ideal environment for her early growth. Transplanting and Early Growth: As she transitioned to a small pot filled with rich soil and Mycor Mix, Blackberry Auto continued to thrive. The Mycor Mix, with its blend of various mycorrhizae species, worked wonders in enlarging her root system and facilitating nutrient uptake. Her early growth was nothing short of spectacular, setting the stage for the robust plant she would become. Rapid Vegetative Phase: Blackberry Auto quickly outgrew her initial pot and was soon transplanted into her final home – a 16L AutoPot. This setup allowed her to drink as she pleased, supported by the precise hydration of the AutoPot Aquavalve. With a foundation of Aptus All-in-One Pellets and Mycor Mix Soil, she had everything she needed for explosive growth. Her leaves grew enormous and lush, and her branches spread wide with gentle low-stress training. Swift Flowering and Stunning Development: Entering the flowering phase, Blackberry Auto didn't slow down. Her buds formed quickly, each one a masterpiece of nature. The colors were a sight to behold – deep purples, vibrant magentas, and hints of dark blue. The aromatic symphony filled the grow room, a testament to her potent genetics and the meticulous care provided. Natural Brilliance and Final Weeks: Observing her rapid progress, I ceased all feedings to let Blackberry Auto showcase her natural brilliance. Her final weeks were marked by a dazzling display of colors and an incredible pace of bud development. Each day brought new marvels, as her buds swelled and her trichomes sparkled like a constellation. A Heartfelt Reflection: From the moment she sprouted to her final days of flowering, Blackberry Auto has been a true wonder. Her speed and beauty have exceeded all expectations, and it's hard to believe how quickly she reached this point. This journey has been a testament to the magic of cultivation and the resilience of a well-bred strain. Acknowledgments and Gratitude: As we celebrate this harvest, I extend my deepest gratitude to @fastbuds_official for creating such a remarkable strain. To Aptus Holland, my main sponsor, your support has been invaluable in nurturing this beauty. A special thank you to Grow Diaries for providing a platform to share this journey, and to the community for your shared passion and camaraderie. 🌱💚 As we move forward, I eagerly anticipate the trim and smoke reports, where we'll dive into the sensory delights of Blackberry Auto. For now, let's revel in the joy of a successful harvest and the extraordinary journey that brought us here. Genetics Blackberry Auto @Fast_Buds Food - @aptusholland @aptus_world As always thank you all for stopping by, for the love and for it all , this journey of mine wold just not be the same without you guys, the love and support is very much appreciated and i fell honored and blessed with you all in my life
Processing
Likes
4
Share
Week 4 Day 1 Time to flush, plants showing signs of over feeding. Flush with 2 gallons, water came out yellowish + 2 hours of sunlight Week 4 Day 2 Awesome result from flushing. 4 hours of sun light today to boost them up.
Processing
Likes
7
Share
@Kushizlez
Follow
Day 56-63 (Day 57) I might have to fix the light to the roof of the tent so I can get another 3 inches up. The ppfd is just too intense at this height. The node stacking is super tight, I’m seeing some droop on almost every plant and the plants just look stunted. I might have to take out the big shelf I just paid 90$ for and raise the light to get the ppfd level down. This happened my last grow as well. It’s a great light for flowering but sucks ass for veg unless it’s hung 5’ above the canopy. I’ve seen videos of others with the same light and they have to fix it to the roof. The dimming function only works with a master controller I don’t have the money for right now. Pulling bbb #2. I’m seeing very small but clear pollen sacks. It’s also drooping like crazy. The roots don’t look as healthy as some of the other males I pulled earlier. They have a slight brown tinge but still mostly white. I wonder if I accidentally gave top dressed it too many times when I mixed them all up a while ago. I’m going to transplant bbb’s #1, #3, #6 & #7 into my 10 gallon destiny/coco pots lightly water. This is kind of a gamble because 2 of them are not showing definitively. Although I’m about 75% sure they’re fems. If not, I got my two backups. (Day 58) I was reading about symptoms of high PH and I definitely have it indicated by the twisted and stunted growth on top. I’m going to try to water in a full gallon at 5.8 and see if I get a good response. I sprayed the pump nozzle directly into the soil after it was empty to put some oxygen into that big 10g pot. The blackberry I gave the lowered PH water too noticeably responded within a few hours. The clawing has pretty much stopped and it now looks like the healthiest plant in the tent. I’m going to see how it responds over the next few days then try it with my other plants if everything looks good. I’m going to try it with bbb #5 in the 1.7g pot and see if it responds in the same way. I ran a gallon of 5.8 water through 1.7g and got less than a 100ml of runoff which is a little surprising. The runoff measured 1750ppms which seems a little on the high side but isn’t insane for peat based soil. (Day 59) Wow. The plants responded to that little PH adjustment insanely well. #5 isn’t dropping at all and the leaf wrinkles are actually flattening out. It’s starting to look like one of the healthiest plants in the tent. I’m still hoping for #5 to show female. 5 plants would cut my veg time down and give me another opportunity for a keeper pheno. All 4 plants are looking like they’ve already recovered from their transplant. #1 in particular was drooping like crazy yesterday and today it’s bounced back and looking happier than ever. I’m seeing a bit of tip droop on a few plants but they still seem fine I wonder if because my soil is 50% coco I should try watering on the acidic side, around 6.0-6.2 from now on. I’m almost certain that solved all the issues I was having. (Day 62) Plants are all looking really healthy. They all seem to have outgrown the initial light stress actually but node stacking is still really tight and I hope to raise the light up next week sometime. I’m going to drop the humidity to 60% for the rest of veg. These pots are massive and I’m still a little worried about dry downs but they aren’t showing any signs of overwatering or lack of oxygen. BBB#3 is starting to show some weird discoloring like an mag or nitrogen deficiency. Which is weird because it’s freshly transplanted into nitrogen rich soil. Guess I will give it a kelp foliar spray. I’ve been looking for a good organic source of K without an absurd amount of magnesium and sulfur like langbeinite has. I found some 0-0-15 kelp/seaweed extract in soluble crystal form. So from time to time I will water that in at half strength or with compost teas to keep my soil K dominant. (Day 63) I’m still waiting on #6 to show sex. I am shocked it hasn’t shown sex yet. Although it was started a week and a half after the others but still. I’m going to be so pissed if it ends up being a male. I’m taking a gamble but I’m confident it will show female when the time comes. bbb#3 got a little more color back from that foliar spray. Hope that doesn’t get worse because it’s my favorite pheno so far. I will give a N boost in the form of compost tea tomorrow afternoon to both of my tents. I’m starting to utilize the scrog net and boy does it make training way easier. This seems to be a much smarter style of growing for yield and quality. I’m getting tired of these pH fluctuations every time I water. I’ve been eyeballing for the most part and I need a consistent formula. I found the perfect mix to stabilize my RO water and stabilize the pH at 6.2. I moistened the top soil of each plant and will watch for any reactions. Water recipe: 60ml bottled water 2000ml RO water 3ml calmag 2ml microbes
Likes
3
Share
@Bud_vista
Follow
The weather is going crazy at the moment, so I decided to take the plant outside. The leaves start turning in color. I already ordered a digital microscope looking for trichomes.
Likes
10
Share
Nothing has realy happened since I cropped the royal cream....It is just hanging. Decided to do a dry trim so that it takes longer to dry due to the fact I am having to just use my cupboard so the humidity is pretty low. Leaving the leaves on just means It takes longer to dry. I am going to crop the Easy Bud in the next few days when the mood takes me. I had 4 left over R. Cream seeds left over because I informed them that. bought 2x 3 packs and only 2 seeds germinated so they sent me another packet which is REALLY good of them and the sort of thing that means I would definitely use Royal Queen Seeds again, for sure! The trich's are basically all cloudy with a few clear. I cant see any amber but my loupe is a ridiculously cheap Chinese piece of crap. I will invest in a microscope camera so I can hook it up to my phone or MacBook. It is way too hard to keep everything steady In order to see what is popping with my sexy trichomes. Obviously feeding has stopped for about a week now. I forgot to change it In the diary last week so will try and correct that now.. I know it is not strictly relevant but I had to go somewhere earlier and took a video because I was able o walk in the middle of a main road in my town which Is usually packed full of cars, especially at the time I was walking on it. It is a time that makes me even more glad I grow my own. I really need to buy the bigger tent, lights and re-locate to the bigger, more subtle cupboard (not the one i am using to dry my weed in the video I posted) and then I will be able to effectively ScrOG the 2 or 3 plants I have, in order to maximise yield so I can be totally self sufficient with regards to my cannabis medicine. UPDATE - MONDAY I just realised I have made a proper idiots mistake an missed out on some much tastier buds because of it. OK, so I got paid today, so I though I would treat myself to some of them cheap COB chips I used for my last grow because hey were super cheap and actually really effective considering the price. I ordered 2x 100w 6000k veg spectrum chips with a solderless connection for my power. I also ordered one of these heatsink + reflector. https://www.amazon.co.uk/gp/product/B01MT824NP/ref=ppx_yo_dt_b_asin_title_o01_s00?ie=UTF8&psc=1 My thinking was that I have a spare heatsink here that the old citizen CLU-048 is attached to so I was going to fit one of the chips into that and the other into the heatsink and fan I bought. This hought process lead me to go ad retrieve the old citizen LED and I thought I would try it. Still didn't work, then suddenly I thought it could be a simple blown fuse so I changed it aaaannnnd.....still doesn't work. doh! I started to remove the COB holder and COB from the heatsink (it was just glued to it using thermal compound) and when I laid it on the table I decided to test the driver without the COB holder on the tiny off chance it might work...nope I then realised maybe I got the + and - the wrong way round, tried again and boom works perfectly. The connection from the holder to the cob had bent slightly off contact. Really annoying that this whole time I could have doubled my photons to the plant, however, really nice that I don't have to spend a load more money on lighting in order to upgrade into the new room. So all I have to do now is spend money on a pre-drilled heatsink and a new metal COB holder for the citizen.
Likes
6
Share
This grow is more around the 9 and a half week stage I’ve chopped her a few days earlier than I’d liked but she was ready with plenty of amber trichomes to be seen. I never had much hope for this girl she was just a last minute idea, I’ve also used 4 year old soil from previous grows as an experiment ..this has been a cheap run and will still be a flavoursome smoke! This strain is sooo resilient I put her through hell and she still rewarded me! (Not the greatest yield but decent) Bad quality camera just in time for harvest typical but yeah she really took off after some topping and gave me some nice heads! I’m getting a fruity biscuit sort of smell out of her she smells amazing! Will update this post in 10 days dry
Likes
28
Share
@Chubbs
Follow
420Fastbuds FBT2307 Week 1 Week 1 of the start of veg for these 3 FBT2307 plants. So far I've switched to 18/6 light cycle and keep a 75'f day temp with a 65'f night time Temps. I give them 500ml of straight well water every other day. I did to a pm spray and didn't realize my lights would be coming on as soon as they did. Lesson learned it'll burn the leafs. 😆 All in all Happy Growing
Likes
39
Share
Dear Friends ❤️ in this week we topped again and bended this unique Black Harlequin by Sensi Seeds. I topped the plant and remove big fan leaves that covered bud sites I missed to give top crop Big one at 14 october, it is important to give 10 days before flowering The last day of this week we switched the light to 12/12 week #5 of vegetation The 240w light is working at 50% power and now it is combined with the 480w quantum board. I consider week 4 the week from 18/10 to 24/10. day to day fert schedule: 📅 18/10 📅 19/10 NEEM OIL 📅 20/10 📅 21/10 Top Veg 3ml/L-Deeper Underground 2ml/L - Green Explosion 2ml/L - big one 2ml/L - PURPINATOR 1,2ml/L 📅 22/10 📅 23/10 📅 24/10 Hola friends! we are here to present a super strain called Black Harlequin from Sensi Seeds. We choosed this strain because it has a wonderful THC:CBD ratio and it will guarantee an excellent yield with a lot of super tasty buds. About Black Harlequin Feminized Black Harlequin Feminized is an indica / sativa hybrid. Its formidable genetic pool includes our own Black Domina, a Cannabis Cup-winner; and Harlequin, a strong CBD strain from the USA. Growers can anticipate huge yields from their plants, and a scent that’s floral, woody and earthy. They have a THC / CBD ratio of 1:1, and offer consumers a high that’s wonderfully relaxing for the body and mind, with plenty of balance. This special strain began life as one of our 2019 Sensi Seeds Research varieties. Despite initial plans to only add three of them to our permanent catalogue, this one received such great feedback from our community that we decided to include it too. Growth pattern of Black Harlequin Feminized Black Harlequin Feminized cannabis seeds are an indica / sativa hybrid. Its genetic pool features Sensi Seeds’ Black Domina, a Cannabis Cup winner; and Harlequin, a respected CBD strain from the USA. This strain is feminized, which is useful for growers who don’t want to have to identify and remove male plants. It makes cultivation easier for novices, and anyone desiring a simple-to-grow variety. The plants have an average flowering period, so there isn’t too long to wait until harvest time. Black Harlequin Feminized’s plants are usually average in height, both indoors and outside. They’re also capable of producing phenomenally large yields, especially in the hands of a grower with good cultivation skills. In appearance, the plants are fairly bushy with a thick central cola. They’re also covered in plentiful compact buds. The strain can be grown successfully in both temperate and continental climates, and also does very well when cultivated indoors, at any time of the year. Effect, taste, and smell of Black Harlequin Feminized Black Harlequin Feminized is an indica / sativa hybrid, with a THC / CBD ratio of 1:1. This high CBD content is noticeable in the effect, and the influence of the parent plants can be detected in the aroma and taste. After consumption, users often report a welcome sense of relaxation, both of the body and mind. Thanks to the CBD levels, it’s also balanced and relatively gentle. While the plants are growing, they produce an aroma that’s woody, earthy and slightly floral. These notes all become more apparent during the flowering stage, and the bud-curing process. In terms of flavour, users can expect to pick up on the pungent earthiness of the strain, with a delicate hint of sweet flowers and exotic wood. In a nutshell • The plants grow to average heights, both indoors and outside • The strain can be grown indoors, and outdoors in temperate and continental climates • The scent and flavour of the buds are woody and earthy, with a hint of floral lightness • The THC / CBD ratio is 1:1, thanks to the introduction of a CBD strain to the genetic pool • This strain is feminized, which makes cultivation easier for beginners • The high is pleasantly relaxing, without being too overpowering 💸💸💸💸💸Buy BLACK HARLEQUIN: hhttps://sensiseeds.com/en/feminized-seeds/sensi-seeds/black-harlequin-feminized 🔧💡WHAT WE ARE USING💡🔧 -LIGHTS: 💣Quantum board - 480w - 4x120w Boards by Zhoangshan Koray Opto-Electronic Ltd. Samsung LM301B 288 led/board +24led/board led Osram 660nm Efficiency 2.6 umol/J 220 lm/w Driver: Meanwell HLG-480H-36B temperature: 3000k Heat dissipator board: No Noise: 0dB 💣Quantum board - 240w - 2x120w Boards by Shenzen Yuanhui Led Ltd. Samsung LM301H 504 led +24led/board led Osram 660nm Efficiency 2.7 umol/J 220 lm/w Driver: Meanwell HLG-240H-48B temperature: 3500k Heat dissipator board: YES 15MM Noise: 0dB -ESTRACTION FAN: Blauberg 125 Turbo Pro Series Power: 42-50W RPM: 1940-2620 minimum -1 Maximum air flow: 430-560 m³ / h Sound pressure level at 3 m: 32-44 dBA -FANS: A)OSCILLATING FAN Maximum consumption: 20 W Minimum consumption: 17 W Fan diameter: 15 cm Housing diameter: 20 cm Height with handle: 35 cm 2100 revolutions per minute Two speeds B) COMPUTER FAN Sunon DP200A - 230V Nominal power: 22/21 Watt Noise level: 44 / 49dB (A) Rated speed: 2700/3100 RPM ± 10% Air delivery: 95/115 CFM C)Cornawall Electronics Multifan Turbo, three speeds, can be used both on support surfaces and mounted on the wall. High capacity, about 740 m3 / h, can be used in medium-sized rooms. High silence and reliability make it adaptable and versatile. Technical details: Rotation range of 90 degrees Tilt adjustment Three speeds of rotation Suitable for wall and ceiling suspension Power Consumption: 35 Watts Air Flow: Approx. 740 mc / h Operating noise: approx. 39 db Diameter: 20 cm Voltage: 220-240V Frequency: 50Hz Dimensions: L 28 x D 16 x H 28 cm 💊💉💊FERTILIZERS: MAIN FERTILIZER BRAND: TOP CROP I use these products: -DEEPER UNDERGROUND: to stimulate roots system -TOP VEG: for a excellent growth in the vegetative phase -GREEN EXPLOSION: to promote creation of bud sites and to allow a faster growth -MICRO VITA: bacterias for equilibrate the soil and to make the plant healty -BIG ONE: to stimulate bud sites and to stimulate resin production -TOP BLOOM: to achieve excellent big and hard buds -TOP CANDY: to feed the buds with molasses for a tastier smoke and to gain weight -TOP BUD: to enlarge buds and to gain weight PLAGRON: PK 13-14 to have big and hard buds and to feed plants with lower effort ADVANCED NUTRIENTS: Sensi Cal-Mag Extra-> for cal mag deficiency GROTEK: CAL MAG for cal mag deficiency HESI: PowerZyme to clean and balance the soil. It feeds the plant cleaning the soil. GHE: - Final Part (ex Ripen) accelerate the final flowering phase, dissolves minerals in excess - Flash Clean to flush the plant and to be sure that all excesses are out from plant and pot These two products improve A LOT the smoke of our babies -PURPINATOR to stimulate flavonoids and to have a better taste and smell. ____________________________________________________________________________________________ ❤️ THANK YOU FOR BEING HERE ❤️ Please leave a comment with your opinions, it is very important to us to have a comparison. If you like our job, tap the weed button and follow us. It will be really appreciated.🙏 🌿Thank you again🌿 ❤️Sweet hugs❤️ 👨‍🌾CHILLING_RACOONS👩‍🌾
Likes
16
Share
Light is on 50% for another week. Everything is really recovering well from transplant, topping and pruning. Try 75% until flower time then give them hell
Likes
24
Share
@AutoCrazy
Follow
Week 11 Week 4 of Flower This lady is pretty happy right now. She did get a bit of tip burn this week but nothing too serious. This plant really stretched out. Even more so than her tent mate the Mimosa EVO. There are loads of bud site now so the fun has truly begun. I am excited for the weeks ahead. Cooler internals: 5.9pH 650ppm 67F solution temperature Onward 😎🍻
Likes
45
Share
@Robbaus
Follow
Ciao a tutti! Sono veramente senza parole per la quantità di terpeni e tricomi, mai avuti risultati simili. Devo dire che la linea advanced nutrients sta facendo tutto il suo dovere, non ho mai sentito un profumo così, si sente anche fuori di casa. Ho defogliato ancora tra una rete e l'altra andando a eliminare tutte le foglie che erano inutili, per evitare rischi muffa (visto anche l'umidificatore acceso) e per far sì che aria e luce non abbiano impedimenti a circolare liberamente. Penso che manchino 3 settimane, dalla prossima inizierò con l'overdrive per far sì che la pianta inizi a scaricare tutto quello che ha. Sono veramente soddisfatto, senza parole. La prossima volta metterò solo più due vasi e due strain, per ridurre il consumo di acqua e fertilizzanti, ho visto che ce la posso fare tranquillamente e più o meno nelle stesse tempistiche, visto l'eccessivo allungamento avuto questa volta. Una nota di merito allo strain, la barney's non delude mai ma la mimosa evo è veramente top, lo scorso anno ho fatto quella normale stavolta per orange punch e devo dire che è lo strain migliore che ho messo finora. Bene, continuerò a rifarmi gli occhi, a settimana prossima! 🤣 🍀😎💪🏼🔝
Likes
6
Share
she is doing good but more leafs than my fastbuds plants… we‘re excited for the last weeks
Likes
3
Share
it wasnt a hard grow at all the organic nutes i have make it just that simple just add water and also i look for a sturdy genetic and roll with it but i can say the overall grow on all the strains in that area would have made it a real nice hues of different colors and just the 14 weeks i was on that journey it was nice and easy
Likes
48
Share
@DreamIT
Follow
🧙‍♂️🍁BUBBA HAZE BY REGULAR SEEDS 🍁🧙‍♂️ 🧙‍♂️ 19.3 Father's day in my part, so a couple of photos of Bubba Haze's dad. Greetings to all dads in general 🤘 🧙‍♂️ 20.3 ... 🧙‍♂️ 21.3 ... 🧙‍♂️ 22.3 ... 🧙‍♂️ 23.3 ... 🧙‍♂️ 24.3 The male is blooming and has begun to open the sacs. The female, on the other hand, stopped growing in height (finally, I was afraid that she would come to pierce the box 😆) 🧙‍♂️ 25.3 ___________________________________________________________ 😮 What ???? New to Regular Seeds? Take a look at their site, you won't regret it !! http://bit.ly/REGULARSEEDS ________________________________________________________________ 📜 A look at the details of what I'm growing 📜 🧙‍♂️🍁Bubba Haze 🍁🧙‍♂️ ⚧ Gender ▪️ Regular ➰ Genes ▪️ 75% Indica / 25% Sativa 🎄 Genetics ▪️ Bubba Kush x Jack Herer x Cannalope Haze 🚜Harvest ▪️ 550 g/m² 🌷Flowering ▪️ 8 weeks ✨THC ▪️ Very High ✅CBD ▪️ 1.0% 🏡Room Type ▪️ Indoor 🌄Room Type ▪️ Outdoor 🕋Room Type ▪️ Greenhouse __________________________________________________________________________ 📷🥇 Follow the best photos on Instagram 🥇📷 https://www.instagram.com/dreamit420/ 🔻🔻Leave a comment with your opinions if you pass by here🔻🔻 🤟🤗💚Thanks and Enjoy growth 💚🤗🤟
Likes
15
Share
They started blowing up last week we're in the beginning of the 4th week and there looking good spraying them with Dr zymes ones a week
Likes
18
Share
~ FASTBUDS TESTER #2206 ~ Well friends, here we go on another 'canna-venture' together! The grow room has had a complete remodel and some upgrades done to it including brand spanking new 4x8 and 4x4 tents and a Trolmaster Hydro X controller along with a new Control Panel. This tester strain is one of six tester strains that FastBuds has graciously provided me with and I'm looking forward to seeing what this girl has to offer when she's grown to her full potential! One drawback of 'testers' is I have little to no information on it other than its number and that it's an autoflower... 🤪 But, it's ALWAYS a blast growing them for me because not knowing a lot allows me to just concentrate on the essentials: Light, Environment, Water, Nutrients and possibly a bit of LST... not complicated, just basics like keeping a constant temperature and RH in the tent at a level that gives a good VPD, watering when almost dry and maintaining proper light levels according to their stage of growth. ____________________________________________________________________________________________________________________________________________________________________________________________________________________________________________________________________________________________________________________________________________________________________________________________________________________________________________________ ~THE SETUP~ ~Initially seeds were lightly scuffed, then soaked for 3 hours in 78℉ distilled water after which they were transferred to moist paper towels laid out in a Jiffy Pellet plastic starter tray with lid. Underneath the tray was placed a Vivosun Heat Mat with Controller that was set to 78℉ where they stayed until their tap roots emerged. ~Planted into Jiffy Peat Pellets that were hydrated with distilled water warmed to 78℉ with a 7.0 ph. ~Once roots emerge from the Jiffy Pellet they're transferred to their fabric pots. ~Grown 100% organic in a 4g Gronest fabric pot and a 3g fabric pot by Wraxly filled with Mother Earth 70/30 Coco/Perlite medium and initially amended with Dr. Earth 4-4-4 / Earthworm Castings / Dr. Earth Flower Girl 3-9-4 and Coast of Maine Stonington Blend Organic Plant Food 5-2-4. ~19/5 light cycle for the entire run with supplemental UVA added during flower. Lights are controlled by a Trolmaster Hydro X controller set for a 15min Sunrise/Sunset simulation. ~Top dressing every 3-4 weeks with slow release dry amendments and Earthworm castings. ~Straight water ph'd @ 6.2-6.8 when needed and bi-weekly Compost Tea's. ____________________________________________________________________________________________________________________________________________________________________________________________________________________________________________________________________________________________________________________________________________________________________________________________________________________________________________________ Weekly Updates: 12/1- I soaked both seeds for 3 hours in 78℉ distilled water after which they were transferred to moist paper towels laid out in a Jiffy Pellet plastic starter tray with lid. Underneath the tray was placed a Vivosun Heat Mat with Controller that was set to 78℉ where they stayed until their tap roots emerged roughly 24 hours later. 12/3- Today their tap roots were about 1/2 to 3/4" so at 11 am I transferred them into Jiffy Peat Pellets that were hydrated with distilled water warmed to 78℉ with a 7.0 ph using a tine off of a plastic fork as a 'mini trowel' to make a hole in the pellet and to gently cover the tap root, leaving only the seed head slightly exposed. This method accomplishes most of the initial work the seed has to do by eliminating having to orientate itself, push it's root down and head up. By 10pm the #1 seed had her cotyledon leaves opened and the #2 isn't far behind! 12/5- Well this is Day ONE for the #2 FBT #2206 and the second day for her sister! I'll keep them in the covered/heated Jiffy tray until I see their roots beginning to emerge from the peat pellet, then I'll transfer them gently into their respective fabric pots. The #1 will be going into the 4g Gronest pot from FastBuds and the #2 will reside in a 3g pot by Wraxly, which I'm trying out for the first time. 12/7- Yesterday I checked the #1 tester and she had roots starting to emerge from her pellet so I transferred her into her 4g Gronest pot. After making a hole in the medium for the peat pellet, I coated the entire surface with Xtreme Gardening Mycos then placed the pellet in the hole and planted her in. Lastly, I watered her in with about 4oz of de-chlorinated water with 3ml/g of FishShit added which was then ph'd to 6.4 @ 75℉ after which I placed a humidome over her for 24hrs to ensure that the humidity stays constant. The #2 tester is doing great and I'm confident that she should be ready to transfer into her fabric pot in the next couple of days! 😎💚 Thank you for checking out my passion in life! Please visit as often as you wish and I hope you enjoy this journey as much as I know I will! Grow Strong! 💪😎🤙
Likes
1
Share
@nonick123
Follow
🚀 4 clones de Blueberry Pie F1 Fast seleccionados por @stacksfarmsltd - https://www.instagram.com/stacksfarmsltd 🚀 Breeding by @seedsmangenetics - https://www.seedsman.com/eu-en/blueberry-pie-f1-fast-feminised-seeds-sman-blpi-fast-fem 💦 BioTabs 15% DISCOUNT code "GDBT420" biotabs.nl/en/shop/ @biotabs_official 🌱Substrate PRO-MIX HP BACILLUS + MYCORRHIZAE @promixmitch @promixgrowers_unfiltered 💡2 x Mars Hydro FC1500 EVO Led Grow Light (2024 NEW FC 1500-EVO Samsung LM301H 150W LED) - https://marshydro.eu/products/fc1500-evo-led-grow-lights/ - https://www.amazon.de/dp/B0CSSGN5D8?ref=myi_title_dp