
Likes
Comments
Share


@Proto420
Follow
Another beautiful week with my partner in crime. Babes are coming along beautifully. Got 4 Sonoma’s goin few weeks old, and got 3 mephisto auto’s doin their germ thang. More of course to follow. Hope y’all like my pics.

Processing
Likes
12
Share


@eldruida_lamota
Follow
Buenas noches familia, pues empezamos con el final.
Nuestras power plant xL se han comportado fenómeno , recordamos que metimos 9 plantas de 3 variedades distintas y esta es la única variedad que perdimos espacio del indoor. Aun así sin palabras en cuanto al resultado.
Planta con floración muy rápida, bastante vigorosa, lo malo es que al final tendrás que tutorar si o si, pero es por el peso de la flor.
56/59 días para cortar en floración, (y es Sativa).Se supone que tira 20%thc y su genética es South African sativa.

Likes
44
Share


@SooSan
Follow
13 jours de 12/12
OK il y a du changement !
Dans la partie du scrog vertical le stretch n’a pas été assez fort
J'ai donc abandonné la culture verticale pour cette fois
J'ai donc fusionné le bas de la tente pour avoir un espace de 90x60x90
Le ts1000 a été retiré pour laisser la place aux barres du FC-E 4800
Et bien sur gros LST pour gagner en surface et gagner 20 à 30cm de hauteur
Vu qu’il y a 16 plantes mais que sur growdiaries on ne peut mettre que 8 variétés j'ai divisé en 2 diaries pour le bas de la tente
1️⃣
🏠 90x60x90
☀️ FC-E 4800 => puissance a 20%
🍁
1x Black Bomb / Philosopher Seed
2x Amnesia Lemon / PEV Seeds
1x Blueberry / PEV Seeds
1x Blueberry / 00 Seeds
1x Wappa / Paradise Seed
1x Dark Phoenix / Green House Seed
1x Quick Sherbet / Exotic Seeds
1x Mango Cream / Exotic Seeds
1x Banana Frosting / Sensi Seed
1x Hindu Kush / Sensi Seed
4x Fast Mix / Sweet Seed
📎 https://growdiaries.com/diaries/122084-grow-journal-by-soosan
📎https://growdiaries.com/diaries/124052-grow-journal-by-soosan
2️⃣
🏠 30x60x50
☀️TS1000 => puissance a 50%
🍁 4x Quick Sherbet - Exotic Seed
📎 https://growdiaries.com/diaries/122080-grow-journal-by-soosan


Likes
5
Share


@GrowXown
Follow
Took a bit of a while to upload these seeing as the website had a bit of technical difficulties however i managed to finally get them up. The seedlings are doing well in solo cups going to transplant soon. feeding Bio Bizz fish mix at the moment.

Likes
109
Share


@Prototype0181
Follow
Flipped on 17-7 to flower🌺 and the first issue came 🤷 the sativa dom cookie ( stretchy girl ) couldnt handle the feed and got a little burned, nothing to bad. She's going on a water only diet next two rounds.


Likes
4
Share


@Creme_De_La_Creme
Follow
day 70 was harvest day !!
really fast strain, 24h light ON really played a big role as well
frosty buds and amazing strawberry smell, now lets dry it !!

Likes
7
Share


@TightNugs
Follow
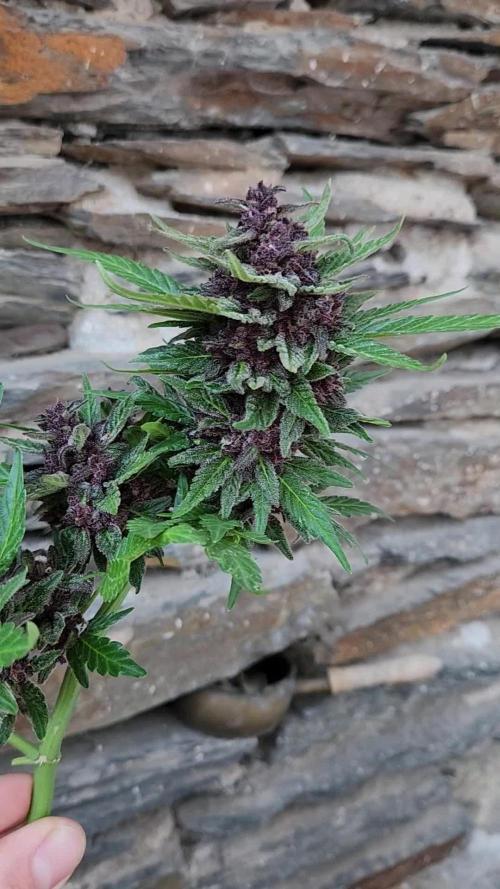
Purple queen doing well,stardawg 1 back from the dead after dropping ph pen on seedling 🙄popped another 1 just in case 😉
Happy growing 🤞🏴🍁
🍁🍁🍁🍁
Breeder-Royal queen seeds purple queen, custom stardawg x2
🍁🍁🍁🍁
https://voost.com/
Light-Voost Vst 120 on 25%

Likes
3
Share


@MoMedicalAlchemist
Follow
Veg veg veg boring...I twisted and pinched the 2 new tops from topping and tied down a few with some plant tie downs...they are already starting to put off a flowering scent not just that green chlorophyll scent a actual flowery pungent hue in the air lol

Likes
92
Share


@DogDoctorOfficial
Follow
Week 5 Veg Report: SCROG Netting, Massive Leafs & Precise Data Mastery!
🌱 Girls Growing Stronger Than Ever! 🌱
This week has been truly epic in the grow room—so much so that it’s time to bring in the SCROG net! With the canopy expanding and the younger ones still working to catch up, the SCROG net will help me achieve that perfect, even canopy. A well-placed SCROG not only ensures better light penetration but also gives the smaller plants a chance to spread out and thrive alongside their bigger sisters.
Now, let’s dive deep into the SCROG method.
The Screen of Green (SCROG) technique is a grower’s secret weapon for maximizing space, light efficiency, and yields. The concept is simple but powerful—train the plants to grow horizontally along the net, forcing them to expose multiple budding sites instead of just a single cola. This way, the canopy spreads evenly, improving light distribution and air circulation throughout the tent. As the plants grow, I’ll gently weave their branches through the screen, ensuring they fill every square inch of space. The end goal? A sea of buds all basking in equal light!
💪 Huge Leafs Everywhere! 🌿
One thing that’s really catching my eye this week is the size of the leaves—they’re HUGE! Honestly, they’re so big I couldn’t resist a little fun, so I made myself some fashion accessories: leaf earrings and a cap from the Super Sativa Seed Club Green Papaya! 😂 And, of course, I captured the moment. But seriously, large leaves at this stage are a great sign of healthy, robust plants. These “solar panels” are hard at work soaking up all the light, driving photosynthesis, and fueling growth.
So, what does it mean when your plants are showing off big, luscious leaves? It’s a clear indication that they’re happy, healthy, and thriving in their environment—big leaves mean lots of energy being produced and stored for future bud growth. Exactly what we want!
💧 Precision Feeding with Aptus Nutrients 💧
This week, I took a deep dive into my Aptus nutrient lineup and shared a video explaining how each product affects the water’s pH and TDS. Using the AMP-3 Precision Meter, I’m getting real-time water readings and keeping everything dialed in perfectly. Let’s break it down:
• pH: 5.83
• TDS in solution: 445 ppm
• Water temperature: 25.2°C
The Aptus products are incredible for balancing nutrients without throwing off the pH or TDS too much. I’m fine-tuning my feedings based on these readings to make sure the girls are getting exactly what they need. The precision I’m able to achieve with the AMP-3 is mind-blowing—I get immediate feedback on pH, temperature, and EC, allowing me to make real-time adjustments and ensure the perfect environment for nutrient uptake.
📊 Environmental Mastery Thanks to TrolMaster 📊
Speaking of control—let’s talk about the TrolMaster system! Between the DSH-2U Humidity Station and all the other sensors, I’ve created the perfect environment for my plants. Here’s where we’re at this week:
• Temperature: 26.2°C
• RH: 70.6%
• CO2 levels: 775 ppm
• VPD: 1.0 kPa
• PPFD: 423
Thanks to TrolMaster, I can monitor and adjust these metrics in real time, and the best part? I can do it all through the TM+ Pro app, even while I’m lounging in my green papaya leaf hat! 😆 Whether I’m checking the CO2 levels, adjusting the lights, or fine-tuning the humidity, it’s all in my hands with just a tap of my phone. Talk about convenience!
🌱 P.S. – Inline Sensors: Heavy-Duty Precision 🌱
Now, let’s talk about the heavy-duty players in this game—the (PCT-2) Heavy Duty Inline EC/Temp Sensor and the (PPH-2) Heavy Duty Inline pH Sensor. These bad boys are connected directly to the AMP-3 Precision Meter, and they’ve been absolutely crucial in giving me the most accurate readings on my water and nutrient solution.
The PCT-2 keeps me informed about the electrical conductivity and temperature of my solution, which is key for monitoring how well my plants are absorbing nutrients. Too high or too low, and we’re asking for trouble, but this sensor ensures I’m always in that perfect range.
The PPH-2, on the other hand, is all about maintaining the perfect pH balance. A fluctuating pH can mean nutrient lockout or deficiencies, but thanks to this sensor, I get a constant read on my pH levels, so the plants are always in their sweet spot for optimal nutrient absorption.
Together, these inline sensors allow me to run a super-tight ship—every drop of water and nutrient is dialed in to perfection, keeping the plants happy and healthy!
Shout Outs!
As always, huge thanks to TrolMaster and ThinkGrow LED for the amazing gear, to Aptus Holland for their top-notch nutrients and Pro-Mix for the best soil i have used so far. Big love to the seed banks, the amazing Grow Diaries community, and all my followers—you guys make this journey so much more exciting. Don’t forget to catch up on my social media, Instagram, and YouTube for real-time updates and exclusive content!
Stay tuned for more—next week is going to be epic!
DogDoctorOfficial Discount Codes so you can save big on your next check out 💚💚💚
Kannabia - DOGDOCTOR 30% off
SeedsmanSeeds - DOGDOCTOR 10% off
CannaKan- DOGDOCTOR 15% off
terpyz.eu - DOCTOR 15% off
The Neutralizer - PORKIT5-DOG 15% off
Growers Love to you all 💚💚💚


Likes
6
Share


@emeraldlabs
Follow
Overall, a quiet week. Minimal LST and some light defoliation. Will be flipping here soon.
Photos/video are day 43 since breaking the soil. Supervisor in last pic!

Likes
12
Share


@DudeGrowsWeed
Follow
Performed some HST this week. Pics and video were taken 2 days after the bending. I bent the main stalk a little lower than 1/2 way down. She was getting a little closer to the HPS light than I liked (but no signs of light burn). I expect her to stand straight up again in a few days but with a new knuckle at the bend point. Then I'll probably bend her over again 👍

Likes
6
Share


@BesosConSaboraMarihuana
Follow
DrUnderground UPink Kush es una indica de potencia muy elevada, no necesita demasiada comida, es bastante agradecida,tiene la particularidad de sacar estigmas de color rosa, e inclusofucsia, el envés de las hojas adquiere tonalidades entre rojizas ypúrpuras, estos caracteres son mas visibles en cultivos al exterior.La cantidad de resina es brutal, típico en las mejores Kush
El aroma es una combinación entre kush original y diesel muy característico en estas lineas con un trasfondo a sal de frutas, pero lo mejor de U-Pink Kush es su efecto, con poco puede ser una delas mejores fumadas jamás conocidas, con mucho... puede arruinarte el día.La densidad de los cogollos es alta, las hojas mas cercanas a estosquedan bañadas en resina.Esta preciosidad termina su periodo de floración entre 8 y 9semanas.
El hachís que se hace de su extracción es una exquisitez dealtísima calidad de fama mundial, con ciertos tonos rojizos y ocresproduce un burbujeo de otra galaxia

Likes
22
Share


@donovanliam
Follow
Love the amount of growth. Pruned a bit just to let light in but i cut as little as possible. If anyone has any suggestions of what to do or if you think im doing something wrong please tell me. This is only my 3rd plant ever so i have alot too learn and dont mind criticism

Likes
59
Share


@Ganjagrandaddy
Follow
Day 56 (flowering day 16): My stars of the show right here. These plants are beasts. I can only imagine how they would grow outside.
I managed to get #1 as she had just gone to sleep. Her wilted look is due to having enough light for the day so she has dropped off like granny after Christmas Dinner while the kids carry on .lol The structures on these are amazing. They have een slower to flower and I expect a mid Jan 2020 harvest.
#1 Sleeping beauty has not missed a beat the whole grow. She continues to wring every last morsel of nutrition from her soil. Tons of bud sites and each branch is looking like a mini version of a whole plant!!.
#2 has een moved to the outside for more ligjt and so I can watch her more. she has shown signs of calmag issues so I have made sure to keep that up with the mega crop too.
#3 while a lot less wide , has a very thick under belly to her branching. she should support a lot of weight.
These ladies will benefit from the earlier harvested strains by getting a light each it seems. let's see what 300w each can do for their lady two weeks.
Merry Christmas all
Likes
43
Share


@MistaOC
Follow
11.02.: So far everything is well under control. temperature and humidity are well adjusted. We will see how it goes on.
The gold juice is intended as food (sugar) for the microorganisms.
Light intensity: 25%
——————————————————————
12.02.: Day 9!
water values checked:
RO Water
Temp. 18,1 degrees
015 ppm
5,7 PH
water value After adding 0,5ml/1L CalMag (BioBizz)
Temp. 18,1 degrees
054 ppm
6,3 PH
fertilized with BioGrow for the first time. (3g/1L substrate)
——————————————————————
15.02.: Day 12!
Today I drop the humidifier from 85% to 80%
The plants now use the water relatively quickly. now has to water every two days.
Before watering the pots had 125g and after watering 180g.
Poured with RO water and 0.3ml/1L CalMag
values:
water:
028 ppm
19 degrees
drain:
765 ppm
19 degrees
The roots looking perfect!
Soon the little ladies will be in their 19 liter fabric pots!
——————————————————————
16.02.: Day 13!
Today I changed the light intensity to 37%.
Everythig looking great.
——————————————————————
17.02.: Day 14!
Today I repotted the ladies into their 19 liter
fabric pots.
Composition per pot:
- 19 liters of BioBizz light mix
- 55g BioGrow - Greenhouse Feeding
- The roots were powdered with Rootmax and Bactrex.
- 3 liters RO water (017ppm) (15% of pot)
- 0.9ml Calmag - BioBizz (029ppm)
- 3g BioEnhancer - GH Feeding (154ppm)
Light intensity increased to 42%
Room temperature 25 degrees
75% humidity
——————————————————————

Likes
9
Share

@Oldwied
Follow
After 85 days of growing I havest.
Plant hung up whole to dry.
5 days later by 21°C/ 45% r.h.
It's trimming time.
Likes
70
Share


@Insaniac_0
Follow
All feeds with nutes use either a whole ratio or combination of "Veg Mix" and "Bloom Mix"concentrates DILUTED in water until a total ppm of add in is reached using a (Total Dissolved Solids)TDS Meter measured in PPM (parts per million). The "Veg Mix" concentrate will eventually be added in smaller ratios and "Bloom Mix" concentrate what will eventually replace the "Veg Mix" concentrate entirely with the ppm and ratios listed when I feed. Veg mix recipe is on week 3. Bloom Mix recipe is on week 5.
Day 56
Took some glamor pics with black background - not really for vanity (although there's a little) but for contrast. I see more of the lockout issue better in the pics this way. - on that note, the ph seems to be working as it's been two days since defoliation and knitting needle ph correction, and the progression is way slower than it was on the last leaves at 3rd day of identifying.
So with that, room VPD of 1.07kpa seems stable enough with temps about 76F/65%RH/33%ILV
I released the binds today to let her grow without them until they crowd each other too much and I need to restrain - so in a couple of days at max.
Day 62
Transfer day. Although at first I didnt think I would be able to until Saturday, I got pots and plant saucers today, so I ended up going ahead and doing it.
Started by calibrating/testing both meters. Double checked the soil mix from yesterday as the last time I used wood ash the ph rose the day after... however this time it was fully mixed to I wanted to know if there would be a higher ph - it was the same as yesterady - 5 reading avg of about 6.35 - the slurry of 1:1 soil and 7.7 ph water was tested at 6.3 also.
Made about .75 gallon of 75/25 veg/bloom juice water at 500ppm feed water. Tried to ph read the soil in the pot and seen it go from 6.6 down to 6.35 (took video) in the dry soil, so I decided to use the 6.35 new soil reading and ph balanced the feed to that.
Used the needles since it was 7 days since the last feed and I am using such a small amount. Poured over needles in 8 places and pulled each out to let water down. the vacuum pulls the water down when I lift the needles.
Then I mixed 5tsp of Dynomyco to the 5 gallons of new soil and mixed really good. I placed a layer of perlite on the bottom of the 10 gallon pot and then layered in some soil.
Then with the help of my wife we pulled the plant out of the pot and placed it in the 10 gallon. I place back in the tent and added about a quart of plain de-chlorinated water evenly over the new and older soil to help bind them.
I reduced lights by 100ppfd to have about 505 and 500 at center colas and 430 lowest on outer ring with most at 450 and 470 highest. Soil to light is 35 inches and the plant is about 14 inches so about 21 inches from leaves to lights.
I left the ring off today and will rebind as needed tomorrow after she rests. Today the leaves look wilted and limp.
Also reduced humidity to 60% so 58 to 65% should be the range and the temps are 73F with the lights lower.
PPFD was higher with the new growth - unbound and tucked in for better cola/light position, it reads 570 to 580 on outer colas and 590 at both center branches
Day 57
Getting 1 more day out of free range growth before I tie her back against a ring. So in that time I decided to take a few vanity pics.
Overall the ph block seems to have slowed or stopped and she's back to growing again. Will be thinking about flip at the end of this week or so.
VPD same stats 76F/65%RH/33%ILV - ppfd right at max so I'll likely tie her off tomorrow. 605 600 in center and 580 to 590 at the outer ring.
Day 58
VPD stats mostly steady again today - 76F/65%RH/33%ILV - ppfd was checked after LST, measured 600 at each center cola and the outer ring measured between 550 and 590 most at 580
So as I said, I did LST today to bind her more out while the 4 center 4 colas fill the middle. I had to bind to the pot base instead of the ring as the colas are still a little short to reach for binds at the ring just yet. There's a lot of space to fill and a few (about half) of the out colas are sideways for now.
Had a break at the center cola when I tried to pull it back for bind. I knew to hold the branch at the node but forgot to do it here and heard a "snap" ... taped the crack and moved on - will monitor obviously
Day 59
Did more light LST to ensure the branches are growing where I want. PPFD was mostly the same as yesterday only now there are more colas around 560 than 580 on the outer ring with the center colas at 610 and 590 (front cola was tied down to spread more away from the ring and fill center better.
vpd same as past week or so 76F/65%RH/33%ILV
Last feed was on day 54 and the soil still seems damp so I will check again tomorrow for the next day. (Day 61)
The broken branch doesnt seem to have affected either side of the split as both sides seem to have grown a little with little to no wilt or drooping leaves. Im hoping it heals okay and doesnt delay flip to recover more; still monitoring.
Day 60
Did some light LST today by releasing the lower binds to the pot and attached as couple to the outer ring now. So far I only have to bind a few as most are already holding where i want them to.
Took the tape off the split and seen I didnt seel the gap closed when I taped it so now Im considering a drop of super glue to bind the branch back in hopes it grows onto the other side again. If not at least it would be more secure than it is now. And since it's a main split for 4 colas, I dont want too restrict it by binding at the split and potentially cutting off the nutrient pathways.
ppfd after LST was 610 and 600 after more LST and the outer ring is still ranging 550 to 580 with more at 560 now.
VPD same as I havent messing with any of the variables. 76F/65%RH/33%ILV
Soil is a bit dry and it's been 5 days since the last feed flush, so I have about 3 gallons of tap burning of chlorine now for a feed tomorrow morning.
Might still update again later if I find superglue...
found some superglue - tried to take pictures but I cant hold, squeeze the applicator, and film with just two hands. So the idea gets through, I did both sides.
On a side note I discovered a root popping out of the soil from the top. Covered it up but wasn't sure if I should be concerned.
Day 61
VPD same as it's been for most of the last week - 74F/65%RH/33%ILV
PPFD was recorded after I turn the plant a quarter turn for the smaller colas struggling to get over he ring's edge to have more light. Most colas at 580 with a couple at 600 and a couple more at 550 - center colas are hitting 615 and 620, but I have plancs to reduce in the next couple of days now
On that note, the root growing out of the top tells me that she's hungry and needs more root space, even if that means growing through the top of the soil. So I plan to transplant to a 10 gallon and flip after the recovery. After reviewing more of NugBucket's journal I realized this is why he moves them when growing 16 colas.
New pots should be here Friday so I should be able do it on Saturday.
So I prepped soil (using more Happy frog with mycorrhizal fungi already growing in it for a few weeks) with de-chlorinated tap water
Started by ph testing the soil and the water (4 readings on soil at 5.03 avg) - added about 1/2 cup total of wood ash to bring up the ph , mixed and tested again - added water at (about 7.7 ph) and tested again... last 5 readings in soil was 6.24,6.3,6.35,6.37,6.38 avg of 6.328 - covered and let rest until needed.
Since I plan to transplant in a few days I felt it would be best to 'lightly' feed tomorrow, again on transplant day, and again 2 to 3 days later.
Since my wife was taking pics at this time, I could only find this one to show the roots growing into the perlite then we planted it in the bigger pot.
--------
(Day 62 root base picture from above)
I have a hypothesis that says these are so short because I intentionally tried not to move the plant without the base stand to keep it from grinding these up and allowed them to grow in the last 2 weeks. This is that test picture/results.
I like the idea of better/more drainage, but thinking I am doing more harm each time I hear those gravel pieces crunch as it cuts those and forces the plant to look somewhere else for root space. Notice how the small root lines have no finer pieces or laterals grow out from these - I believe that is because they are so new in growth and that the perlite chewed up the smaller laterals even with little to no movement over the last two weeks
I would like to see a root ball experiment that exposed the roots throughout the grow but for now I can see these roots do grow into the base perlite and need to be handled carefully if you want them to grow more freely or with a standard pot size. As you can see Im not root bound but my plant thinks it is and is growing roots out the top.
Likes
7
Share


@Organic473
Follow
Her growth this week was extraordinary. The extra hours of light works. I will continue her in veg for another 3 weeks. Hoping she is ready before the end of November.


Likes
6
Share


@Greenfingeress
Follow
Last week I started with a 3cm spacer, the 3 top head's grew 9cm apart (3rd head bit shorter).
This week I'm starting with a 12cm spacer, nearly all branches now have spacers on (bending them)
This will now naturally occur bending this wil reduce vertical growth and expose more of the plants surface to maximum light, gaining more tops😁
The other 11Roses has also now got a 10cm spacer inbetween her 2 head's.
I have topped all 4 longer head's I'm trying to train these two 11 Roses to be my new mum's(for cloning)...... Any tips anyone has would be greatly appreciated😁

Likes
54
Share


@TheCannaProphet
Follow
~ FastBuds Strawberry Gorilla Autoflower Harvest Report ~
The Setup:
• AC Infinity 4x4 tent
•AC Infinity Cloudline T6 Exhaust Fan w/ Controller 67
•HLG 650R w/UVA Bar *** For some reason GD does NOT have a listing for the USA version of the 650R so I selected the closest match to it.
•AirCube Active Oxygen Ebb/Flow 6 pot System
•TrolMaster Hydro-X Controller for light
•AutoPilot APC8200 co2 controller fed by a 50# tank
•16" Hurricane oscillating fan and 8" floor fan
•Tent cooling via filtered outside air delivered by AC Infinity Cloudline T6 fan
•BlueLab instruments: PH Pen and Truncheon Nutrient Meter
________________________________________________________________________________________________________________________________________________________________________________________________________________________________________________________________________________________________________________________
Here we go fam!...after 13 exciting weeks this run of three FastBuds Strawberry Gorilla Autoflowers has come to an end and, despite some hiccups along the way, all three of this phenomenal cultivar delivered the goods!
This was my first attempt at 'hydroponic' growing and honestly I made some mistakes along the way. In hindsight, I ran too many feed cycles in a 24hr period which did not allow the medium and fabric pots dry out enough which led to a Fungus Gnat infestation which wasn't caught until late into flower. I also think I had the nutrient level set too high which may have kept the upper portion of the medium too wet. Other than those issues the only other hindrances were related to the actual ebb/flow system itself and beyond my immediate control such as plant spacing, solution temperature etc.
I will say that when using this AirCube system I found out the hard way that you really need to have all of your plants starting at the same time, and preferably of the same strain unless you're using a trellis net to control the canopy height. Lastly, I will say that the GrowAce AirCube system was very well built, used quality materials, is expandable, and was very easy to setup and get running.
Now to the plants... All three Strawberry Gorilla's were germinated together and sprouted within 24hrs of one another. I did very minimal training on them consisting of leaf tucking and gentle bending of branches, then some LST using horticulture wire starting in Week 1 of flower, which all three responded well to. All three pheno's began to flower right around Day 24 from seed and continued for another 10 weeks. I kept the tent temperatures during veg and early flower between 76-80℉ with the light on, and 70-72℉ with the light off and the RH at 60-70%. Once in flower, I gradually lowered the 'light on' temperature to 72-75℉ and 65℉ during the dark period. I also lowered the RH down to 35-40% during late flower. The entire run they were fed Plagron nutrients exclusively, using their Cocos 'A' and Cocos 'B' along with Green Sensation. Power Roots and Royal Rush. I had nothing but great results from this lineup from Plagron and highly recommend their entire product line!
I ended up with three distinct phenotypes, two of which leaning more to the fruity/strawberry side. The third pheno was Glue all the way, with a pungent, chem-like aroma that will make your eyes water! The #1 and #2 phenotypes took on some beautiful coloration through late flower, expressing shades of purple, pinks and lavender. Both of them also had a very fruity/sweet aroma that grew extremely strong during late flower. The #3 phenotype struggled a little bit during the run and was affected the most by the Fungus Gnats (which I'm sure affected her yield) but incredibly ended up not only being the most aromatic of the bunch, but also the frostiest! The #3's flowers were a lime green with hints of pink and lavender on some, all were covered in large headed trichomes!
Once the Strawberry Gorilla's reached Week 8 of flower I began regular checks of their trichomes and once they had reached a ratio of 90% milky/10% amber I placed all three plants in darkness for 72hrs in the 4x4, keeping the temperature at 64℉ and a RH of 35%. After three days in the dark I chopped and hung the plants whole in the 4x4 suspended by a wire I ran across the tent. I kept gentle air circulation going in the tent and maintained a temperature of 55-60℉ and monitored the RH, keeping it at 50% for the first 24hrs, then 60% for the remainder of the hanging time. The first plant was ready to trim in 9 days, with the other two 10 & 11 days respectively. All three were trimmed and their flowers placed in Mason jars with a hygrometer inside to begin the curing process. The beautiful 'sugar trim' was sifted on my 24"x24" four screen setup which I did outside on my porch on a calm day that was only 38-40℉. I got a tremendous return of 42g of some beautiful 90u sift that I can't wait to press into rosin!
All in all, having cultivated this strain previously I can say that the results could have been a whole lot better, but... taking into consideration my level of expertise with hydroponic growing and the stresses that the Strawberry Gorilla's had to contend with, I'd say that it was a win and a testimony to how resilient and strong this strain from FastBuds is... It's no wonder that Strawberry Gorilla Auto is a trophy winner!🏆