


Likes
Comments
Share





Likes
50
Share


@DogDoctorOfficial
Follow
Week 5: Transplant Time & Root Power!
Oh man, this was one of those weeks! We transplanted all five phenos into bigger pots, and let me tell you, they’re thriving! (Check out the complete video episode for all the details 😉).
The girls are looking amazing, all pretty much the same size for now, so I don’t have any favorites yet—but let’s see what the future holds!
For photos, I used both my Nikon P900 and Sony A6000, with a bunch of lenses and filters to preserve the true colors—these LEDs are powerful!
Current Setup & Conditions
This week, they’re still chilling with their sisters in the big tent, but in about a week, they’ll be moving into the TrolMaster ecosystem for even better environmental control.
Watering: pH 6.06, EC 0.96
Temperature: A bit cold , but it is what it is. We’re facing some freezing outdoor temps (as shown last week in the frosty veggie garden pics!), yet these Runtz are holding strong like true champions. 💪❄️
Nutrition: Still on the Aptus Clean Program, with:
Regulator
System Clean
RO Water Conditioner
All-in-One Liquid
Root Development: The Real MVP!
Let’s go deep on roots! The mycorrhizae in the Pro-Mix soil has been working its magic, and I’m still boosting them further with a touch of Aptus Holland Mycor Mix. The root development on this transplant was insane—super white, healthy, and ready to explode with growth.
What Are Mycorrhizae?
The word “mycorrhiza” comes from Greek:
• Myco- meaning fungus
• Rhiza- meaning root
Mycorrhizae are a type of beneficial fungi that form a symbiotic (mutually beneficial) relationship with plant roots. These fungi extend far beyond the root zone, creating an underground network that helps plants absorb water, nutrients, and improve overall health.
This is not a single species but rather a whole category of fungi, mainly divided into:
1. Ectomycorrhizae – Live on the outside of plant roots, forming a sheath around them. Common in trees like pines and oaks.
2. Endomycorrhizae (Arbuscular Mycorrhizae, AMF) – The most beneficial for most crops and cannabis. These penetrate root cells, forming structures inside the roots that exchange nutrients.
Where Are Mycorrhizae Found in Nature?
Mycorrhizae naturally occur in forests, grasslands, and undisturbed soils worldwide. They play a crucial role in maintaining ecosystem balance by helping plants access nutrients from the soil.
In a natural environment, plants are constantly forming relationships with these fungi. However, in modern agriculture, excessive tilling, chemical fertilizers, and fungicides have reduced their populations, making supplementation necessary in many cases.
How Do Mycorrhizae Work?
Once mycorrhizae colonize a plant’s roots, they start forming an underground fungal network called the mycelium. This network extends the plant’s reach into the soil, acting as a second root system.
Benefits of Mycorrhizae:
✅ Enhanced Nutrient Uptake – Mycorrhizae help plants absorb phosphorus, nitrogen, and micronutrients that would otherwise be unavailable.
✅ Improved Water Absorption – The fungal network can reach deeper into the soil than roots alone, helping plants survive drought conditions.
✅ Stronger, Healthier Roots – They promote thicker, more robust root systems, reducing transplant shock.
✅ Better Soil Structure – They produce glomalin, a protein that improves soil aggregation and helps retain moisture.
✅ Natural Pest & Disease Resistance – Healthy plants with strong mycorrhizal relationships tend to be more resistant to soil-borne pathogens.
How Mycorrhizae Help in Cannabis & Gardening
In controlled growing environments, using mycorrhizae is a game-changer. Since cannabis relies heavily on phosphorus, the enhanced nutrient uptake provided by mycorrhizae is especially beneficial.
Best ways to apply mycorrhizae:
• At transplant – Dust roots with mycorrhizae powder or mix into soil.
• As a soil drench – Some liquid formulations allow fungi to colonize even after planting.
• Mix into your growing medium – Using pre-amended soil like Pro-Mix HP Mycorrhizae ensures roots have early access.
Pro Tip: Mycorrhizae need living roots to survive! Avoid using synthetic fungicides or excessive chemical fertilizers, as they can kill the fungi.
Think of mycorrhizae as a natural root booster. They’ve been around for hundreds of millions of years, helping plants thrive in all conditions. By using them in cultivation, you’re mimicking nature, ensuring your plants grow stronger, healthier, and more resilient.
When used correctly, mycorrhizae can increase yields, improve plant health, and reduce the need for synthetic inputs—making them a must-have for any serious grower!
Can’t wait to see how they’ll look in the next transplant!
I made a few changes to my improvised photo studio, including a pink background for now—because why not? Let’s keep things fun and full of color! 🌸📸
Massive gratitude to all our sponsors and of course, a special shoutout to Zamnesia, Plagron, and Grow Diaries for making this amazing cup happen. 🙌
And to the community—followers, supporters, lovers, haters—I love you all! ❤️ Let’s keep pushing forward, learning, and making this grow legendary!
Stay Tuned for More!
Next week, i may be moving them into bigger pots and getting them into their final environment. You won’t want to miss this next stage!
See you all next week—stay tuned, keep growing, good luck to all and let’s make history together! 🚀🌱
Genetics - Runtz https://www.zamnesia.com/6000-zamnesia-seeds-runtz-feminized.html
Nutrients - Plagron https://plagron.com/en/hobby
- Aptus Holland https://aptus-holland.com/
Controls - Trol MAster https://www.trolmaster.eu/
LED - https://www.futureofgrow.com/en
LED - https://www.thinkgrowled.com
Soil - https://www.promixgardening.com/en
Germination - Cannakan https://cannakan.com/?srsltid=AfmBOopXr-inLXajXu3QFgKXCXXos4F1oEvScjMKIB5MR5dk8-GJ-F49
DOGDOCTOR 15% off
Smoking Papers - https://ziggioriginal.com/
Terpene saver - https://grovebags.com/
As always thank you all for stopping by, for the love and for it all , this journey of mine wold just not be the same without you guys, the love and support is very much appreciloved and i fell honored with you all in my life
With true love comes happiness Always believe in your self and always do things expecting nothing and with an open heart , be a giver and the universe will give back to you in ways you could not even imagine so
As always, this is shared for educational purposes, aiming to spread understanding and appreciation for this plant. The journey with nature is one of discovery, creativity, and respect. Let’s celebrate it responsibly and continue to learn and grow together!
Growers Love To you All 💚
#EternityGrowCup #RuntzHunt #GrowersLove #CannabisCommunity #AptusHolland #ProMixSoil #TrolMaster #Zamnesia #Plagron #ZiggiPapers #Grovebags

Likes
146
Share


@EZgrower
Follow
Day 63 - add about 0,5l of soil. weight of pot from 3,0kg to 3,6kg
Day 64 - Filling. ppm 460. weight of pot from 3,2kg to 4.3kg (1100 ml)
Day 66 -filling. ppm470, weight of pot from 3,15kg to 4.15kg (1000 ml)
Day 67 - fiiling. ppm490. weight of pot from 3,15kg to 4.15kg (1000 ml)

Likes
16
Share


@Tipton
Follow
The stretch has gone nuts... Growth has been amazing... Nothing to really complain about besides they're hungry hungry hungry lol


Likes
64
Share


@SmokingTiki
Follow
The stretch has begun and they look good💪 The first pistils appeared on the 3 plants so the first flowers should be there pretty soon 😎 I decreased the humidity from 60 to 55% and increased the watering.
Plants heights at the end of the week :
-------------------------------------------
Gorilla Cookies : 63cm
Purple Lemonade : 47.5cm
Wedding Cheesecake : 64cm

Likes
88
Share


@PEAKYPLANTERS
Follow
Hi everyone, masters and beginners.
This week we will use the fimming technique on these beautiful photoperiodes to promote more gems.
Thanks to the Fimming Technique, The Growth Hormone Reaches All The Side Ramifications and Not Only The Main One of the Central Stem.
Stay on the piece for subsequent updates

Likes
2
Share


@smokeycropping
Follow
- LAS PLANTAS SIGUEN CON EL MISMO PLAN NUTRICIONAL
- NO SE VEN CARENCIAS NI EXCESOS
- el hps de 600 MANTIENE MI AMBIENTE SIN MAYORES INCONVENIENTES
- EN ESTA SEMANA Y EN LOS ÚLTIMOS DÍAS DE LA SEMANA SE LE APLICO DEFOLIACIÓN

Processing
Likes
14
Share


@kevgrow
Follow
Hey Friends, I just started my very first grow. Excited to see the outcome, Its a learning process, discovering new things everyday.
Plant #2 growing rapidly, seed was very dark compared to others, does that mean something?
On day 4 i noticed the leaf turning yellow on the borders, currently only feeding water, will keep an eye on that and do some research on the topic.
Likes
29
Share


@BioGrowKing
Follow
Die dritte Woche war okay sie bekommt jetzt langsam rechts und links die zwei großen arme die ersten zwei Blätter sind auch voll ausgebildet sie streckt sich ein wenig aber ich denke das ist nicht schön heute am 24. September habe ich in Wieder enhancer benutzt allerdings hab ich es diesmal als eine Art Oberflächendüngen benutzt 0,5g pro Liter Erde sind vorgegeben ich habe etwa 0,2g auf die Oberfläche gestreut und einmassiert vor dem giesen

Likes
2
Share


@Jahrulez
Follow
well jackyboys kinda giving me a hard time... except the mango cream all of the other gyals are 5x his size... i still beleve in him!! well se how that goes :D xDD


Likes
3
Share


@Unculti_responsable
Follow
Esta semana hicimos poda de bajos a podas las puntas y una poda de bajos a todas las ramas , se recupera muy bien de las podas la Jack está semana ya arrancamos de a poco con los fertilizantes de flora , así hacemos el último trasplante a 10 litros para pasar a flora , yo creo q ta esta más que bien para entrar en floración ya , pero quiero hacer el último trasplante antes , vamos a ir viendo como vienen las siguientes semanas

Likes
16
Share


@osmrducks
Follow
Day 22: Honestly didn't think I would have made it this far. The girls are looking great minus a couple of issues. I have over watered them and over fed too! Not to mention trying to LST too early. I will wait a bit longer before watering this time.
Day 23: MORNING - They were super dry. I have been over watering a bit so I watered maybe 1/2 gallon for all 6. I also did some more LST and took 1 large fan leaf off of each plant. I will update again before lights out.
Day 23: NIGHT - The girls are responding very well to the LST. I don't think they are liking the 80°. I am starting to have issues with lower humidity again. I need to try and figure some sort of ducting out or possibly even get a small AC unit for the grow room.
Day 24: MORNING - I removed a couple more leaves that were covering potential bud sites. I have also done a partial main-line on the smallest girl. It looks to be already showing pistols. I've had to open the tent with a big fan blowing directly in with the humidifier behind it. The girls were getting hot and dry.
Day 24: NIGHT - Well 5 are showing to be female. The biggest plant is showing no signs of sex. I am guessing it will be the mystery seed. I will be doing no more LST to these ladies for at least a week or better. I think I have stressed them out enough the past 2 days.
Day 25: These girls are very resilient!! I tortured them all weekend and the one I nopped off to do a sort of mainline grew by 20% at least.
Day 26: It is the official 3 week mark today and the girls are starting to flower. I tied em down to get light to all bud sights. I will 100% not touch them unless they need it from this point!!!! They are soo small and I need not stunt them any more!! I have removed the Mystery Seed as it looks to be a male and I do not want to take the chance!! Also fed and watered today. Only 200 ppm for the feed.
Day 27: Nothing new to report. These girls are gonna be tiny :| I must've stressed em too much too soon :( Looking good though I think! 💪
Day 28: I never do what I say. Dumb! Broke main stem on one of the best plants. Taking it as a lessons learned. It's been two hours and she looks SICK! Oh well.

Likes
10
Share


@Minuteman_Organics
Follow
First day of flower!!
Already beginning to see pre flowers before the flip but too small for any real identification.
Been using kombucha and humic acid to lower pH without adding nutrients and it's been working.
Water schedule has been about once ever 3 days. Each plant takes about .1 gal of water. Need about 2.5 gal to water all 22 plants. Nutrients are still in the 2:1:2 ratio for npk. Adding liquid food every other feeding with recharge in 1/3 recommended dose...
The HP3 is looking very beastly. Fat indica leaves. Thick stems. Quick growth. Stem rubs reveal spicy hash flavors. Similar to black pepper. Excited to see how the flowers turn out
The rainbow belts has been very easy. They need a lot of water so it's been hard staying ontop of that. Also the 1 gal fabric bag I'm using is much taller than the others so it's hard to water it fully. Ant looks good otherwise.
ZB2 is a floppy sativa leaning plant. Kinda spindly. Definitely needs better support and training than I am giving for this pheno hunt. Gonna need a stake to support these for sure. Very thin stems. Short and stocky plants that didn't stretch much even with less than optimal light at the beginning.
Maybe perfect candidate for cannbonsai

Likes
3
Share


@Purplepassion
Follow
I guess the plant is one week younger then I've described here, not 100% sure cause I just used my past pictures on my phone , but the last Picture this week and following pictures are in present time.
Enjoy

Likes
19
Share


@GrowMo
Follow
As she gets closer to the end these fat dense buds are filling out with a ton of trichomes that are so beautiful some almost look purple when the light hits just right. I can’t wait to try this bud out I’ve been so impatient about this cause it looks so good stay tuned for the chop soon only 2 more weeks!
Fed FloraFlex
B1 B2
3.0ec
6.0ph
No Cal-Mag
Likes
33
Share

@DoctorJoint
Follow
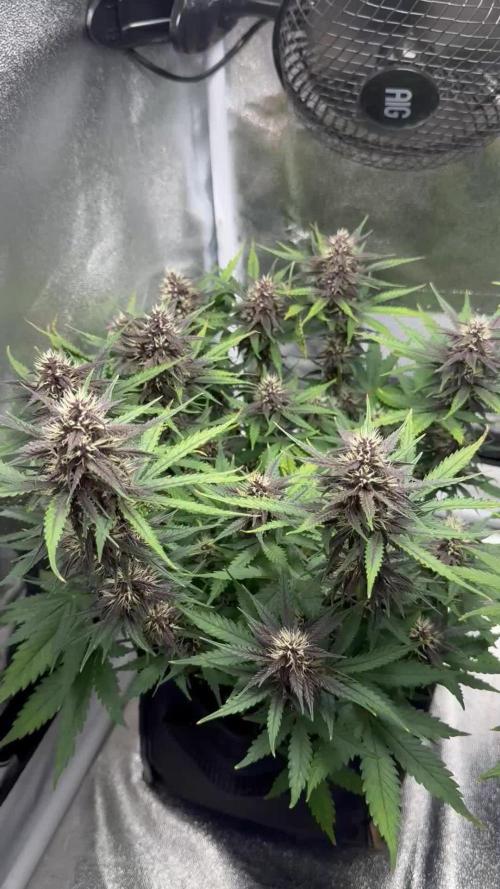
Day 43: I am very happy with this strain. Let me know in the comments if the plant looks good for the 7th week because it is my first cultivation. Thank you very much
Video from day 49 ;)