


Likes
22
Share


@DeepRootsGrowTrees
Follow
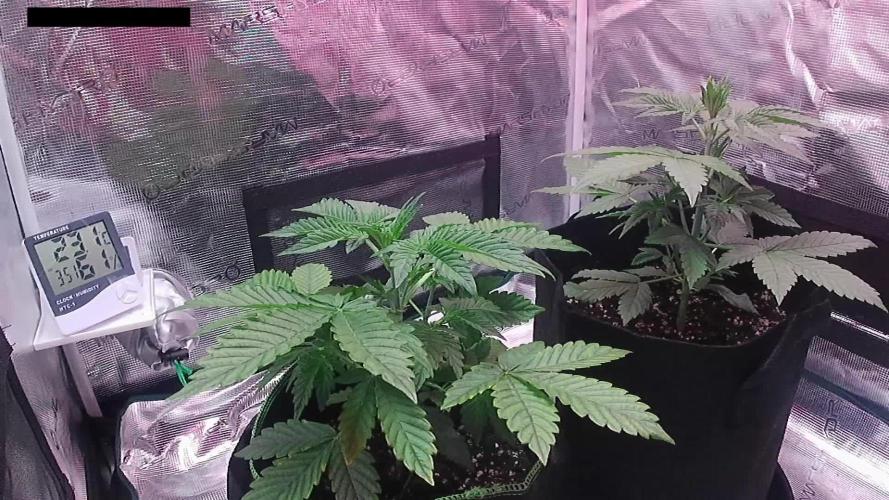
Week #14 GSC By Kannabia seeds
Week #14 GSC week #3 Flower
This week she continues to flower her buds are dense and tight she getting nice trichome coverage.

Likes
8
Share


Likes
1
Share

@avan1garde
Follow
Very bushy grow, gonna have the net up soon to spread the leaves out a bit.

Likes
22
Share


@CampExotic
Follow
Still going strong in flower! We are at the 6 week mark. The smells are very good when I pull off the lower bud sites. Can’t even describe it yet. I wanna say a rich fruit like smell. I can’t stop smelling my hands. Both flowers uniqueness can be seen and smelled. Aiming to begin flushing within 10 days.


Likes
28
Share


@GrowInger420
Follow
Uff...it was rescue in last second. Set her to bigger pots with 20liters of bio bizz allmix, gave her coffeset and biobizz biogrow, and at lesst the sanlight q6w and she slowly recover. I let her too long in a little pot. Hope in 4 to 5 weeks shes strong enough to give some nice buds to me

Likes
7
Share


@Genussmittel420
Follow
The purplematic is foxtailing rly strong :/ but i do not mind that too much, i am much more sad about the actual size of the plants. Got 2 auto hulkberry rdy for next summer. The hulkberry is stacking up in a way more sadisfying way
harvested at day 4 of the week

Likes
20
Share


@eldruida_lamota
Follow
Variedad con una floración corta, entre 8/9 semanas.
Procedente del original Exodus Clon (UK).
Predominancia indica con un nivel de thc superior al 16% .
Es muy fácil de cultivar y la alimentación la acepta muy bien en general .
Cada etapa cumplió con mis expectativas y por ello aparte del sabor el colocon ... en cuanto a todas sus etapas le doy 9/10 .
CEPA BRUTAL enserio.

Likes
5
Share


@killerjoint
Follow
8th days/Flowering /little change
10TH DAYS OF FLOWERING
DUE TO RAIN HAD TO TRIM BOTTOM -LITTLE EARLY
MY HUM WAS HEATING 70 TO 76 BLOWING FANS....
AND CHECKING FOR SEX
POP 9 SEEDS 100% SUCESS
AND ALL FEMALE
THANKS TO COPY CAT GENTICS.
11TH DAYS -FLOWERING
RAINING SEASON HAD TO TRIM BOTTOM FOR AIR VENTILATION
MY HUM HITTING 72%.......T T DUE TO RAIN RUNNING EXTRA FAN FOR AIR VENTILATION.
EVERYDAY PLANTS GROWING ABOUT 2 TO 3 INCHES
LET'S GO GOOMIES


Likes
18
Share


@ZombieKushAddicted
Follow
to view this lamp or any other marshydro product go to: https://instagram.com/marshydro_aliexpress?igshid=YmMyMTA2M2Y=

Likes
10
Share


@JreyBudz
Follow
This will be my first grow. Northern lights x Big bud Auto in Foxfarm happy frog soil. Temperature about 77 average and RH about 50% in my 2 x 3 tent. I’m getting a fantastic airflow with my exhaust being on high. Things are looking really good I’m ready to see these babies come out of the ground.
JreyBudz🔥Likes are appreciated 🌱

Likes
36
Share


@MadeInGermany
Follow
Info:
Unfortunately, I had to find out that my account is used for fake pages in social media.
I am only active here on growdiaries.
I am not on facebook instagram twitter etc All accounts except this one are fake.
Have fun with the update.
Hey everyone 😀.
Another nice week goes by with a great development :-).
Next week it will be placed in the flower chamber with a time interval of 12/12 hours.
1 g of GHSC enhancer was added per liter of water.
I sprayed neem oil again as a preventive measure, hence the dark shine :-)
The tent was completely cleaned and the humidifier was refilled.
I wish you all the best 🙏🏻
You can buy this Strain at :
https://originalsensible.com/original-sensible-seeds-zkittlez~20503
Type:
Zkittlez
☝️🏼
Genetics:
Afghan Kush Indica x Grandaddy Purple x Grapefruit hybrid
👍
Vega lamp:
2 x Todogrow Led
Quantum Board 100 W
💡
Bloom Lamp :
2 x Todogrow Led
Cxb 3590 COB 3500 K 205W
💡💡☝️🏼
Soil :
Canna Coco Professional +
☝️🏼
Fertilizer:
Green House Powder Feeding
☝️🏼🌱
Water:
Osmosis water mixed with normal water (24 hours stale that the chlorine evaporates) to 0.2 EC. Add Cal / Mag to 0.4 Ec Ph with Organic Ph - to 5.5 - 5.8 .

Likes
17
Share


@MoneyGrowup
Follow
Everything is pretty much the same this week the purple punch is doing up numbers, the zkittles is rite behind it with the gelato struggling. Already germinated some seeds for the summer grow hope the gelato grows better out doors
Likes
3
Share


@DoctorD
Follow
Overview:
In the second week of our grow diary "Schroedinger's Plants," the Tropicana Cookies, Gorilla Zkittlez, and Apple Strudel strains have shown varied yet overall positive growth under controlled conditions. Each strain continues to progress well, with interventions to address minor issues.
Plant Specifics:
1. Tropicana Cookies:
Growth: The plant height increased from 8 cm to 11.5 cm throughout the week, showing healthy growth.
Health: Plant health remained robust, marked by the continued green color stabilization and decrease in vein thickness initially noted.
Interventions: Regular doses of Alfa Boost and Epsom Salt were administered to maintain nutrition and micronutrient levels. A notable treatment for fungus gnats (Trauermücken) using nematodes was applied early in the week, which required adjustments in watering to facilitate effective nematode deployment.
Environmental Conditions: The environment was stable with slight increases in daytime and nighttime temperatures towards the end of the week.
2. Gorilla Zkittlez:
Growth: Progressed from 7 cm to 9.5 cm in height by the end of the week.
Health: Similar to Tropicana Cookies, this strain exhibited signs of early nutrient issues (thickening of veins and lighter green in new growth) that were effectively managed, leading to improved color and reduced vein prominence.
Interventions: Application of Alfa Boost and Epsom Salt continued, adjusting as needed based on plant response. Plans to increase PPFD (photosynthetic photon flux density) were made to encourage stronger growth responses.
Challenges: Like the other strains, initial signs of fungus gnat (Trauermücken) were addressed with nematodes.
3. Apple Strudel:
Growth: Showed a steady increase from 6.5 cm to 9 cm.
Health: Initial challenges with vein thickness and lighter green patches were managed through similar nutrient adjustments as the other strains.
Interventions: Consistent nutrient management with Alfa Boost and Epsom Salt helped stabilize growth and coloration. Caught up with the others by the end of the week, after initially lagging slightly behind in growth.
Environmental Notes: The plant environment was kept stable, mirroring the conditions of the other strains with slight temperature increases noted towards the week's end.
General Observations and Actions:
Pest Management: The introduction of nematodes early in the week helped manage the presence of Trauermücken across all plants, a necessary step to prevent infestations.
Nutrient Management: The consistent use of Alfa Boost and Epsom Salt across all strains helped address minor nutrient imbalances seen as vein thickening and changes in leaf coloration.
Environmental Control: Slight increases in temperature and adjustments in humidity levels were monitored to ensure optimal growth conditions. These adjustments were crucial as the plants transition from seedling to more mature vegetative stages.
Conclusion:
The second week showed promising growth and stability across all strains. While minor issues were quickly addressed through targeted interventions, the overall health of the plants remained strong. Moving forward, the focus will be on maintaining this momentum and carefully monitoring environmental parameters and plant responses to optimize growth. The increase in PPFD will be particularly interesting to follow in terms of its impact on growth rates and overall plant vigor. In week 3 we'll also start with LST-Training the Ladies.
Cheers,


Likes
7
Share


@WeEdandGrowLover
Follow
So this week i Can only enjoy how much she's growing.
I had to do some more defoliation on day 23.
I surely should defoliate way more but wanted to try like this.
On day 25 , I just enjoy the view of that Wonderful plant😊

Likes
13
Share


@Silverback_Guerilla
Follow
THURSDAY 12/20:
Delilah isn't recovering much at all...guess she'll end up in the trim bag for e-liquid...so sad.
Dominique is a crispy critter too, but her trichromes are about half cloudy now, so she'll at least finish. I'll give her nutes at least once more with Cha Ching, then start flushing her.
FRIDAY:
The new evaporative cooler is working pretty well in the tent. High temp was 84f with it running on medium and with ice in the reservoir. That's a win. I suspect that when I need to run the other two 85w bar lights it will be pushing 90f again unless I run it on high. RH is is staying between 38% and 45%, which is another win!
SATURDAY:
I fed both DD's about a gallon of full-strength bloom nutes. Not sure how Delilah will like it..but it would be nice to see a little yield from her, too...
SUNDAY:
Photo session...Dominique is actually starting to "pink" a little bit..not the deep dark I had hoped for, but sexy just the same. Delilah didn't freak out on the nutes yesterday..I'll watch for the leaf production to diminish and the calyx production to intensify...🙏


Likes
2
Share


@Growstopher
Follow
3.23.25
Fastbuds LSD-25 auto #1
Germination 1st week
Only watering with spring water. Going to be using foop nutrients with Humboldts secret cal/ mag and nectar for the gods ph up and down!
Here we go!
Likes
Comments
Share


Likes
14
Share


@Terpyboyz
Follow
So this grow came to a finshed but I had a. Few issues that’s held me up from finishing up the diary, but in due time I will reupload it all in order soon. But over all I will also update with a final weigh in of each strain produced so stay tuned 🤙🏻🔥


