Bingeling The seed has gone into water until it sunk a few hours later.
Afterwards i moved the seed into a coco starter pellet and germination has started on the evening of 01-03.
I will update the germination date once the seed has sprouted.
UPDATE:
The seed is now above ground after roughly 48 hours, and germination phase has ended
4 likes
1 comment
Share
Used method
Peat Pellet
Germination Method
1
Week 1. Vegetation
1y ago
1/5
5 cm
Height
21 hrs
Light Schedule
24 °C
Day Air Temp
5.6
pH
No Smell
Smell
50 %
Air Humidity
20 °C
Night Air Temp
0.1 liters
Pot Size
Nutrients 1
Calcium Magnesium Supplement
1.5 mll
Bingeling This marks the beginning of the vegetative phase.
For the first week or two, i will be holding back with the nutrients only feeding a weak solution of RO water and calmag.
As the taproot has gone ham overnight and begun circling the outside of the coco pellet, i have decided to do an early transplant into a small cup
Ending the first week, i retransplanted into the final nursing pot before going into the autopot system in a few weeks
4 likes
3 comments
Share
Used techniques
Transplantation
Technique
2
Week 2. Vegetation
1y ago
1/5
10 cm
Height
18 hrs
Light Schedule
24 °C
Day Air Temp
5.8
pH
No Smell
Smell
50 %
Air Humidity
20 °C
Night Air Temp
0.4 liters
Pot Size
Nutrients 4
Calcium Magnesium Supplement
2 mll
Cocos A
2 mll
Cocos B
2 mll
Bingeling Week 2 has been going alright, i noticed the first set of true leaves begun showing signs of calcium deficiencies, so i have recalibrated my ph pen and upped the calmag abit. Furthermore i have started feeding with plagron coco A & B and a drop of silica, at approximate 1.2-1.3 ec total.
Im crossing my fingers that im past the deficiency issue by now, as the second set of leaves aren't showing any bad signs yet, and that the problem stemmed from either the ph being a bit off, or the coco hogging the calcium from the calmag.
4 likes
1 comment
Share
3
Week 3. Vegetation
1y ago
1/6
10 cm
Height
18 hrs
Light Schedule
24 °C
Day Air Temp
5.8
pH
No Smell
Smell
800 PPM
TDS
50 %
Air Humidity
20 °C
Night Air Temp
0.4 liters
Pot Size
Nutrients 4
Calcium Magnesium Supplement
2 mll
Cocos A
2.5 mll
Cocos B
2.5 mll
Bingeling Week 3 has been going allright, i think i nipped the deficiency issue in the butt as the new growth is looking healthy once again. I have started low stress training by bending the stem, and depending on how the lower shoots develop, i might top it aswell.
The overall goal right now is getting the girl ready to transplant into the autopot system where i will scrog her
5 likes
comments
Share
Used techniques
LST
Technique
4
Week 4. Vegetation
1y ago
1/10
20 cm
Height
18 hrs
Light Schedule
25 °C
Day Air Temp
5.8
pH
No Smell
Smell
800 PPM
TDS
50 %
Air Humidity
20 °C
Night Air Temp
0.4 liters
Pot Size
Nutrients 5
Calcium Magnesium Supplement
2 mll
Cocos A
3 mll
Cocos B
3 mll
Bingeling Week 4 has been going great, i have been increasing nutrients and i topped her early in the week, and the manifold is looking great so far.
I have also moved the plant into its final tent in the autopot system.
5 likes
comments
Share
Used techniques
Topping
Technique
HST
Technique
5
Week 5. Vegetation
1y ago
1/12
35 cm
Height
18 hrs
Light Schedule
25 °C
Day Air Temp
5.8
pH
No Smell
Smell
850 PPM
TDS
50 %
Air Humidity
20 °C
Night Air Temp
8 liters
Pot Size
40 cm
Lamp Distance
Nutrients 5
Calcium Magnesium Supplement
2 mll
Cocos A
3 mll
Cocos B
3 mll
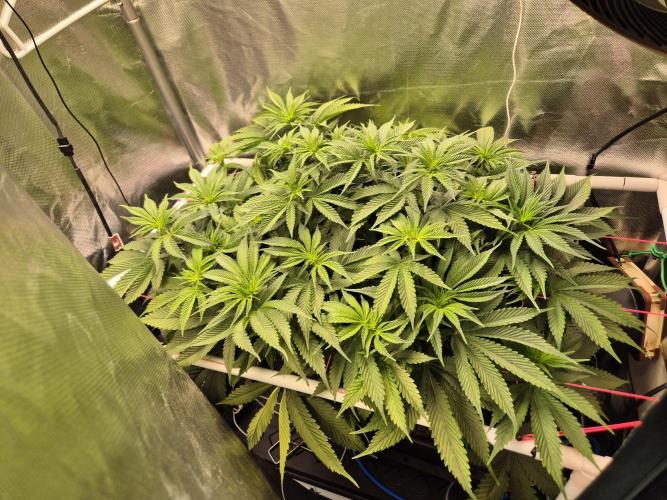
Bingeling Alot of growth has been happening this week! The accelerated growth from the autopot system with the airdome in looks to begin to show.
I have defoliated her a bit, as she got quite bushy during the week.
Although i haven't fully decided yet, i might ditch the scrog screen for this grow, as she seems to have such a nice and even growing manifold, that i could probably just leave the space in the middle open, and get deeper light penetration that way.
6 likes
comments
Share
Used techniques
LST
Technique
Manifolding
Technique
Defoliation
Technique
6
Week 6. Vegetation
1y ago
1/6
40 cm
Height
18 hrs
Light Schedule
25 °C
Day Air Temp
5.8
pH
No Smell
Smell
850 PPM
TDS
50 %
Air Humidity
20 °C
Night Air Temp
8 liters
Pot Size
40 cm
Lamp Distance
Nutrients 4
Cocos A
3 mll
Cocos B
3 mll
Stimulus
0.5 mll
Bingeling This week has been going with mostly spreading out her branches through tying them down to the pot. Otherwise not much has changed, i have removed a few leaves here and there.
3 likes
comments
Share
Used techniques
Defoliation
Technique
LST
Technique
7
Week 7. Vegetation
1y ago
1/5
45 cm
Height
18 hrs
Light Schedule
25 °C
Day Air Temp
5.9
pH
No Smell
Smell
900 PPM
TDS
50 %
Air Humidity
20 °C
Night Air Temp
8 liters
Pot Size
40 cm
Lamp Distance
Nutrients 4
Cocos A
3 mll
Cocos B
3 mll
Stimulus
0.7 mll
Bingeling This week has been going smooth. Not alot has happened throughout the week, except for refilling the autopot reservoir but ending it i did a pre flowering phase defoliation, and switched the light cycle to 12/12. Depending on how much she stretches, i might ditch the scrog net, but we will see :)
5 likes
1 comment
Share
Used techniques
Defoliation
Technique
LST
Technique
8
Week 8. Flowering
10mo ago
1/8
50 cm
Height
12 hrs
Light Schedule
25 °C
Day Air Temp
5.9
pH
Weak
Smell
900 PPM
TDS
50 %
Air Humidity
20 °C
Night Air Temp
8 liters
Pot Size
40 cm
Lamp Distance
Nutrients 5
Cocos A
3 mll
Cocos B
3 mll
Green Sensation
0.1 mll
Bingeling This has been the first week since switching the lightcycle to 12/12. Overall the week has been going great, and i can definitely tell stretch has started, as she has reached the scrog net!
I have started to add a tiny bit of green sensation to my autopot reservior, as i have experienced great results from this method before (maybe due to bio stimulants)
3 likes
comments
Share
Used techniques
LST
Technique
ScrOG
Technique
Defoliation
Technique
9
Week 9. Flowering
10mo ago
1/7
60 cm
Height
12 hrs
Light Schedule
25 °C
Day Air Temp
6.0
pH
Normal
Smell
975 PPM
TDS
50 %
Air Humidity
20 °C
Night Air Temp
8 liters
Pot Size
40 cm
Lamp Distance
Nutrients 4
Cocos A
3.5 mll
Cocos B
3.5 mll
Green Sensation
0.4 mll
Bingeling Week 2 since switching to 12/12 has been going smooth. I have upped the fertilizer in the solution a little bit, and adjusted the PH a little upwards.
I have been removing lower growth which i deemed not to give anything usefull come full flower, and on top of that i have been defoliating a bit to combat her bushiness.
She has stretched quite a bit this week, and i have decided to keep the net on her, as would have trouple spacing the tops apart otherwise
5 likes
comments
Share
Used techniques
Defoliation
Technique
LST
Technique
ScrOG
Technique
10
Week 10. Flowering
10mo ago
1/11
75 cm
Height
12 hrs
Light Schedule
25 °C
Day Air Temp
6.1
pH
Normal
Smell
975 PPM
TDS
50 %
Air Humidity
20 °C
Night Air Temp
8 liters
Pot Size
40 cm
Lamp Distance
Nutrients 4
Cocos A
3.5 mll
Cocos B
3.5 mll
Green Sensation
0.4 mll
Bingeling 3rd week since 12/12 switch has passed, and damn she has stretched during this week. Although i don't track exact water usage, she has been using almost double the amount she did for the past two weeks.
I noticed she has begun producing flowers, and doing her final stretching.
I ended the week by giving her a lolipopping, removing all flower nodes and most leaves underneath the scrog net. I also gave her a thorough defoliation above the net, to improve the light and air penetration of the canopy.
Although she is a little roughed up at the moment, i'm quite confident she will recover nicely, as she has been one of the most healthy, tough and vigorously growing plants i've grown (big thumbs up to the genetics here)
5 likes
comments
Share
Used techniques
HST
Technique
Defoliation
Technique
Lolipopping
Technique
11
Week 11. Flowering
10mo ago
1/6
80 cm
Height
12 hrs
Light Schedule
25 °C
Day Air Temp
6.1
pH
Strong
Smell
975 PPM
TDS
50 %
Air Humidity
20 °C
Night Air Temp
8 liters
Pot Size
40 cm
Lamp Distance
Nutrients 4
Cocos A
3.5 mll
Cocos B
3.5 mll
Green Sensation
0.7 mll
Bingeling This week has been going smooth, she stretched a final bit apparently, resulting in growing a bit too close to the lamp and getting a bit sunburned.
She has really begun building her top flowers, so i have upped the strength a bit on the green sensation.
I have mostly spend the week refilling her reservoir and removing growth underneath the trellis.
3 likes
1 comment
Share
Used techniques
Defoliation
Technique
12
Week 12. Flowering
10mo ago
1/4
85 cm
Height
12 hrs
Light Schedule
25 °C
Day Air Temp
6.2
pH
Strong
Smell
1000 PPM
TDS
50 %
Air Humidity
20 °C
Night Air Temp
8 liters
Pot Size
40 cm
Lamp Distance
Nutrients 4
Cocos A
3.5 mll
Cocos B
3.5 mll
Green Sensation
0.8 mll
Bingeling This week has been a bit wierd. I had believed that she was done stretching allready, but it turned out that she had more height in her. I had to move out the extractor fan from the tent, just in order to make a little more space for the light in the top of the tent. She has consumed alot of nutrient water, and definitively put it to good use, as she is stacking flowers all over. I sincerely hope this will have been the last bit stretching, as i literally am running out of space in the tent.
4 likes
comments
Share
Used techniques
Defoliation
Technique
13
Week 13. Flowering
9mo ago
1/5
110 cm
Height
12 hrs
Light Schedule
25 °C
Day Air Temp
6.2
pH
Strong
Smell
1000 PPM
TDS
50 %
Air Humidity
20 °C
Night Air Temp
8 liters
Pot Size
20 cm
Lamp Distance
Nutrients 4
Cocos A
3.5 mll
Cocos B
3.5 mll
Green Sensation
1 mll
Bingeling She has become a hungry lady by now, i have upped the feed a little to try and force a bit more nutes in. Other than that i have mostly spend the week thinking about how to move the light further away - as i have completely run out of top space now.. This has resulted in a bit of bleaching of most of the central top buds (see the pictures). i have tried to combat this, by turning down the power of the light a bit, but i don't think it will be enough.. I therefore have to come to terms with the fact that i am gonna have some sunburned top shoots.
4 likes
comments
Share
14
Week 14. Flowering
9mo ago
1/4
110 cm
Height
12 hrs
Light Schedule
25 °C
Day Air Temp
6.2
pH
Normal
Smell
1000 PPM
TDS
50 %
Air Humidity
20 °C
Night Air Temp
8 liters
Pot Size
20 cm
Lamp Distance
Nutrients 4
Cocos A
3.5 mll
Cocos B
3.5 mll
Green Sensation
1 mll
Bingeling Not a lot have gone on this week. She has put on some more weight, and the bleaching have continued to evolve sadly (see photo 3)
4 likes
2 comments
Share
15
Week 15. Flowering
9mo ago
1/6
110 cm
Height
12 hrs
Light Schedule
25 °C
Day Air Temp
6.2
pH
Strong
Smell
1000 PPM
TDS
50 %
Air Humidity
20 °C
Night Air Temp
8 liters
Pot Size
20 cm
Lamp Distance
Nutrients 4
Cocos A
3.5 mll
Cocos B
3.5 mll
Green Sensation
1 mll
Bingeling This week she has finally stopped growing new leaves, and purely focused on density. She has begun to swell up really nicely, and the long stretched colas are beginning to fill out. My biggest problem the ongoing sunburn, there isn't much i can do which wouldn't lower the overall yield (like turning the light intensity way down), so i will have to make the tradeoff of some sunburned buds at the top, in exchange for much more growth further down on the plant.
7 likes
1 comment
Share
16
Week 16. Flowering
9mo ago
1/6
110 cm
Height
12 hrs
Light Schedule
25 °C
Day Air Temp
6.3
pH
Normal
Smell
1100 PPM
TDS
50 %
Air Humidity
20 °C
Night Air Temp
8 liters
Pot Size
20 cm
Lamp Distance
Nutrients 4
Cocos A
3.5 mll
Cocos B
3.5 mll
Green Sensation
1 mll
Bingeling Were done with the eighth week of flower by now. As you can probably tell from the pictures, the light damage is beginning to be visible on the upper leaves as well. On top of that, i probably gave it a little to much gas pedal on the pk (green sensation), due to evaporation in the autopot reservoir, as i measured an average ec of 2.2-2.3 in the reservoir throughout the week. I will be lowering the amount of PK i feed her up until chop in order to combat the tip burn i have begun seeing.
Zamnesia states that their runtz is an 8-9 week strain, so I did a quick lookover of the top colas with a jewelers loup, in order to try to determine from the trichomes how far i am from chop, and my conclusion for now is that she will definitely not be done within the next week. My best guestimate on my phenotype is that it will probably need to flower 12-13 weeks total to be fully ripe. I am not in a rush however, so I am not complaining, as i am looking forward to see how plumb the top colas will get over the next few weeks :)
5 likes
2 comments
Share
17
Week 17. Flowering
8mo ago
1/4
110 cm
Height
12 hrs
Light Schedule
25 °C
Day Air Temp
6.3
pH
Normal
Smell
950 PPM
TDS
50 %
Air Humidity
20 °C
Night Air Temp
8 liters
Pot Size
20 cm
Lamp Distance
Nutrients 4
Cocos A
3 mll
Cocos B
3 mll
Green Sensation
0.8 mll
Bingeling This week i have decided to begin tapering off the nutrients. This doesn't mean i have begun flushing, i have just begun the process of slowly lowering the strength of the nutrient solution i feed her.
I can tell she has taken on a bit of weight on her top shoots, as they feel heavier when i move the branches, but it can be a little difficult to tell by eye (except for the lower parts of the colas).
I cross my fingers that she stays this happy until harvest, as i have heard horror stories about what light burn could eventually lead to (herming).
3 likes
1 comment
Share
18
Week 18. Flowering
8mo ago
1/4
110 cm
Height
12 hrs
Light Schedule
25 °C
Day Air Temp
6.3
pH
Normal
Smell
950 PPM
TDS
50 %
Air Humidity
20 °C
Night Air Temp
8 liters
Pot Size
20 cm
Lamp Distance
Nutrients 4
Cocos A
2.75 mll
Cocos B
2.75 mll
Green Sensation
0.6 mll
Bingeling I haven't been giving her a lot of attention this this week, but she has been packing on weight quickly. I might have to adjust my previous harvest guestimate down a week, as the first few amber trichomes are beginning to show on the lower budsites.
On top of that, she has what i believe is a phosphorous toxicity going, and i have been removing the leaves with the most amount of damage. I believe it is due to salt buildup in the soil. I'm not going to adjust much now though, as it would probably kill her if i tried to flush it down through the pot. I will however completely cut out pk boosts from her feed to see if i can slow down the damage, so i can let her "ride it out" until harvest.
At this stage, i look at her trichomes every other day and try to follow their development, until i deem her to be harvest ready. (which for me is somewhere between 10-30% amber trichomes)
4 likes
comments
Share
19
Week 19. Flowering
8mo ago
1/3
110 cm
Height
12 hrs
Light Schedule
25 °C
Day Air Temp
6.3
pH
Normal
Smell
700 PPM
TDS
50 %
Air Humidity
20 °C
Night Air Temp
8 liters
Pot Size
20 cm
Lamp Distance
Nutrients 4
Cocos A
1.75 mll
Cocos B
1.75 mll
Green Sensation
0.4 mll
Bingeling This has been her last week, as i plan to chop during the weekend.
I have continued to lower her nutrient dosage during the week, as her drinking has also slowed down significantly. I take this as a sign that she is nearing the end.
Other than that I have been following her trichome development closely, trying to figure out weather she would be ready to chop during the weekend or not. It has been a bit difficult to determine as the trichomes are at completely different development stages throughout the plant. The middle buds are looking quite done, whilst the lower still have clear trichomes and the upper parts of the colas looks to be mostly cloudy.
lets see if i do end up chopping or letting her sit another week ;) - Find out in the next journal entry.
She has been an easygoing lady in general, healthy and without genetically induced problems during the grow.
I do believe i pulled a longer flowering phenotype in the gene lottery, but I'm quite fond of the result, so i wouldn't have it any other way.
She grew to become a little airy, even in the top shoots, but i do believe its mostly my own fault, as i couldn't keep the temperatures low enough.
The resulting smoke is incredibly nice though, and it fits quite well into my preferred effects of a nice and balanced high.
Show more
Translate
Spent 135 days
Ger Veg Flo Har
1
Plants
Easy
Difficulty
Height
Day air temperature
Air humidity
PPM
PH
Light schedule
Night air temperature
Pot size
Lamp distance
1/10
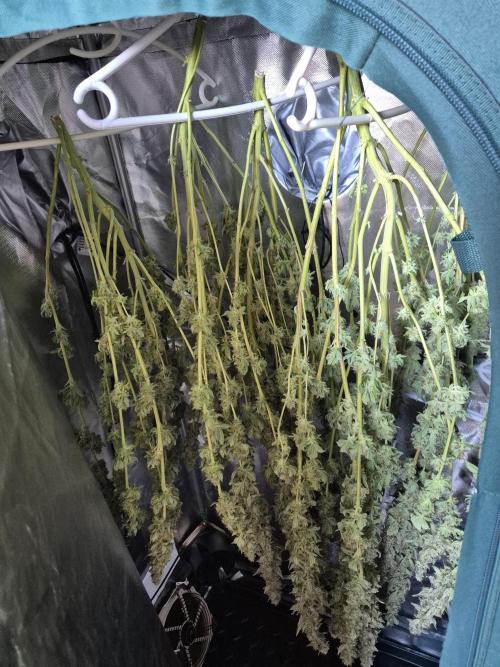
Bingeling I ended up cutting her down that weekend. I let her hang dry for about 5 days, and she is curing in jars now.
I did try the smoke already and i can definitively tell i like the effects. She delivers a nice and balanced high, but can still get you really stoned/couch locked if you smoke enough.
@Photoinduc I haven't done anything special this time around, so i suppose it's just the genes/ phenotype i pulled in the gene lottery. For previous grows it has helped to let them veg a little longer than the breeders recommendation, but even there it has been mostly phenotype dependent :)
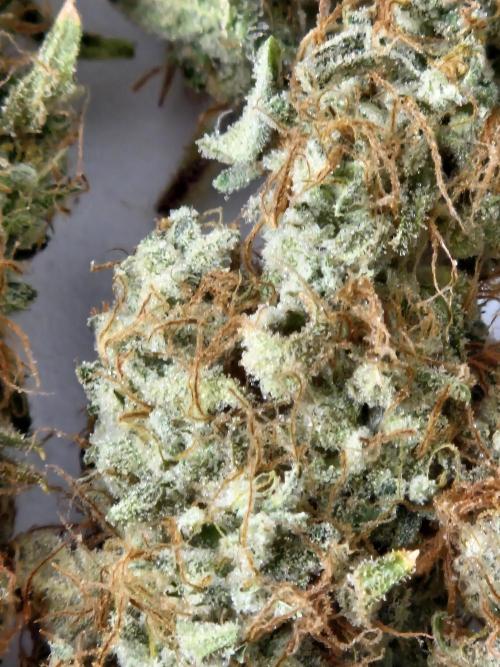
Wow bro, look's like an haze but is a Runtz, incredible blades long colas, please do a great shooting in harvest phase and show us this monster dry buds
Hey Legend,
.
Did you know you have a chance to win a JBL Charge 2 + 3x 1L additives from Plagron?
.
We are giving away 3 JBLs & 10 additive packs if Plagron wins the Grow Diaries awards.
.
Want to take your shot?
.
👉 (Re)vote for Plagron as Best Nutrient Brand & Best Organic Nutrient Brand.
.
And Vote Zamnesia for Best Breeder
.
Best of luck with your Eternity Grow Cup participation.😎
.
Let's win together! 🙌


 commentedweek 11y ago